Link billing account and profile to Partner Center account
Appropriate roles: Global admin
Microsoft AI Cloud Partner program purchases are now migrated to Microsoft's new commerce platform. The new platform offers a unified purchasing experience across Microsoft products, such as Microsoft 365 and Azure and Microsoft AI Cloud Partner Program offers. Partner programs include Microsoft Action Pack, Solutions Partner designations, and Legacy Silver/Gold benefits.
Partner accounts transition from the existing payment platform to Microsoft's new commerce payment platform.
As part of the migration, it's necessary for the Global admin to complete the linking process to make any purchases after January 2024. You can either link your Partner Center account to the existing Microsoft billing account and billing profile or create a new billing account and profile.
Prerequisites
To link a billing account and profile to your Partner Center account, you need:
- The Global administrator role.
- A Partner Center account in an Active state.
Understand the billing account
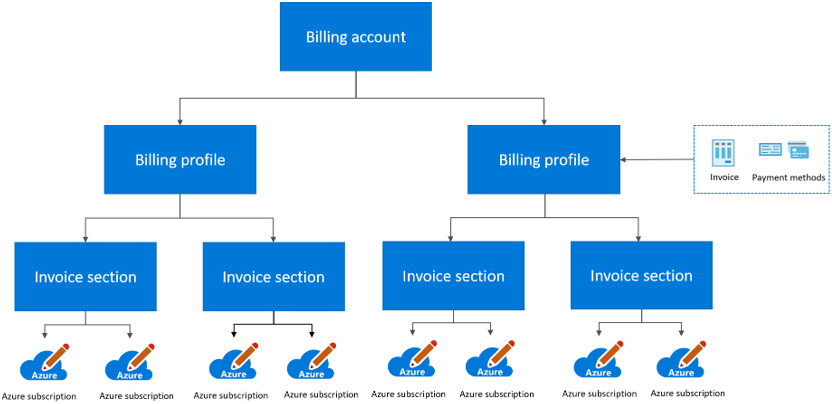
The billing account represents an agreement that a customer accepts to use Microsoft products and services. It contains one or more billing profiles. Use your billing account to manage invoices, payments, and track costs. A billing account contains one or more billing profiles that let you manage your invoices and payment methods. Each billing profile contains one or more invoice sections that let you organize costs on the billing profile's invoice.
The following diagram shows the relationship between a billing account, billing profiles, and invoice sections.
In the flowchart, you see that each billing account has an invoice and payment methods associated with it. Under the billing profile are multiple invoice sections, each section has multiple Azure subscriptions.
Roles on the billing account have the highest level of permissions. By default, only the user who created the billing account can access the billing account. Assign the roles to users that need to view invoices and track costs for your entire organization, for example, your finance or IT managers. For more information, see billing account roles and tasks.
Understand the billing profile
The billing profile represents an agreement that a customer accepts to use Microsoft products and services. It contains one or more billing profiles. Use a billing profile to manage your invoice and payment methods. A monthly invoice generates at the beginning of the month for each billing profile in your account. The invoice shows charges for all purchases from the previous month.
You create a billing profile for your billing account. It contains one invoice section by default. You can create more sections to easily track and organize costs based on your needs whether it's per project, per department, or per development environment. You can see these sections on the billing profile's invoice reflecting the usage of each subscription and purchases you assign to it.
Roles on the billing profiles have permissions to view and manage invoices and payment methods. Assign these roles to users who pay invoices, for example, members of the accounting team in your organization. For more information, see billing profile roles and tasks.
Link the billing account and billing profile to your Partner Center account
For Membership purchases, you need to link a billing profile and corresponding billing account to your Partner Center account. You can either reuse your existing Microsoft billing account and profile, or create a new billing account and profile to link to.
Note
If you have multiple tenants linked to your account, log into Partner Center through the tenant for which you want to make Membership purchases and complete the linking for the billing profile.
Create a new billing account and profile
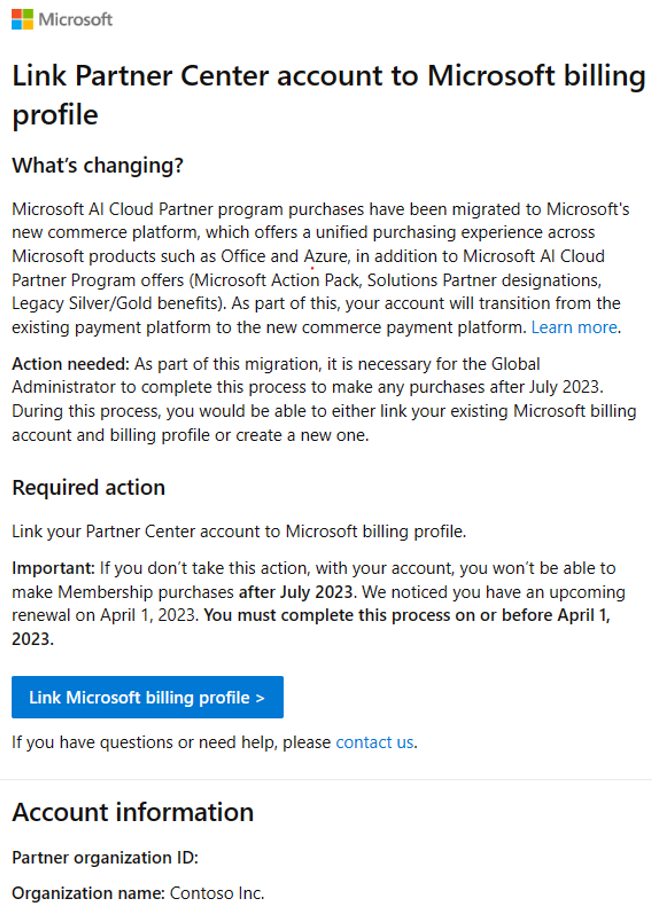
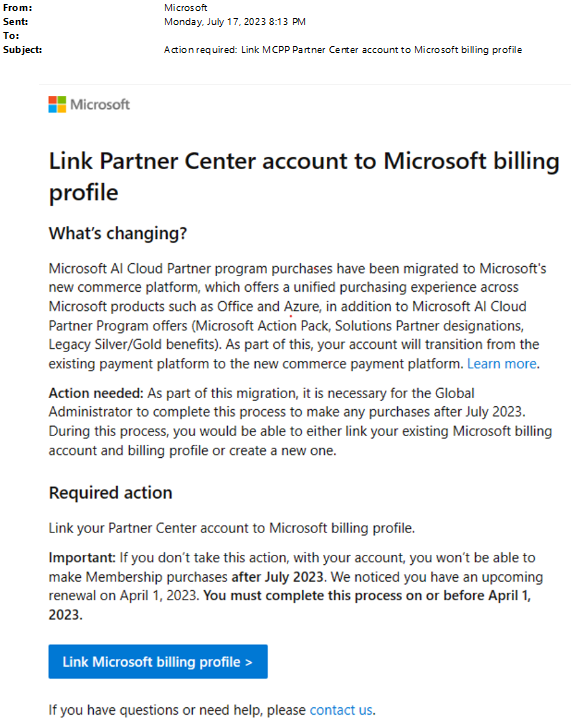
You receive an email from Microsoft and in-product notification that prompts you to link your Microsoft AI Cloud Partner Program Partner Center account to the Microsoft billing profile. Select Link Microsoft billing profile. Alternatively, you can start the process by selecting link Microsoft billing profile.
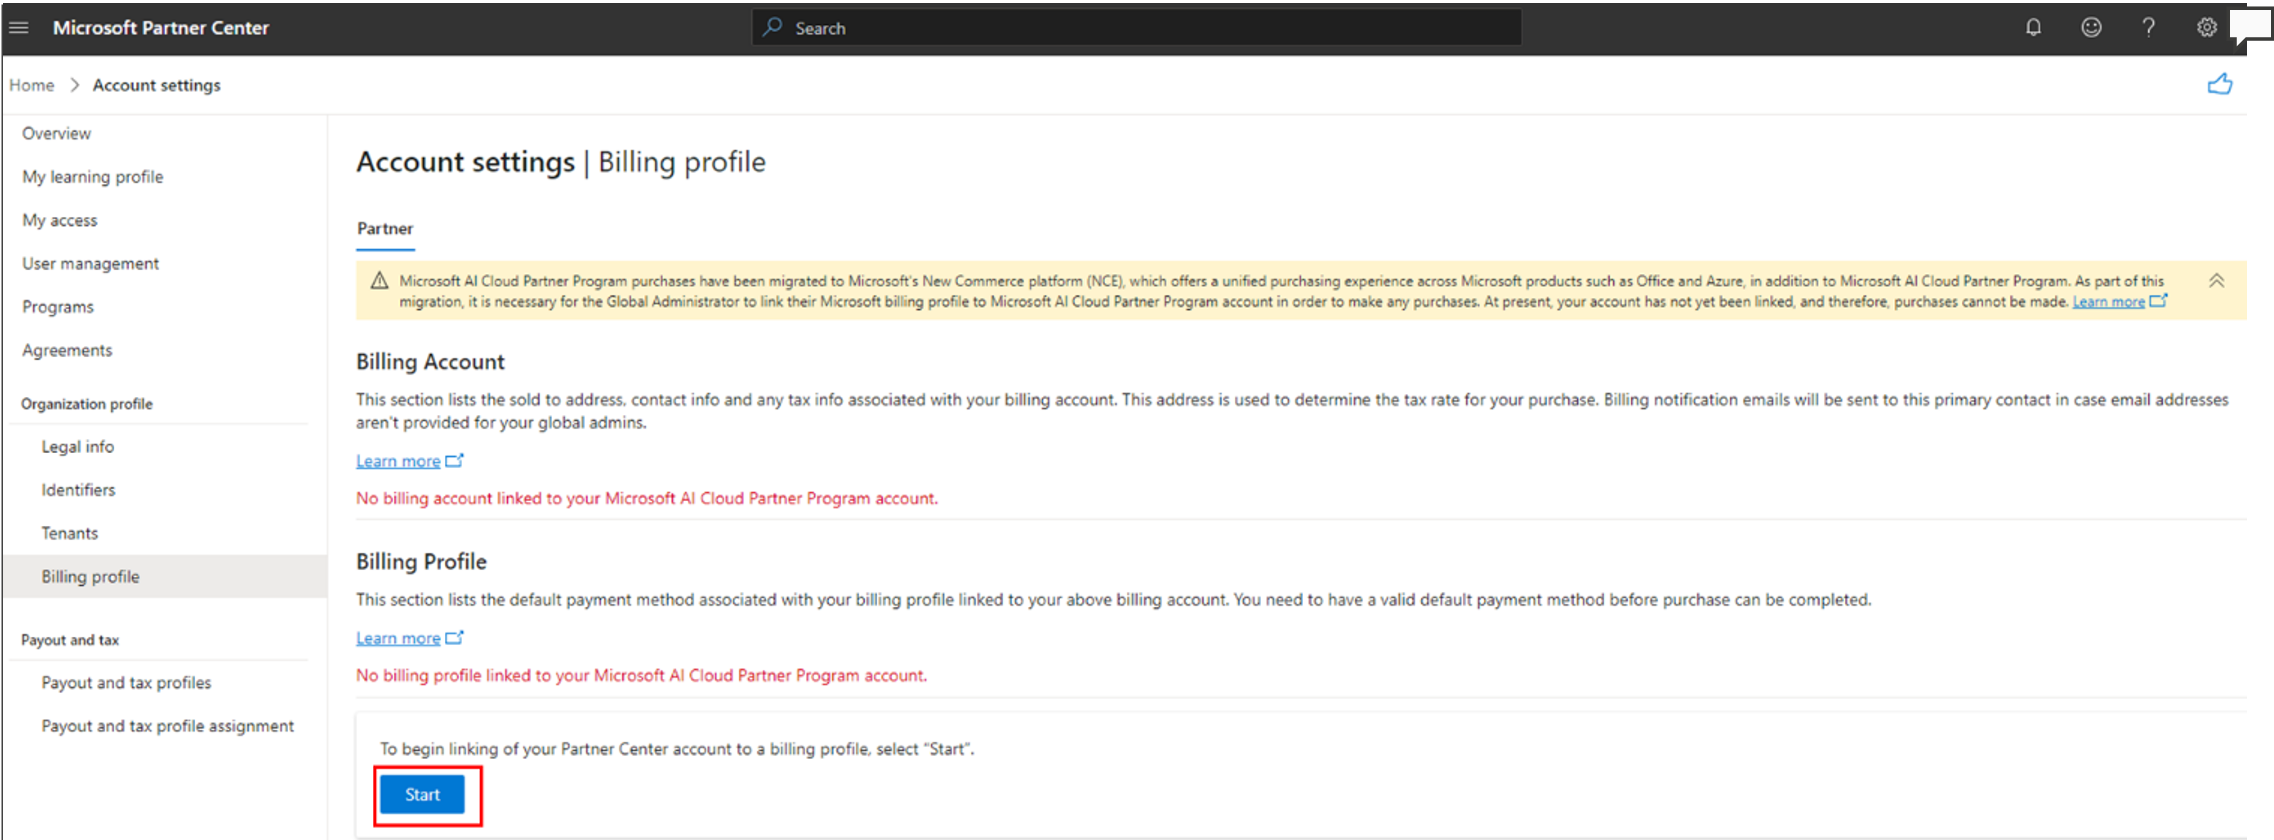
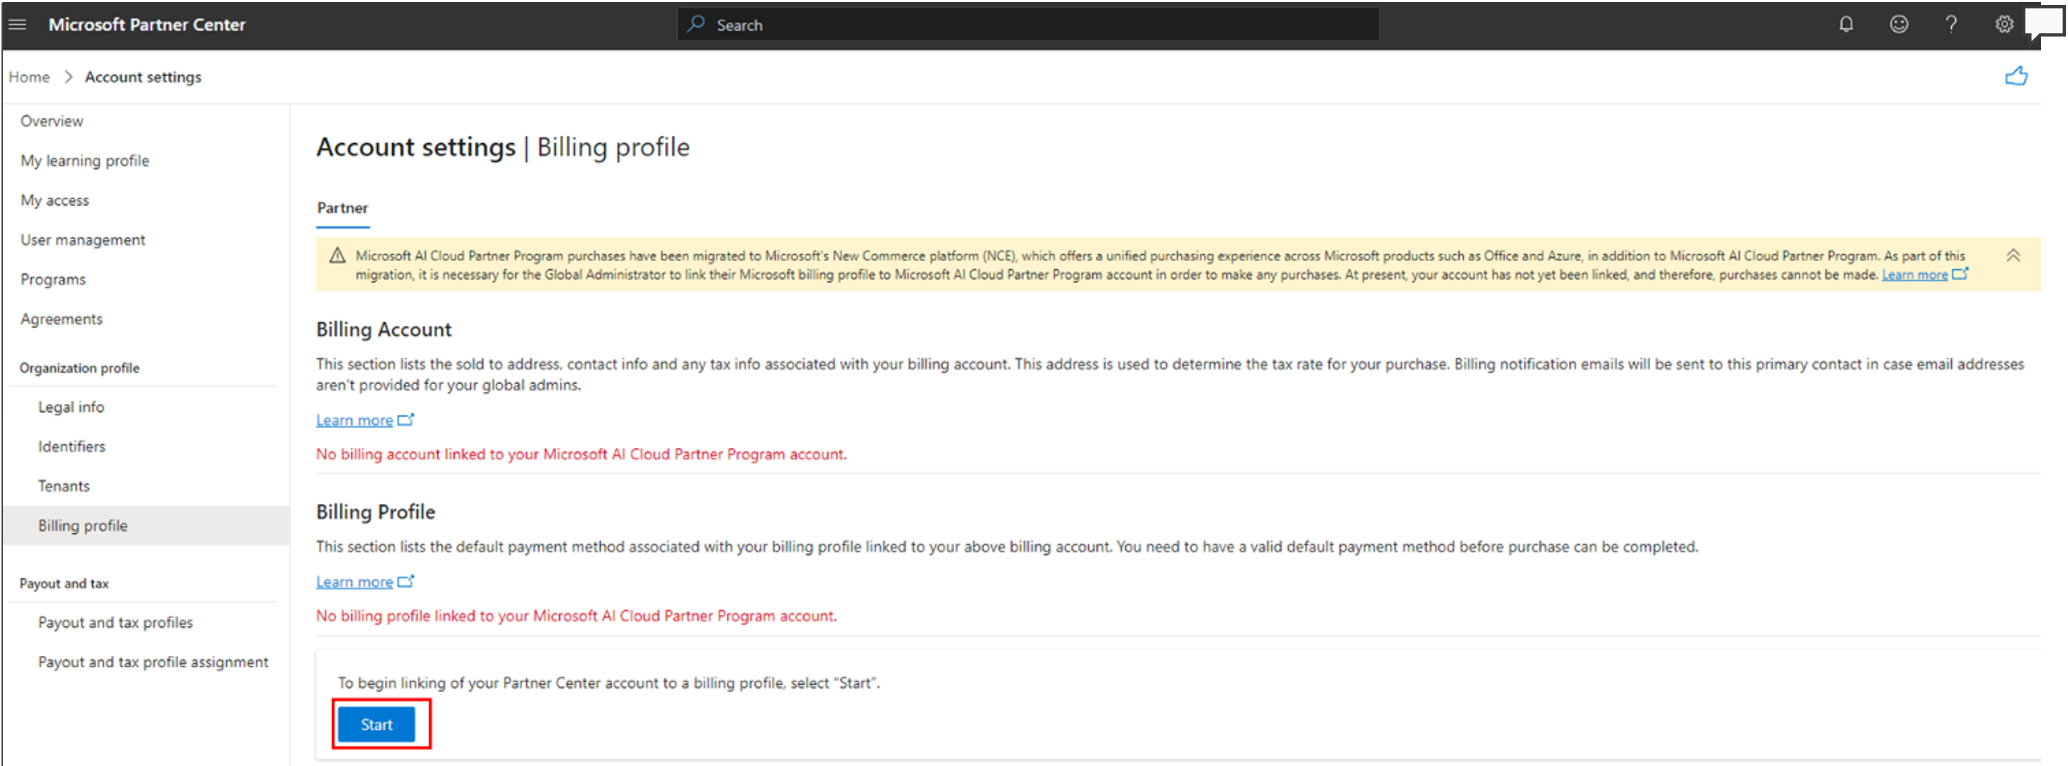
Once in the Billing profile page in the Accounts settings workspace, select Start.
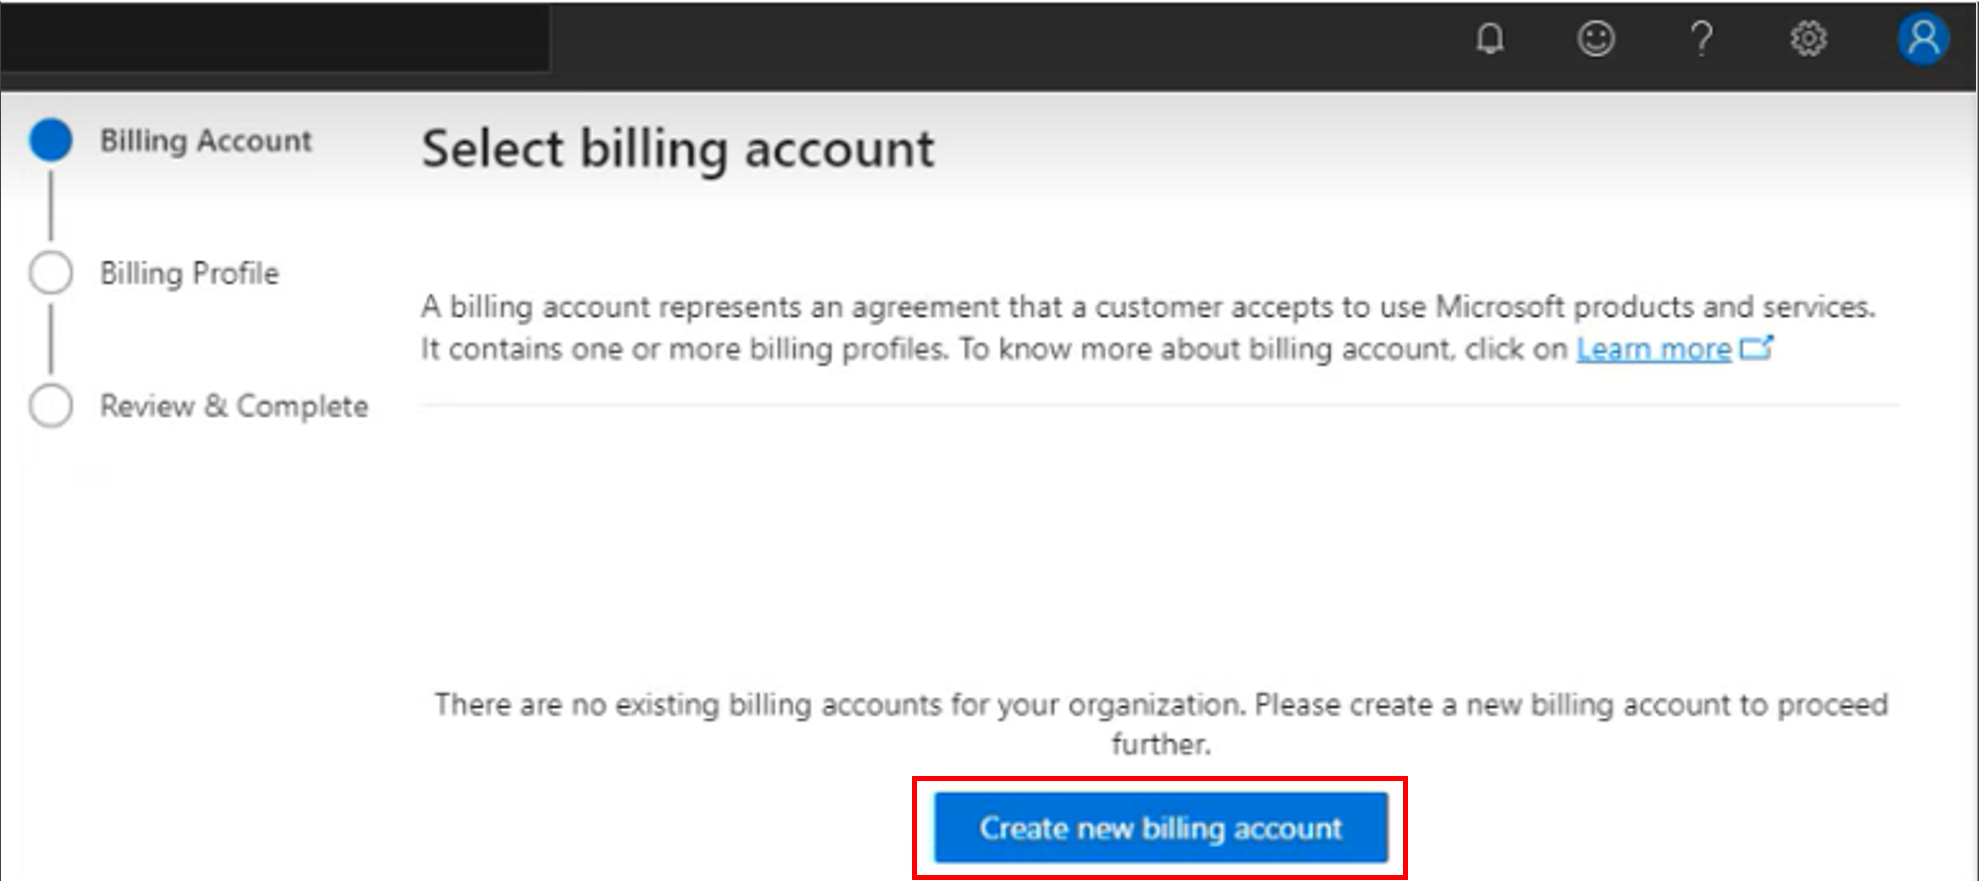
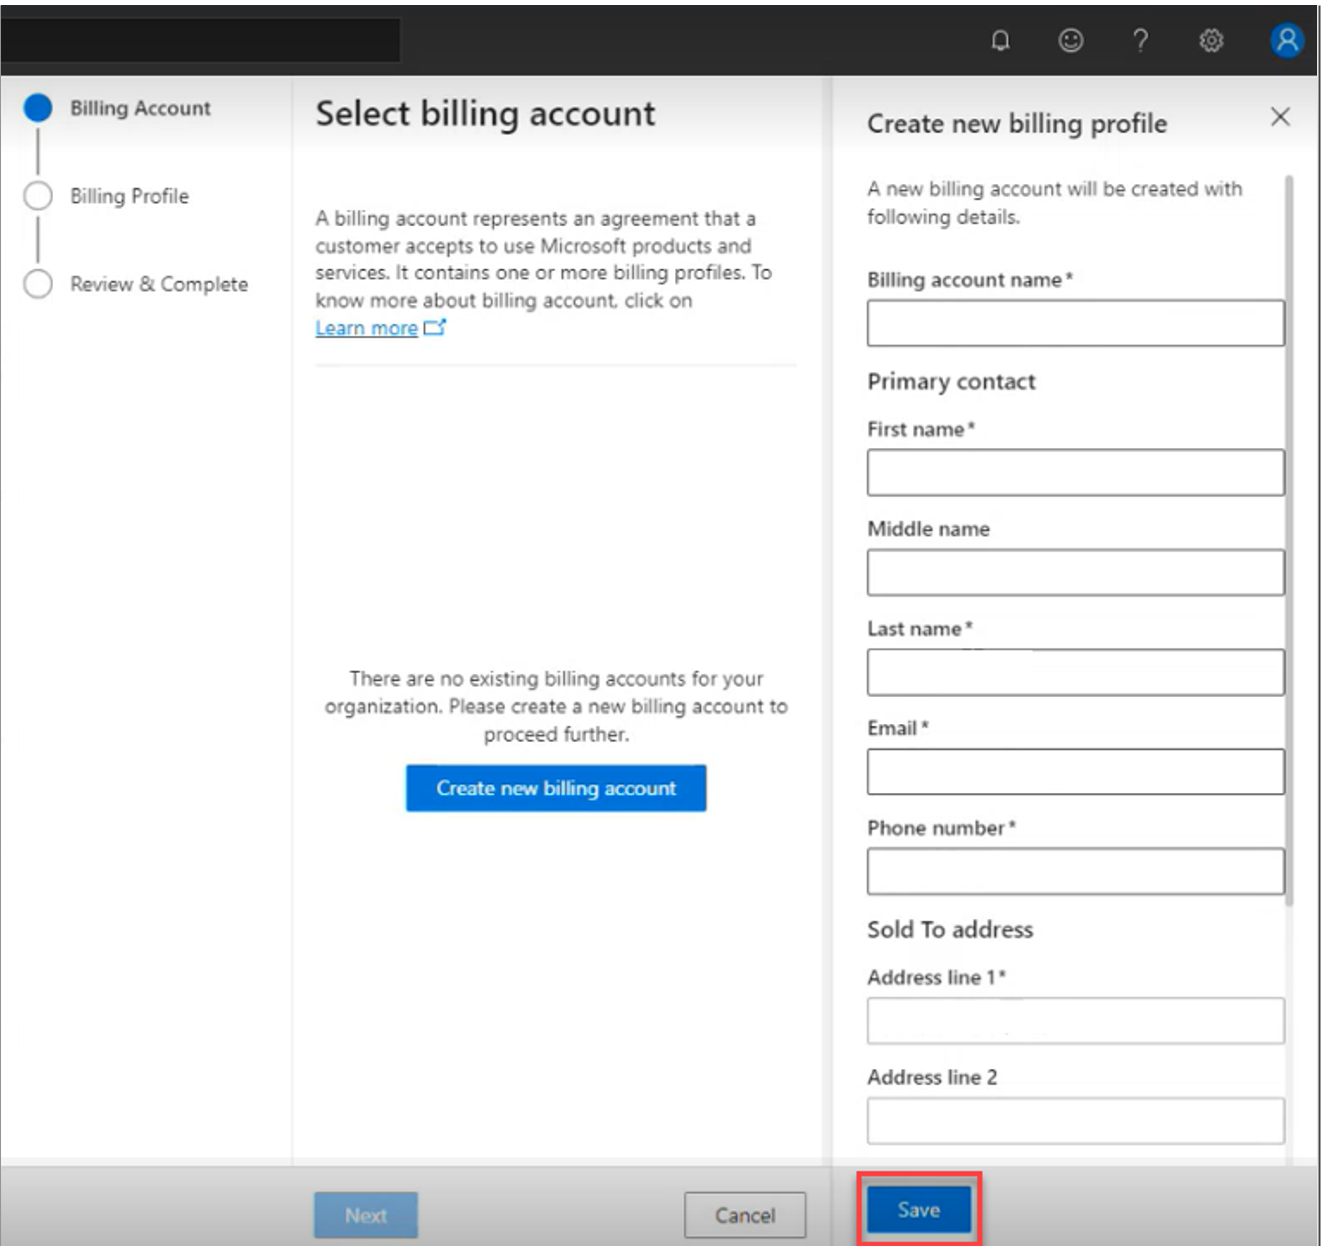
Select Create new billing account.
Update the details of your billing account. Some information, like your legal profile data, are filled in by default. Select Save.
Note
Mandatory fields like Sold to address aren't editable on this panel. If you want to update these fields, do that from the Legal profile page in Account settings. Once the changes verify, they appear on this panel and you can continue the process.
Primary Contact isn't listed as a mandatory field. We strongly recommend including it, because if this field is empty, it can prevent a purchase from going through.
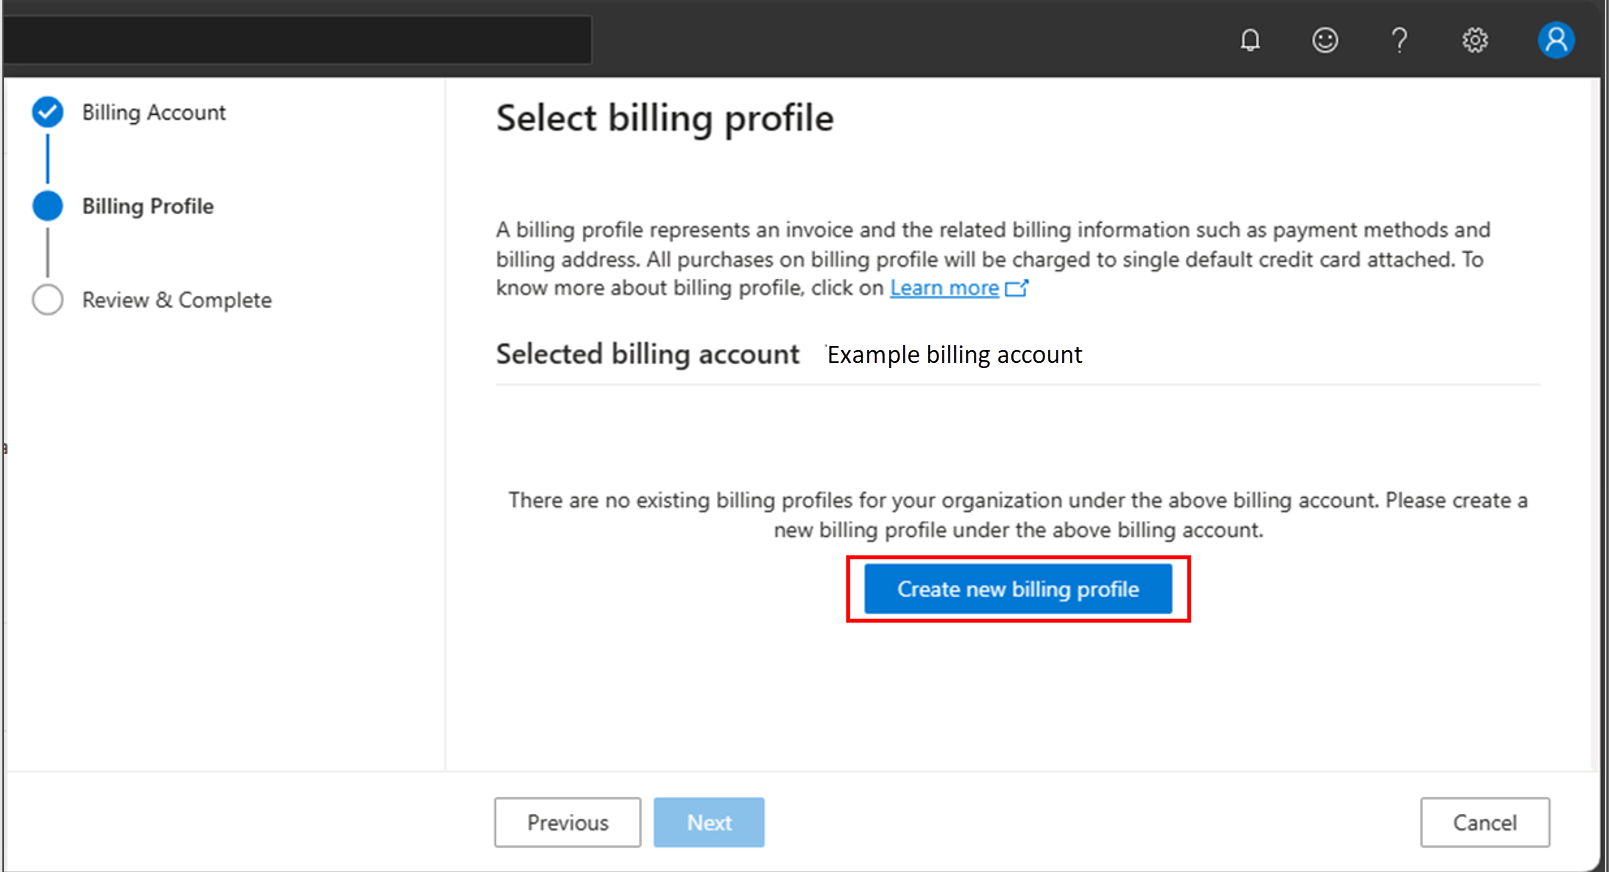
Select Next to enter the billing profile details. The billing profile is created under the previous billing account.
Select Create new billing profile.
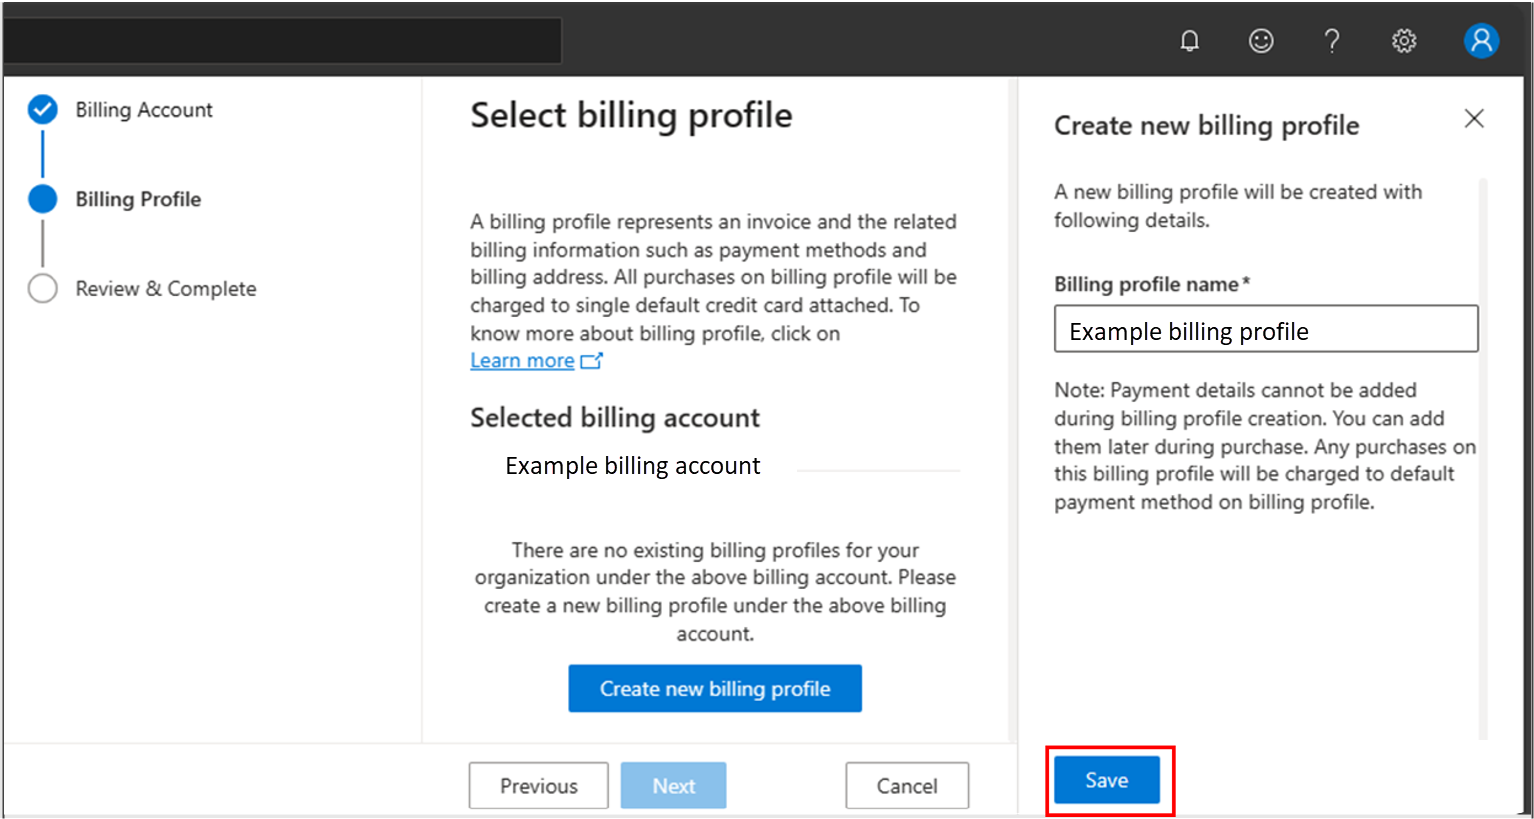
Enter a billing profile name, then select Save.
Note
You can't add payment details during billing profile creation. Payment details for a new billing profile you creat as part of this process appears as None. You can add payment details later to the billing profile during a purchase.
The process then saves the billing profile details. Select Next to move to the review page.
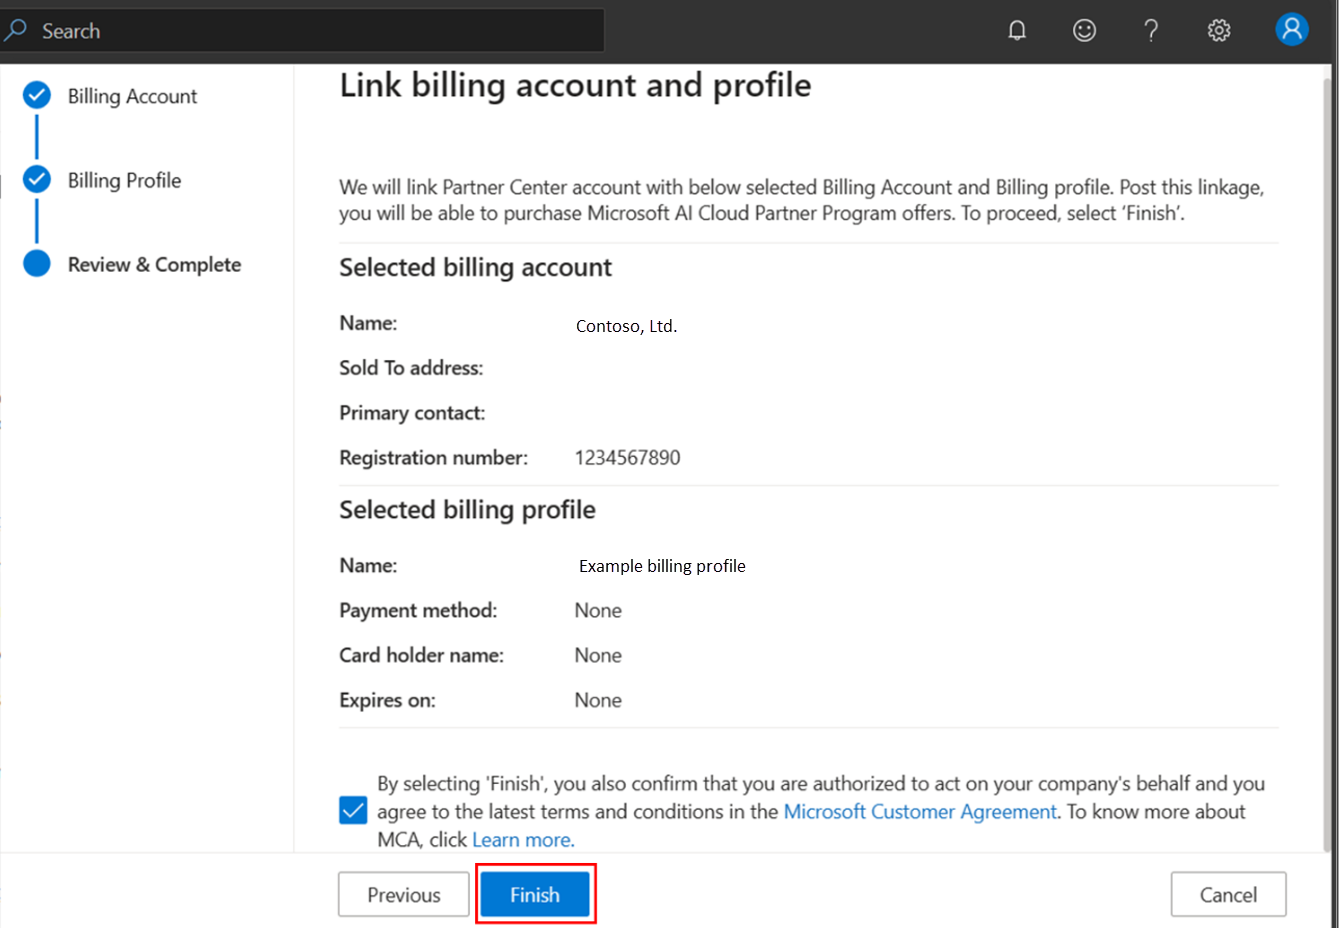
Review the details of the billing account and profile that you entered. Select the box to confirm acceptance of the Microsoft Customer Agreement (MCA), then choose Finish.
Note
If your Sold To address is in Italy, you're prompted for a secondary acknowledgment of the MCA.
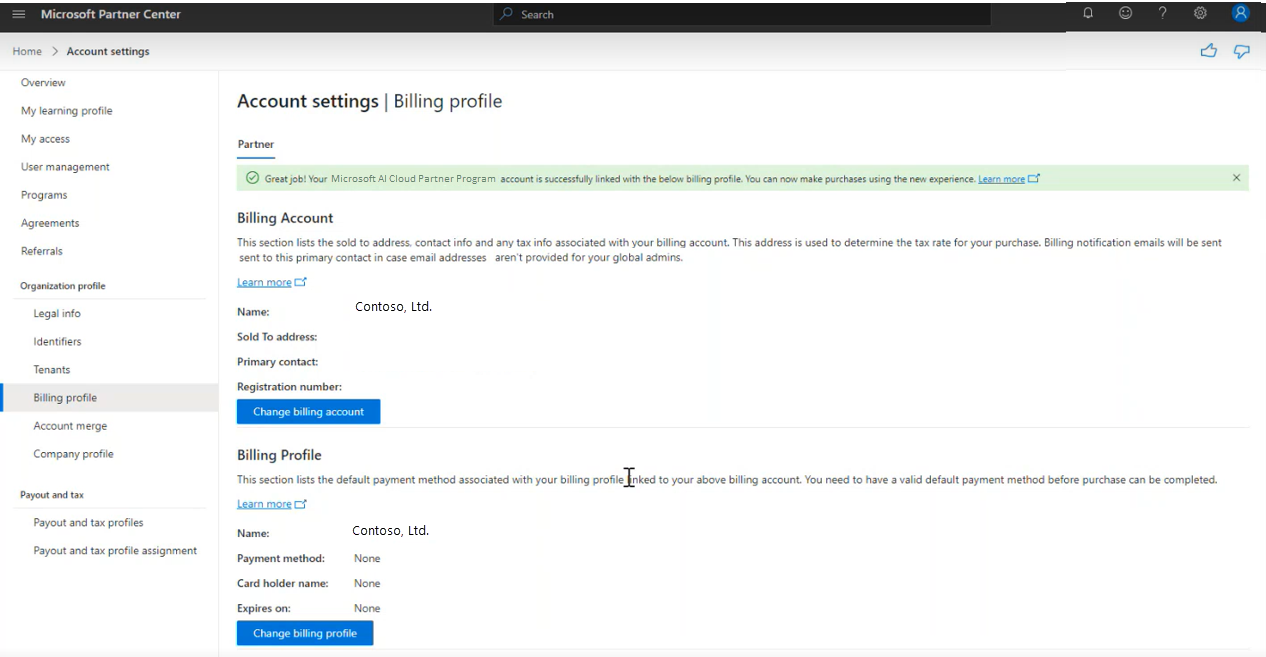
The billing account and profile are created and linked to your Partner Center account successfully. The Microsoft AI Cloud Partner Program Admin can continue with the Membership purchases on the Membership page.
Reuse your existing Microsoft billing account and profile
You receive an email and in-product notification to start the process of linking your billing account and profile. Select the link in the email to navigate to the Billing profile page in Partner center.
Select Start.
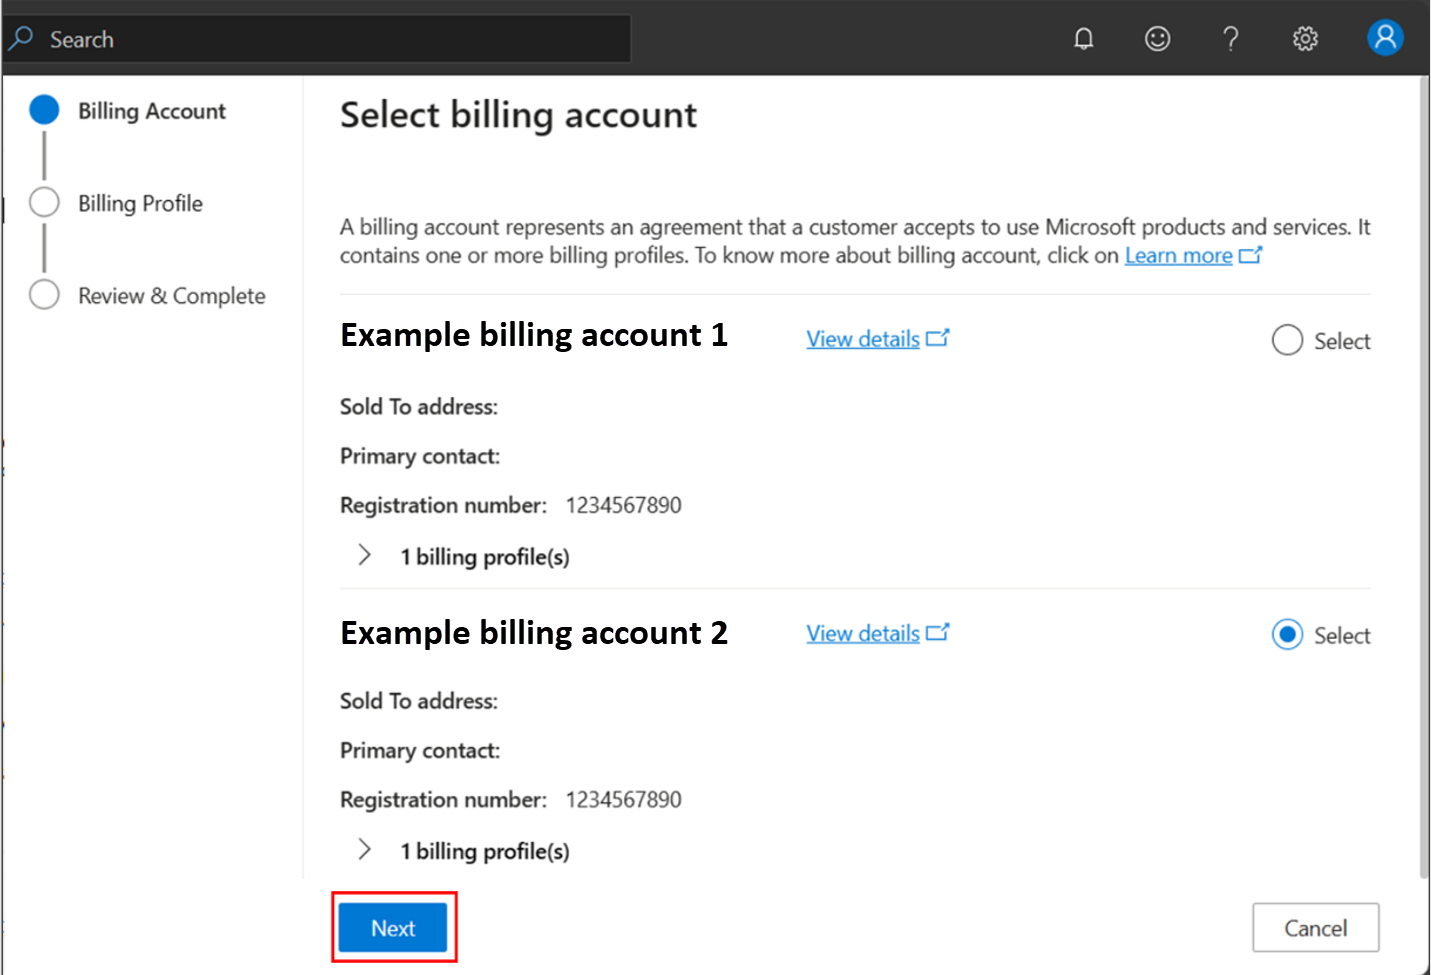
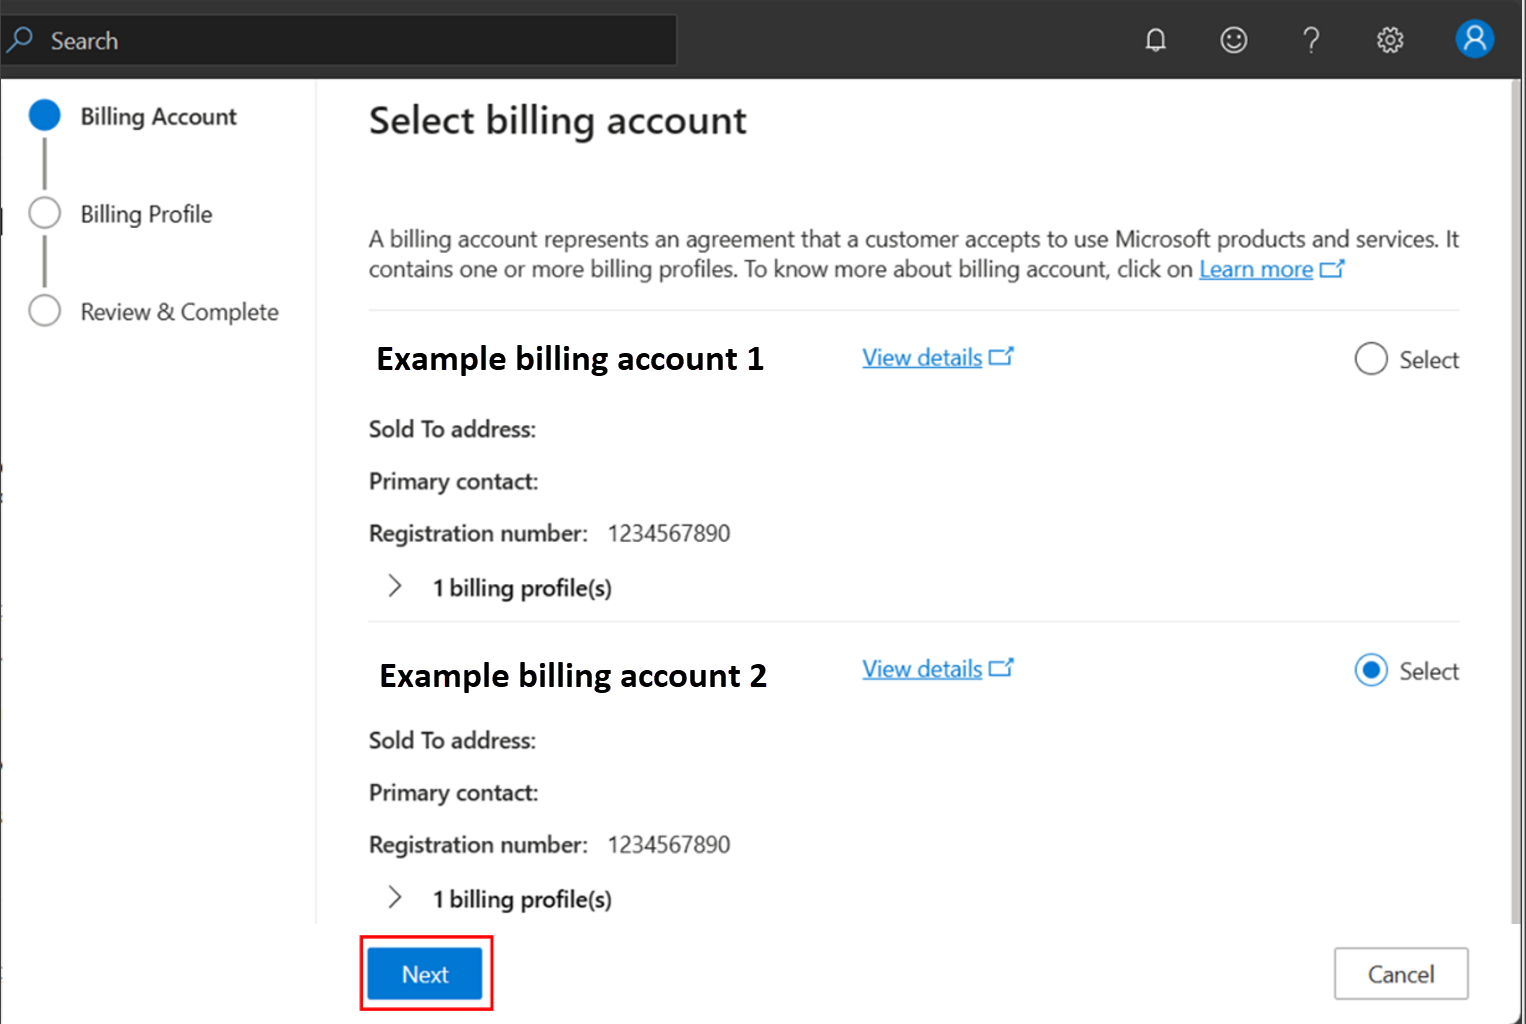
Select the billing account that you want to link with your Partner Center account, and select Next. If you want to see the list of billing profiles under a billing account, select the billing profile dropdown. If you want to see more details on a billing profile, select View details. This action redirects you to Azure portal.
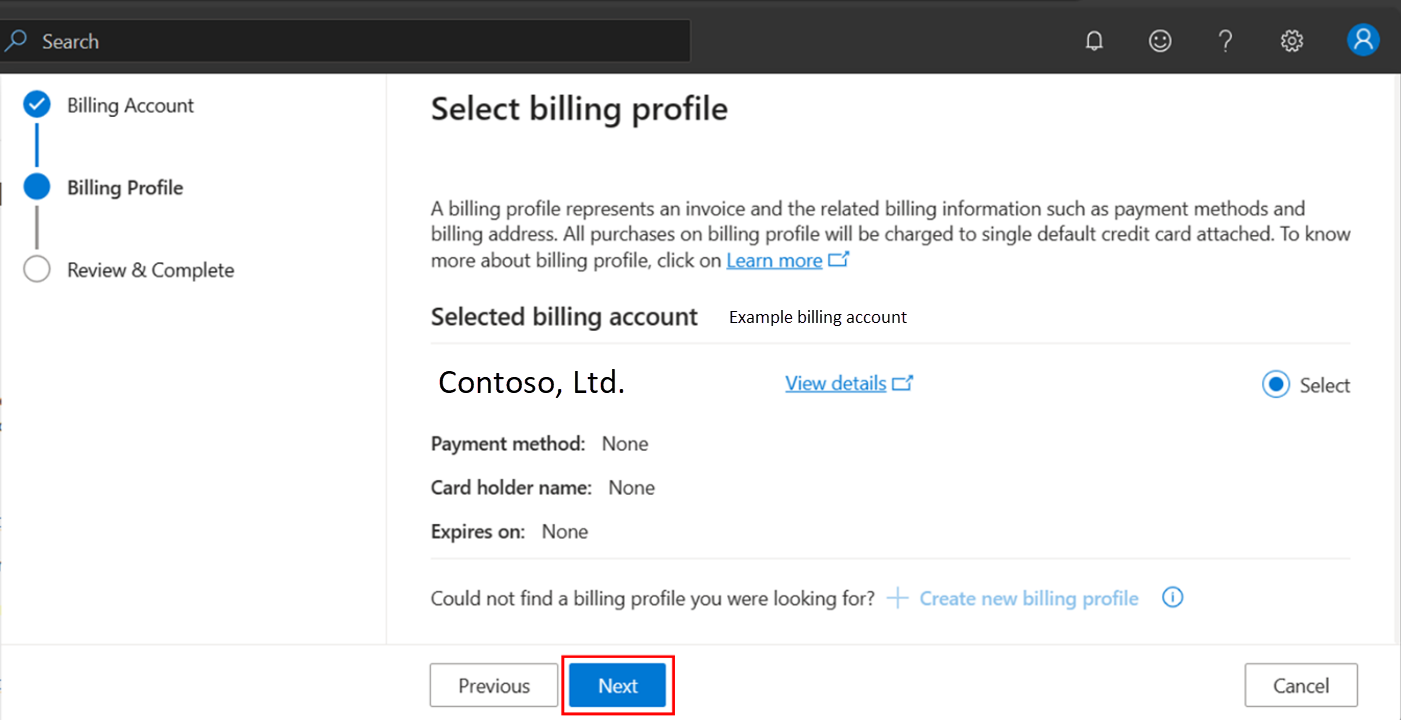
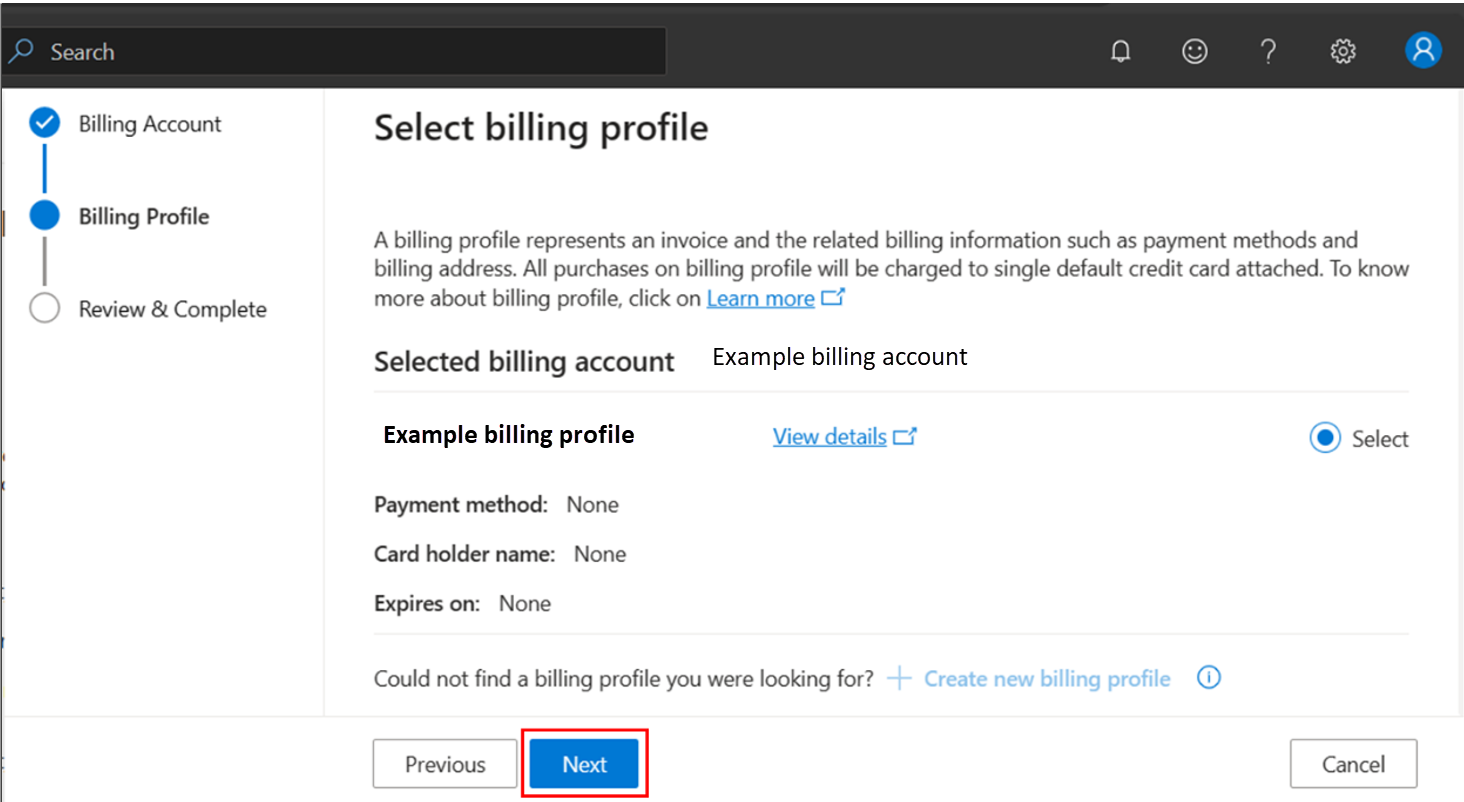
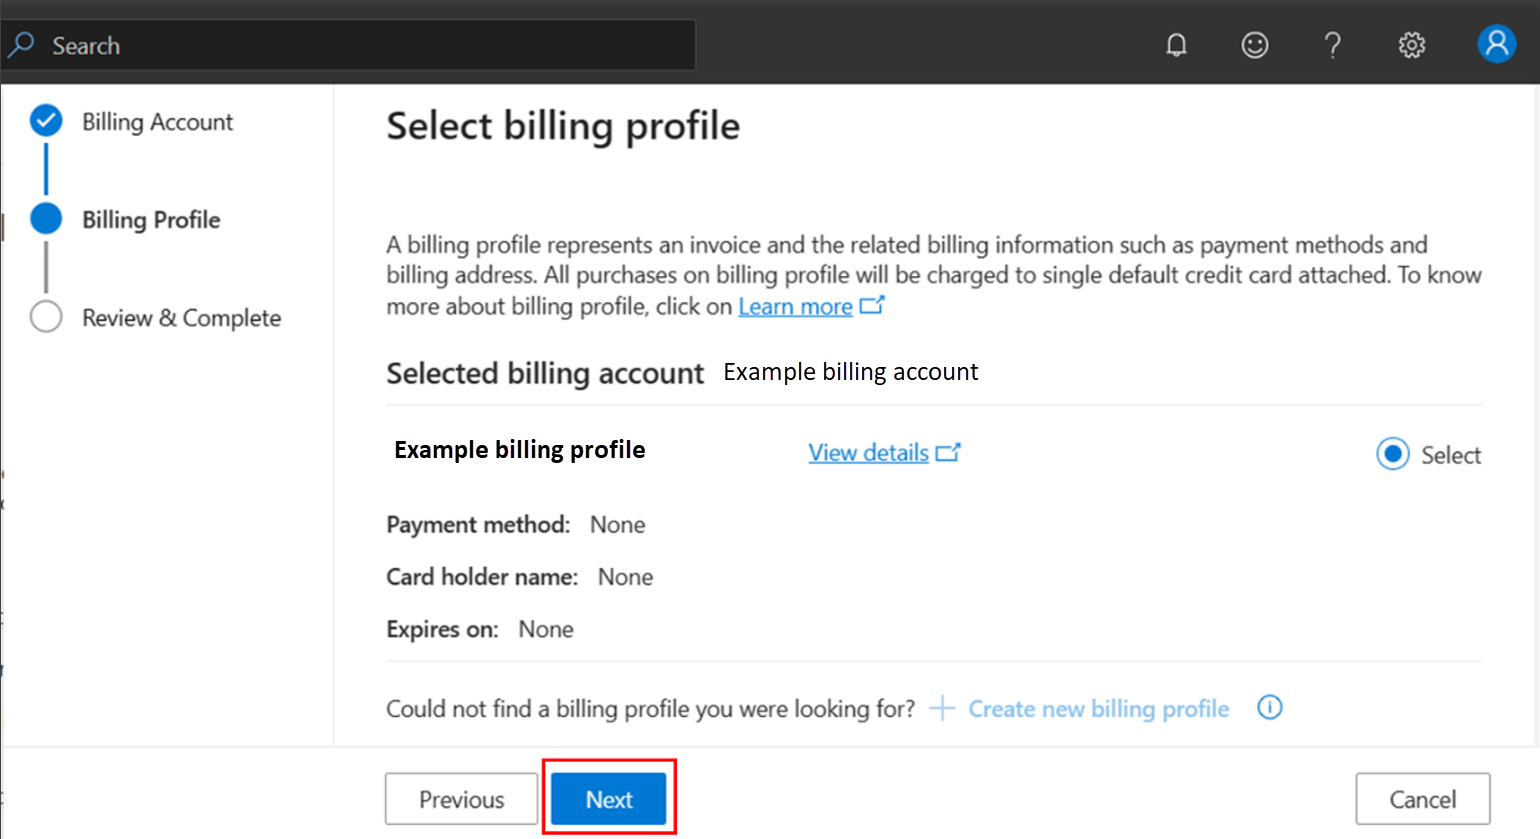
Select the billing profile under the selected billing account and choose Next.
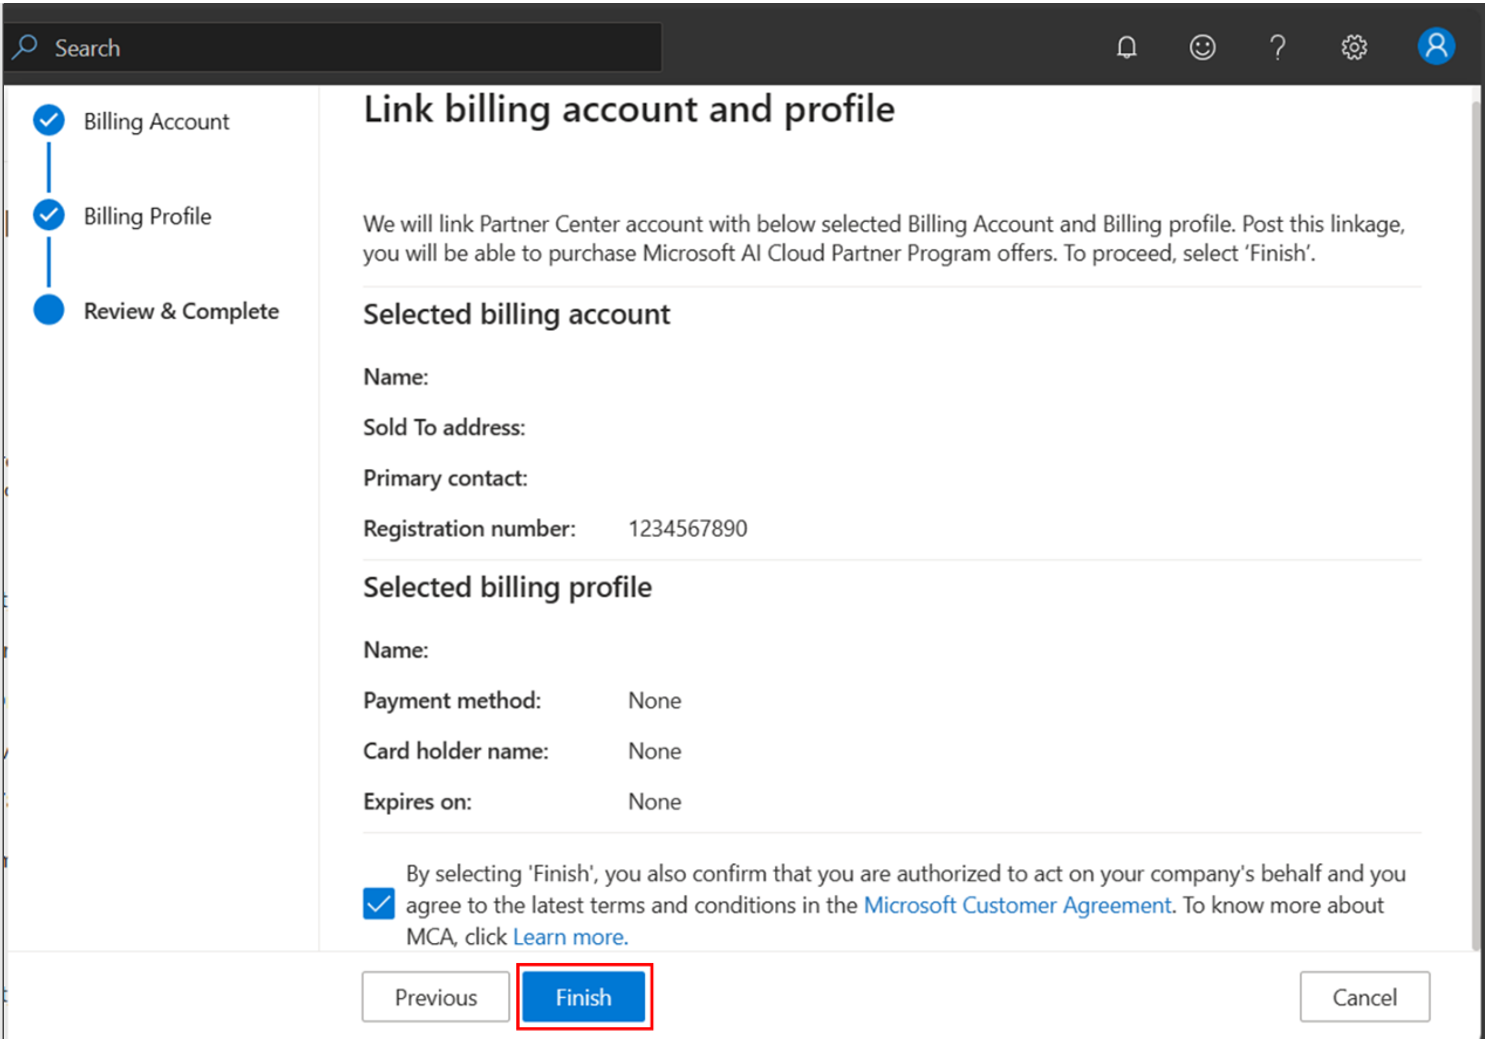
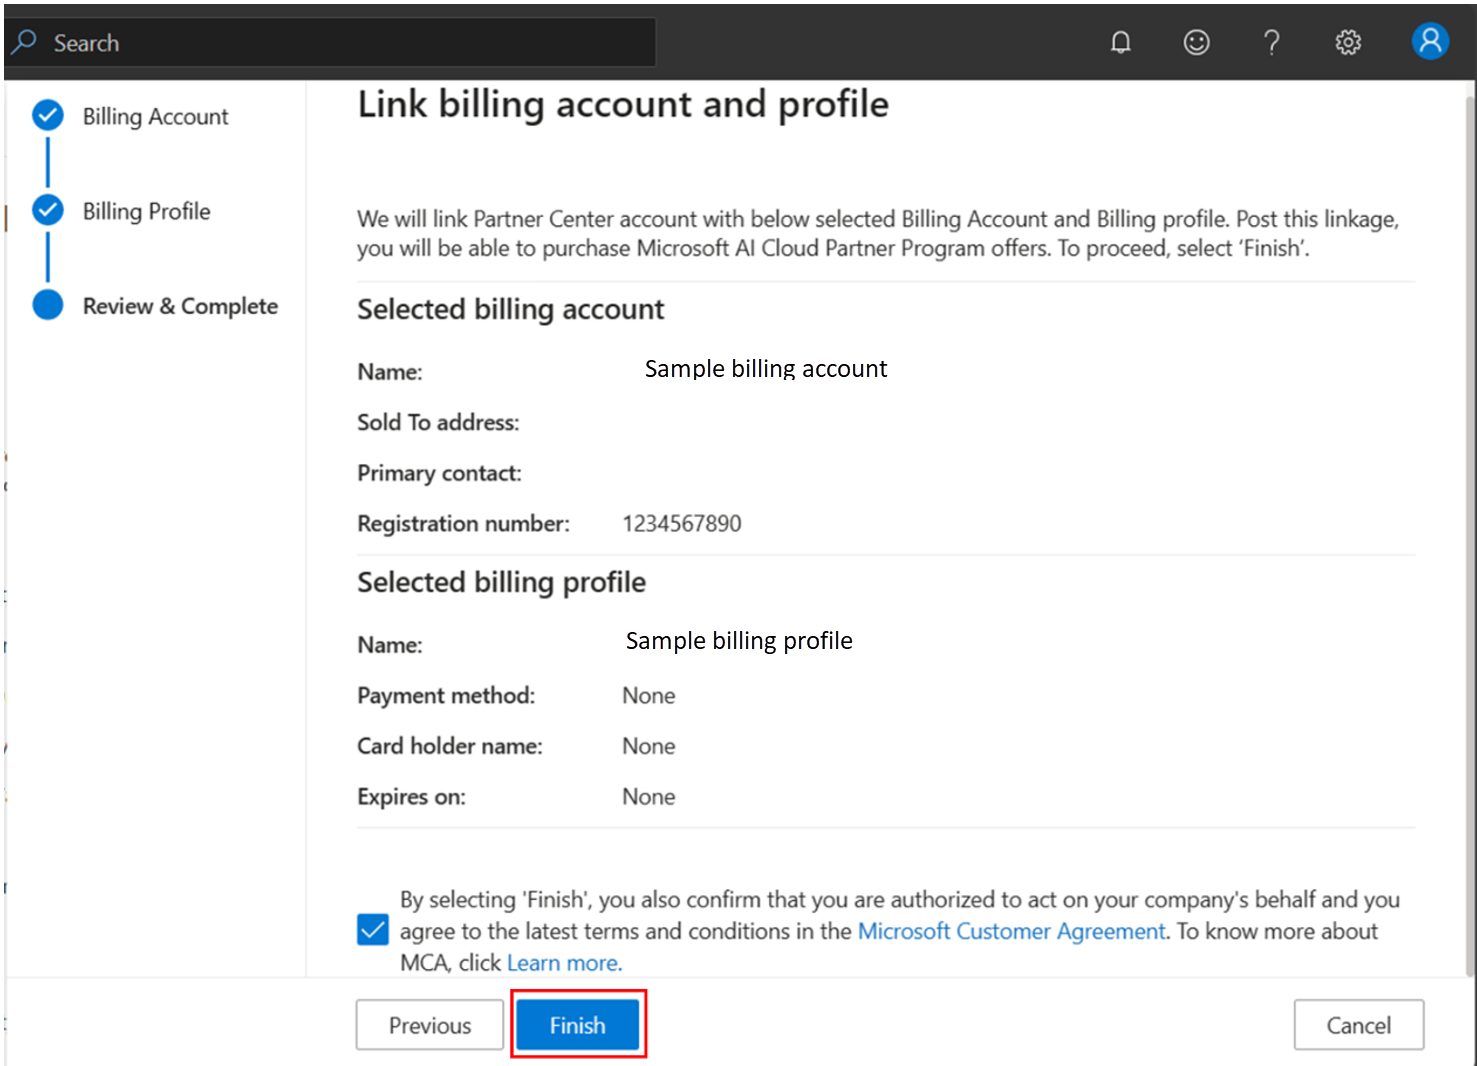
Review the details of the billing account and profile you selected. Select the box to confirm acceptance of the Microsoft Customer Agreement (MCA). If you already signed MCA in the past for the selected billing account, the checkbox is disabled. Select Finish.
Note
If your Sold To address is in Italy, you're prompted to provide a secondary acknowledgment of the MCA.
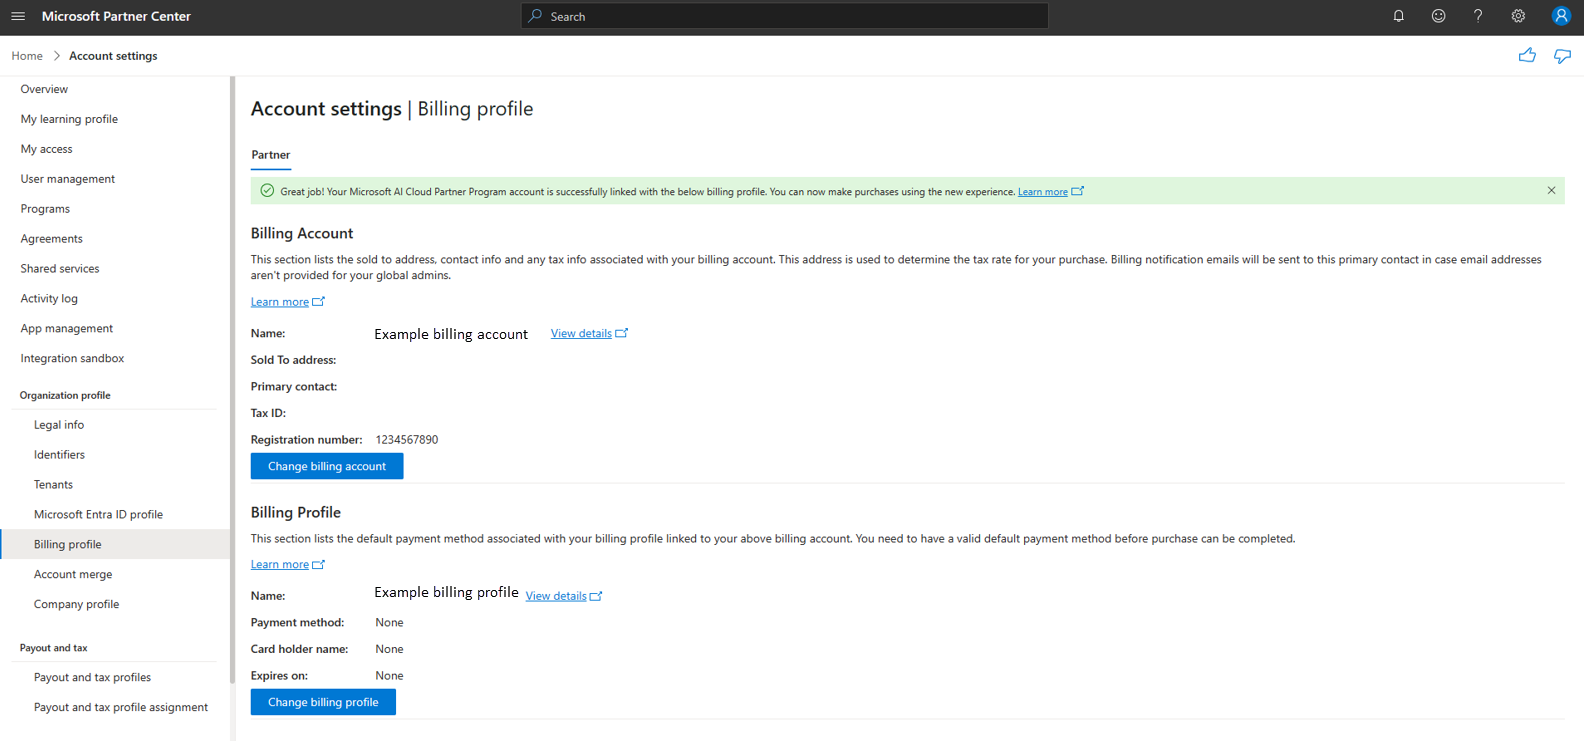
The billing account and profile are then linked to your Partner Center account successfully. The Microsoft AI Cloud Partner Program Admin can continue with the membership purchases on the Membership page.
Change the billing account and profile linked to your Partner Center account
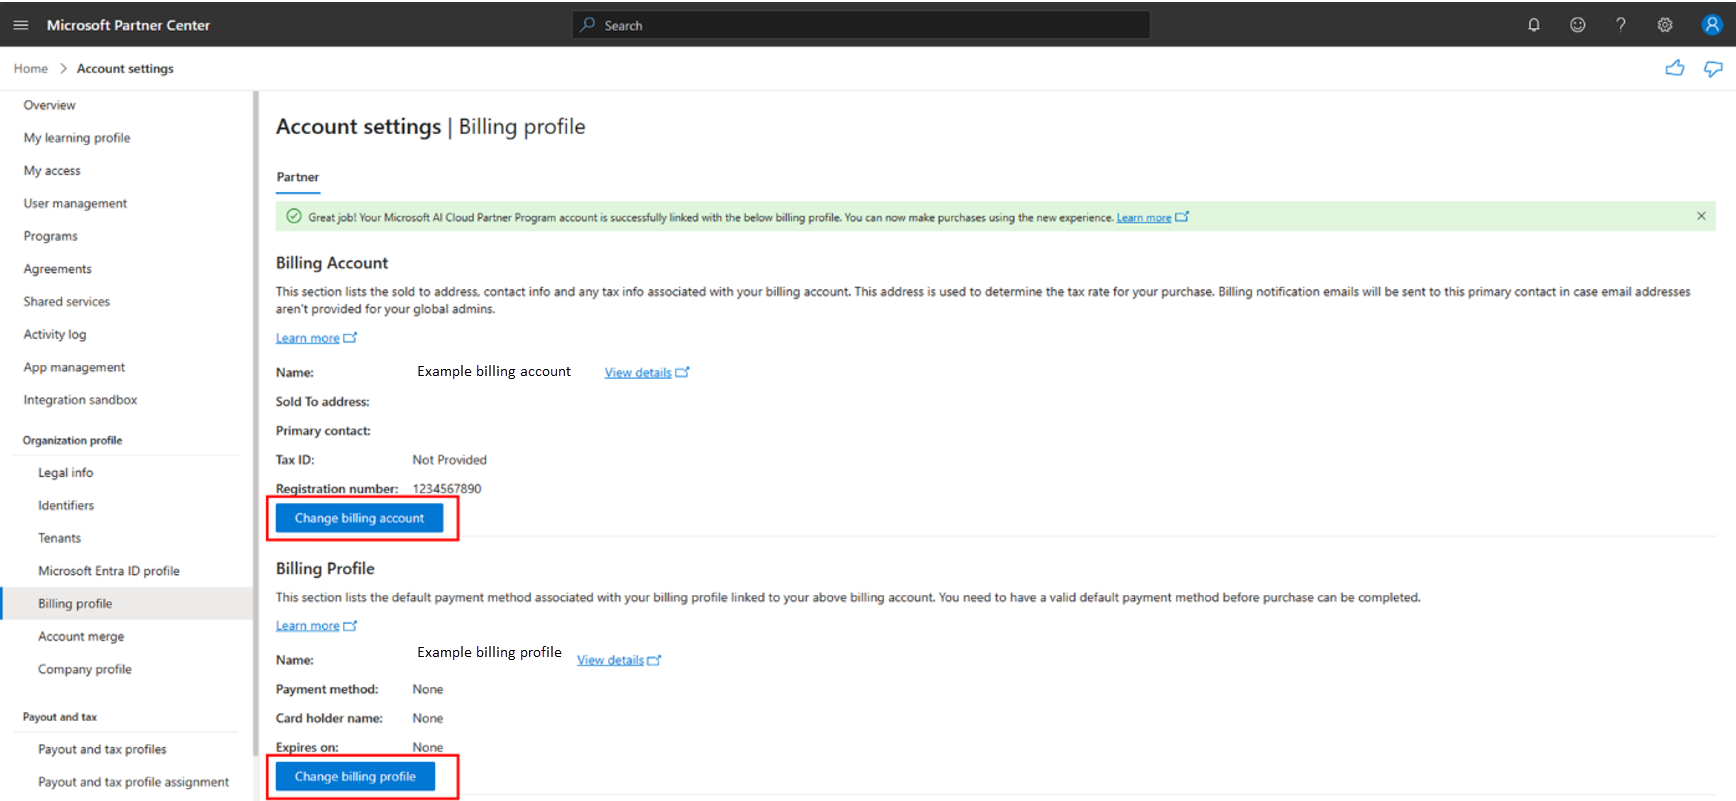
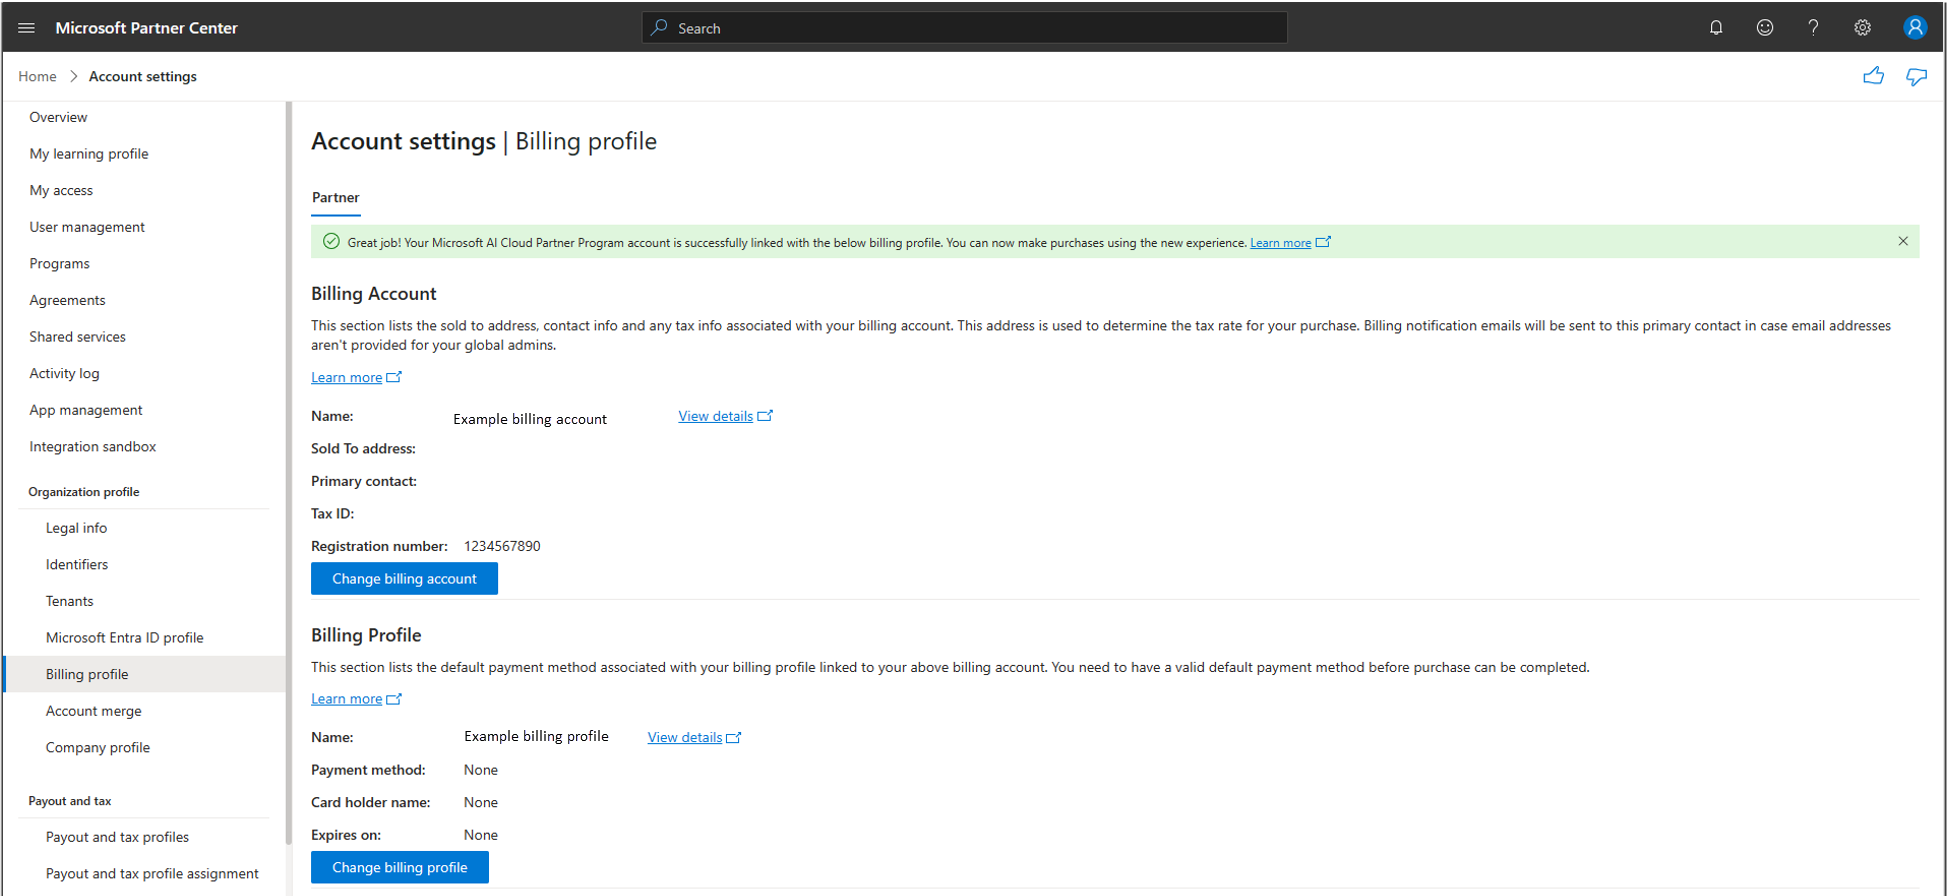
If you want to change an existing billing account and billing profile linked to your Partner Center account to another billing account or profile, you can do so on the Billing profile page. After the change, all your subsequent purchases reflect on the new billing profile.
On the Billing profile page, select Change billing account if you want to change the billing account linked to your Partner Center account. If you want to change only the billing profile under the billing account linked to your Partner Center account, select Change billing profile.
Select the billing account that you want to link with your Partner Center account from the existing list for your tenant. Select Next. You can also create a new billing account and link it. If you want to change the billing profile, you land directly on the Select billing profile page.
Select a billing profile from the existing list under the billing account. Select Next. You can also create a new billing profile under the selected billing account and link it. If you already have a billing profile without a payment instrument, you need to reuse the same, you can't create a new billing profile.
Review the details of the billing account and profile you selected. Select the box to confirm acceptance of the MCA. If you already signed MCA in the past for the selected billing account, the checkbox is disabled. Select Finish.
Note
If your Sold To address is in Italy, you're prompted to provide a secondary acknowledgment of the MCA.
The billing account and profile get linked to your Partner Center account successfully. The Microsoft AI Cloud Partner Program Admin can continue with the membership purchases on the Membership page.
