Scénář s asistencí – nasazení Windows 365 spuštění do fyzických zařízení
Podle tohoto scénáře s asistencí můžete nasadit Windows 365 Boot do sdílených Windows 11 Pro fyzických zařízení. Windows 365 Boot umožňuje uživatelům fyzických zařízení přihlásit se přímo ke cloudovým počítačům bez přihlášení k fyzickým zařízením.
Tento průvodce vás provede definováním:
- Šablony názvů zařízení Autopilot a předpony názvů prostředků
- Nastavení služby Windows Update.
- Profil VPN, profil Wi-Fi a nastavení jazyka
- Přiřazení skupin k určení fyzických zařízení, která jsou nastavená pro spuštění Windows 365.
Další obecné informace o scénářích s asistencí najdete v tématu přehled scénářů s asistencí Intune.
Požadavky
- Každé fyzické zařízení a cloudový počítač musí používat Windows 11 Enterprise nebo Professional verze 22621.3374 nebo novější.
- Musíte mít roli správce služeb Intune.
Před přidáním fyzických zařízení do skupiny se musíte ujistit, že splňují požadavky na spuštění Windows 365.
Scénář s asistencí můžete dokončit dříve, než budou ve skupině nějaká zařízení. Po přidání zařízení do skupiny a přístupu k internetu se automaticky aktualizují nastavením spouštění Windows 365 definovaným ve scénáři s asistencí.
Krok 1 – úvod
- Přihlaste se k Centru pro správu Microsoft Intune jako uživatel s rolí správce služby Intune.
- Vyberte Zařízení>Windows 365 (v části Přehled) >Windows 365 Spuštění (v části Windows 365 průvodci).
- Na stránce Úvod vyberte Další: Základy.
Krok 2 – Základy
Zvolte, jak se budou vaše zařízení při registraci jmenovat, a zvolte předponu všech vytvořených prostředků.

Šablona názvu zařízení Autopilot: Tento scénář s asistencí zaregistruje vaše zařízení ve Windows Autopilotu. Při registraci můžete zařízení volitelně pojmenovat pomocí jedinečného vzoru, který platí pro všechna zařízení. Možnosti:
Použít šablonu názvu zařízení: Pokud toto políčko nezaškrtnete, při pojmenování zařízení se nevytvořila žádná šablona ani vzor. Zařízení získá název výrobce OEM, například DESKTOP-, následovaný některými náhodnými znaky. Výběrem políčka vytvořte jedinečný vzor pro pojmenování zařízení. Zadejte například Contoso-%RAND:7% a pojmenujte všechna vaše zařízení Contoso- a sedm náhodných znaků.
Názvy:
- Musí obsahovat nejméně 15 znaků.
- Může obsahovat písmena (a-z, A–Z), čísla (0–9) a spojovníky.
- Nemůžou být jenom čísla a nesmí obsahovat prázdné místo.
- Pomocí makra %SERIAL% můžete přidat sériové číslo specifické pro hardware.
- Pomocí makra %RAND:x% můžete přidat náhodný řetězec znaků, kde x se rovná počtu znaků, které se mají přidat.
Předpona názvu prostředku: Při nasazení tohoto scénáře s asistencí se automaticky vytvoří několik prostředků. Pokud chcete odlišit položky použité v tomto nasazení, přidejte předponu.
Zadejte název předpony prostředku: Zadejte text, který se má umístit na začátek vytvořených položek. Zadejte
Windows 365 Bootnapříklad . Všechny vytvořené prostředky se nazývají podobně jako Windows 365 Boot Azure Virtual Desktop (HostApp).Režim spouštěcího zařízení: Vyberte jednu z následujících možností:
- Režim sdíleného počítače: Pro fyzická zařízení sdílená více uživateli
- Vyhrazený režim: Pro fyzické zařízení používané jedním konkrétním uživatelem.
Vyberte Další: Aktualizace koncových bodů.
Krok 3 – aktualizace koncových bodů
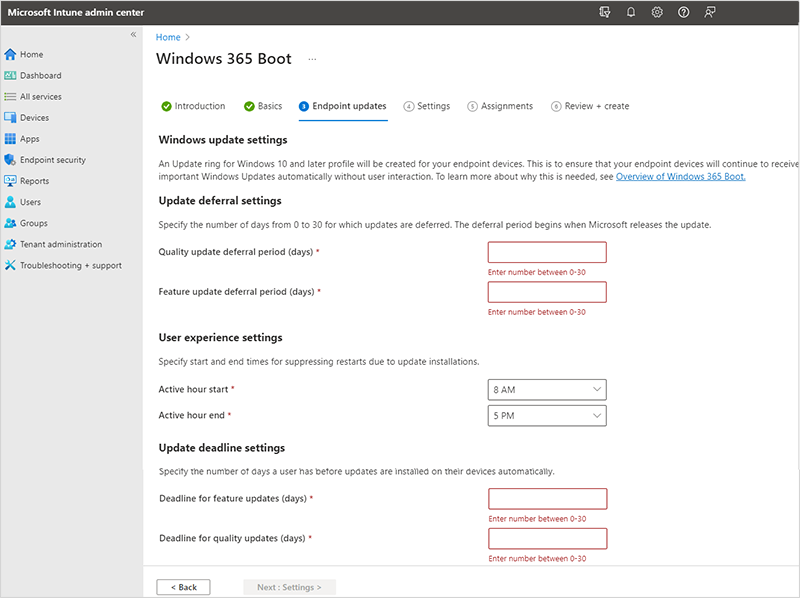
Na stránce Aktualizace koncového bodu nastavte možnosti, které chcete použít pro Windows Aktualizace na fyzických zařízeních. Ujistěte se, že vaše volby jsou v souladu s požadavky vaší organizace na zabezpečení. Vyberte Další: Nastavení.

Windows 365 Boot podporuje automatickou opravu Windows, která automatizuje správu oprav pro fyzická zařízení Windows 365 Spouštění. Pokud používáte tuto automatizaci, měla by být nakonfigurovaná mimo tento scénář s asistencí.
Krok 4 – Nastavení

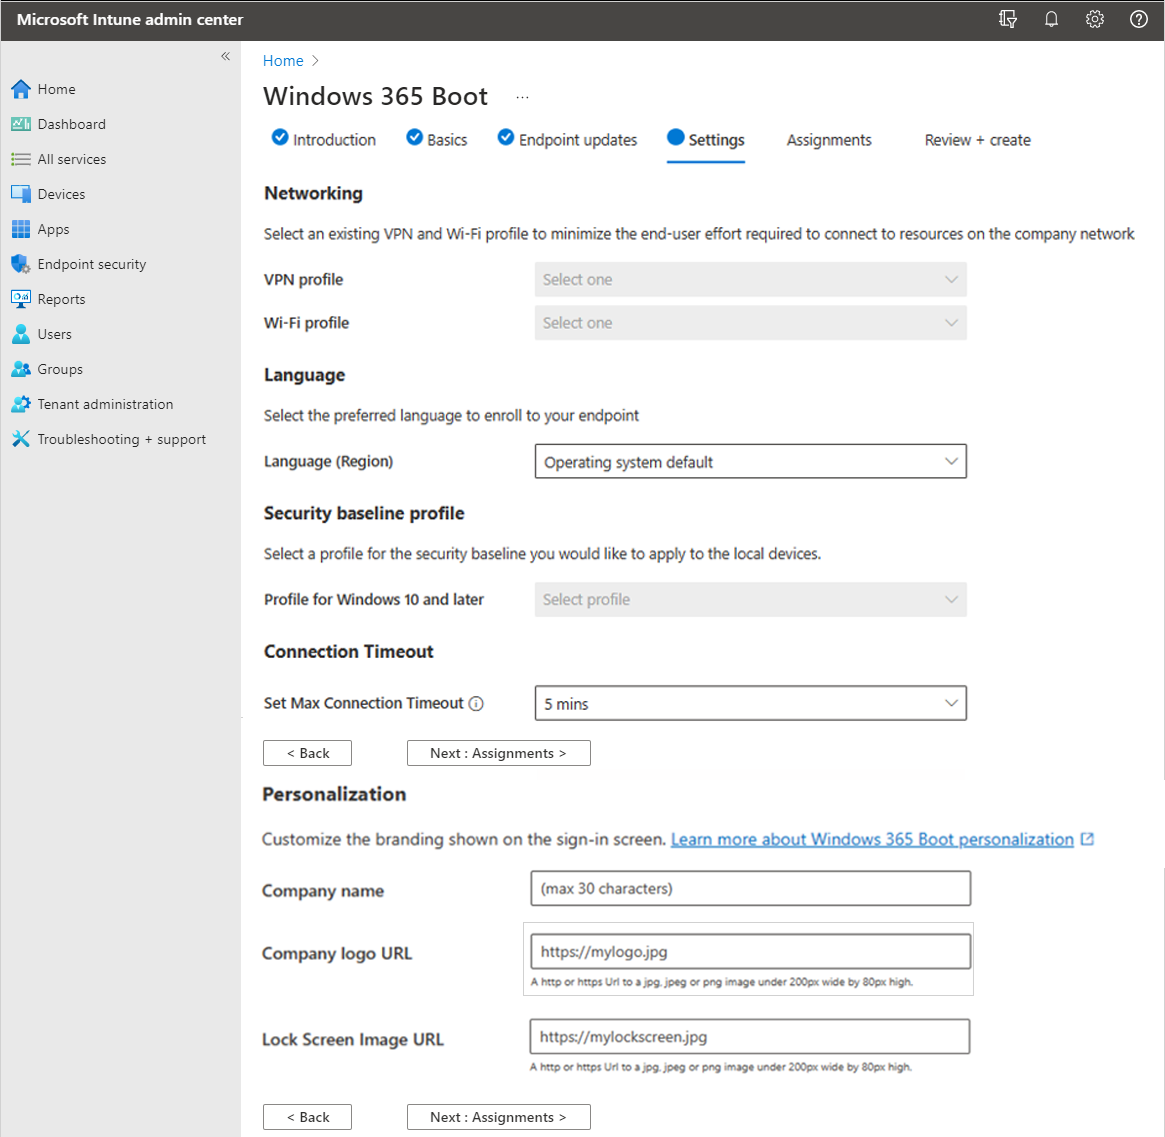
- (Volitelné) Na stránce Nastavení vyberte profil SÍTĚ VPN a profil Wi-Fi, které chcete použít pro fyzická zařízení Windows 365 Spuštění. Pokud vyberete existující profil Wi-Fi nebo VPN a profil je již přiřazený k možnostem Všichni uživatelé nebo Všechna zařízení, bude toto přiřazení odebráno a nahrazeno novým přiřazením, které cílí pouze na skupinu Windows 365 vytvořenou nebo vybranou v tomto scénáři s asistencí.
- (Volitelné) Pokud nechcete používat výchozí jazyk operačního systému, vyberte konkrétní jazyk (oblast)>Další: Přiřazení.
- (Volitelné) Vyberte profil standardních hodnot zabezpečení, který chcete použít pro fyzická zařízení Windows 365 spuštění.
- (Volitelné) Vyberte hodnotu pro nastavení časového limitu maximálního počtu připojení pro spuštění Windows 365. Operační systém čeká na připojení, dokud se nedosáhne vybrané hodnoty časového limitu. Další informace najdete v tématu SetMaxConnectionTimeout policy CSP.
- (Volitelné) Pokud chcete přizpůsobit branding zobrazený v horní části přihlašovací obrazovky, zadejte některé nebo všechny následující informace:
- Název společnosti
- Adresa URL s logem společnosti
- Adresa URL obrázku zamykací obrazovky
Krok 5 – Přiřazení
Vyberte skupiny, pro které chcete tento scénář s asistencí přijímat, a všechny prostředky, které tento scénář vytvoří. Můžete přiřadit existující skupiny nebo vytvořit nové a přiřadit je.
Vytvořit novou skupinu: Vytvoří novou skupinu a nasadí do této skupiny zásady s asistencí scénáře. Po přidání zařízení do této skupiny získají prostředky z tohoto scénáře s asistencí.
-
Název skupiny: Zadejte název skupiny. Zadejte
Windows 365 boot physical devicesnapříklad .
-
Název skupiny: Zadejte název skupiny. Zadejte
Zvolte existující skupinu: Vyberte existující skupinu. Do této skupiny se nasadí prostředky scénáře s asistencí.
Po přiřazení skupin vyberte Další: Zkontrolovat a vytvořit.
Scénář s asistencí můžete dokončit dříve, než budou ve skupině nějaká zařízení. Když jsou zařízení přidána do skupiny a mají přístup k internetu, začnou automaticky přijímat zásady v tomto scénáři s asistencí.
Do skupiny můžete také přidat předregistrovaná zařízení Windows Autopilot. Přidejte je do skupiny před registrací nebo použitím jakýchkoli zásad. Postup nastavení nových zařízení s Windows Autopilotem najdete v tématu Windows 365 Požadavky na fyzické zařízení spouštění.
Krok 6 – kontrola a vytvoření
Zobrazí se souhrn nastavení a hodnot, které jste nakonfigurovali. Můžete se vrátit na ostatní karty a změnit hodnoty, které jste přidali.
Až budete s nastavením spokojeni, vyberte Vytvořit.
Další kroky
Windows 365 Požadavky na fyzické zařízení pro spuštění.
Omezte přístup uživatelů k fyzickému zařízení Windows 365 Spuštění.
Řešení potíží se spuštěním Windows 365
Další informace o scénářích s asistencí najdete v přehledu Intune scénářů s asistencí.