Kontrola Windows 365 Enterprise Cloud PC
V rámci žádosti o digitální forenzní vědu můžete být požádáni, abyste interním nebo externím vyšetřovatelům poskytli snímek cloudového počítače. Když cloudový počítač pod kontrolou umístíte, uloží se snímek cloudového počítače do účtu Služby Azure Storage. Odtud můžete snímek poskytnout vyšetřovateli.
Poznámka
Současně je možné kontrolovat až 10 cloudových počítačů. Když se najednou zkontroluje více než 10 požadavků, zařadí se do fronty pro zpracování, ale pokud požadavky zůstanou ve frontě příliš dlouho, zvýší se možnost vypršení časových limitů. Pokud dochází k vypršení časových limitů, doporučujeme požadavky rozmístit, abyste měli dostatek času na dokončení předchozích požadavků jako první.
Požadavky
Pokud chcete cloudový počítač zkontrolovat, musíte splňovat následující požadavky:
- Licence Windows 365 Enterprise.
- Účet služby Azure Storage ve stejném tenantovi, který je nastavený podle následujících požadavků.
Nastavení účtu úložiště Azure
Pokud chcete cloudový počítač zkontrolovat, musíte mít nejprve účet úložiště Azure ve stejném tenantovi jako cloudový počítač. Další informace, které vám pomůžou se rozhodnout, jaký typ účtu vyhovuje vašim potřebám, najdete v tématu Přehled účtu úložiště. Doporučujeme vytvořit a udržovat vyhrazený účet úložiště s vyhrazenými řízeními přístupu pro auditování cloudových počítačů. V rámci procesu kontroly cloudových počítačů vyžaduje Windows 365 pro váš účet úložiště Azure role Přispěvatel účtu úložiště a Přispěvatel dat v objektech blob služby Storage.
Vytvořte účet úložiště v předplatném Azure podle svého výběru. K vytvoření účtu můžete použít PowerShell, Azure CLI, Azure Resource Manager Template nebo Azure Portal.
Nakonfigurujte účet úložiště pomocí následujících nastavení:
-
Podrobnosti o instanci
- Oblast: Stejná oblast, ve které se z hlediska výkonu navrhuje CloudPC. Neexistuje žádné omezení pro oblast.
- Výkon: Premium (podporuje horká úroveň přístupu) nebo Standard (podporuje všechny úrovně přístupu).
- Typ účtu Premium: Objekty blob stránky
-
Zabezpečení
- Minimální verze protokolu TLS: verze 1.2.
- Ověřte, že možnost Povolit anonymní přístup k objektům blob je zakázaná (výchozí).
- Zakažte Povolit přístup ke klíči účtu úložiště.
-
Sítě
- Přístup k síti: Povolení veřejného přístupu ze všech sítí
VOLITELNÉ: Pokud chcete zkopírovat účet úložiště zkopírovaný do neměnného úložiště, nastavte tato pole:
- Vyberte Povolit správu verzí pro objekty blob.
- Vyberte Povolit podporu neměnnosti na úrovni verze.
- Pokud je vybraná možnost Výkon Úrovně Premium, musí být vybráno také zónově redundantní úložiště (ZRS). Místně redundantní úložiště (LRS) není podporovaná možnost neměnného úložiště.
NEPODPOROVÁNO: Nastavení rozsahu povolení pro operace kopírování. Aby bylo možné kopírování z libovolného účtu úložiště do cílového účtu, musí být výchozí hodnota (null).
-
Podrobnosti o instanci
Přiřaďte roli Azure pro přístup k datům objektů blob. Minimální oprávnění, která služba Windows 365 potřebuje ke kontrole cloudového počítače, jsou Přispěvatel účtu úložiště a Přispěvatel dat v objektech blob služby Storage.
Kontrola cloudového počítače
Po nastavení účtu úložiště Azure s oprávněními, jak je vysvětleno výše, můžete cloudový počítač zkontrolovat pomocí následujícího postupu:
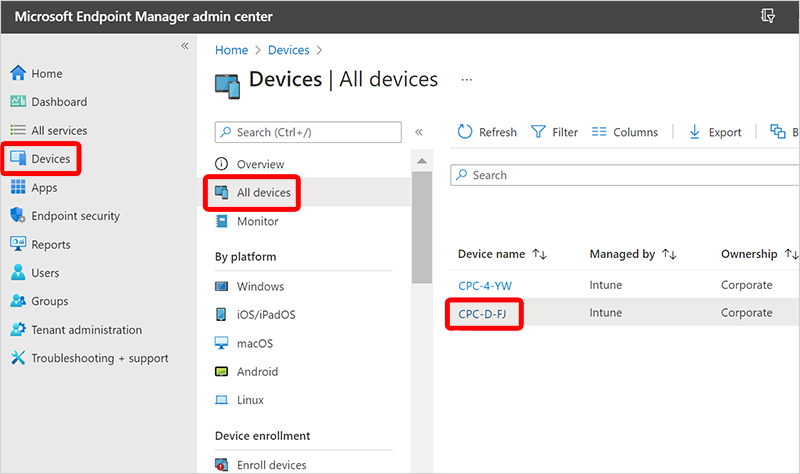
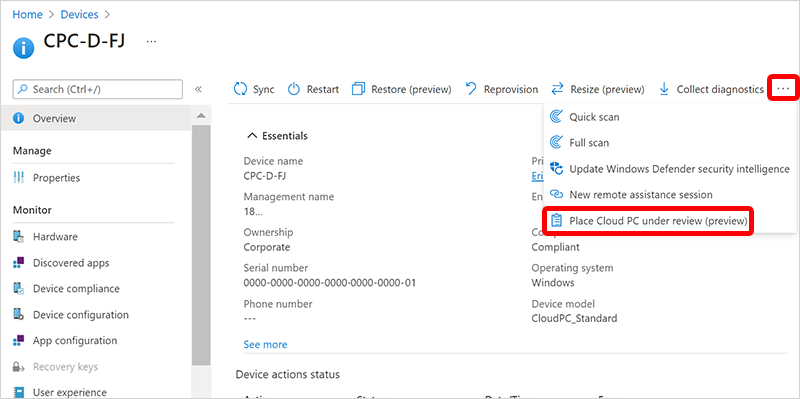
Přihlaste se do Centra pro správu Microsoft Intune a vyberte Zařízení>Všechna zařízení> zvolte zařízení.

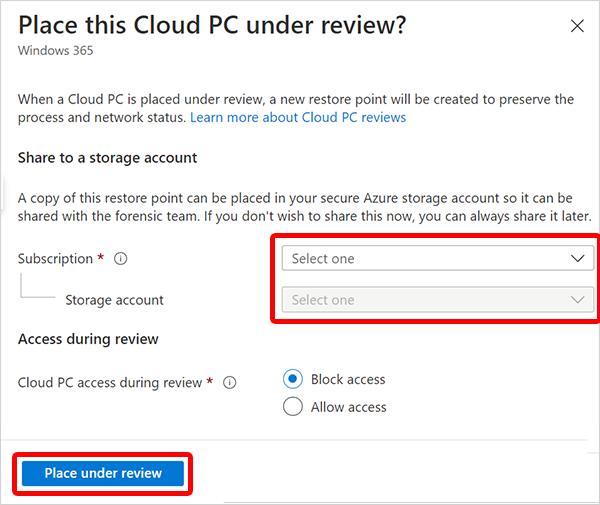
Vyberte úroveň předplatného, účtu úložiště a přístupu (nejvyšší náklady na horkou, zatímco nejnižší náklady na archivaci), ke kterým měla služba Windows 365 oprávnění Přispěvatel účtu úložiště a Přispěvatel dat v objektech blob služby Storage.
Virtuální počítač může připojit jenom objekty blob stránky horké vrstvy. Všechny ostatní vrstvy jsou objekty blob bloku, které je potřeba převést na objekt blob stránky, pokud potřebujete připojit disk k virtuálnímu počítači. Archivní úroveň je offline úroveň, takže před převodem na objekt blob stránky je nutné provést dosazování na online vrstvu.
Úrovně účtu úložiště s výkonem Úrovně Standard: U účtu úložiště s výkonem úrovně Standard může být úroveň objektu blob, který se kopíruje z Windows 365 do vašeho účtu úložiště, jiná. Pokud nastavíte účet úložiště horké vrstvy, ostatní objekty budou ve výchozím nastavení horké. Můžete ale nastavit, aby obrázek počítače Cloud PC pod kontrolou byl studený, studený nebo archivní.
Úrovně účtu Premium Performance Storage: Výkon Premium je vždy účet úložiště horké úrovně. U účtů úložiště s výkonem Premium se ignoruje rozevírací nabídka pro úroveň přístupu.
Pokud v části Přístup během kontroly zvolíte
- Blokovat přístup, cloudový počítač se okamžitě vypne, aby uživatel nemohl získat přístup ke cloudovým počítačům, a pak se vytvoří snímek. To je užitečné v případech, kdy byste chtěli zadržet bezpečnostní hrozbu vypnutím cloudového počítače a následnou analýzou snímku v izolovaném prostředí.
- Povolit přístup: Uživatel cloudového počítače může cloudový počítač dál používat, i když v účtu úložiště vytváříte snímek.

Vyberte Umístit pod kontrolu. V závislosti na velikosti disku cloudového počítače a cílové oblasti účtu úložiště se může doba uložení každého snímku do účtu úložiště pohybovat v řádu minut až několika hodin. Například pro účet úložiště ve stejné oblasti Azure může trvat až jednu hodinu nebo déle na 128 GB dat na disku.
Pokud chcete, aby byl snímek po uložení v účtu úložiště zřejmý, měli byste vytvořit hodnotu hash souboru snímku. Jedním ze způsobů, jak vytvořit hodnotu hash souboru, je použít rutinu Get-FileHash . Pro zajištění nejlepšího výkonu by se rutina Get-FileHash měla spustit pro kopii staženého souboru nebo se spustit pro snímek v účtu úložiště Azure z prostředku umístěného ve stejné oblasti Azure.
Odebrání cloudového počítače z kontroly
Přihlaste se do Centra pro správu Microsoft Intune a vyberte Zařízení>Všechna zařízení> zvolte zařízení >...>Odebrat z revize.
Hromadné akce
Pomocí hromadných akcí zařízení Intune můžete také zkontrolovat více cloudových počítačů najednou. Další informace najdete v tématu Použití hromadných akcí zařízení.
Poznámka
Současně je možné kontrolovat až 10 cloudových počítačů. Pokud se najednou zkontroluje více než 10 požadavků, zařadí se do fronty a pokud požadavek zůstane ve frontě příliš dlouho, může se časový limit zvýšit. Pokud dochází k vypršení časových limitů, doporučujeme požadavky rozmístit, abyste měli dostatek času na dokončení předchozích požadavků jako první. Časy dokončení budou záviset na velikosti disku Cloud PC a také na umístění a typu vašeho účtu Azure Storage.
Správa pomocí rozhraní API
Pomocí Graph API můžete cloudový počítač umístit nebo odebrat z kontroly. Další informace najdete v tématu managedDevice: setCloudPcReviewStatus.
Další kroky
Přečtěte si další informace o digitální forenzní službě a cloudových počítačích.
