Network migration - Consolidate multiple Viva Engage networks
If you have multiple email domains in your Microsoft 365 tenant, and those email domains support two or more Viva Engage networks, you must consolidate your Viva Engage networks into a single one. For example, if your company has multiple business units or subsidiaries, each with its own Viva Engage network on the same tenant, you must consolidate those networks.
Note
Read this article if you manage multiple Viva Engage networks.
Consolidation to one primary network helps employees collaborate more closely with each other. Doing so also simplifies management of your Viva Engage network.
Here are the basic steps:
| Step |
Description |
|---|---|
| Step 1: Plan the network migration |
Identify the Viva Engage networks to consolidate, identify data to export and upload, plan any needed changes to community structure and membership in the primary network, and plan communication with your users. |
| Step 2: Export content from primary networks | IMPORTANT: Migration only migrates users, not content. To access any content later, export all content from secondary Viva Engage networks. The secondary network isn't accessible after the migration starts. |
| Step 3: Communicate with all users before the migration | Use the sample communication provided in this section to inform everyone on the secondary networks of the change, timing, what information is preserved, and the community structure in the primary network. Recommend that users save information they want to keep before the migration start date, such as files and data in conversations. Let primary network users know that more people are joining. |
| Step 4: Perform the network migration | Run the network migration tool once for each secondary network. The tool migrates all users from the secondary Viva Engage network into the primary Viva Engage network, and turns off the secondary network. It doesn't migrate any conversations or files. |
| Step 5: Make primary network changes | Adjust the structure of your primary Viva Engage network so it meets the needs of incoming users. Create communities, invite members to the communities, and upload files that you exported. |
| Step 6: Communicate with all users after the migration | Send a notification to all users that the consolidated Viva Engage network is ready to use. |
Important things to know before you start a network migration
The migration carries over active and pending users, including the users' information, such as name and profile picture. If a user exists in a primary and secondary network, the migration keeps the user's account in the primary network. If necessary, the user gets promoted from a guest account to a regular account. Viva Engage deletes the user's account in the secondary network.
The migration doesn't carry over the communities, conversations, and files from the secondary network. If you want any of this content, you must export it and upload it.
After the migration completes, access is blocked to the secondary Viva Engage network.
Only users with the global admin role in Microsoft 365 can perform network consolidation.
The primary and secondary Viva Engage networks must be on verified domains in one Microsoft 365 tenant. Consolidating Viva Engage networks across Microsoft 365 tenants isn't supported.
The migration can't be reversed.
Note
You can start multiple network migrations back-to-back, without waiting for previous ones to finish.
Step 1: Plan the network migration
Here are the main questions to ask during the planning step:
Which Viva Engage networks need to be consolidated?
Which network should be the primary network, and which are the secondaries?
What role should users have in planning the consolidation? Consider using a Viva Engage community on each secondary network to help plan the changes.
What's the timing? Do we need down-time? If so, what's the best time to schedule the consolidation?
What's the best way to communicate with the users before and after the consolidation?
What communities are necessary in the primary network for incoming users from the secondary networks? Who should be in these communities? Who should be the admins for each community?
What secondary networks' content needs to be exported and loaded onto the primary network?
Who does each each of the following tasks: export the data from the secondary network, set up the community structure in the primary network, decide what data needs to be uploaded, upload that data, and communicate with users? Do you have the resources in-house to do the tasks, or do you need a third party to help?
Data exports from a secondary network produce CSV files that contain community, user, admin, file, and conversation information, all of which are contained in a folder.
Do the following to use this exported information to upload data or to set up communities in your primary network:
Identify who can help you upload data. Someone from your secondary network must identify important content and map it to its destination in the parent network.
Identify the skill set required to bring the content into your primary network. If there's a small amount of data, you can do so manually. If the secondary network contains extensive content, find a resource who can use Windows PowerShell and the Yammer API for the following use cases:
- If you have many communities, generate the community membership changes from your secondary network before migration and to set up the communities in your parent network.
- If you want to load files or messages from the secondary network, write scripts to load the data.
Identify tasks that your local team can manage:
- If you need to create new communities with specific people from a secondary network, or add users from your secondary network to existing communities in your primary network, create CSV files for each community that contain the members to invite.
- If you have just a few communities to add or modify, you can create these lists before migration (see Export data from Viva Engage. For each community, you can invite members from your primary network after migration.
Step 2: Export content from primary networks
To export all Viva Engage data for a secondary network, see Export data from Viva Engage.
You can upload exported files to the primary network. You must create a mapping between the file name and the location for the file in your primary network.
Community names and memberships aren't migrated. You can use the exported lists of communities and users to help you create appropriate communities in the primary network.
Conversations aren't migrated, so secondary network users must save any needed data from conversations.
Step 3: Communicate with all users before the migration
Use the sample communications to let everyone on the secondary networks know the purpose and timing of the change, the information that the migration keeps and eliminates, and the community structure in the primary network. Always recommend that users save information they want to keep before the migration start date, such as files and data in conversations. Let primary network users know that more people are joining.
To communicate with all users on a network, use the Viva Engage All Company community. If you contact people by email, export the Viva Engage users list. For instructions, see Export data from Viva Engage. You can get the email addresses for a specific community by exporting Viva Engage community members to a CSV file.
Sample pre-migration communications to people currently using secondary Viva Engage networks
We're consolidating all of our Viva Engage networks to communicate more easily with each other. The migration starts on [date]. After the migration completes, when you access Viva Engage with your regular work email address, you'll go directly to the new consolidated Viva Engage network.
Important tasks to do before [date]:
Save any files and conversations you want to keep. The consolidation doesn't move your Viva Engage content from [Contoso_sub1.com] to the [Contoso.com] Viva Engage network.
Save files:
In Viva Engage, select the Settings icon, and then select Files.
Use the My Files section to find your files.
Next to each file you want to save, select the down arrow, and then Download.
Choose a location, and select Save.
Save data from private conversations:
In Viva Engage, select your Inbox, and then select Private Messages.
Open a message and review the content of the conversation.
Copy and paste any needed information into a file.
Down time:
Don't use the [Contoso.com] Viva Engage network from [date] to [date]. We're adding communities and community files from the [Contoso.sub] network. You'll get another email from us when everything is ready.
Sample message for people using the primary Viva Engage network
We're pleased to announce that all [Contoso] users from [Contoso_sub1] and [Contsoso_sub2] are joining us on the [Contoso.com] Viva Engage network.
Starting [date], you'll see some changes to our community structure and some new communities, and more people. [List the changes]
If you have questions or concerns, or just want to welcome [Contoso_sub1] and [Contoso_sub2] staff, join the new "One company - one Viva Engage network" community. We want your input to help everyone's voice be heard on our new consolidated network.
Step 4: Perform the network migration
Important
Before you start, ensure you export the data from secondary networks and communicate with their users!
The network migration guides you through three steps. You can also start multiple network migrations back-to-back, without waiting for the previous ones to finish. Start from the primary network (the network into which you want to migrate the other networks).
Run the Network Migration tool
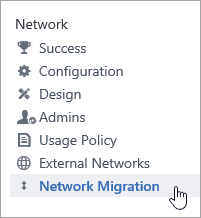
In the primary Viva Engage network, go to Settings > Network Admin.
Choose Network Migration.
You start on the page with the title Step 1 of 3 - Check/Add Verified Domains. This page lists the verified domains that are added to the Microsoft 365 tenant for this Viva Engage network. If you don't see the network you want, take the steps in add a domain to Microsoft 365, and then return to this page.
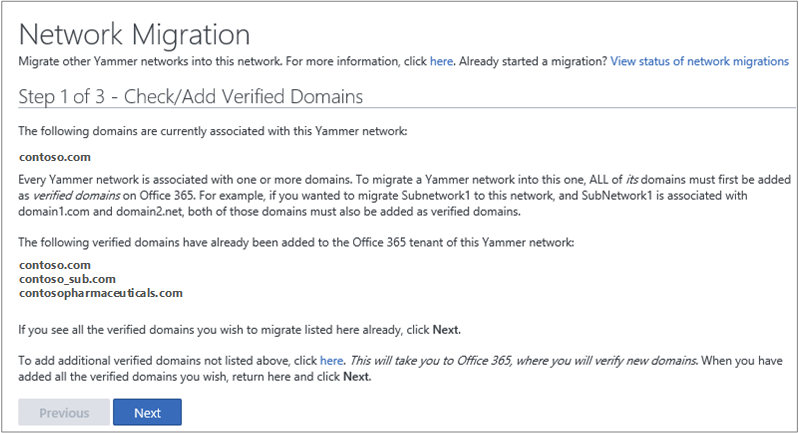
After you add all verified domains, choose Next.
The Step 2 of 3 - Choose a Viva Engage Network to Migrate page opens. This page lists all the networks that are eligible for migration. Remember, all domains of a migrating Viva Engage network must be added as verified domains on Microsoft 365. It lists only the verified Viva Engage network domains. If you don't see the network you're looking for, choose the Previous button and add the verified domain.
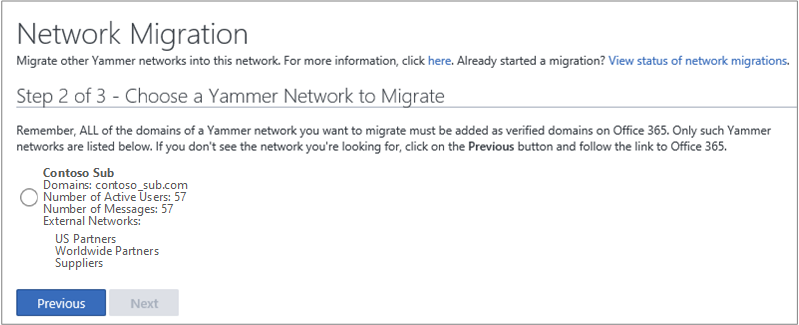
On the Step 2 of 3 - Choose a Viva Engage Network to Migrate page, select the secondary Viva Engage network that you want to migrate into this network, and then choose Next.
The Step 3 of 3 - Export Data & Start Migration page opens. This page gives you information about the network you're about to migrate, so you can confirm that it's the right network. Active and pending users migrate. All other content is permanently deleted.
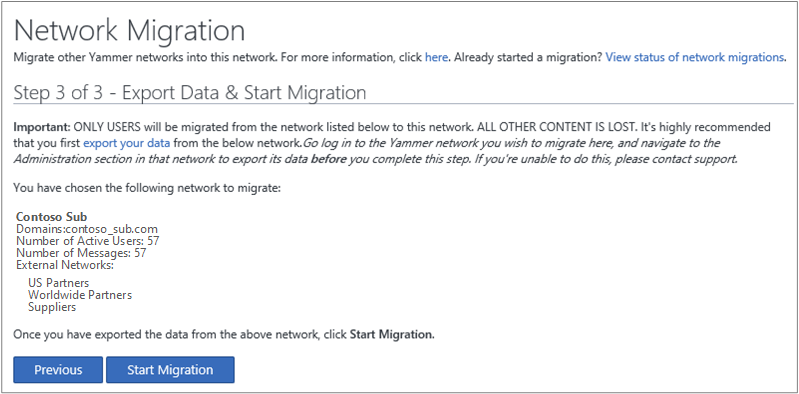
When you export the data you want, and you're ready to begin the migration, choose Start Migration.
A confirmation dialog box appears.
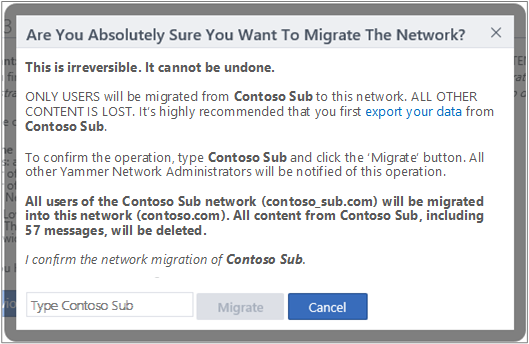
In the Are you absolutely sure you want to migrate the network? box, under I confirm the network migration of Network Name, enter the name of the network you want to migrate to confirm it, and then choose Migrate.
Caution
You can't stop or reverse the migration. Before you select Migrate, be sure you export all necessary data and that you choose the correct network to migrate. If you're unsure, choose Cancel and verify your data export. Also, check the network name.
After you migrate a Viva Engage network, all content and data in the secondary network will be lost. Make sure to export any files or documents you wish to keep before initiating the migration.
On the Status of network migrations page, you can view the status for the migration. The status lists the following information:
- The domains associated with the migrating networks
- The person who initiated the migration
- The Start and Completed dates and times for the migration
- The current status of the migration.
You can see details about the network, including the number of active users, the number of messages, and the external networks.

You can start multiple network migrations sequentially, without waiting for previous ones to finish. You can immediately start another migration through a new wizard run.
View status of network migration
The network migration process works as shown in the following illustration.
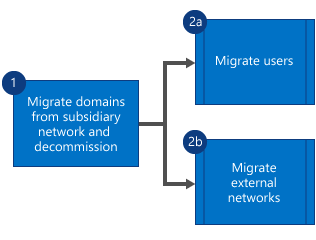
In step 1, the secondary network domains migrate and the secondary network is decommissioned. In step 2, active and pending users and external networks migrate in parallel. Even if a subset of users or external networks doesn't migrate, the migration itself continues. Find more details/errors on the Status page.
The migration status page can show the following error messages.
| Error message | What it means |
|---|---|
| Failed to migrate source network name |
The secondary network's migration didn't succeed. |
| Failed to migrate user email |
If one or more users fail to migrate, error messages appear. You can manually add the user to the primary network. The secondary network successfully migrated. |
| Failed to migrate external network name |
If one or more external networks failed to migrate, one or more error messages appear. The secondary network successfully migrated. |
To troubleshoot further, contact Viva Engage support.
Step 5: Make primary network change
Create communities
Use the communities.csv and users.csv data to identify communities that might be needed in the primary network, and to invite the new users to those communities. You can do it manually or create a Windows PowerShell script.
Upload files
In data exports, files are named with their Viva Engage ID, rather than their file name. The Files.csv file lists each file name and location. You can create a Windows PowerShell script to rename the exported files and load them into the correct location in the primary network.
Step 6: Communicate with all users after the migration
Use this communication to reinforce how you want people to use Viva Engage.
Sample post-migration communication
We're ready to start collaborating more efficiently! Sign in to Viva Engage today, using your [Contoso.com] email and regular password for that account. If you need your password reset for that account, contact [IT department]. We restructured the communities so that the content works for everyone, so take some time to browse the communities and join the ones that make sense for you.
Questions or concerns? Join the new "One company - one Viva Engage network" community. We want your input to make our new consolidated network help your voice be heard.