偵測和追蹤多個觸控點
下列步驟說明如何使用 Windows Touch 追蹤多個觸控點。
- 建立應用程式並啟用 Windows Touch。
- 新增 WM_TOUCH 和追蹤點的處理程式。
- 繪製點。
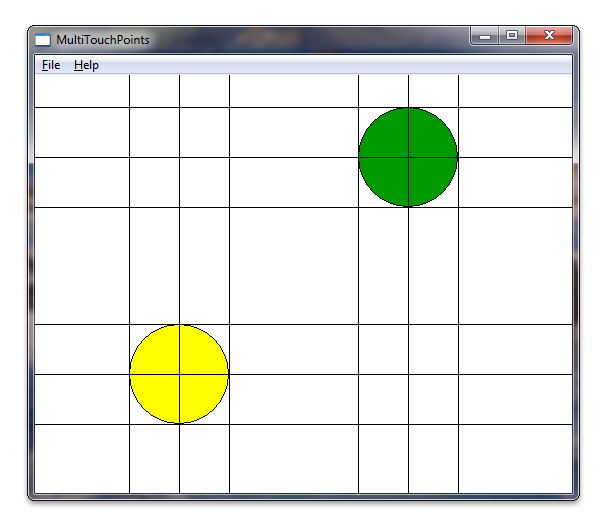
當您的應用程式執行之後,它會在每個觸控下顯示圓。 下列螢幕快照顯示應用程式在執行時的外觀。
建立應用程式並啟用 Windows Touch
使用 Microsoft Visual Studio 精靈,從 Microsoft Win32 應用程式開始。 完成精靈之後,請在 targetver.h 中設定 Windows 版本,並在您的應用程式中包含 windows.h 和 windowsx.h,以新增 Windows Touch 訊息的支援。 下列程式代碼示範如何在 targetver.h 中設定 Windows 版本。
#ifndef WINVER                  // Specifies that the minimum required platform is Windows 7.
#define WINVER 0x0601           // Change this to the appropriate value to target other versions of Windows.
#endif

#ifndef _WIN32_WINNT            // Specifies that the minimum required platform is Windows 7.
#define _WIN32_WINNT 0x0601     // Change this to the appropriate value to target other versions of Windows.
#endif

#ifndef _WIN32_WINDOWS          // Specifies that the minimum required platform is Windows 98.
#define _WIN32_WINDOWS 0x0410 // Change this to the appropriate value to target Windows Me or later.
#endif

#ifndef _WIN32_IE                       // Specifies that the minimum required platform is Internet Explorer 7.0.
#define _WIN32_IE 0x0700        // Change this to the appropriate value to target other versions of IE.
#endif
以下程式碼展示如何新增 include 指令。 此外,您也可以建立稍後將使用的一些全域變數。
#include <windows.h>    // included for Windows Touch
#include <windowsx.h>   // included for point conversion

#define MAXPOINTS 10

// You will use this array to track touch points
int points[MAXPOINTS][2];

// You will use this array to switch the color / track ids
int idLookup[MAXPOINTS];


// You can make the touch points larger
// by changing this radius value
static int radius      = 50;

// There should be at least as many colors
// as there can be touch points so that you
// can have different colors for each point
COLORREF colors[] = { RGB(153,255,51),
                      RGB(153,0,0),
                      RGB(0,153,0),
                      RGB(255,255,0),
                      RGB(255,51,204),
                      RGB(0,0,0),
                      RGB(0,153,0),
                      RGB(153, 255, 255),
                      RGB(153,153,255),
                      RGB(0,51,153)
                    };
新增 WM_TOUCH 事件和追蹤點的處理程式。
首先,宣告 WndProc中 WM_TOUCH 處理程式所使用的一些變數。
int wmId, wmEvent, i, x, y;

UINT cInputs;
PTOUCHINPUT pInputs;
POINT ptInput;
現在,初始化用來儲存觸控點的變數,並註冊來自 initInstance 方法 觸控輸入的視窗。
BOOL InitInstance(HINSTANCE hInstance, int nCmdShow)
{
   HWND hWnd;

   hInst = hInstance; // Store instance handle in our global variable

   hWnd = CreateWindow(szWindowClass, szTitle, WS_OVERLAPPEDWINDOW,
      CW_USEDEFAULT, 0, CW_USEDEFAULT, 0, NULL, NULL, hInstance, NULL);

   if (!hWnd) {
      return FALSE;
   }

   // register the window for touch instead of gestures
   RegisterTouchWindow(hWnd, 0);

   // the following code initializes the points
   for (int i=0; i< MAXPOINTS; i++){
     points[i][0] = -1;
     points[i][1] = -1;
     idLookup[i]  = -1;
   }

   ShowWindow(hWnd, nCmdShow);
   UpdateWindow(hWnd);

   return TRUE;
}
接下來,處理來自 WndProc 方法的 WM_TOUCH 訊息。 下列程式代碼顯示 WM_TOUCH處理程式的實作。
case WM_TOUCH:
  cInputs = LOWORD(wParam);
  pInputs = new TOUCHINPUT[cInputs];
  if (pInputs){
    if (GetTouchInputInfo((HTOUCHINPUT)lParam, cInputs, pInputs, sizeof(TOUCHINPUT))){
      for (int i=0; i < static_cast<INT>(cInputs); i++){
        TOUCHINPUT ti = pInputs[i];
        index = GetContactIndex(ti.dwID);
        if (ti.dwID != 0 && index < MAXPOINTS){
          // Do something with your touch input handle
          ptInput.x = TOUCH_COORD_TO_PIXEL(ti.x);
          ptInput.y = TOUCH_COORD_TO_PIXEL(ti.y);
          ScreenToClient(hWnd, &ptInput);

          if (ti.dwFlags & TOUCHEVENTF_UP){
            points[index][0] = -1;
            points[index][1] = -1;

            // Remove the old contact index to make it available for the new incremented dwID.
            // On some touch devices, the dwID value is continuously incremented.
            RemoveContactIndex(index);
          }else{
            points[index][0] = ptInput.x;
            points[index][1] = ptInput.y;
          }
        }
      }

      InvalidateRect(hWnd, NULL, FALSE);
    }
    // If you handled the message and don't want anything else done with it, you can close it
    CloseTouchInputHandle((HTOUCHINPUT)lParam);
    delete [] pInputs;
  }else{
    // Handle the error here
  }
注意
若要使用 ScreenToClient 函式,您必須在應用程式中支援高 DPI。 如需支援高 DPI 的詳細資訊,請參閱 高 DPI。
現在當使用者觸碰螢幕時,會儲存在點陣列中。 dwID 是 TOUCHINPUT 結構中的一個成員,其存儲的標識碼將依賴於硬體。
為了解決依賴硬體的 dwID 成員問題,WM_TOUCH 案例處理程式 會使用函式 GetContactIndex,將 TOUCHINPUT 結構 dwID 成員對應到畫面上繪製的點。 下列程式代碼顯示此函式的實作。
// This function is used to return an index given an ID
int GetContactIndex(int dwID){
  for (int i = 0; i < MAXPOINTS; i++) {
      if (idLookup[i] == dwID) {
          return i;
      }
  }

  for (int i = 0; i < MAXPOINTS; i++) {
      if (idLookup[i] == -1) {
          idLookup[i] = dwID;
          return i;
      }
  }
  // Out of contacts
  return -1;
}

// Mark the specified index as initialized for new use
BOOL RemoveContactIndex(int index) {
    if (index >= 0 && index < MAXPOINTS) {
        idLookup[index] = -1;
        return true;
    }

    return false;
}
重要
Windows 11 和更新版本
根據預設,某些三指和四指觸控互動將無法在 Windows 應用程式中運作。
根據預設,系統現在會針對切換或最小化視窗和變更虛擬桌面等作業使用三指和四指觸控互動。 由於這些互動現在會在系統層級處理,因此您的應用程式功能可能會受到這項變更的影響。
為了支援應用程式內的三指或四指互動,引進了新的使用者設定,指定系統是否處理這些互動:
藍牙 & 裝置 > 觸控 >「三指和四指觸控手勢」
當設定為 [開啟] 時,系統會處理所有三指和四指互動(應用程式將無法支持它們)。
當設定為 「關閉」時,應用程式可以支援三指和四指互動(系統不會處理它們)。
如果您的應用程式必須支持這些互動,建議您通知使用者此設定,並提供連結,以啟動 [設定] 應用程式至相關頁面 (ms-settings:devices-touch)。 如需詳細資訊,請參閱 Launcher.LaunchUriAsync 方法。
繪製點
為繪圖例程宣告下列變數。
    // For double buffering
    static HDC memDC       = 0;
    static HBITMAP hMemBmp = 0;
    HBITMAP hOldBmp        = 0;

    // For drawing / fills
    PAINTSTRUCT ps;
    HDC hdc;
    HBRUSH hBrush;

    // For tracking dwId to points
    int index;
使用記憶體顯示內容 memDC 來儲存暫存圖形內容,這些內容與轉譯顯示內容 hdc交換,以消除閃爍。 實作繪圖例程,其會採用您儲存的點,並在點上繪製圓形。 下列程式代碼示範如何實作 WM_PAINT 處理程式。
  case WM_PAINT:
    hdc = BeginPaint(hWnd, &ps);
    RECT client;
    GetClientRect(hWnd, &client);

    // start double buffering
    if (!memDC){
      memDC = CreateCompatibleDC(hdc);
    }
    hMemBmp = CreateCompatibleBitmap(hdc, client.right, client.bottom);
    hOldBmp = (HBITMAP)SelectObject(memDC, hMemBmp);

    hBrush = CreateSolidBrush(RGB(255, 255, 255));
    FillRect(memDC, &client, hBrush);
    DeleteObject(hBrush);

    //Draw Touched Points
    for (i=0; i < MAXPOINTS; i++){
      hBrush = CreateSolidBrush(colors[i]);
      SelectObject( memDC, hBrush);

      x = points[i][0];
      y = points[i][1];
      if  (x >0 && y>0){
        Ellipse(memDC, x - radius, y - radius, x+ radius, y + radius);
      }

      DeleteObject(hBrush);
    }

    BitBlt(hdc, 0,0, client.right, client.bottom, memDC, 0,0, SRCCOPY);
    EndPaint(hWnd, &ps);

    SelectObject(memDC, hOldBmp);
    DeleteObject(hMemBmp);

    break;
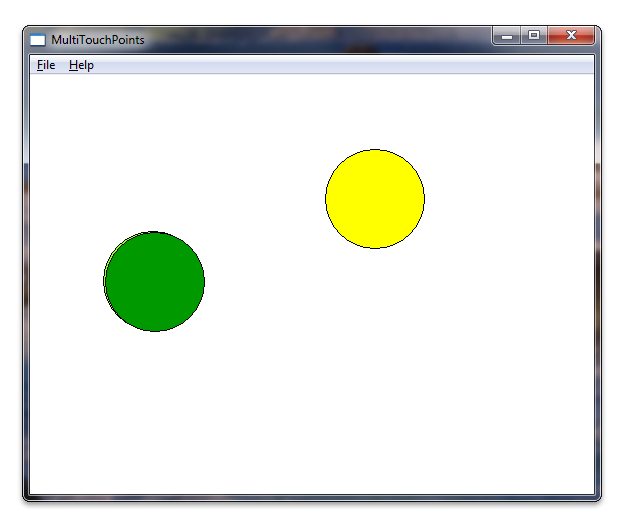
當您執行應用程式時,現在應該看起來像本節開頭的圖例。
為了有趣,您可以在觸控點周圍繪製一些額外的線條。 下列螢幕快照顯示應用程式在圓形周圍繪製幾條額外線條後的樣子。