如何將用戶端繪圖效果新增至文字版面配置
提供簡短教學課程,說明如何使用IDWriteTextLayout介面和自訂文字轉譯器,將用戶端繪圖效果新增至DirectWrite應用程式。
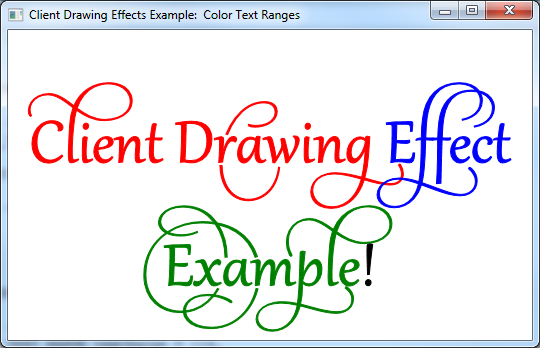
本教學課程的結束產品是一個應用程式,其會顯示文字範圍,每個文字都有不同色彩繪圖效果,如下列螢幕擷取畫面所示。

注意
本教學課程旨在簡化如何建立自訂用戶端繪圖效果的範例,而不是繪製色彩文字的簡單方法範例。 如需詳細資訊,請參閱 IDWriteTextLayout::SetDrawingEffect 參考頁面。
本教學課程包含下列部分:
- 步驟 1:建立文字版面配置
- 步驟 2:實作自訂繪圖效果類別
- 步驟 3:實作自訂文字轉譯器類別
- 步驟 4:建立文字轉譯器
- 步驟 5:具現化色彩繪圖效果物件
- 步驟 6:設定特定文字範圍的繪圖效果
- 步驟 7:使用自訂轉譯器繪製文字版面配置
- 步驟 8:清除
步驟 1:建立文字版面配置
若要開始,您將需要具有 IDWriteTextLayout 物件的應用程式。 如果您已經有顯示文字版面配置的應用程式,或使用自訂 DrawingEffect 範例程式碼,請跳至步驟 2。
若要新增文字配置,您必須執行下列動作:
將 IDWriteTextLayout 介面的指標宣告為 類別的成員。
IDWriteTextLayout* pTextLayout_;在CreateDeviceIndependentResources方法的結尾,呼叫CreateTextLayout方法建立IDWriteTextLayout介面物件。
// Create a text layout using the text format.
if (SUCCEEDED(hr))
{
    RECT rect;
    GetClientRect(hwnd_, &rect);
    float width  = rect.right  / dpiScaleX_;
    float height = rect.bottom / dpiScaleY_;

    hr = pDWriteFactory_->CreateTextLayout(
        wszText_,      // The string to be laid out and formatted.
        cTextLength_,  // The length of the string.
        pTextFormat_,  // The text format to apply to the string (contains font information, etc).
        width,         // The width of the layout box.
        height,        // The height of the layout box.
        &pTextLayout_  // The IDWriteTextLayout interface pointer.
        );
}
最後,請記得在解構函式中釋放文字配置。
SafeRelease(&pTextLayout_);
步驟 2:實作自訂繪圖效果類別
除了繼承自 IUnknown 的方法以外,自訂用戶端繪圖效果介面不需要它必須實作的內容。 在此情況下, ColorDrawingEffect 類別只會保留 D2D1_COLOR_F 值,並宣告方法來取得和設定此值,以及一開始可以設定色彩的建構函式。
在用戶端繪圖效果套用至 IDWriteTextLayout 物件中的文字範圍之後,繪圖效果會傳遞至要轉譯之任何圖像執行的 IDWriteTextRenderer::D rawGlyphRun 方法。 繪圖效果的方法接著可供文字轉譯器使用。
用戶端繪圖效果可能很複雜,因為您想要讓它變得複雜,而且會比此範例中更多的資訊,以及提供改變字元的方法、建立要用於繪圖的物件等等。
步驟 3:實作自訂文字轉譯器類別
若要利用用戶端繪圖效果,您必須實作自訂文字轉譯器。 此文字轉譯器會將 IDWriteTextLayout::D raw 方法傳遞的繪圖效果套用至所繪製的字元執行。
建構函式
自訂文字轉譯器的建構函式會儲存用來建立Direct2D物件的ID2D1Factory物件,以及將繪製文字的 Direct2D 轉譯目標。
CustomTextRenderer::CustomTextRenderer(
    ID2D1Factory* pD2DFactory,
    ID2D1HwndRenderTarget* pRT
    )
:
cRefCount_(0),
pD2DFactory_(pD2DFactory),
pRT_(pRT)
{
    pD2DFactory_->AddRef();
    pRT_->AddRef();
}
DrawGlyphRun 方法
字元回合是一組共用相同格式的字元,包括用戶端繪圖效果。 DrawGlyphRun方法會處理指定字元執行的文字轉譯。
首先,建立 ID2D1PathGeometry 和 ID2D1GeometrySink,然後使用 IDWriteFontFace::GetGlyphRunOutline擷取字元執行大綱。 然後使用 Direct2DID2D1Factory::CreateTransformedGeometry 方法轉換幾何的來源,如下列程式碼所示。
HRESULT hr = S_OK;

// Create the path geometry.
ID2D1PathGeometry* pPathGeometry = NULL;
hr = pD2DFactory_->CreatePathGeometry(
        &pPathGeometry
        );

// Write to the path geometry using the geometry sink.
ID2D1GeometrySink* pSink = NULL;
if (SUCCEEDED(hr))
{
    hr = pPathGeometry->Open(
        &pSink
        );
}

// Get the glyph run outline geometries back from DirectWrite and place them within the
// geometry sink.
if (SUCCEEDED(hr))
{
    hr = glyphRun->fontFace->GetGlyphRunOutline(
        glyphRun->fontEmSize,
        glyphRun->glyphIndices,
        glyphRun->glyphAdvances,
        glyphRun->glyphOffsets,
        glyphRun->glyphCount,
        glyphRun->isSideways,
        glyphRun->bidiLevel%2,
        pSink
        );
}

// Close the geometry sink
if (SUCCEEDED(hr))
{
    hr = pSink->Close();
}

// Initialize a matrix to translate the origin of the glyph run.
D2D1::Matrix3x2F const matrix = D2D1::Matrix3x2F(
    1.0f, 0.0f,
    0.0f, 1.0f,
    baselineOriginX, baselineOriginY
    );

// Create the transformed geometry
ID2D1TransformedGeometry* pTransformedGeometry = NULL;
if (SUCCEEDED(hr))
{
    hr = pD2DFactory_->CreateTransformedGeometry(
        pPathGeometry,
        &matrix,
        &pTransformedGeometry
        );
}
接下來,宣告 Direct2D 實心筆刷物件。
ID2D1SolidColorBrush* pBrush = NULL;
如果 clientDrawingEffect 參數不是 Null,請查詢 ColorDrawingEffect 介面的物件。 這會正常運作,因為您將這個類別設定為對文字版面設定物件的文字範圍進行用戶端繪圖效果。
一旦您有ColorDrawingEffect介面的指標,您就可以使用GetColor方法擷取其所儲存的D2D1_COLOR_F值。 然後,使用 D2D1_COLOR_F 以該色彩建立 ID2D1SolidColorBrush 。
如果 clientDrawingEffect 參數為 Null,則只要建立黑色 ID2D1SolidColorBrush。
// If there is a drawing effect create a color brush using it, otherwise create a black brush.
if (clientDrawingEffect != NULL)
{
    // Go from IUnknown to ColorDrawingEffect.
    ColorDrawingEffect *colorDrawingEffect;

    clientDrawingEffect->QueryInterface(__uuidof(ColorDrawingEffect), reinterpret_cast<void**>(&colorDrawingEffect));

    // Get the color from the ColorDrawingEffect object.
    D2D1_COLOR_F color;

    colorDrawingEffect->GetColor(&color);

    // Create the brush using the color pecified by our ColorDrawingEffect object.
    if (SUCCEEDED(hr))
    {
        hr = pRT_->CreateSolidColorBrush(
            color,
            &pBrush);
    }

    SafeRelease(&colorDrawingEffect);
}
else
{
    // Create a black brush.
    if (SUCCEEDED(hr))
    {
        hr = pRT_->CreateSolidColorBrush(
            D2D1::ColorF(
            D2D1::ColorF::Black
            ),
            &pBrush);
    }
}
最後,繪製外框幾何,並使用您剛才建立的純色筆刷填滿。
if (SUCCEEDED(hr))
{
    // Draw the outline of the glyph run
    pRT_->DrawGeometry(
        pTransformedGeometry,
        pBrush
        );

    // Fill in the glyph run
    pRT_->FillGeometry(
        pTransformedGeometry,
        pBrush
        );
}
解構函式
別忘了釋放解構函式中的 Direct2D 處理站和轉譯目標。
CustomTextRenderer::~CustomTextRenderer()
{
    SafeRelease(&pD2DFactory_);
    SafeRelease(&pRT_);
}
步驟 4:建立文字轉譯器
在 CreateDeviceDependent 資源中,建立自訂文字轉譯器物件。 它是裝置相依的,因為它使用 ID2D1RenderTarget,這是本身的裝置相依性。
// Create the text renderer
pTextRenderer_ = new CustomTextRenderer(
                        pD2DFactory_,
                        pRT_
                        );
步驟 5:具現化色彩繪圖效果物件
以紅色、綠色和藍色將 ColorDrawingEffect 物件具現化。
// Instantiate some custom color drawing effects.
redDrawingEffect_ = new ColorDrawingEffect(
    D2D1::ColorF(
        D2D1::ColorF::Red
        )
    );

blueDrawingEffect_ = new ColorDrawingEffect(
    D2D1::ColorF(
        D2D1::ColorF::Blue
        )
    );

greenDrawingEffect_ = new ColorDrawingEffect(
    D2D1::ColorF(
        D2D1::ColorF::Green
        )
    );
步驟 6:設定特定文字範圍的繪圖效果
使用 IDWriteTextLayou::SetDrawingEffect 方法和 DWRITE_TEXT_RANGE 結構,設定特定文字範圍的繪圖效果。
// Set the drawing effects.

// Red.
if (SUCCEEDED(hr))
{
    // Set the drawing effect for the specified range.
    DWRITE_TEXT_RANGE textRange = {0,
                                   14};
    if (SUCCEEDED(hr))
    {
        hr = pTextLayout_->SetDrawingEffect(redDrawingEffect_, textRange);
    }
}

// Blue.
if (SUCCEEDED(hr))
{
    // Set the drawing effect for the specified range.
    DWRITE_TEXT_RANGE textRange = {14,
                                   7};
    if (SUCCEEDED(hr))
    {
        hr = pTextLayout_->SetDrawingEffect(blueDrawingEffect_, textRange);
    }
}

// Green.
if (SUCCEEDED(hr))
{
    // Set the drawing effect for the specified range.
    DWRITE_TEXT_RANGE textRange = {21,
                                   8};
    if (SUCCEEDED(hr))
    {
        hr = pTextLayout_->SetDrawingEffect(greenDrawingEffect_, textRange);
    }
}
步驟 7:使用自訂轉譯器繪製文字版面配置
您必須呼叫 IDWriteTextLayout::D raw 方法,而不是 ID2D1RenderTarget::D rawText 或 ID2D1RenderTarget::D rawTextLayout 方法。
// Draw the text layout using DirectWrite and the CustomTextRenderer class.
hr = pTextLayout_->Draw(
        NULL,
        pTextRenderer_,  // Custom text renderer.
        origin.x,
        origin.y
        );
步驟 8:清除
在 DemoApp 解構函式中,釋放自訂文字轉譯器。
SafeRelease(&pTextRenderer_);
之後,新增程式碼以釋放用戶端繪圖效果類別。
SafeRelease(&redDrawingEffect_);
SafeRelease(&blueDrawingEffect_);
SafeRelease(&greenDrawingEffect_);