新增控制項
注意
本主題屬於<使用 DirectX 建立簡單的通用 Windows 平台 (UWP) 遊戲>教學課程系列的一部分。 該連結主題是提供這系列教學的基本背景介紹。
[已針對 Windows 10 的 UWP 應用程式進行更新。 如需 Windows 8.x 相關文章,請參閱封存檔案]
理想的通用 Windows 平台 (UWP) 遊戲可支援各種介面。 潛在玩家使用 Windows 10 的裝置可能是:沒有實體按鍵的平板電腦、連接遊戲控制器的電腦,或搭配高效能滑鼠和遊戲鍵盤的最新桌面遊戲系統。 在我們的遊戲中,控制項是在 MoveLookController 類別中實作。 此類別會將所有三種輸入 (滑鼠和鍵盤、觸控和遊戲台) 彙總為單一控制器。 成品將會是第一人稱射擊遊戲,使用一般標準外觀視角控制項,適用於多種裝置。
注意
如需有關控制項的詳細資訊,請參閱<遊戲的移動視角控制項>和<遊戲的觸控控制項>。
目標
截至目前,我們已有一個可轉譯的遊戲,但無法移動玩家或射擊目標。 本文將說明如何針對 UWP DirectX 遊戲的下列輸入類型,實作第一人稱射擊的移動視角控制項。
- 滑鼠和鍵盤
- 觸控
- 遊戲台
注意
如果您尚未下載此範例的最新遊戲程式碼,請至 Direct3D 範例遊戲頁面下載。 此範例屬於大型 UWP 功能範例集。 如需範例下載的相關指示,請參閱<適用 Windows 開發的範例應用程式>。
常見的控制項和行為
觸控控制項和滑鼠/鍵盤控制項的核心實作非常類似。 在 UWP 應用程式中,指標只是螢幕上的一個點。 移動滑鼠或在觸控螢幕上滑動手指,即可移動指標。 因此您可註冊一組事件,這樣就不必擔心玩家移動及按下指標時,使用的是滑鼠還是觸控螢幕。
初始化範例遊戲中的 MoveLookController 類別時,系統會註冊四個指標特定事件及一個滑鼠特定事件:
| 活動 | 描述 |
|---|---|
| CoreWindow::PointerPressed | 按下滑鼠左鍵或右鍵 (不放),或點選觸控介面。 |
| CoreWindow::PointerMoved | 在觸控介面移動滑鼠或拖曳動作。 |
| CoreWindow::PointerReleased | 已放開滑鼠左鍵或移開接觸觸控介面的物體。 |
| CoreWindow::PointerExited | 指標已移出主視窗。 |
| Windows::Devices::Input::MouseMoved | 滑鼠移動一段特定距離。 請注意,我們只需要滑鼠的移動差異值,而不是目前的 X-Y 位置。 |
這些事件處理常式已設為一旦 MoveLookController 在應用程式視窗中初始化,就開始接聽使用者輸入。
void MoveLookController::InitWindow(_In_ CoreWindow const& window)
{
    ResetState();

    window.PointerPressed({ this, &MoveLookController::OnPointerPressed });

    window.PointerMoved({ this, &MoveLookController::OnPointerMoved });

    window.PointerReleased({ this, &MoveLookController::OnPointerReleased });

    window.PointerExited({ this, &MoveLookController::OnPointerExited });

    ...

    // There is a separate handler for mouse-only relative mouse movement events.
    MouseDevice::GetForCurrentView().MouseMoved({ this, &MoveLookController::OnMouseMoved });

    ...
}
在 GitHub 上可查看完整的 InitWindow 的程式碼。
為判斷遊戲何時應接聽特定輸入,MoveLookController 類別有三個控制器特定狀態 (不論控制器類型為何):
| State | 描述 |
|---|---|
| None | 這是控制器的初始化狀態。 由於遊戲未預期任何控制器輸入,因此會忽略所有輸入。 |
| WaitForInput | 控制器正在等候玩家以滑鼠左鍵、觸控事件或遊戲台的功能表按鍵確認遊戲訊息。 |
| 使用中 | 控制器處於使用中的遊戲模式。 |
WaitForInput 狀態和暫停遊戲
遊戲在暫停時進入 WaitForInput 狀態。 玩家將指標移至遊戲主視窗外,或按下暫停按鈕 (P 鍵或遊戲台的 [開始] 按鍵),就會發生這種情況。 MoveLookController 會註冊該按下事件,並在呼叫 IsPauseRequested 方法時通知遊戲迴圈。 此時如果 IsPauseRequested 傳回true,遊戲迴圈接著會對 MoveLookController 呼叫 WaitForPress,使控制器處於 WaitForInput 狀態。
一旦處於 WaitForInput 狀態,遊戲會停止處理幾乎所有遊戲輸入事件,直到其回到 Active 狀態。 除非按下暫停按鈕,按下該按鈕會使遊戲回到使用中狀態。 除了暫停按鈕,如要讓遊戲回到 Active 狀態,玩家需要選取功能表項目。
Active (使用中) 狀態
在 Active 狀態期間,MoveLookController 執行個體會處理來自所有已啟用輸入裝置的事件,並解譯玩家的意圖。 因此,該執行個體會更新玩家檢視的速度和視角方向,並在從遊戲迴圈呼叫 Update 後,與遊戲共用已更新的資料。
所有指標輸入都在 Active 狀態下受到追蹤,並使用不同的指標識別碼對應不同的指標動作。 收到 PointerPressed 事件時,MoveLookController 會取得視窗建立的指標識別碼值。 指標識別碼代表特定類型的輸入。 例如,在多點觸控裝置上,同時可能有數個不同的輸入處於使用中狀態。 識別碼可用來追蹤玩家使用的輸入。 如果某個事件位於觸控螢幕的移動矩形中,系統會指派識別碼以追蹤移動矩形中的任何指標事件。 系統會以不同的指標識別碼個別追蹤觸發矩形中的其他指標事件。
注意
滑鼠和遊戲台右搖桿的輸入也有識別碼並個別處理。
將指標事件對應至特定遊戲動作後,即可更新 MoveLookController 物件與主要遊戲迴圈共用的資料。
呼叫範例遊戲中的 Update 方法時,系統會處理輸入並更新速度和視角方向變數 (m_velocity 和 m_lookdirection),接著遊戲迴圈會擷取這些資料,方法是呼叫 Velocity 和 LookDirection 公用方法。
注意
如需有關 Update 方法的詳細資料,本頁稍後會進一步說明。
遊戲迴圈可對 MoveLookController 執行個體呼叫 IsFiring 方法,測試玩家是否觸發動作。 MoveLookController 會檢查玩家是否已按下三種輸入的任一種觸發按鈕。
bool MoveLookController::IsFiring()
{
    if (m_state == MoveLookControllerState::Active)
    {
        if (m_autoFire)
        {
            return (m_fireInUse || (m_mouseInUse && m_mouseLeftInUse) || PollingFireInUse());
        }
        else
        {
            if (m_firePressed)
            {
                m_firePressed = false;
                return true;
            }
        }
    }
    return false;
}
接著,我們一起更深入瞭解這三種控制類型的實作方式。
新增相對滑鼠控制項
如果偵測到滑鼠移動,則可使用該動作判斷相機的新俯仰和偏航維度。 我們可透過實作相對滑鼠控制項執行此動作,在此情況下處理的是滑鼠移動的相對距離 (移動開始到停止之間的差異值),而非記錄動作的絕對 x-y 像素座標。
如要執行此動作,我們可在 MouseMoved 事件傳回的 Windows::Device::Input::MouseEventArgs::MouseDelta 引數物件中,檢視 MouseDelta::X 和 MouseDelta::Y 欄位,取得 X (水平動作) 的變化值及 Y (垂直動作) 座標。
void MoveLookController::OnMouseMoved(
    _In_ MouseDevice const& /* mouseDevice */,
    _In_ MouseEventArgs const& args
    )
{
    // Handle Mouse Input via dedicated relative movement handler.

    switch (m_state)
    {
    case MoveLookControllerState::Active:
        XMFLOAT2 mouseDelta;
        mouseDelta.x = static_cast<float>(args.MouseDelta().X);
        mouseDelta.y = static_cast<float>(args.MouseDelta().Y);

        XMFLOAT2 rotationDelta;
        // Scale for control sensitivity.
        rotationDelta.x = mouseDelta.x * MoveLookConstants::RotationGain;
        rotationDelta.y = mouseDelta.y * MoveLookConstants::RotationGain;

        // Update our orientation based on the command.
        m_pitch -= rotationDelta.y;
        m_yaw += rotationDelta.x;

        // Limit pitch to straight up or straight down.
        float limit = XM_PI / 2.0f - 0.01f;
        m_pitch = __max(-limit, m_pitch);
        m_pitch = __min(+limit, m_pitch);

        // Keep longitude in sane range by wrapping.
        if (m_yaw > XM_PI)
        {
            m_yaw -= XM_PI * 2.0f;
        }
        else if (m_yaw < -XM_PI)
        {
            m_yaw += XM_PI * 2.0f;
        }
        break;
    }
}
新增觸控支援
觸控控制項很適合支援平板電腦使用者。 此遊戲會透過區分畫面的特定區域收集觸控輸入,各區域會對應特定的遊戲內動作。 此遊戲的觸控輸入使用三個區域。
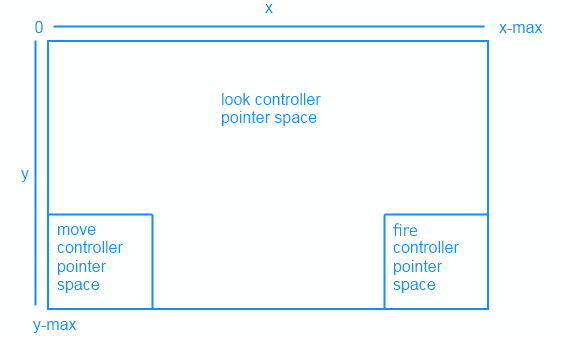
下列命令摘要說明觸控控制行為。 User input | Action :------- | :-------- Move rectangle | 觸控輸入會轉換成虛擬搖桿,其中垂直動作會轉譯為向前/向後位置動作,而水平動作會轉譯為向左/向右位置動作。 觸發矩形 | 觸發球體。 發生在移動和觸發矩形外的觸控 | 變更相機檢視的旋轉角度 (俯仰和偏航)。
MoveLookController 會檢查識別碼 ID,以判斷事件發生位置並執行下列任一動作:
- 如果 PointerMoved 事件發生在移動或觸發矩形內,請更新控制器的指標位置。
- 如果 PointerMoved 事件發生在畫面 (如視角控制項所定義) 其餘部分某處,則計算視角方向向量的俯仰和偏航變化。
實作觸控控制項後,稍早以 Direct2D 繪製的矩形就會向玩家指示移動、觸發和視角區的位置。

現在,我們來看看如何實作每個控制項。
移動和觸發控制器
螢幕左下象限中的移動控制器矩形可當成方向鍵使用。 在這個空間中,左右滑動拇指可使玩家左右移動,拇指上下滑動則可使相機前後移動。 完成此設定之後,點選螢幕右下象限中的觸發控制器可觸發球體。
SetMoveRect 和 SetFireRect 方法會建立輸入矩形,並採用兩個 2D 向量指定螢幕上每個矩形的左上角和右下角位置。
然後,系統會指派參數給 m_fireUpperLeft 和 m_fireLowerRight,以協助判斷使用者觸控的位置是否在矩形內。
m_fireUpperLeft = upperLeft;
m_fireLowerRight = lowerRight;
如果螢幕重設大小,這些矩形會重新繪製成適當的大小。
我們已區隔控制項區域,接著可判斷使用者實際使用控制項的時間。 針對使用者按下、移動或放開指標的動作,在 MoveLookController::InitWindow 方法中設定一些事件處理常式,即可做到這點。
window.PointerPressed({ this, &MoveLookController::OnPointerPressed });

window.PointerMoved({ this, &MoveLookController::OnPointerMoved });

window.PointerReleased({ this, &MoveLookController::OnPointerReleased });
我們先使用 OnPointerPressed 方法,判斷使用者在移動或觸發矩形內第一次按下控制項時發生的狀況。 此時,我們會檢查使用者點選控制項的位置,以及指標是否已在該控制器中。 如果是點選特定控制項的第一根手指,我們會執行下列動作。
- 在 m_moveFirstDown 或 m_fireFirstDown 中將觸控位置儲存為 2D 向量。
- 指派指標識別碼給 m_movePointerID 或 m_firePointerID。
- 將適當的 InUse 旗標 (m_moveInUse 或 m_fireInUse) 設為
true,因為現在已有該控制項的使用者指標。
PointerPoint point = args.CurrentPoint();
uint32_t pointerID = point.PointerId();
Point pointerPosition = point.Position();
PointerPointProperties pointProperties = point.Properties();
auto pointerDevice = point.PointerDevice();
auto pointerDeviceType = pointerDevice.PointerDeviceType();

XMFLOAT2 position = XMFLOAT2(pointerPosition.X, pointerPosition.Y);

...
case MoveLookControllerState::Active:
    switch (pointerDeviceType)
    {
    case winrt::Windows::Devices::Input::PointerDeviceType::Touch:
        // Check to see if this pointer is in the move control.
        if (position.x > m_moveUpperLeft.x &&
            position.x < m_moveLowerRight.x &&
            position.y > m_moveUpperLeft.y &&
            position.y < m_moveLowerRight.y)
        {
            // If no pointer is in this control yet.
            if (!m_moveInUse)
            {
                // Process a DPad touch down event.
                // Save the location of the initial contact
                m_moveFirstDown = position;
                // Store the pointer using this control
                m_movePointerID = pointerID;
                // Set InUse flag to signal there is an active move pointer
                m_moveInUse = true;
            }
        }
        // Check to see if this pointer is in the fire control.
        else if (position.x > m_fireUpperLeft.x &&
            position.x < m_fireLowerRight.x &&
            position.y > m_fireUpperLeft.y &&
            position.y < m_fireLowerRight.y)
        {
            if (!m_fireInUse)
            {
                // Save the location of the initial contact
                m_fireLastPoint = position;
                // Store the pointer using this control
                m_firePointerID = pointerID;
                // Set InUse flag to signal there is an active fire pointer
                m_fireInUse = true;
                ...
            }
        }
        ...
我們已經確認使用者是否點選移動或觸發控制項,接著可判斷玩家按下控制項後是否進行任何移動。 使用 MoveLookController::OnPointerMoved 方法檢查指標已移動的項目,然後將其新位置儲存為 2D 向量。
PointerPoint point = args.CurrentPoint();
uint32_t pointerID = point.PointerId();
Point pointerPosition = point.Position();
PointerPointProperties pointProperties = point.Properties();
auto pointerDevice = point.PointerDevice();

// convert to allow math
XMFLOAT2 position = XMFLOAT2(pointerPosition.X, pointerPosition.Y);

switch (m_state)
{
case MoveLookControllerState::Active:
    // Decide which control this pointer is operating.

    // Move control
    if (pointerID == m_movePointerID)
    {
        // Save the current position.
        m_movePointerPosition = position;
    }
    // Look control
    else if (pointerID == m_lookPointerID)
    {
        ...
    }
    // Fire control
    else if (pointerID == m_firePointerID)
    {
        m_fireLastPoint = position;
    }
    ...
使用者在控制項內做出手勢後,就會放開指標。 使用 MoveLookController::OnPointerReleased 方法,判斷哪個指標已放開並進行一系列的重設。
如果移動控制項已放開,我們會執行下列動作。
- 將玩家速度的所有方向都設為
0,防止他們在遊戲中移動。 - 將 m_moveInUse 切換至
false,因為使用者不再觸控移動控制器。 - 將移動指標識別碼設為
0,因為移動控制器中不再有指標。
if (pointerID == m_movePointerID)
{
    // Stop on release.
    m_velocity = XMFLOAT3(0, 0, 0);
    m_moveInUse = false;
    m_movePointerID = 0;
}
如果觸發控制項已放開,我們只需要將 m_fireInUse 旗標切換至 false,並將觸發指標識別碼設為 0 即可,因為觸發控制項不再有指標。
else if (pointerID == m_firePointerID)
{
    m_fireInUse = false;
    m_firePointerID = 0;
}
視角控制器
我們會將螢幕未使用區域中的觸控裝置指標事件視為視角控制器。 在這個區域滑動手指會改變玩家相機的俯仰和偏航 (旋轉) 角度。
如果此區域的觸控裝置上引發了 MoveLookController::OnPointerPressed 事件,且遊戲狀態設為 Active,系統會指派指標識別碼。
// If no pointer is in this control yet.
if (!m_lookInUse)
{
    // Save point for later move.
    m_lookLastPoint = position;
    // Store the pointer using this control.
    m_lookPointerID = pointerID;
    // These are for smoothing.
    m_lookLastDelta.x = m_lookLastDelta.y = 0;
    m_lookInUse = true;
}
此時,對於引發事件的指標,MoveLookController 會指派指標識別碼給對應視角區域的特定變數。 若視角區域發生觸控事件,m_lookPointerID 變數會設為觸發事件的指標識別碼。 布林值變數 m_lookInUse 也會設為指示控制項尚未放開。
接著,我們來看看範例遊戲如何處理 PointerMoved 觸控螢幕事件。
在 MoveLookController::OnPointerMoved 方法內,我們會檢查是否已指派指標識別碼給事件。 如果是 m_lookPointerID,則計算指標位置變更。 然後使用該差異值計算旋轉的變更值。 最後,我們可更新要在遊戲中使用的 m_pitch 和 m_yaw,以變更玩家的旋轉角度。
// This is the look pointer.
else if (pointerID == m_lookPointerID)
{
    // Look control.
    XMFLOAT2 pointerDelta;
    // How far did the pointer move?
    pointerDelta.x = position.x - m_lookLastPoint.x;
    pointerDelta.y = position.y - m_lookLastPoint.y;

    XMFLOAT2 rotationDelta;
    // Scale for control sensitivity.
    rotationDelta.x = pointerDelta.x * MoveLookConstants::RotationGain;
    rotationDelta.y = pointerDelta.y * MoveLookConstants::RotationGain;
    // Save for next time through.
    m_lookLastPoint = position;

    // Update our orientation based on the command.
    m_pitch -= rotationDelta.y;
    m_yaw += rotationDelta.x;

    // Limit pitch to straight up or straight down.
    float limit = XM_PI / 2.0f - 0.01f;
    m_pitch = __max(-limit, m_pitch);
    m_pitch = __min(+limit, m_pitch);
    ...
}
最後要介紹的部分是範例遊戲如何處理 PointerReleased 觸控螢幕事件。
使用者完成觸控手勢並將手指從螢幕上移開後,即啟動 MoveLookController::OnPointerReleased。
如果觸發 PointerReleased 事件的指標識別碼就是先前記錄的移動指標識別碼,MoveLookController 會將速度設為 0,因為玩家已停止觸控視角區域。
else if (pointerID == m_lookPointerID)
{
    m_lookInUse = false;
    m_lookPointerID = 0;
}
新增滑鼠和鍵盤支援
此遊戲具有以下鍵盤和滑鼠控制項版面配置。
| 使用者輸入 | 動作 |
|---|---|
| 星期三 | 將玩家往前移 |
| A | 將玩家往左移 |
| S | 將玩家往後移 |
| D | 將玩家往右移 |
| X | 向上移動檢視 |
| 空格鍵 | 向下移動檢視 |
| P | 暫停遊戲 |
| 滑鼠移動 | 變更相機檢視的旋轉 (俯仰和偏航) |
| 滑鼠左鍵 | 觸發球體 |
為使用鍵盤,範例遊戲在 MoveLookController::InitWindow 方法中註冊 CoreWindow::KeyUp 和 CoreWindow::KeyDown 兩個新事件。 這些事件會處理按鍵的按下和放開。
window.KeyDown({ this, &MoveLookController::OnKeyDown });

window.KeyUp({ this, &MoveLookController::OnKeyUp });
即使滑鼠也使用指標,但系統處理滑鼠的方式還是會與處理觸控控制項的方式略有不同。 為配合控制項的版面配置,MoveLookController 會在滑鼠移動時旋轉相機,並於使用者按下滑鼠左鍵時觸發。
這會在 MoveLookController 的 OnPointerPressed 方法中進行處理。
在此方法中,我們會檢查與 Windows::Devices::Input::PointerDeviceType 列舉搭配使用的指標裝置類型。
如果遊戲處於 Active 狀態,但 PointerDeviceType 的值不是 Touch,則假設其為滑鼠輸入。
case MoveLookControllerState::Active:
    switch (pointerDeviceType)
    {
    case winrt::Windows::Devices::Input::PointerDeviceType::Touch:
        // Behavior for touch controls
        ...

    default:
        // Behavior for mouse controls
        bool rightButton = pointProperties.IsRightButtonPressed();
        bool leftButton = pointProperties.IsLeftButtonPressed();

        if (!m_autoFire && (!m_mouseLeftInUse && leftButton))
        {
            m_firePressed = true;
        }

        if (!m_mouseInUse)
        {
            m_mouseInUse = true;
            m_mouseLastPoint = position;
            m_mousePointerID = pointerID;
            m_mouseLeftInUse = leftButton;
            m_mouseRightInUse = rightButton;
            // These are for smoothing.
            m_lookLastDelta.x = m_lookLastDelta.y = 0;
        }
        break;
    }
    break;
當玩家停止按下其中一個滑鼠按鈕,會引發 CoreWindow::PointerReleased 滑鼠事件,並呼叫 MoveLookController::OnPointerReleased 方法,這樣即輸入完成。 此時如果滑鼠左鍵原本是按下狀態,而現在已放開,球體就會停止觸發。 由於視角一律已啟用,遊戲會繼續使用相同的滑鼠指標,追蹤進行中的視角事件。
case MoveLookControllerState::Active:
    // Touch points
    if (pointerID == m_movePointerID)
    {
        // Stop movement
        ...
    }
    else if (pointerID == m_lookPointerID)
    {
        // Stop look rotation
        ...
    }
    // Fire button has been released
    else if (pointerID == m_firePointerID)
    {
        // Stop firing
        ...
    }
    // Mouse point
    else if (pointerID == m_mousePointerID)
    {
        bool rightButton = pointProperties.IsRightButtonPressed();
        bool leftButton = pointProperties.IsLeftButtonPressed();

        // Mouse no longer in use so stop firing
        m_mouseInUse = false;

        // Don't clear the mouse pointer ID so that Move events still result in Look changes.
        // m_mousePointerID = 0;
        m_mouseLeftInUse = leftButton;
        m_mouseRightInUse = rightButton;
    }
    break;
接著我們來看看最後一個支援控制項類型:遊戲台。 由於遊戲台不使用指標物件,處理方式與觸控和滑鼠控制項不同, 因此需要新增一些新的事件處理常式和方法。
新增遊戲台支援
針對此遊戲,呼叫 Windows.Gaming.Input API 即可新增遊戲台支援。 這組 API 可讓您存取遊戲控制器輸入,例如賽車方向盤和飛行搖桿。
遊戲台控制項如下所列。
| 使用者輸入 | 動作 |
|---|---|
| 左模擬搖桿 | 移動玩家 |
| 右模擬搖桿 | 變更相機檢視的旋轉 (俯仰和偏航) |
| 觸發往右 | 觸發球體 |
| [開始/功能表] 按鍵 | 暫停或繼續遊戲 |
在 InitWindow 方法中,我們會新增兩個新事件,以判斷遊戲台是否已新增或移除。 這些事件會更新 m_gamepadsChanged 屬性。 該屬性用於 UpdatePollingDevices 方法,以檢查已知遊戲台清單是否已變更。
// Detect gamepad connection and disconnection events.
Gamepad::GamepadAdded({ this, &MoveLookController::OnGamepadAdded });

Gamepad::GamepadRemoved({ this, &MoveLookController::OnGamepadRemoved });
注意
焦點不在 UWP 應用程式上時,該應用程式無法從遊戲控制器接收輸入。
UpdatePollingDevices 方法
MoveLookController 執行個體的 UpdatePollingDevices 方法會立即檢查遊戲台是否已連線。 如果已連線,則使用 Gamepad.GetCurrentReading 開始讀取其狀態。 這會傳回 GamepadReading 結構,讓我們檢查哪些按鈕已按下或已移動哪些搖桿。
如果遊戲的狀態是 WaitForInput,我們只會接聽控制器的 [開始/功能表] 按鍵,使遊戲繼續進行。
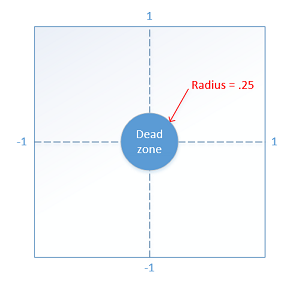
如果是 Active 狀態,我們會檢查使用者輸入,並判斷需要執行哪些遊戲內動作。 例如,如果使用者向特定方向移動左模擬搖桿,這可讓遊戲知道需要將玩家移往搖桿移動的方向。 對於往特定方向移動搖桿的動作,必須註冊大於死區的半徑,否則不會有任何反應。 必須透過這個死區半徑來防止「漂移」,也就是控制器擷取到玩家停留在搖桿上的拇指有任何小動作時。 如果沒有死區,使用者可能會覺得控制項太過靈敏。
X 軸和 y 軸的搖桿輸入都是介於 -1 到 1 之間。 下列常數會指定遊戲桿死區的半徑。
#define THUMBSTICK_DEADZONE 0.25f
接著,我們會使用此變數開始處理可操作的搖桿輸入。 移動會發生在任一軸上 [-1, -.26] 或 [.26, 1] 的值。
UpdatePollingDevices 方法的這部分將處理左搖桿及右搖桿。 系統會檢查每個搖桿的 X 和 Y 值是否位於死區之外。 若其中一個或兩者都在範圍外,則更新對應的元件。 例如,如果左搖桿沿著 X 軸向左移動,我們會將 -1 新增至 m_moveCommand 向量的 x 元件。 此向量將用來彙整所有裝置上的所有移動,稍後用於計算玩家應移動的位置。
// Use the left thumbstick to control the eye point position
// (position of the player).

// Check if left thumbstick is outside of dead zone on x axis
if (reading.LeftThumbstickX > THUMBSTICK_DEADZONE ||
    reading.LeftThumbstickX < -THUMBSTICK_DEADZONE)
{
    // Get value of left thumbstick's position on x axis
    float x = static_cast<float>(reading.LeftThumbstickX);
    // Set the x of the move vector to 1 if the stick is being moved right.
    // Set to -1 if moved left.
    m_moveCommand.x -= (x > 0) ? 1 : -1;
}

// Check if left thumbstick is outside of dead zone on y axis
if (reading.LeftThumbstickY > THUMBSTICK_DEADZONE ||
    reading.LeftThumbstickY < -THUMBSTICK_DEADZONE)
{
    // Get value of left thumbstick's position on y axis
    float y = static_cast<float>(reading.LeftThumbstickY);
    // Set the y of the move vector to 1 if the stick is being moved forward.
    // Set to -1 if moved backwards.
    m_moveCommand.y += (y > 0) ? 1 : -1;
}
與左搖桿控制移動的方式類似,右搖桿控制相機旋轉。
右搖桿行為與滑鼠和鍵盤控制項設定中的滑鼠移動行為一致。 如果遊戲桿位於死區之外,則針對目前指標位置與使用者當下嘗試查看的位置,計算兩者差異。 這項指標位置的變更值 (pointerDelta) 接著會用於更新相機旋轉的俯仰和偏航,這些資料稍後將用於 Update 方法。 pointerDelta 向量看起來可能很熟悉,因為其亦用於 MoveLookController::OnPointerMoved 方法,以追蹤滑鼠和觸控輸入的指標位置變更。
// Use the right thumbstick to control the look at position

XMFLOAT2 pointerDelta;

// Check if right thumbstick is outside of deadzone on x axis
if (reading.RightThumbstickX > THUMBSTICK_DEADZONE ||
    reading.RightThumbstickX < -THUMBSTICK_DEADZONE)
{
    float x = static_cast<float>(reading.RightThumbstickX);
    // Register the change in the pointer along the x axis
    pointerDelta.x = x * x * x;
}
// No actionable thumbstick movement. Register no change in pointer.
else
{
    pointerDelta.x = 0.0f;
}
// Check if right thumbstick is outside of deadzone on y axis
if (reading.RightThumbstickY > THUMBSTICK_DEADZONE ||
    reading.RightThumbstickY < -THUMBSTICK_DEADZONE)
{
    float y = static_cast<float>(reading.RightThumbstickY);
    // Register the change in the pointer along the y axis
    pointerDelta.y = y * y * y;
}
else
{
    pointerDelta.y = 0.0f;
}

XMFLOAT2 rotationDelta;
// Scale for control sensitivity.
rotationDelta.x = pointerDelta.x * 0.08f;
rotationDelta.y = pointerDelta.y * 0.08f;

// Update our orientation based on the command.
m_pitch += rotationDelta.y;
m_yaw += rotationDelta.x;

// Limit pitch to straight up or straight down.
m_pitch = __max(-XM_PI / 2.0f, m_pitch);
m_pitch = __min(+XM_PI / 2.0f, m_pitch);
如果不能觸發球體,遊戲的控制項就不會完成!
此 UpdatePollingDevices 方法也會檢查是否已按下正確的觸發程序。 如果是,m_firePressed 屬性會翻轉為 true,並向遊戲發出訊號指出應開始觸發球體。
if (reading.RightTrigger > TRIGGER_DEADZONE)
{
    if (!m_autoFire && !m_gamepadTriggerInUse)
    {
        m_firePressed = true;
    }

    m_gamepadTriggerInUse = true;
}
else
{
    m_gamepadTriggerInUse = false;
}
Update 方法
最後,我們來進一步瞭解 Update 方法。 此方法會合併玩家使用任何支援輸入進行的任何移動或旋轉,以產生速度向量並更新俯仰和偏航值,供遊戲迴圈存取。
Update 方法會呼叫 UpdatePollingDevices 啟動動作,並更新控制器的狀態。 此方法也會收集來自遊戲台的任何輸入,並將其移動新增至 m_moveCommand 向量。
在 Update 方法中接著執行下列輸入檢查。
- 如果玩家使用移動控制器矩形,我們接下來要判斷指標位置的變更,並使用該值計算使用者是否已將指標移出控制器的死區。 如果超出死區,m_moveCommand 向量屬性就會更新為虛擬搖桿值。
- 如果按下任何移動鍵盤輸入,則
1.0f或-1.0f的值會新增至 m_moveCommand 往前向量 (1.0f) 及往後 (-1.0f) 向量的對應元件。
考量所有移動輸入之後,我們接著會透過一些計算執行 m_moveCommand 向量,以產生新向量,代表玩家在遊戲事件的方向。
然後採取與世界有關的動作,並將其視為該方向的速度套用至玩家。
最後,我們會將 m_moveCommand 向量重設為 (0.0f, 0.0f, 0.0f),確保所有資源已準備好用於下一個遊戲畫面格。
void MoveLookController::Update()
{
    // Get any gamepad input and update state
    UpdatePollingDevices();

    if (m_moveInUse)
    {
        // Move control.
        XMFLOAT2 pointerDelta;

        pointerDelta.x = m_movePointerPosition.x - m_moveFirstDown.x;
        pointerDelta.y = m_movePointerPosition.y - m_moveFirstDown.y;

        // Figure out the command from the virtual joystick.
        XMFLOAT3 commandDirection = XMFLOAT3(0.0f, 0.0f, 0.0f);
        // Leave 32 pixel-wide dead spot for being still.
        if (fabsf(pointerDelta.x) > 16.0f)
            m_moveCommand.x -= pointerDelta.x / fabsf(pointerDelta.x);

        if (fabsf(pointerDelta.y) > 16.0f)
            m_moveCommand.y -= pointerDelta.y / fabsf(pointerDelta.y);
    }

    // Poll our state bits set by the keyboard input events.
    if (m_forward)
    {
        m_moveCommand.y += 1.0f;
    }
    if (m_back)
    {
        m_moveCommand.y -= 1.0f;
    }
    if (m_left)
    {
        m_moveCommand.x += 1.0f;
    }
    if (m_right)
    {
        m_moveCommand.x -= 1.0f;
    }
    if (m_up)
    {
        m_moveCommand.z += 1.0f;
    }
    if (m_down)
    {
        m_moveCommand.z -= 1.0f;
    }

    // Make sure that 45deg cases are not faster.
    if (fabsf(m_moveCommand.x) > 0.1f ||
        fabsf(m_moveCommand.y) > 0.1f ||
        fabsf(m_moveCommand.z) > 0.1f)
    {
        XMStoreFloat3(&m_moveCommand, XMVector3Normalize(XMLoadFloat3(&m_moveCommand)));
    }

    // Rotate command to align with our direction (world coordinates).
    XMFLOAT3 wCommand;
    wCommand.x = m_moveCommand.x * cosf(m_yaw) - m_moveCommand.y * sinf(m_yaw);
    wCommand.y = m_moveCommand.x * sinf(m_yaw) + m_moveCommand.y * cosf(m_yaw);
    wCommand.z = m_moveCommand.z;

    // Scale for sensitivity adjustment.
    // Our velocity is based on the command. Y is up.
    m_velocity.x = -wCommand.x * MoveLookConstants::MovementGain;
    m_velocity.z = wCommand.y * MoveLookConstants::MovementGain;
    m_velocity.y = wCommand.z * MoveLookConstants::MovementGain;

    // Clear movement input accumulator for use during next frame.
    m_moveCommand = XMFLOAT3(0.0f, 0.0f, 0.0f);
}
下一步
新增完控制項之後,接著我們還需要新增另一項功能,才能打造沉浸式遊戲:音效! 音樂和音效對所有遊戲都不可或缺,因此接下來我們會說明如何新增音效。