HoloLens (第 1 代) 和 Azure 309:Application Insights
注意事項
Mixed Reality Academy 教學課程是使用 HoloLens (第 1 代) 和 Mixed Reality 沉浸式頭戴裝置來設計。 因此,對於仍在尋找這些裝置開發指引的開發人員而言,請務必保留這些教學課程。 這些教學課程將不會更新為用於 HoloLens 2 的最新工具組或互動。 系統會維護這些裝置,以繼續在支援的裝置上運作。 未來將會張貼一系列新的教學課程,示範如何開發 HoloLens 2。 張貼這些教學課程時,將會使用連結來更新此通知。
在本課程中,您將瞭解如何使用 Azure 應用程式 Insights API 將 Application Insights 功能新增至混合實境應用程式,以收集有關用戶行為的分析。
Application Insights 是Microsoft服務,可讓開發人員從其應用程式收集分析,並從容易使用的入口網站進行管理。 從效能到您想要收集的自定義資訊,分析可以是任何專案。 如需詳細資訊,請流覽 Application Insights 頁面。
完成本課程之後,您將擁有混合實境沉浸式頭戴裝置應用程式,其將能夠執行下列動作:
- 允許使用者注視場景並四處移動。
- 使用場景內對象的注視和鄰近性,觸發將分析傳送至 Application Insights 服務。
- 應用程式也會在服務上呼叫 ,以擷取使用者在過去 24 小時內最接近哪些物件的相關信息。 該物件會將其色彩變更為綠色。
本課程將教導您如何從 Application Insights Service 取得結果,並以 Unity 為基礎的範例應用程式。 您必須將這些概念套用至您可能要建置的自定義應用程式。
裝置支援
| 課程 | HoloLens | 沉浸式頭戴裝置 |
|---|---|---|
| MR 和 Azure 309:Application Insights | ✔️ | ✔️ |
注意事項
雖然本課程主要著重於 Windows Mixed Reality 沉浸式 (VR) 頭戴式裝置,但您也可以將本課程中所學到的內容套用至 Microsoft HoloLens。 隨著課程的進行,您會看到支援 HoloLens 所需的任何變更附註。 使用 HoloLens 時,您可能會注意到語音擷取期間有一些回應。
先決條件
注意事項
本教學課程是專為具有 Unity 和 C# 基本體驗的開發人員所設計。 也請注意,本檔中的必要條件和書面指示代表在撰寫 (2018 年 7 月) 時已測試和驗證的內容。 您可以自由使用最新軟體,如 安裝工具 一文中所列,但不應該假設本課程中的資訊會與您在較新軟體中找到的資訊完全相符,比下面所列的內容還要高。
我們建議您在本課程中使用下列硬體和軟體:
- 開發計算機,與沉浸式 (VR) 頭戴式裝置開發的 Windows Mixed Reality 相容
- 已啟用開發人員模式的 Windows 10 Fall Creators Update (或更新版本)
- 最新的 Windows 10 SDK
- Unity 2017.4
- Visual Studio 2017
- 啟用開發人員模式的 Windows Mixed Reality 沉浸式 (VR) 頭戴式裝置或 Microsoft HoloLens
- 如果耳機沒有內建麥克風和喇叭,則一組內建麥克風 ()
- Azure 安裝程式和 Application Insights 數據擷取的因特網存取
開始之前
若要避免建置此專案時發生問題,強烈建議您在本教學課程的根或接近根資料夾中建立專案, (長資料夾路徑可能會在建置階段) 時造成問題。
警告
請注意,移至 Application Insights 的數據需要一些時間,因此請耐心等候。 如果您想要檢查服務是否已收到您的數據,請參閱 第 14 章,這會示範如何瀏覽入口網站。
第 1 章 - Azure 入口網站
若要使用 Application Insights,您必須在 Azure 入口網站 中建立及設定 Application Insights 服務。
登入 Azure 入口網站。
注意事項
如果您還沒有 Azure 帳戶,則必須建立一個帳戶。 如果您在教室或實驗室情況下遵循本教學課程,請向講師或其中一位專業人員尋求設定新帳戶的協助。
登入之後,按兩下左上角的 [ 新增 ],然後搜尋 Application Insights,然後按兩下 Enter。
注意事項
在較 新的 入口網站中,[新增] 一詞可能已取代為 [ 建立資源]。
![顯示 Azure 入口網站的螢幕快照,[所有專案] 窗格中會醒目提示 [深入解析]。](images/azurelabs-lab309-01.png)
右側的新頁面會提供 Azure 應用程式 Insights 服務的描述。 在此頁面的左下方,選取 [ 建立] 按鈕,以建立與此服務的關聯。
![Application Insights 畫面的螢幕快照,其中已醒目提示 [建立]。](images/azurelabs-lab309-02.png)
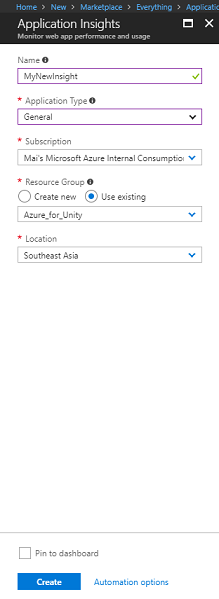
按兩下 [ 建立] 之後:
插入此服務 實例所需的名稱 。
在 [應用程式類型] 中,選取 [ 一般]。
選取適當的 訂用帳戶。
選擇 資源群組 或建立新的資源群組。 資源群組可讓您監視、控制存取、布建和管理 Azure 資產集合的計費。 例如,建議您保留與單一專案相關聯的所有 Azure 服務 (,例如,這些課程) 在一般資源群組) 下。
如果您想要深入瞭解 Azure 資源群組,請 瀏覽資源群組文章。
選取 [位置]。
您也必須確認您已瞭解套用至此服務的條款及條件。
選取 [建立]。
按兩下 [ 建立] 之後,您必須等候服務建立,這可能需要一分鐘的時間。
建立服務實例之後,入口網站中就會出現通知。

選取通知以探索新的服務實例。
![顯示 [部署成功] 對話框的螢幕快照,其中已醒目提示 [移至資源]。](images/azurelabs-lab309-05.png)
按兩下通知中的 [ 移至資源 ] 按鈕,以探索新的服務實例。 系統會帶您前往新的 Application Insights Service 實 例。
注意事項
讓此網頁保持開啟且易於存取,您經常會回到這裡查看收集的數據。
重要事項
若要實作 Application Insights,您必須使用三 (3) 特定值: 檢測密鑰、 應用程式識別碼和 API 金鑰。 您會在下方瞭解如何從您的服務擷取這些值。 請務必在空白的 [記事本 ] 頁面上記下這些值,因為您很快就會在程序代碼中使用這些值。
若要尋找 檢測金鑰,您必須向下卷動服務函式清單,然後選取 [ 屬性],顯示的索引標籤將會顯示 服務金鑰。
![顯示服務函式的螢幕快照,在 [設定] 區段中反白顯示 [屬性],並在主要窗格中反白顯示 [檢測密鑰]。](images/azurelabs-lab309-07.png)
在 [ 屬性] 下方,您會發現需要單擊的 API 存取。 右邊的面板會提供您應用程式的應用程式 識別 碼。
![顯示服務函式的螢幕快照,其中已醒目提示 P I 存取。主要窗格中會醒目提示 [建立 P I 金鑰] 和 [應用程式 I D]。](images/azurelabs-lab309-08.png)
在 [ 應用程式識別符] 面板仍然開啟時,按兩下 [ 建立 API 金鑰],這會開啟 [建立 API 金鑰 ] 面板。
![顯示 [建立 A P I 金鑰] 面板的螢幕快照。](images/azurelabs-lab309-09.png)
在現在開啟的 [建立 API 金鑰 ] 面板中,輸入描述,然後 勾選三個方塊。
按兩下 [產生金鑰]。 將會建立並顯示您的 API 金鑰 。
![[建立 A P I 金鑰] 面板的螢幕快照,其中顯示新的服務密鑰資訊。](images/azurelabs-lab309-10.png)
警告
這是唯一顯示 服務金鑰 的時間,因此請確定您現在要複製它。
第 2 章 - 設定 Unity 專案
以下是使用混合實境進行開發的一般設定,因此是適用於其他專案的良好範本。
開 啟 Unity ,然後按兩下 [ 新增]。
您現在必須提供 Unity 項目名稱,並插入 MR_Azure_Application_Insights。 請確定 範本 已設定為 3D。 將 [位置 ] 設定為適合您 (記住的位置,更接近根目錄) 。 然後,按兩下 [建立專案]。
![Unity [新增專案] 視窗的螢幕快照,其中顯示項目資訊。](images/azurelabs-lab309-12.png)
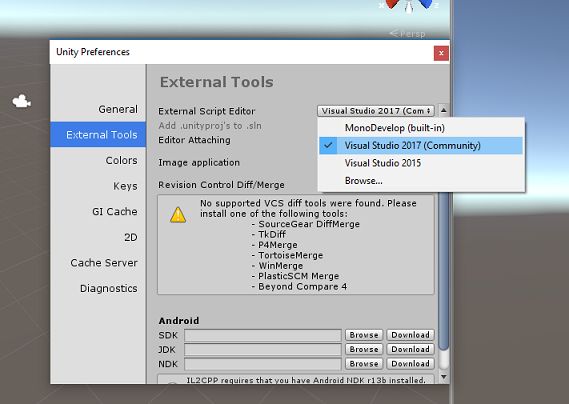
當 Unity 開啟時,值得檢查預設的腳本 編輯器 設定為 Visual Studio。 移至 [編輯 > 喜好設定] ,然後從新的視窗流覽至 [ 外部工具]。 將外部腳本 編輯器 變更為 Visual Studio 2017。 關閉 [ 喜好設定] 視窗。
接下來,移至 [檔案>建置設定],然後按兩下 [切換平臺] 按鈕,將平臺切換至 [通用 Windows 平台]。
![[組建設定] 視窗的螢幕快照,其中顯示 [平臺] 選取清單。已選取 通用 Windows 平台。](images/azurelabs-lab309-14.png)
移至 [檔案 > 建置設定 ],並確定:
[目標裝置] 設定為 [ 任何裝置]
針對 Microsoft HoloLens,將 [目標裝置] 設定為 [HoloLens]。
組建類型 設定為 D3D
SDK 設定為 [已安裝最新]
[建置並執行] 設定為 [ 本機計算機]
儲存場景並將其新增至組建。
若要這麼做,請選取 [新增開啟場景]。 隨即會出現儲存視窗。
![已選取 [新增開啟場景] [組建設定] 視窗的螢幕快照。](images/azurelabs-lab309-15.png)
為此和任何未來的場景建立新資料夾,然後按兩下 [ 新增資料夾 ] 按鈕,以建立新資料夾,並將它命名為 [場景]。
![[儲存場景] 視窗的螢幕快照,其中已選取 [場景] 資料夾。](images/azurelabs-lab309-16.png)
開啟新建立的 [場景 ] 資料夾,然後在 [ 檔名: 文字] 字段中輸入 ApplicationInsightsScene,然後按兩下 [ 儲存]。
![[儲存場景] 視窗的螢幕快照,其中已輸入檔名。](images/azurelabs-lab309-17.png)
組建 設定中的其餘設定目前應保留為預設值。
在 [ 組建設定] 視窗中 ,選取 [播放機設定],這會在 Inspector 所在的空間中開啟相關的面板。
![[偵測器] 索引標籤的螢幕快照,其中顯示 [播放器設定]。](images/azurelabs-lab309-18.png)
在此面板中,需要驗證一些設定:
在 [ 其他設定] 索引標籤中 :
腳本運行時間版本應該是實驗性 (.NET 4.6 對等) ,這會觸發重新啟動 編輯器 的需求。
腳本後端 應該是 .NET
API 相容性層級 應該是 .NET 4.6
![[偵測器] 索引標籤的螢幕快照,其中顯示 [其他設定] 之組態區段中的詳細數據。](images/azurelabs-lab309-19.png)
在 [ 發佈設定] 索引標籤的 [ 功能] 底下,檢查:
InternetClient
![已核取 [因特網用戶端] [功能] 列表的螢幕快照。](images/azurelabs-lab309-20.png)
在面板的 [XR 設定] (下方找到 [發佈設定) ],勾選 [支援虛擬實境],確定已新增 Windows Mixed Reality SDK。
![已核取 [支援虛擬實境] 區段的螢幕快照。](images/azurelabs-lab309-21.png)
回到 組建設定, Unity C# 專案 不再呈現灰色;勾選此旁邊的複選框。
關閉 [組建設定] 視窗。
將場景和專案儲存 (檔案>儲存場景/檔案>儲存專案) 。
第 3 章 - 匯入 Unity 套件
重要事項
如果您想要略過本課程的 Unity 設定 元件,並直接進入程式碼,請隨意下載此 Azure-MR-309.unitypackage,並將其以 自定義套件匯入您的專案。 這也會包含下一章的 DLL。 匯入之後,請從 第 6 章繼續。
重要事項
若要在 Unity 內使用 Application Insights,您必須為其匯入 DLL,以及 Newtonsoft DLL。 Unity 目前有一個已知問題,需要在匯入之後重新設定外掛程式。 本節 (4 - 7 中的這些步驟) 在錯誤解決之後就不再需要。
若要將 Application Insights 匯入到您自己的專案,請確定您已 下載包含外掛程式的 '.unitypackage'。 然後,執行下列動作:
使用 [資產>>匯入套件自定義套件] 功能表選項,將 the.unitypackage** 新增至 Unity。
在彈出的 [ 匯入 Unity 套 件] 方塊中,確定已選取 (下的所有專案,並包含) 外掛程式 。
![[匯入 Unity 套件] 對話框的螢幕快照,其中顯示已核取的所有專案。](images/azurelabs-lab309-22.png)
按兩下 [ 匯入] 按鈕,將專案新增至您的專案。
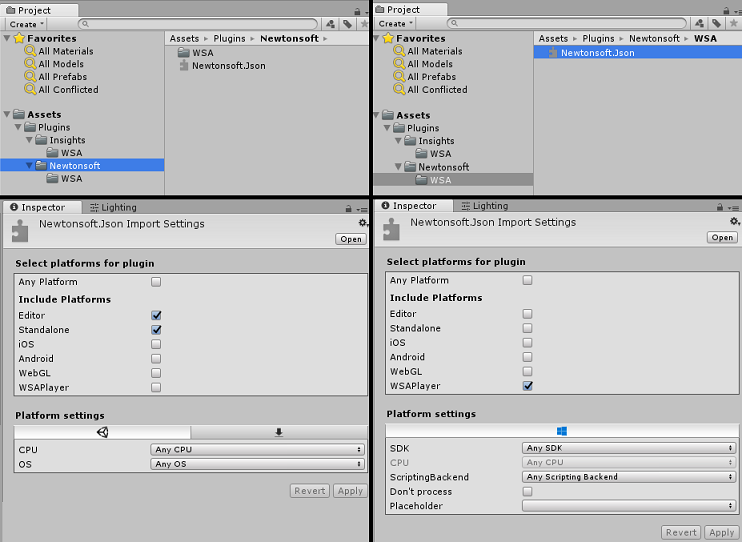
移至 [專案] 檢視中 [外掛程式] 底下的 [深入解析] 資料夾,並只選取下列外掛程式:
- Microsoft.ApplicationInsights
![[專案] 面板的螢幕快照,[Insights] 資料夾已開啟。](images/azurelabs-lab309-23.png)
選取此外掛程式后,請確定 [任何平臺] 未核取,然後確定 WSAPlayer 也未核取,然後按兩下 [套用]。 這麼做只是為了確認檔案已正確設定。
![[偵測器] 面板的螢幕快照,其中顯示已核取 編輯器 和獨立檢查。](images/azurelabs-lab309-24.png)
注意事項
標示如下的外掛程式,將它們設定為只在 Unity 編輯器 中使用。 WSA 資料夾中有一組不同的 DLL,會在從 Unity 匯出項目之後使用。
接下來,您必須在 Insights 資料夾內開啟 WSA 資料夾。 您會看到您所設定之相同檔案的複本。 選取此檔案,然後在偵測器中,確定 [任何平臺] 未核取,然後確定只檢查WSAPlayer。 按一下 [套用]。
![[偵測器] 面板的螢幕快照,其中顯示已核取的 W S A Player。](images/azurelabs-lab309-25.png)
您現在必須遵循 步驟 4-6,但改用 Newtonsoft 外掛程式。 如需結果的外觀,請參閱下列螢幕快照。
第 4 章 - 設定相機和使用者控制項
在本章中,您將設定相機和控件,讓用戶能夠在場景中查看和移動。
以滑鼠右鍵按兩下 [階層面板] 中的空白區域,然後按兩下 [建立空白]>。
![[階層] 面板的螢幕快照,其中已選取 [建立空白]。](images/azurelabs-lab309-26.png)
將新的空白 GameObject 重新命名為 Camera Parent。
![[階層] 面板的螢幕快照,其中已選取 [相機父代]。偵測器面板](images/azurelabs-lab309-27.png)
以滑鼠右鍵按兩下 [階層面板] 中的空白區域,然後按兩下 [3D 物件],然後按兩下 [Sphere]。
將Sphere重新命名為 右側。
將右手的 轉換縮放比例 設定為 0.1、0.1、0.1
![[階層] 和 [偵測器] 面板的螢幕快照,其中已醒目提示 [偵測器] 面板上的 [轉換] 區段。](images/azurelabs-lab309-28.png)
按兩下Sphere碰撞器元件中的齒輪,然後按兩下 [移除元件],從右側移除Sphere碰撞器元件。
![[偵測器] 面板的螢幕快照,[Sphere 碰撞器] 區段中會醒目提示齒輪圖示和 [移除元件]。](images/azurelabs-lab309-29.png)
在 [階層面板] 中,將 主相機 和 右手 物件拖曳至 [相機父 代] 物件。
![[階層] 面板的螢幕快照,其中已選取 [主相機],[偵測器] 面板會顯示已核取 [主相機]。](images/azurelabs-lab309-30.png)
將主相機和右手物件的轉換位置設定為 0, 0, 0。
![[階層] 面板的螢幕快照,其中已選取 [主相機],[偵測器] 面板中會醒目提示 [轉換設定]。](images/azurelabs-lab309-31.png)
![[階層] 面板的螢幕快照,其中已選取右手,[偵測器] 面板中會醒目提示 [轉換設定]。](images/azurelabs-lab309-32.png)
第 5 章 - 在 Unity 場景中設定物件
您現在會為場景建立一些基本圖形,讓使用者可以與其互動。
以滑鼠右鍵按兩下 [階層面板] 中的空白區域,然後在 [3D 物件] 上,選取 [ 平面]。
將 [平面 轉換位置 ] 設定為 0、-1、0。
將 [平面 轉換縮放比例 ] 設定為 5、1、5。
![場景、階層和偵測器面板的螢幕快照。[偵測器] 面板中的 [轉換] 區段會反白顯示。](images/azurelabs-lab309-33.png)
建立要與 Plane 物件搭配使用的基本材質,讓其他圖形更容易查看。 流覽至您的 專案面板,以滑鼠右鍵按兩下,然後按兩下 [ 建立],後面接著 [ 資料夾],以建立新的資料夾。 將它命名為 材質。
![[專案] 面板的螢幕快照,其中已醒目提示 [建立] 和 [資料夾]。](images/azurelabs-lab309-34.png)
![[專案] 面板的螢幕快照。材質會在 [資產] 窗格中反白顯示。](images/azurelabs-lab309-35.png)
開啟 [ 材質 ] 資料夾,然後按下滑鼠右鍵,按兩下 [ 建立],然後按兩下 [ 材質],以建立新的材質。 將其命名為 Blue。
![[專案] 面板的螢幕快照,其中已醒目提示 [建立] 和 [材質]。](images/azurelabs-lab309-36.png)
![[專案] 面板的螢幕快照。藍色會在 [材質] 窗格中反白顯示。](images/azurelabs-lab309-37.png)
選取新的 藍色 材質后,查看 [偵測器],然後按兩下 Albedo旁邊的矩形視窗。 選取藍色 (下圖為十六進位 色彩:#3592FFFF) 。 選擇之後,按兩下 [關閉] 按鈕。
![[偵測器] 面板的螢幕快照。色彩區段會反白顯示。](images/azurelabs-lab309-38.png)
將新材質從 [材質] 資料夾拖曳到場景內新建立的 [平面] (,或將它放在Hierarchy) 內的 Plane 物件上。
![[場景] 面板的螢幕快照,其中顯示 [材質] 資料夾中的新材質。](images/azurelabs-lab309-39.png)
以滑鼠右鍵按兩下 [階層面板] 中的空白區域,然後按兩下 [3D 物件]、[封艙]。
- 選取 [太空艙 ] 后,將其 [轉換位置 ] 變更為: -10, 1, 0。
以滑鼠右鍵按兩下 階層面板中的空白區域,然後在 3D物件 Cube 上按兩下。
- 選取 Cube 之後,將其 [轉換位置 ] 變更為: 0、0、10。
以滑鼠右鍵按兩下 [階層面板] 中的空白區域,然後按兩下 [3D 物件]、[Sphere]。
- 選取 Sphere 后,將其 [轉換位置 ] 變更為: 10, 0, 0。
![場景、階層和偵測器面板的螢幕快照。在 [階層] 面板中選取了 [小艙]。](images/azurelabs-lab309-40.png)
注意事項
這些 位置 值是 建議。 您可以隨意將物件的位置設定為任何您想要的位置,不過,如果對象距離不是離相機太遠,則對應用程式的使用者而言會比較容易。
當您的應用程式正在執行時,它必須能夠識別場景內的物件,才能達到此目的,必須標記它們。 選取其中一個 對象,然後在 [ 偵測器 ] 面板中,按兩下 [ 新增標籤...],這會將 Inspector 與 [ 標記 & 圖層] 面板交換。
![[偵測器] 面板的螢幕快照,其中已醒目提示 [新增卷標] 選項。](images/azurelabs-lab309-41.png)
![[偵測器] 面板的螢幕快照,其中已醒目提示 [標記] 和 [圖層]。](images/azurelabs-lab309-42.png)
按兩下 + (加上) 符號,然後將標記名稱輸入為 ObjectInScene。
![[偵測器] 面板的螢幕快照,其中已選取 [標記] 和 [圖層]。[新增標籤名稱] 對話框會反白顯示。](images/azurelabs-lab309-43.png)
警告
如果您為標記使用不同的名稱,則稍後必須確定此變更也會進行 DataFromAnalytics、 ObjectTrigger 和 注視、腳本,以便在場景中找到並偵測到您的物件。
建立 標籤之後,您現在必須將它套用至所有三個物件。 從 [階層] 中,按 住 Shift 鍵,然後按下 [艙體]、[ Cube] 和 [ Sphere] 物件,然後在 [偵測器] 中,單擊 [ 捲標] 旁的下拉菜單,然後按下您建立的 ObjectInScene 卷標。
![[偵測器] 面板的螢幕快照,箭號指向 [標記]。[未標記] 功能表會顯示已選取的 [未標記] 和 [ObjectInScene]。](images/azurelabs-lab309-44.png)
![顯示兩個功能表的螢幕快照,其中已醒目提示 [建立] 和 [資料夾]。](images/azurelabs-lab309-45.png)
第 6 章 - 建立 ApplicationInsightsTracker 類別
您需要建立的第一個腳本是 ApplicationInsightsTracker,負責:
根據用戶互動建立事件,以提交至 Azure 應用程式 Insights。
視用戶互動而定,建立適當的事件名稱。
將事件提交至 Application Insights Service 實例。
若要建立這個類別:
以滑鼠右鍵按兩下 [項目面板],然後按兩下 [ 建立>資料夾]。 將資料夾命名 為 Scripts。
![[專案] 面板的螢幕快照。[資產] 窗格中會醒目提示 [腳本] 資料夾圖示。](images/azurelabs-lab309-46.png)
![顯示功能表選項的螢幕快照,其中已選取 [建立] 和 [C# 腳本] 選項。](images/azurelabs-lab309-47.png)
建立 Scripts 資料夾後,按兩下即可開啟。 然後,在該資料夾中,以滑鼠右鍵按兩下 [ 建立>C# 腳本]。 將腳本命名為 ApplicationInsightsTracker。
按兩下新的 ApplicationInsightsTracker 腳本,以使用 Visual Studio 開啟它。
將文稿頂端的命名空間更新為如下:
    using Microsoft.ApplicationInsights;
    using Microsoft.ApplicationInsights.DataContracts;
    using Microsoft.ApplicationInsights.Extensibility;
    using UnityEngine;
在類別內插入下列變數:
    /// <summary>
    /// Allows this class to behavior like a singleton
    /// </summary>
    public static ApplicationInsightsTracker Instance;

    /// <summary>
    /// Insert your Instrumentation Key here
    /// </summary>
    internal string instrumentationKey = "Insert Instrumentation Key here";

    /// <summary>
    /// Insert your Application Id here
    /// </summary>
    internal string applicationId = "Insert Application Id here";

    /// <summary>
    /// Insert your API Key here
    /// </summary>
    internal string API_Key = "Insert API Key here";

    /// <summary>
    /// Represent the Analytic Custom Event object
    /// </summary>
    private TelemetryClient telemetryClient;

    /// <summary>
    /// Represent the Analytic object able to host gaze duration
    /// </summary>
    private MetricTelemetry metric;
注意事項
使用 Azure 入口網站的服務金鑰,適當地設定 instrumentationKey、applicationId 和 API_Key 值,如步驟 9 第 1 章所述。
然後,新增 Start () 和 醒 () 方法,此類別初始化時會呼叫這些方法:
    /// <summary>
    /// Sets this class instance as a singleton
    /// </summary>
    void Awake()
    {
        Instance = this;
    }

    /// <summary>
    /// Use this for initialization
    /// </summary>
    void Start()
    {
        // Instantiate telemetry and metric
        telemetryClient = new TelemetryClient();

        metric = new MetricTelemetry();

        // Assign the Instrumentation Key to the Event and Metric objects
        TelemetryConfiguration.Active.InstrumentationKey = instrumentationKey;

        telemetryClient.InstrumentationKey = instrumentationKey;
    }
新增負責傳送應用程式所註冊之事件和計量的方法:
    /// <summary>
    /// Submit the Event to Azure Analytics using the event trigger object
    /// </summary>
    public void RecordProximityEvent(string objectName)
    {
        telemetryClient.TrackEvent(CreateEventName(objectName));
    }

    /// <summary>
    /// Uses the name of the object involved in the event to create
    /// and return an Event Name convention
    /// </summary>
    public string CreateEventName(string name)
    {
        string eventName = $"User near {name}";
        return eventName;
    }

    /// <summary>
    /// Submit a Metric to Azure Analytics using the metric gazed object
    /// and the time count of the gaze
    /// </summary>
    public void RecordGazeMetrics(string objectName, int time)
    {
        // Output Console information about gaze.
        Debug.Log($"Finished gazing at {objectName}, which went for <b>{time}</b> second{(time != 1 ? "s" : "")}");

        metric.Name = $"Gazed {objectName}";

        metric.Value = time;

        telemetryClient.TrackMetric(metric);
    }
請務必先將變更儲存在 Visual Studio 中,再返回 Unity。
第 7 章 - 建立注視腳本
下一個要建立的腳本是 注視 腳本。 此腳本負責建立將從主相機向前投影的Raycast,以偵測使用者正在查看的物件。 在此情況下, Raycast 必須識別使用者是否正在查看具有 ObjectInScene 卷標的物件,然後計算使用者 注視 該對象的時間長度。
按兩下 [文稿] 資料夾,將其開啟。
以滑鼠右鍵按兩下 [腳稿 ] 資料夾內,按兩下 [ 建立>C# 腳本]。 將腳本命名為 注視。
按兩下腳本以使用Visual Studio 開啟它。
以下欄程序代碼取代現有的程式代碼:
    using UnityEngine;

    public class Gaze : MonoBehaviour
    {
        /// <summary>
        /// Provides Singleton-like behavior to this class.
        /// </summary>
        public static Gaze Instance;

        /// <summary>
        /// Provides a reference to the object the user is currently looking at.
        /// </summary>
        public GameObject FocusedGameObject { get; private set; }

        /// <summary>
        /// Provides whether an object has been successfully hit by the raycast.
        /// </summary>
        public bool Hit { get; private set; }

        /// <summary>
        /// Provides a reference to compare whether the user is still looking at
        /// the same object (and has not looked away).
        /// </summary>
        private GameObject _oldFocusedObject = null;

        /// <summary>
        /// Max Ray Distance
        /// </summary>
        private float _gazeMaxDistance = 300;

        /// <summary>
        /// Max Ray Distance
        /// </summary>
        private float _gazeTimeCounter = 0;

        /// <summary>
        /// The cursor object will be created when the app is running,
        /// this will store its values.
        /// </summary>
        private GameObject _cursor;
    }
現在必須新增 醒醒 () 和 Start () 方法的程序代碼。
    private void Awake()
    {
        // Set this class to behave similar to singleton
        Instance = this;
        _cursor = CreateCursor();
    }

    void Start()
    {
        FocusedGameObject = null;
    }

    /// <summary>
    /// Create a cursor object, to provide what the user
    /// is looking at.
    /// </summary>
    /// <returns></returns>
    private GameObject CreateCursor()
    {
        GameObject newCursor = GameObject.CreatePrimitive(PrimitiveType.Sphere);

        // Remove the collider, so it does not block raycast.
        Destroy(newCursor.GetComponent<SphereCollider>());

        newCursor.transform.localScale = new Vector3(0.1f, 0.1f, 0.1f);

        newCursor.GetComponent<MeshRenderer>().material.color =
        Color.HSVToRGB(0.0223f, 0.7922f, 1.000f);

        newCursor.SetActive(false);
        return newCursor;
    }
在 Gaze 類別內,在 Update () 方法中新增下列程式代碼,以投影 Raycast 並偵測目標點擊:
    /// <summary>
    /// Called every frame
    /// </summary>
    void Update()
    {
        // Set the old focused gameobject.
        _oldFocusedObject = FocusedGameObject;

        RaycastHit hitInfo;

        // Initialize Raycasting.
        Hit = Physics.Raycast(Camera.main.transform.position, Camera.main.transform.forward, out hitInfo, _gazeMaxDistance);

        // Check whether raycast has hit.
        if (Hit == true)
        {
            // Check whether the hit has a collider.
            if (hitInfo.collider != null)
            {
                // Set the focused object with what the user just looked at.
                FocusedGameObject = hitInfo.collider.gameObject;

                // Lerp the cursor to the hit point, which helps to stabilize the gaze.
                _cursor.transform.position = Vector3.Lerp(_cursor.transform.position, hitInfo.point, 0.6f);

                _cursor.SetActive(true);
            }
            else
            {
                // Object looked on is not valid, set focused gameobject to null.
                FocusedGameObject = null;

                _cursor.SetActive(false);
            }
        }
        else
        {
            // No object looked upon, set focused gameobject to null.
            FocusedGameObject = null;

            _cursor.SetActive(false);
        }

        // Check whether the previous focused object is this same object. If so, reset the focused object.
        if (FocusedGameObject != _oldFocusedObject)
        {
            ResetFocusedObject();
        }
        // If they are the same, but are null, reset the counter.
        else if (FocusedGameObject == null && _oldFocusedObject == null)
        {
            _gazeTimeCounter = 0;
        }
        // Count whilst the user continues looking at the same object.
        else
        {
            _gazeTimeCounter += Time.deltaTime;
        }
    }
新增 ResetFocusedObject () 方法,以在使用者查看物件時將數據傳送至 Application Insights 。
    /// <summary>
    /// Reset the old focused object, stop the gaze timer, and send data if it
    /// is greater than one.
    /// </summary>
    public void ResetFocusedObject()
    {
        // Ensure the old focused object is not null.
        if (_oldFocusedObject != null)
        {
            // Only looking for objects with the correct tag.
            if (_oldFocusedObject.CompareTag("ObjectInScene"))
            {
                // Turn the timer into an int, and ensure that more than zero time has passed.
                int gazeAsInt = (int)_gazeTimeCounter;

                if (gazeAsInt > 0)
                {
                    //Record the object gazed and duration of gaze for Analytics
                    ApplicationInsightsTracker.Instance.RecordGazeMetrics(_oldFocusedObject.name, gazeAsInt);
                }
                //Reset timer
                _gazeTimeCounter = 0;
            }
        }
    }
您現在已完成 注視 文稿。 在返回 Unity 之前,請先將變更儲存在 Visual Studio中。
第 8 章 - 建立 ObjectTrigger 類別
您需要建立的下一個腳本是 ObjectTrigger,負責:
- 將碰撞所需的元件新增至主相機。
- 偵測相機是否接近標記為 ObjectInScene 的物件。
若要建立文稿:
按兩下 [文稿] 資料夾,將其開啟。
以滑鼠右鍵按兩下 [腳稿 ] 資料夾內,按兩下 [ 建立>C# 腳本]。 將腳本命名為 ObjectTrigger。
按兩下腳本以使用Visual Studio 開啟它。 以下欄程序代碼取代現有的程式代碼:
    using UnityEngine;

    public class ObjectTrigger : MonoBehaviour
    {
        private void Start()
        {
            // Add the Collider and Rigidbody components,
            // and set their respective settings. This allows for collision.
            gameObject.AddComponent<SphereCollider>().radius = 1.5f;

            gameObject.AddComponent<Rigidbody>().useGravity = false;
        }

        /// <summary>
        /// Triggered when an object with a collider enters this objects trigger collider.
        /// </summary>
        /// <param name="collision">Collided object</param>
        private void OnCollisionEnter(Collision collision)
        {
            CompareTriggerEvent(collision, true);
        }

        /// <summary>
        /// Triggered when an object with a collider exits this objects trigger collider.
        /// </summary>
        /// <param name="collision">Collided object</param>
        private void OnCollisionExit(Collision collision)
        {
            CompareTriggerEvent(collision, false);
        }

        /// <summary>
        /// Method for providing debug message, and sending event information to InsightsTracker.
        /// </summary>
        /// <param name="other">Collided object</param>
        /// <param name="enter">Enter = true, Exit = False</param>
        private void CompareTriggerEvent(Collision other, bool enter)
        {
            if (other.collider.CompareTag("ObjectInScene"))
            {
                string message = $"User is{(enter == true ? " " : " no longer ")}near <b>{other.gameObject.name}</b>";

                if (enter == true)
                {
                    ApplicationInsightsTracker.Instance.RecordProximityEvent(other.gameObject.name);
                }
                Debug.Log(message);
            }
        }
    }
請務必先將變更儲存在 Visual Studio 中,再返回 Unity。
第 9 章 - 建立 DataFromAnalytics 類別
您現在必須建立 DataFromAnalytics 腳本,負責:
- 擷取相機最接近哪一個物件的分析數據。
- 使用服務金鑰,允許與您的 Azure 應用程式 Insights Service 實例通訊。
- 根據事件計數最高的物件,排序場景中的物件。
- 將最接近對象的材質色彩變更為 綠色。
若要建立文稿:
按兩下 [文稿] 資料夾,將其開啟。
以滑鼠右鍵按兩下 [腳稿 ] 資料夾內,按兩下 [ 建立>C# 腳本]。 將腳本命名為 DataFromAnalytics。
按兩下腳本以使用Visual Studio 開啟它。
插入下列命名空間:
    using Newtonsoft.Json;
    using System;
    using System.Collections;
    using System.Collections.Generic;
    using System.Linq;
    using UnityEngine;
    using UnityEngine.Networking;
在文稿中,插入下列專案:
    /// <summary>
    /// Number of most recent events to be queried
    /// </summary>
    private int _quantityOfEventsQueried = 10;

    /// <summary>
    /// The timespan with which to query. Needs to be in hours.
    /// </summary>
    private int _timepspanAsHours = 24;

    /// <summary>
    /// A list of the objects in the scene
    /// </summary>
    private List<GameObject> _listOfGameObjectsInScene;

    /// <summary>
    /// Number of queries which have returned, after being sent.
    /// </summary>
    private int _queriesReturned = 0;

    /// <summary>
    /// List of GameObjects, as the Key, with their event count, as the Value.
    /// </summary>
    private List<KeyValuePair<GameObject, int>> _pairedObjectsWithEventCount = new List<KeyValuePair<GameObject, int>>();

    // Use this for initialization
    void Start()
    {
        // Find all objects in scene which have the ObjectInScene tag (as there may be other GameObjects in the scene which you do not want).
        _listOfGameObjectsInScene = GameObject.FindGameObjectsWithTag("ObjectInScene").ToList();

        FetchAnalytics();
    }
在 DataFromAnalytics 類別中,於 Start () 方法之後,將名為 FetchAnalytics 的下列方法新增至 () 。 這個方法負責填入機碼值組的清單,其中包含 GameObject 和佔位元符事件計數編號。 然後,它會初始化 GetWebRequest () 協同程式。 呼叫 Application Insights 的查詢結構也可以在此方法中找到,作為 查詢 URL 端點。
    private void FetchAnalytics()
    {
        // Iterate through the objects in the list
        for (int i = 0; i < _listOfGameObjectsInScene.Count; i++)
        {
            // The current event number is not known, so set it to zero.
            int eventCount = 0;

            // Add new pair to list, as placeholder, until eventCount is known.
            _pairedObjectsWithEventCount.Add(new KeyValuePair<GameObject, int>(_listOfGameObjectsInScene[i], eventCount));

            // Set the renderer of the object to the default color, white
            _listOfGameObjectsInScene[i].GetComponent<Renderer>().material.color = Color.white;

            // Create the appropriate object name using Insights structure
            string objectName = _listOfGameObjectsInScene[i].name;

 		    // Build the queryUrl for this object.
 		    string queryUrl = Uri.EscapeUriString(string.Format(
                "https://api.applicationinsights.io/v1/apps/{0}/events/$all?timespan=PT{1}H&$search={2}&$select=customMetric/name&$top={3}&$count=true",
 			    ApplicationInsightsTracker.Instance.applicationId, _timepspanAsHours, "Gazed " + objectName, _quantityOfEventsQueried));


            // Send this object away within the WebRequest Coroutine, to determine it is event count.
            StartCoroutine("GetWebRequest", new KeyValuePair<string, int>(queryUrl, i));
        }
    }
在 FetchAnalytics () 方法的正下方,新增名為 GetWebRequest () 的方法,其會傳回 IEnumerator。 這個方法負責要求在 Application Insights 中呼叫與特定 GameObject 對應的事件次數。 當所有傳送的查詢都傳回時,會呼叫 DetermineWinner () 方法。
    /// <summary>
    /// Requests the data count for number of events, according to the
    /// input query URL.
    /// </summary>
    /// <param name="webQueryPair">Query URL and the list number count.</param>
    /// <returns></returns>
    private IEnumerator GetWebRequest(KeyValuePair<string, int> webQueryPair)
    {
        // Set the URL and count as their own variables (for readability).
        string url = webQueryPair.Key;
        int currentCount = webQueryPair.Value;

        using (UnityWebRequest unityWebRequest = UnityWebRequest.Get(url))
        {
            DownloadHandlerBuffer handlerBuffer = new DownloadHandlerBuffer();

            unityWebRequest.downloadHandler = handlerBuffer;

            unityWebRequest.SetRequestHeader("host", "api.applicationinsights.io");

            unityWebRequest.SetRequestHeader("x-api-key", ApplicationInsightsTracker.Instance.API_Key);

            yield return unityWebRequest.SendWebRequest();

            if (unityWebRequest.isNetworkError)
            {
                // Failure with web request.
                Debug.Log("<color=red>Error Sending:</color> " + unityWebRequest.error);
            }
            else
            {
                // This query has returned, so add to the current count.
                _queriesReturned++;

                // Initialize event count integer.
                int eventCount = 0;

                // Deserialize the response with the custom Analytics class.
                Analytics welcome = JsonConvert.DeserializeObject<Analytics>(unityWebRequest.downloadHandler.text);

                // Get and return the count for the Event
                if (int.TryParse(welcome.OdataCount, out eventCount) == false)
                {
                    // Parsing failed. Can sometimes mean that the Query URL was incorrect.
                    Debug.Log("<color=red>Failure to Parse Data Results. Check Query URL for issues.</color>");
                }
                else
                {
                    // Overwrite the current pair, with its actual values, now that the event count is known.
                    _pairedObjectsWithEventCount[currentCount] = new KeyValuePair<GameObject, int>(_pairedObjectsWithEventCount[currentCount].Key, eventCount);
                }

                // If all queries (compared with the number which was sent away) have
                // returned, then run the determine winner method.
                if (_queriesReturned == _pairedObjectsWithEventCount.Count)
                {
                    DetermineWinner();
                }
            }
        }
    }
下一個方法是 DetermineWinner () ,它會根據最高的事件計數來排序 GameObject 和 Int 配對的清單。 然後,它會將該 GameObject 的材質色彩變更為 綠色 (,作為其計數) 最高的意見反應。 這會顯示含有分析結果的訊息。
    /// <summary>
    /// Call to determine the keyValue pair, within the objects list,
    /// with the highest event count.
    /// </summary>
    private void DetermineWinner()
    {
        // Sort the values within the list of pairs.
        _pairedObjectsWithEventCount.Sort((x, y) => y.Value.CompareTo(x.Value));

        // Change its colour to green
        _pairedObjectsWithEventCount.First().Key.GetComponent<Renderer>().material.color = Color.green;

        // Provide the winner, and other results, within the console window.
        string message = $"<b>Analytics Results:</b>\n " +
            $"<i>{_pairedObjectsWithEventCount.First().Key.name}</i> has the highest event count, " +
            $"with <i>{_pairedObjectsWithEventCount.First().Value.ToString()}</i>.\nFollowed by: ";

        for (int i = 1; i < _pairedObjectsWithEventCount.Count; i++)
        {
            message += $"{_pairedObjectsWithEventCount[i].Key.name}, " +
                $"with {_pairedObjectsWithEventCount[i].Value.ToString()} events.\n";
        }

        Debug.Log(message);
    }
新增類別結構,以用來還原串行化從 Application Insights 接收的 JSON 物件。 在類別定義以外的DataFromAnalytics 類別檔案底部新增這些類別。
    /// <summary>
    /// These classes represent the structure of the JSON response from Azure Insight
    /// </summary>
    [Serializable]
    public class Analytics
    {
        [JsonProperty("@odata.context")]
        public string OdataContext { get; set; }

        [JsonProperty("@odata.count")]
        public string OdataCount { get; set; }

        [JsonProperty("value")]
        public Value[] Value { get; set; }
    }

    [Serializable]
    public class Value
    {
        [JsonProperty("customMetric")]
        public CustomMetric CustomMetric { get; set; }
    }

    [Serializable]
    public class CustomMetric
    {
        [JsonProperty("name")]
        public string Name { get; set; }
    }
請務必先將變更儲存在 Visual Studio 中,再返回 Unity。
第 10 章 - 建立 Movement 類別
移動腳本是您需要建立的下一個腳本。 其負責:
- 根據相機朝向的方向移動主相機。
- 將所有其他腳本新增至場景物件。
若要建立文稿:
按兩下 [文稿] 資料夾,將其開啟。
以滑鼠右鍵按兩下 [腳稿 ] 資料夾內,按兩下 [ 建立>C# 腳本]。 將腳本命名為 Movement。
按兩下腳本以使用 Visual Studio 開啟它。
以下欄程序代碼取代現有的程式代碼:
using UnityEngine; using UnityEngine.XR.WSA.Input; public class Movement : MonoBehaviour { /// <summary> /// The rendered object representing the right controller. /// </summary> public GameObject Controller; /// <summary> /// The movement speed of the user. /// </summary> public float UserSpeed; /// <summary> /// Provides whether source updates have been registered. /// </summary> private bool _isAttached = false; /// <summary> /// The chosen controller hand to use. /// </summary> private InteractionSourceHandedness _handness = InteractionSourceHandedness.Right; /// <summary> /// Used to calculate and proposes movement translation. /// </summary> private Vector3 _playerMovementTranslation; private void Start() { // You are now adding components dynamically // to ensure they are existing on the correct object // Add all camera related scripts to the camera. Camera.main.gameObject.AddComponent<Gaze>(); Camera.main.gameObject.AddComponent<ObjectTrigger>(); // Add all other scripts to this object. gameObject.AddComponent<ApplicationInsightsTracker>(); gameObject.AddComponent<DataFromAnalytics>(); } // Update is called once per frame void Update() { } }在Movement類別的空白Update () 方法下方,插入下列可讓使用者使用手部控制器在虛擬空間中移動的方法:
    /// <summary>
    /// Used for tracking the current position and rotation of the controller.
    /// </summary>
    private void UpdateControllerState()
    {
#if UNITY_WSA && UNITY_2017_2_OR_NEWER
        // Check for current connected controllers, only if WSA.
        string message = string.Empty;

        if (InteractionManager.GetCurrentReading().Length > 0)
        {
            foreach (var sourceState in InteractionManager.GetCurrentReading())
            {
                if (sourceState.source.kind == InteractionSourceKind.Controller && sourceState.source.handedness == _handness)
                {
                    // If a controller source is found, which matches the selected handness,
                    // check whether interaction source updated events have been registered.
                    if (_isAttached == false)
                    {
                        // Register events, as not yet registered.
                        message = "<color=green>Source Found: Registering Controller Source Events</color>";
                        _isAttached = true;

                        InteractionManager.InteractionSourceUpdated += InteractionManager_InteractionSourceUpdated;
                    }

                    // Update the position and rotation information for the controller.
                    Vector3 newPosition;
                    if (sourceState.sourcePose.TryGetPosition(out newPosition, InteractionSourceNode.Pointer) && ValidPosition(newPosition))
                    {
                        Controller.transform.localPosition = newPosition;
                    }

                    Quaternion newRotation;

                    if (sourceState.sourcePose.TryGetRotation(out newRotation, InteractionSourceNode.Pointer) && ValidRotation(newRotation))
                    {
                        Controller.transform.localRotation = newRotation;
                    }
                }
            }
        }
        else
        {
            // Controller source not detected.
            message = "<color=blue>Trying to detect controller source</color>";

            if (_isAttached == true)
            {
                // A source was previously connected, however, has been lost. Disconnected
                // all registered events.

                _isAttached = false;

                InteractionManager.InteractionSourceUpdated -= InteractionManager_InteractionSourceUpdated;

                message = "<color=red>Source Lost: Detaching Controller Source Events</color>";
            }
        }

        if(message != string.Empty)
        {
            Debug.Log(message);
        }
#endif
    }
/// <summary> /// This registered event is triggered when a source state has been updated. /// </summary> /// <param name="obj"></param> private void InteractionManager_InteractionSourceUpdated(InteractionSourceUpdatedEventArgs obj) { if (obj.state.source.handedness == _handness) { if(obj.state.thumbstickPosition.magnitude > 0.2f) { float thumbstickY = obj.state.thumbstickPosition.y; // Vertical Input. if (thumbstickY > 0.3f || thumbstickY < -0.3f) { _playerMovementTranslation = Camera.main.transform.forward; _playerMovementTranslation.y = 0; transform.Translate(_playerMovementTranslation * UserSpeed * Time.deltaTime * thumbstickY, Space.World); } } } }/// <summary> /// Check that controller position is valid. /// </summary> /// <param name="inputVector3">The Vector3 to check</param> /// <returns>The position is valid</returns> private bool ValidPosition(Vector3 inputVector3) { return !float.IsNaN(inputVector3.x) && !float.IsNaN(inputVector3.y) && !float.IsNaN(inputVector3.z) && !float.IsInfinity(inputVector3.x) && !float.IsInfinity(inputVector3.y) && !float.IsInfinity(inputVector3.z); } /// <summary> /// Check that controller rotation is valid. /// </summary> /// <param name="inputQuaternion">The Quaternion to check</param> /// <returns>The rotation is valid</returns> private bool ValidRotation(Quaternion inputQuaternion) { return !float.IsNaN(inputQuaternion.x) && !float.IsNaN(inputQuaternion.y) && !float.IsNaN(inputQuaternion.z) && !float.IsNaN(inputQuaternion.w) && !float.IsInfinity(inputQuaternion.x) && !float.IsInfinity(inputQuaternion.y) && !float.IsInfinity(inputQuaternion.z) && !float.IsInfinity(inputQuaternion.w); }最後,在 Update () 方法內新增 方法呼叫。
    // Update is called once per frame
    void Update()
    {
        UpdateControllerState();
    }
請務必先將變更儲存在 Visual Studio 中,再返回 Unity。
第 11 章 - 設定文本參考
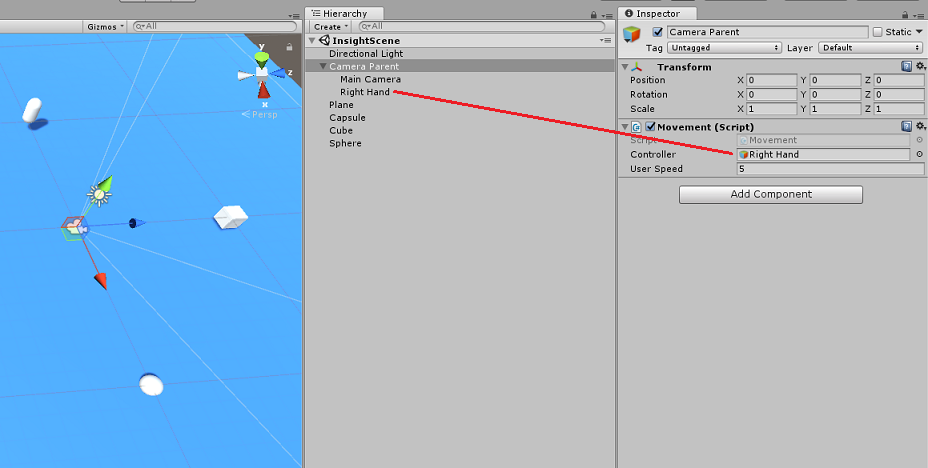
在本章中,您需要將 移動 腳本放在 數字相機父 代上,並設定其參考目標。 該腳本接著會處理將其他腳本放置在需要的位置。
從 [項目面板] 的 [腳本] 資料夾中,將 [移動] 腳本拖曳至位於階層面板中的 Camera Parent 物件。
![[專案] 和 [階層] 面板的螢幕快照。移動會反白顯示。](images/azurelabs-lab309-48.png)
按兩下 [相機父代]。 在階層面板中,將右側物件從階層面板拖曳至偵測器面板中的參考目標 Controller。 將 [使用者速度 ] 設定為 5,如下圖所示。
第 12 章 - 建置 Unity 專案
此專案 Unity 區段所需的一切現在都已完成,因此是時候從 Unity 建置它了。
流覽至 [ 組建設定], ([檔案>建置設定 ]) 。
從 [ 組建設定] 視窗中,按兩下 [ 建置]。
![[組建設定] 視窗的螢幕快照,其中顯示組建中的場景。](images/azurelabs-lab309-50.png)
隨即會出現 檔案總管 視窗,提示您輸入組建的位置。 按兩下左上角) 中的 [ 新增資料夾 ],以建立 (的新資料夾,並將它命名為 BUILDS。
![顯示醒目提示 [組建] 資料夾 檔案總管 螢幕快照。](images/azurelabs-lab309-51.png)
開啟新的 BUILDS 資料夾,然後再次使用 [ 新增 資料夾] () 建立另一個資料夾,並將它命名 MR_Azure_Application_Insights。
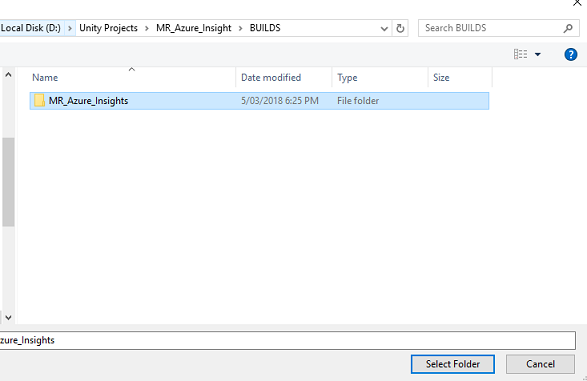
選取 MR_Azure_Application_Insights 資料夾后,按兩下 [ 選取資料夾]。 專案需要一分鐘左右的時間才能建置。
在 [建置] 之後,檔案總管 會顯示新專案的位置。
第 13 章 - 將MR_Azure_Application_Insights應用程式部署到您的電腦
若要在本機電腦上部署 MR_Azure_Application_Insights 應用程式:
在 Visual Studio 中開啟MR_Azure_Application_Insights應用程式的方案檔。
在 [ 解決方案平臺] 中,選取 [x86,本機計算機]。
在 [ 方案組態] 中 ,選取 [ 偵錯]。
![Visual Studio [方案組態] 畫面的螢幕快照,其中顯示功能表欄中的 [偵錯]。](images/azurelabs-lab309-53.png)
移至 [建置] 功能表 ,然後按下 [ 部署解決方案 ] 將應用程式側載至您的電腦。
您的應用程式現在應該會出現在已安裝的應用程式清單中,準備好啟動。
啟動混合實境應用程式。
在場景中移動、接近物件並查看對象,當 Azure Insight Service 收集到足夠的事件數據時,它會將最接近的物件設定為綠色。
重要事項
雖然服務收集 事件和計量 的平均等候時間大約需要 15 分鐘,但在某些情況下,最多可能需要 1 小時。
第 14 章 - Application Insights 服務入口網站
在場景四處漫遊並注視數個對象之後,您就可以看到 Application Insights Service 入口網站中收集的數據。
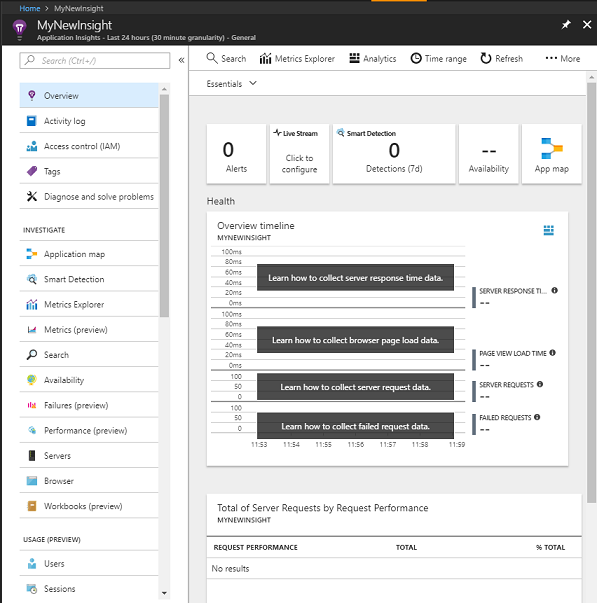
返回 至您的 Application Insights 服務入口網站。
選 取 [計量總管]。
![顯示選項清單的 MyNewInsight 面板螢幕快照。計量瀏覽器會列在 [調查] 區段中。](images/azurelabs-lab309-54.png)
它會在包含圖表的索引標籤中開啟,該圖表代表與您應用程式相關的 事件和計量 。 如上所述,可能需要一些時間 (最多 1 小時) ,數據才會顯示在圖表中
![[計量總管] 的螢幕快照,其中顯示事件和計量圖表。](images/azurelabs-lab309-55.png)
選取 [依應用程式版本的事件總數] 中的 [事件] 列,以查看事件名稱的詳細明細。
![[搜尋] 面板的螢幕快照,其中顯示自定義事件篩選的結果。](images/azurelabs-lab309-56.png)
您的 Application Insights Service 應用程式已完成
恭喜,您已建置混合實境應用程式,利用 Application Insights Service 來監視使用者在應用程式內的活動。
獎勵練習
練習 1
請嘗試繁衍 ObjectInScene 物件,而不是手動建立物件,並在腳本內的平面上設定其座標。 如此一來,您可以詢問 Azure 從注視或鄰近結果) (哪些最常用的物件,併產生其中一個 額外的 物件。
練習 2
依時間排序 Application Insights 結果,以便取得最相關的數據,並在應用程式中實作該時間敏感數據。