從您的應用程式列印
本主題描述如何從 Windows 應用程式列印。
如需更進階的功能,請參閱 自訂列印預覽 UI。
- 重要 API:Windows.Graphics.Printing 命名空間、PrintManager 類別、PrintTask、Microsoft.UI.Xaml.Printing 命名空間、PrintDocument 類別
註冊列印
將列印新增至應用程式的第一個步驟是取得目前視窗的 PrintManager 對象來註冊列印。 PrintManager 類別負責協調應用程式的列印流程。 若要使用這個類別,您必須先呼叫方法,這個方法會傳回目前使用中視窗特定的 PrintManager 物件。
- 在非 UWP 應用程式中,使用 PrintManagerInterop.GetForWindow 方法。
- 在UWP應用程式中,使用 PrintManager.GetForCurrentView 方法。
您的應用程式必須在您希望使用者能夠列印的每個螢幕上執行此操作。 只有向使用者顯示的螢幕才能註冊列印。 如果應用程式的一個畫面已註冊列印,退出時必須取消註冊列印。 如果它被另一個畫面取代,下一個畫面必須在開啟時註冊列印。
提示
如果您需要支援從應用程式中的多個頁面進行列印,您可以將此列印程式碼放入通用幫助程式類別中,並讓您的應用程式頁面重複使用它。 有關如何執行此操作的範例,請參閱 PrintHelperUWP 列印範例中的類別。
使用者起始列印之後,您可以使用 PrintDocument 來準備要傳送至印表機的頁面。此 PrintDocument 類型位於 Microsoft.UI.Xaml.Printing 命名空間,以及支援準備 XAML 內容以進行列印的其他類型。
PrintDocument 類別可用來處理應用程式與 PrintManager 之間的大部分互動,但它會公開自己的數個回呼。 在註冊期間,建立和 PrintDocument 的PrintManager實例,並註冊其列印事件的處理程式。
在此範例中,註冊會在方法中 RegisterForPrinting 執行,此方法是從頁面的 Loaded 事件處理程式呼叫。
using Microsoft.UI.Xaml.Printing;
using Windows.Graphics.Printing;

PrintDocument printDocument = null;
IPrintDocumentSource printDocumentSource = null;
List<UIElement> printPreviewPages = new List<UIElement>();

private void MainPage_Loaded(object sender, RoutedEventArgs e)
{
    RegisterForPrinting();
}

private void RegisterForPrinting()
{
    var hWnd = WinRT.Interop.WindowNative.GetWindowHandle(App.MainWindow);
    PrintManager printManager = PrintManagerInterop.GetForWindow(hWnd);
    printManager.PrintTaskRequested += PrintTask_Requested;

    printDocument = new PrintDocument();
    printDocumentSource = printDocument.DocumentSource;
    printDocument.Paginate += PrintDocument_Paginate;
    printDocument.GetPreviewPage += PrintDocument_GetPreviewPage;
    printDocument.AddPages += PrintDocument_AddPages;
}
警告
在UWP列印範例中,建議從 OnNavigatedTo 方法覆寫註冊列印。 在非 UWP 應用程式中,您必須在 PrintManagerInterop.GetForWindow 呼叫中使用視窗句柄,因此您應該使用 Loaded 事件來確保視窗句柄不是 null,這可能是 OnNavigatedTo 的情況。
在這裡,事件處理程式會從 OnNavigatedFrom 方法呼叫的方法中UnregisterForPrinting取消註冊。
protected override void OnNavigatedFrom(NavigationEventArgs e)
{
    base.OnNavigatedFrom(e);
    UnregisterForPrinting();
}


private void UnregisterForPrinting()
{
    if (printDocument == null)
    {
        return;
    }

    printDocument.Paginate -= PrintDocument_Paginate;
    printDocument.GetPreviewPage -= PrintDocument_GetPreviewPage;
    printDocument.AddPages -= PrintDocument_AddPages;

    var hWnd = WinRT.Interop.WindowNative.GetWindowHandle(App.MainWindow);
    PrintManager printManager = PrintManagerInterop.GetForWindow(hWnd);
    printManager.PrintTaskRequested -= PrintTask_Requested;
}
注意
如果您有多頁應用程式且未中斷列印連線,當使用者離開頁面並返回頁面時,就會擲回例外狀況。
建立列印按鈕
將列印按鈕新增至您想要顯示的應用程式畫面。 請確定它不會干擾您想要列印的內容。
<Button x:Name="InvokePrintingButton"
        Content="Print"
        Click="InvokePrintingButton_Click"/>
在 Button 的 Click 事件處理程式中,向使用者顯示 Windows 列印 UI。
- 在非 UWP 應用程式中,使用 PrintManagerInterop.ShowPrintUIForWindowAsync 方法。
- 在UWP應用程式中,使用 PrintManager.ShowPrintUIAsync 方法。
var hWnd = WinRT.Interop.WindowNative.GetWindowHandle(App.MainWindow);
await PrintManagerInterop.ShowPrintUIForWindowAsync(hWnd);
此方法是顯示適當列印視窗的異步方法,因此您必須將async關鍵詞新增至 Click 處理程式。 建議您先呼叫 IsSupported 方法,以檢查應用程式是否正在支援列印的裝置上執行 (並處理它不是的情況)。 如果因為任何其他原因而無法執行列印,此方法將會擲回例外狀況。 建議您攔截這些例外狀況,並讓使用者知道列印無法繼續。
在此範例中,按鈕按兩下的事件處理常式中會顯示列印視窗。 如果方法擲回例外狀況 (因為當時無法執行列印),ContentDialog 控制項會通知使用者情況。
private async void InvokePrintingButton_Click(object sender, RoutedEventArgs e)
{
    if (PrintManager.IsSupported())
    {
        try
        {
            // Show system print UI.
            var hWnd = WinRT.Interop.WindowNative.GetWindowHandle(App.MainWindow);
            await Windows.Graphics.Printing.PrintManagerInterop.ShowPrintUIForWindowAsync(hWnd);
        }
        catch
        {
            // Printing cannot proceed at this time.
            ContentDialog noPrintingDialog = new ContentDialog()
            {
                Title = "Printing error",
                Content = "\nSorry, printing can' t proceed at this time.",
                PrimaryButtonText = "OK"
            };
            await noPrintingDialog.ShowAsync();
        }
    }
    else
    {
        // Printing is not supported on this device.
        ContentDialog noPrintingDialog = new ContentDialog()
        {
            Title = "Printing not supported",
            Content = "\nSorry, printing is not supported on this device.",
            PrimaryButtonText = "OK"
        };
        await noPrintingDialog.ShowAsync();
    }
}
格式化應用程式的內容
呼叫 時 ShowPrintUIForWindowAsync , 會引發 PrintTaskRequested 事件。 在事件處理程式中PrintTaskRequested,您可以呼叫 PrintTaskRequest.CreatePrintTask 方法來建立 PrintTask。 傳遞列印頁面的標題和 PrintTaskSourceRequestedHandler 委派的名稱。 標題會顯示在列印預覽UI中。 PrintTask的連結PrintTaskSourceRequestedHandler會與 PrintDocument 提供內容之的連結。
在此範例中,也會定義完成處理常式來攔截錯誤。 處理完成事件是個好主意,因為您的應用程式可以讓使用者知道是否發生錯誤並提供可能的解決方案。 同樣地,您的應用程式可以使用完成事件來指出使用者在列印作業成功之後要採取的後續步驟。
private void PrintTask_Requested(PrintManager sender, PrintTaskRequestedEventArgs args)
{
    // Create the PrintTask.
    // Defines the title and delegate for PrintTaskSourceRequested.
    PrintTask printTask = args.Request.CreatePrintTask("WinUI 3 Printing example", PrintTaskSourceRequested);

    // Handle PrintTask.Completed to catch failed print jobs.
    printTask.Completed += PrintTask_Completed;

    DispatcherQueue.TryEnqueue(DispatcherQueuePriority.Normal, () =>
    {
        InvokePrintingButton.IsEnabled = false;
    });
}

private void PrintTaskSourceRequested(PrintTaskSourceRequestedArgs args)
{
    // Set the document source.
    args.SetSource(printDocumentSource);
}

private void PrintTask_Completed(PrintTask sender, PrintTaskCompletedEventArgs args)
{
    string StatusBlockText = string.Empty;

    // Notify the user if the print operation fails.
    if (args.Completion == PrintTaskCompletion.Failed)
    {
        StatusBlockText = "Failed to print.";
    }
    else if (args.Completion == PrintTaskCompletion.Canceled)
    {
        StatusBlockText = "Printing canceled.";
    }
    else
    {
        StatusBlockText = "Printing completed.";
    }


    DispatcherQueue.TryEnqueue(DispatcherQueuePriority.Normal, () =>
    {
        StatusBlock.Text = StatusBlockText;
        InvokePrintingButton.IsEnabled = true;
    });
}
建立列印工作之後,PrintManager 會藉由引發Paginate 事件,要求列印頁面集合顯示在列印預覽UI中。 (這對應於 Paginate 介面的 IPrintPreviewPageCollection 方法。此時會呼叫您在註冊期間建立的事件處理程式。
重要
如果使用者變更列印設定,將會再次呼叫分頁事件處理常式,以允許您重排內容。 為了獲得最佳使用者體驗,建議您在重排內容之前檢查設定,並避免在不需要時重新初始化編頁內容。
在 Paginate 事件處理程式中,建立要顯示在列印預覽 UI 中的頁面,並傳送至印表機。 您用來準備應用程式內容以進行列印的程式碼專屬於您的應用程式和您列印的內容。
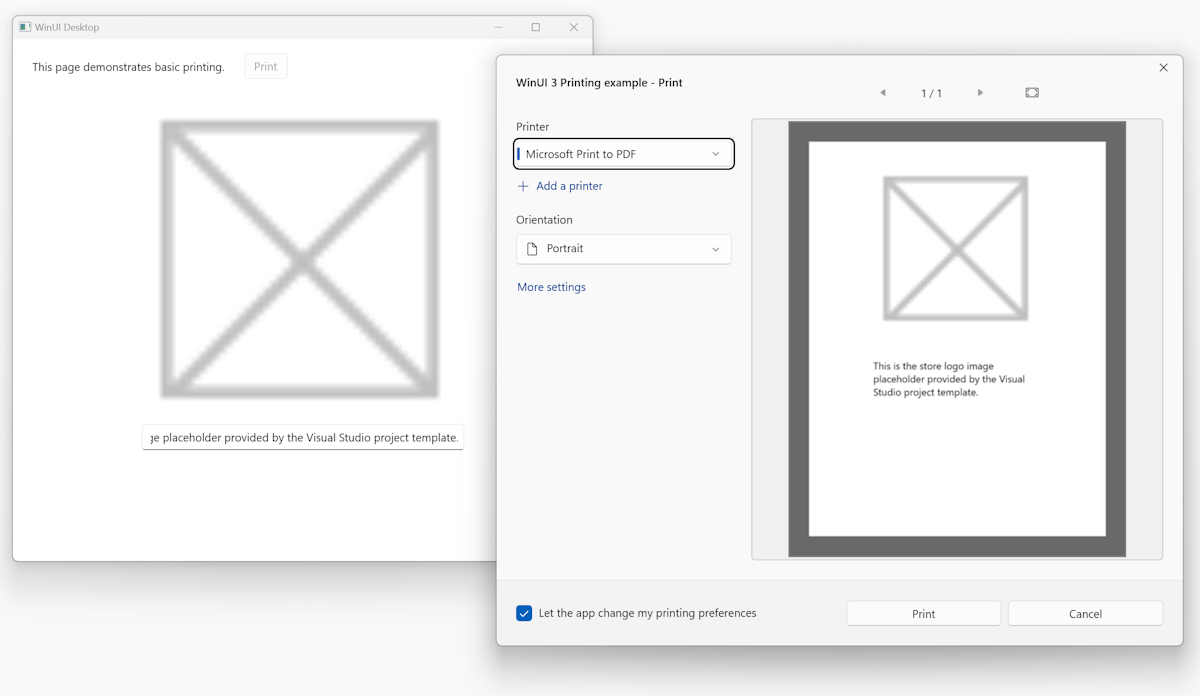
此範例示範建立單一列印頁面的基本步驟,從畫面上顯示的頁面列印影像和標題。
- 建立清單來保存要列印的UI元素(頁面)。
- 清除預覽頁面清單,以便在每次分頁時不會重複頁面。
- 使用 PrintPageDescription 取得印表機頁面的大小。
- 格式化您的 XAML 內容以符合印表機頁面。 要列印的每個頁面都是 XAML UI 元素(通常是包含其他內容的容器元素)。 在此範例中,元素會在程序代碼中建立,並使用與畫面上所示元素相同的數據。
- 視需要將內容流動至其他頁面。 本基本範例中不會顯示多個頁面,但將內容分割成頁面是Paginate事件的重要部分。
- 將每個頁面新增至要列印的頁面清單。
- 設定 PrintDocument 上的預覽頁面計數。
List<UIElement> printPreviewPages = new List<UIElement>();

private void PrintDocument_Paginate(object sender, PaginateEventArgs e)
{
    // Clear the cache of preview pages.
    printPreviewPages.Clear();

    // Get the PrintTaskOptions.
    PrintTaskOptions printingOptions = ((PrintTaskOptions)e.PrintTaskOptions);
    // Get the page description to determine the size of the print page.
    PrintPageDescription pageDescription = printingOptions.GetPageDescription(0);

    // Create the print layout.
    StackPanel printLayout = new StackPanel();
    printLayout.Width = pageDescription.PageSize.Width;
    printLayout.Height = pageDescription.PageSize.Height;
    printLayout.BorderBrush = new Microsoft.UI.Xaml.Media.SolidColorBrush(Microsoft.UI.Colors.Black);
    printLayout.BorderThickness = new Thickness(48);

    Image printImage = new Image();
    printImage.Source = printContent.Source;

    printImage.Width = pageDescription.PageSize.Width / 2;
    printImage.Height = pageDescription.PageSize.Height / 2;

    TextBlock imageDescriptionText = new TextBlock();
    imageDescriptionText.Text = imageDescription.Text;
    imageDescriptionText.FontSize = 24;
    imageDescriptionText.HorizontalAlignment = HorizontalAlignment.Center;
    imageDescriptionText.Width = pageDescription.PageSize.Width / 2;
    imageDescriptionText.TextWrapping = TextWrapping.WrapWholeWords;

    printLayout.Children.Add(printImage);
    printLayout.Children.Add(imageDescriptionText);

    // Add the print layout to the list of preview pages.
    printPreviewPages.Add(printLayout);

    // Report the number of preview pages created.
    PrintDocument printDocument = (PrintDocument)sender;
    printDocument.SetPreviewPageCount(printPreviewPages.Count,
                                          PreviewPageCountType.Intermediate);
}
以下是應用程式 UI 的螢幕快照,以及內容在列印預覽 UI 中的顯示方式。

當列印預覽視窗中顯示特定頁面時,PrintManager 會引發 GetPreviewPage 事件。 這會對應至 MakePage 介面的 IPrintPreviewPageCollection 方法。 此時會呼叫您在註冊期間建立的事件處理程式。
在 GetPreviewPage 事件處理程式中,設定列印文件的適當頁面。
private void PrintDocument_GetPreviewPage(object sender, GetPreviewPageEventArgs e)
{
    PrintDocument printDocument = (PrintDocument)sender;
    printDocument.SetPreviewPage(e.PageNumber, printPreviewPages[e.PageNumber - 1]);
}
最後,一旦使用者按兩下列印按鈕,PrintManager 會呼叫 MakeDocument 介面的 IDocumentPageSource 方法,要求要傳送至印表機之頁面的最終集合。 在 XAML 中,這會引發 AddPages 事件。 此時會呼叫您在註冊期間建立的事件處理程式。
在 AddPages 事件處理程式中,將頁面集合中的頁面新增至 要傳送至印表機的 PrintDocument 物件。 如果使用者指定要列印的特定頁面或頁面範圍,您可以使用此處的資訊只新增實際要傳送至列印機的頁面。
private void PrintDocument_AddPages(object sender, AddPagesEventArgs e)
{
    PrintDocument printDocument = (PrintDocument)sender;

    // Loop over all of the preview pages and add each one to be printed.
    for (int i = 0; i < printPreviewPages.Count; i++)
    {
        printDocument.AddPage(printPreviewPages[i]);
    }

    // Indicate that all of the print pages have been provided.
    printDocument.AddPagesComplete();
}
