使用 Windows 機器學習 API 在 Windows 應用程式中部署 TensorFlow 模型
最後一節將說明如何使用 GUI 建立簡單的 UWP 應用程式,以使用 Windows ML 評估 YOLO 模型來串流網絡攝影機並偵測物件。
在 Visual Studio 中建立 UWP 應用程式
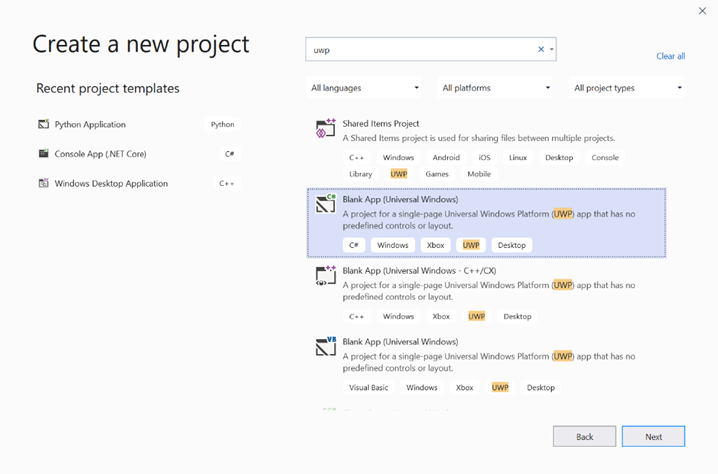
- 開啟 Visual Studio,然後選取
Create a new project.[搜尋 UWP],然後選取Blank App (Universal Windows)。

- 在下一個頁面上,提供專案 [名稱] 和 [位置] 來設定專案設定。 然後選取您應用程式的目標和最低 OS 版本。 若要使用 Windows ML API,您必須使用 X,或者您可以選擇 NuGet 套件以支援至 X。如果您選擇使用 NuGet 套件,請遵循下列指示 [link]。
呼叫 Windows ML API 以評估模型
步驟 1:使用機器學習程式碼產生器來產生 Windows ML API 的包裝函式類別。
步驟 2:修改產生的 .cs 檔案中產生的程式碼。 最終檔案看起來像這樣:
using System;
using System.Collections.Generic;
using System.Threading.Tasks;
using Windows.Media;
using Windows.Storage;
using Windows.Storage.Streams;
using Windows.AI.MachineLearning;
namespace yolodemo
{

    public sealed class YoloInput
    {
        public TensorFloat input_100; // shape(-1,3,416,416)
    }

    public sealed class YoloOutput
    {
        public TensorFloat concat_1600; // shape(-1,-1,-1)
    }

    public sealed class YoloModel
    {
        private LearningModel model;
        private LearningModelSession session;
        private LearningModelBinding binding;
        public static async Task<YoloModel> CreateFromStreamAsync(IRandomAccessStreamReference stream)
        {
            YoloModel learningModel = new YoloModel();
            learningModel.model = await LearningModel.LoadFromStreamAsync(stream);
            learningModel.session = new LearningModelSession(learningModel.model);
            learningModel.binding = new LearningModelBinding(learningModel.session);
            return learningModel;
        }
        public async Task<YoloOutput> EvaluateAsync(YoloInput input)
        {
            binding.Bind("input_1:0", input.input_100);
            var result = await session.EvaluateAsync(binding, "0");
            var output = new YoloOutput();
            output.concat_1600 = result.Outputs["concat_16:0"] as TensorFloat;
            return output;
        }
    }
}
評估每個視訊畫面以偵測物件並繪製周框方塊。
- 將下列程式庫新增至 mainPage.xaml.cs。
using System.Threading.Tasks;
using Windows.Devices.Enumeration;
using Windows.Media;
using Windows.Media.Capture;
using Windows.Storage;
using Windows.UI;
using Windows.UI.Xaml.Media.Imaging;
using Windows.UI.Xaml.Shapes;
using Windows.AI.MachineLearning;
- 在 中
public sealed partial class MainPage : Page新增下列變數。
private MediaCapture _media_capture;
private LearningModel _model;
private LearningModelSession _session;
private LearningModelBinding _binding;
private readonly SolidColorBrush _fill_brush = new SolidColorBrush(Colors.Transparent);
private readonly SolidColorBrush _line_brush = new SolidColorBrush(Colors.DarkGreen);
private readonly double _line_thickness = 2.0;
        private readonly string[] _labels =
            {
                "<list of labels>"
        };
- 建立如何格式化偵測結果的結構。
        internal struct DetectionResult
        {
            public string label;
            public List<float> bbox;
            public double prob;
        }
- 建立比較子物件,以比較 Box 類型的兩個物件。 這個類別將用來在偵測到的物件周圍繪製周框方塊。
        class Comparer : IComparer<DetectionResult>
        {
            public int Compare(DetectionResult x, DetectionResult y)
            {
                return y.prob.CompareTo(x.prob);
            }
        }
- 新增下列方法來初始化裝置的網路攝影機串流,並開始處理每個畫面以偵測物件。
        private async Task InitCameraAsync()
        {
            if (_media_capture == null || _media_capture.CameraStreamState == Windows.Media.Devices.CameraStreamState.Shutdown || _media_capture.CameraStreamState == Windows.Media.Devices.CameraStreamState.NotStreaming)
            {
                if (_media_capture != null)
                {
                    _media_capture.Dispose();
                }

                MediaCaptureInitializationSettings settings = new MediaCaptureInitializationSettings();
                var cameras = await DeviceInformation.FindAllAsync(DeviceClass.VideoCapture);
                var camera = cameras.FirstOrDefault();
                settings.VideoDeviceId = camera.Id;

                _media_capture = new MediaCapture();
                await _media_capture.InitializeAsync(settings);
                WebCam.Source = _media_capture;
            }

            if (_media_capture.CameraStreamState == Windows.Media.Devices.CameraStreamState.NotStreaming)
            {
                await _media_capture.StartPreviewAsync();
                WebCam.Visibility = Visibility.Visible;
            }

            ProcessFrame();
        }
- 新增下列方法來處理每個框架。 此方法會呼叫 EvaluateFrame 和 DrawBoxes,我們將在稍後的步驟中實作。
        private async Task ProcessFrame()
        {
            var frame = new VideoFrame(Windows.Graphics.Imaging.BitmapPixelFormat.Bgra8, (int)WebCam.Width, (int)WebCam.Height);
            await _media_capture.GetPreviewFrameAsync(frame);
            var results = await EvaluateFrame(frame);
            await DrawBoxes(results.ToArray(), frame);
            ProcessFrame();
        }
- 建立新的 Sigmoid 浮點數
        private float Sigmoid(float val)
        {
            var x = (float)Math.Exp(val);
            return x / (1.0f + x);
        }
- 建立正確偵測物件的臨界值。
        private float ComputeIOU(DetectionResult DRa, DetectionResult DRb)
        {
            float ay1 = DRa.bbox[0];
            float ax1 = DRa.bbox[1];
            float ay2 = DRa.bbox[2];
            float ax2 = DRa.bbox[3];
            float by1 = DRb.bbox[0];
            float bx1 = DRb.bbox[1];
            float by2 = DRb.bbox[2];
            float bx2 = DRb.bbox[3];

            Debug.Assert(ay1 < ay2);
            Debug.Assert(ax1 < ax2);
            Debug.Assert(by1 < by2);
            Debug.Assert(bx1 < bx2);

            // determine the coordinates of the intersection rectangle
            float x_left = Math.Max(ax1, bx1);
            float y_top = Math.Max(ay1, by1);
            float x_right = Math.Min(ax2, bx2);
            float y_bottom = Math.Min(ay2, by2);

            if (x_right < x_left || y_bottom < y_top)
                return 0;
            float intersection_area = (x_right - x_left) * (y_bottom - y_top);
            float bb1_area = (ax2 - ax1) * (ay2 - ay1);
            float bb2_area = (bx2 - bx1) * (by2 - by1);
            float iou = intersection_area / (bb1_area + bb2_area - intersection_area);

            Debug.Assert(iou >= 0 && iou <= 1);
            return iou;
        }
- 實作下列清單,以追蹤框架中偵測到的目前物件。
        private List<DetectionResult> NMS(IReadOnlyList<DetectionResult> detections,
            float IOU_threshold = 0.45f,
            float score_threshold=0.3f)
        {
            List<DetectionResult> final_detections = new List<DetectionResult>();
            for (int i = 0; i < detections.Count; i++)
            {
                int j = 0;
                for (j = 0; j < final_detections.Count; j++)
                {
                    if (ComputeIOU(final_detections[j], detections[i]) > IOU_threshold)
                    {
                        break;
                    }
                }
                if (j==final_detections.Count)
                {
                    final_detections.Add(detections[i]);
                }
            }
            return final_detections;
        }
- 實作下列方法。
        private List<DetectionResult> ParseResult(float[] results)
        {
            int c_values = 84;
            int c_boxes = results.Length / c_values;
            float confidence_threshold = 0.5f;
            List<DetectionResult> detections = new List<DetectionResult>();
            this.OverlayCanvas.Children.Clear();
            for (int i_box = 0; i_box < c_boxes; i_box++)
            {
                float max_prob = 0.0f;
                int label_index = -1;
                for (int j_confidence = 4; j_confidence < c_values; j_confidence++)
                {
                    int index = i_box * c_values + j_confidence;
                    if (results[index] > max_prob)
                    {
                        max_prob = results[index];
                        label_index = j_confidence - 4;
                    }
                }
                if (max_prob > confidence_threshold)
                {
                    List<float> bbox = new List<float>();
                    bbox.Add(results[i_box * c_values + 0]);
                    bbox.Add(results[i_box * c_values + 1]);
                    bbox.Add(results[i_box * c_values + 2]);
                    bbox.Add(results[i_box * c_values + 3]);

                    detections.Add(new DetectionResult()
                    {
                        label = _labels[label_index],
                        bbox = bbox,
                        prob = max_prob
                    });
                }
            }
            return detections;
        }
- 新增下列方法,以在框架中偵測到的物件周圍繪製方塊。
private async Task DrawBoxes(float[] results, VideoFrame frame)
        {
            List<DetectionResult> detections = ParseResult(results);
            Comparer cp = new Comparer();
            detections.Sort(cp);
            IReadOnlyList<DetectionResult> final_detetions = NMS(detections);

            for (int i=0; i < final_detetions.Count; ++i)
            {
                int top = (int)(final_detetions[i].bbox[0] * WebCam.Height);
                int left = (int)(final_detetions[i].bbox[1] * WebCam.Width);
                int bottom = (int)(final_detetions[i].bbox[2] * WebCam.Height);
                int right = (int)(final_detetions[i].bbox[3] * WebCam.Width);

                var brush = new ImageBrush();
                var bitmap_source = new SoftwareBitmapSource();
                await bitmap_source.SetBitmapAsync(frame.SoftwareBitmap);

                brush.ImageSource = bitmap_source;
                // brush.Stretch = Stretch.Fill;

                this.OverlayCanvas.Background = brush;

                var r = new Rectangle();
                r.Tag = i;
                r.Width = right - left;
                r.Height = bottom - top;
                r.Fill = this._fill_brush;
                r.Stroke = this._line_brush;
                r.StrokeThickness = this._line_thickness;
                r.Margin = new Thickness(left, top, 0, 0);

                this.OverlayCanvas.Children.Add(r);
                // Default configuration for border
                // Render text label


                var border = new Border();
                var backgroundColorBrush = new SolidColorBrush(Colors.Black);
                var foregroundColorBrush = new SolidColorBrush(Colors.SpringGreen);
                var textBlock = new TextBlock();
                textBlock.Foreground = foregroundColorBrush;
                textBlock.FontSize = 18;

                textBlock.Text = final_detetions[i].label;
                // Hide
                textBlock.Visibility = Visibility.Collapsed;
                border.Background = backgroundColorBrush;
                border.Child = textBlock;

                Canvas.SetLeft(border, final_detetions[i].bbox[1] * 416 + 2);
                Canvas.SetTop(border, final_detetions[i].bbox[0] * 416 + 2);
                textBlock.Visibility = Visibility.Visible;
                // Add to canvas
                this.OverlayCanvas.Children.Add(border);
            }
        }
- 既然我們已經處理了必要的基礎結構,是時候納入評估本身了。 此方法會根據目前的框架評估模型,以偵測物件。
        private async Task<List<float>> EvaluateFrame(VideoFrame frame)
        {
            _binding.Clear();
            _binding.Bind("input_1:0", frame);
            var results = await _session.EvaluateAsync(_binding, "");
            Debug.Print("output done\n");

            TensorFloat result = results.Outputs["Identity:0"] as TensorFloat;
            var shape = result.Shape;
            var data = result.GetAsVectorView();

            return data.ToList<float>();
        }
- 我們的應用程式需要以某種方式啟動。 新增方法,當使用者按下
Go按鈕時,會開始網路攝影機串流和模型評估。
        private void button_go_Click(object sender, RoutedEventArgs e)
        {
            InitModelAsync();
            InitCameraAsync();
        }
- 新增方法來呼叫 Windows ML API 以評估模型。 首先,模型會從儲存體載入,然後建立會話並系結至記憶體。
        private async Task InitModelAsync()
        {
            var model_file = await StorageFile.GetFileFromApplicationUriAsync(new Uri("ms-appx:///Assets//Yolo.onnx"));
            _model = await LearningModel.LoadFromStorageFileAsync(model_file);
            var device = new LearningModelDevice(LearningModelDeviceKind.Cpu);
            _session = new LearningModelSession(_model, device);
            _binding = new LearningModelBinding(_session);
        }
啟動應用程式
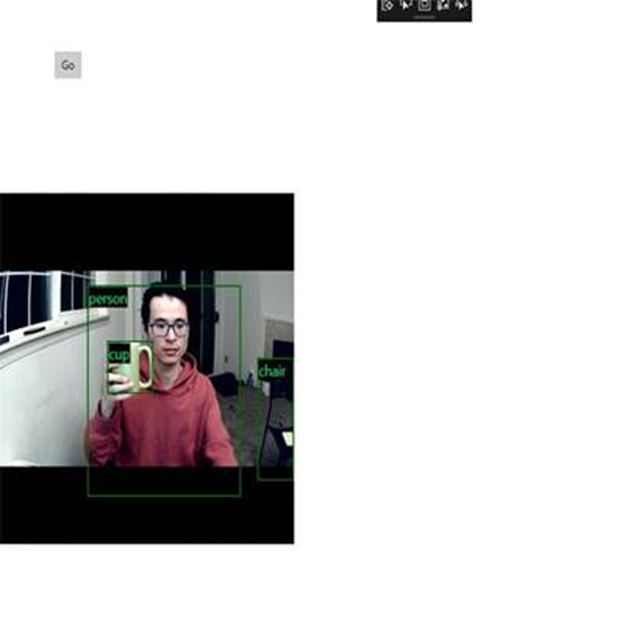
您現在已成功建立即時物件偵測應用程式! Run選取 Visual Studio 頂端列上的按鈕以啟動應用程式。 應用程式看起來應該像這樣。

其他資源
若要深入了解此教學課程中提及的主題,請瀏覽下列資源:
- Windows ML 工具:深入瞭解 Windows ML 儀表板 、 WinMLRunner 和 mglen Windows ML 程式碼產生器等 工具。
- ONNX 模型 :深入瞭解 ONNX 格式。
- Windows ML 效能和記憶體 :深入瞭解如何使用 Windows ML 管理應用程式效能。
- Windows 機器學習 API 參考 :深入瞭解 Windows ML API 的三個領域。