使用 AD FS 的身分識別委派案例
[從 .NET Framework 4.5 開始,Windows Identity Foundation (WIF) 已完全整合至 .NET Framework。 本主題所處理的 WIF 版本 (WIF 3.5) 已被取代,只有在針對 .NET Framework 3.5 SP1 或 .NET Framework 4 進行開發時,才應該使用該版本。 如需 .NET Framework 4.5 (也稱為 WIF 4.5) 中 WIF 的詳細資訊,請參閱《.NET Framework 4.5 開發指南》中的 Windows Identity Foundation 文件。]
此案例描述需要存取後端資源的應用程式,而這些後端資源需要身分識別委派鏈結,才能執行存取控制檢查。 簡單的身分識別委派鏈結通常由初始呼叫者的相關資訊和即時呼叫者的身分識別所組成。
使用現今 Windows 平台上的 Kerberos 委派模型,後端資源只能存取即時呼叫者的身分識別,而不是存取初始呼叫者的身分識別。 此模型通常稱為受信任的子系統模型。 WIF 會使用 Actor 屬性,維護初始呼叫者以及委派鏈結中即時呼叫者的身分識別。
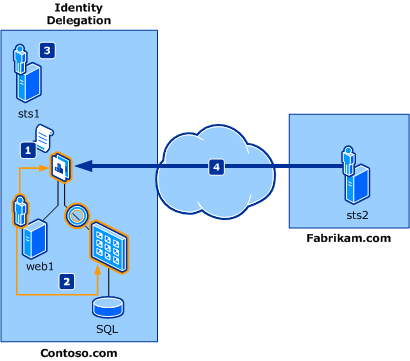
下圖說明一般身分識別委派案例,其中 Fabrikam 員工會存取 Contoso.com 應用程式中公開的資源。

參與此案例的虛構使用者如下:
- Frank:想要存取 Contoso 資源的 Fabrikam 員工。
- Daniel:在應用程式中實作必要變更的 Contoso 應用程式開發人員。
- Adam:Contoso IT 系統管理員。
涉及此案例的元件如下:
- web1:具有後端資源連結的 Web 應用程式,這些後端資源需要初始呼叫者的委派身分識別。 此應用程式是使用 ASP.NET 所建置。
- 存取 SQL Server 的 Web 服務,其需要初始呼叫者的委派身分識別,以及即時呼叫者的身分識別。 此服務是使用 WCF 所建置。
- sts1:扮演宣告提供者角色的 STS,其會發出應用程式預期的宣告 (web1)。 其已與 Fabrikam.com 同時也與應用程式建立信任。
- sts2:為 Fabrikam.com 扮演身分識別提供者角色的 STS,其會提供 Fabrikam 員工用來驗證的端點。 其已與 Contoso.com 建立信任,以便允許 Fabrikam 員工存取 Contoso.com 上的資源。
注意
通常在此案例中使用的「ActAs 權杖」一詞是指 STS 所發行的權杖,其中包含使用者的身分識別。 Actor 屬性包含 STS 的身分識別。
如上圖所示,此案例中的流程如下:
- Contoso 應用程式會設定為取得 ActAs 權杖,其中包含 Fabrikam 員工的身分識別,以及 Actor 屬性中即時呼叫者的身分識別。 Daniel 已對應用程式實作這些變更。
- Contoso 應用程式會設定為將 ActAs 權杖傳遞至後端服務。 Daniel 已對應用程式實作這些變更。
- Contoso Web 服務會設定為呼叫 sts1 來驗證 ActAs 權杖。 Adam 已啟用 sts1 來處理委派要求。
- Fabrikam 使用者 Frank 會存取 Contoso 應用程式,並獲得存取後端資源的權限。
設定識別提供者 (IP)
有三個選項可供 Fabrikam.com 系統管理員 Frank 使用:
- 購買並安裝 STS 產品,例如 Active Directory® 同盟服務 (AD FS)。
- 訂閱雲端 STS 產品,例如 LiveID STS。
- 使用 WIF 建置自訂 STS。
針對此範例案例,我們假設 Frank 會選取 option1,並將 AD FS 安裝為 IP-STS。 其也會設定名為 \windowsauth 的端點來驗證使用者。 透過參閱 AD FS 產品文件並與 Adam 交談,Contoso IT 系統管理員 Frank 會與 Contoso.com 網域建立信任。
設定宣告提供者
Contoso.com 系統管理員 Adam 可用的選項,與識別提供者先前所述的選項相同。 針對此範例案例,我們假設 Adam 會選取 [選項 1],並將 AD FS 2.0 安裝為 RP-STS。
使用 IP 和應用程式設定信任
藉由參閱 AD FS 文件,Adam 會在 Fabrikam.com 與應用程式之間建立信任。
設定委派
AD FS 提供委派處理。 藉由參考 AD FS 文件,Adam 會啟用 ActAs 權杖的處理。
應用程式特定變更
必須進行下列變更,才能將身分識別委派的支援新增至現有的應用程式。 Daniel 會使用 WIF 進行這些變更。
- 快取 web1 已從 sts1 收到的啟動權杖。
- 使用 CreateChannelActingAs 搭配發行的權杖,來建立後端 Web 服務的通道。
- 呼叫後端服務的方法。
快取啟動權杖
啟動權杖是 STS 所發行的初始權杖,而應用程式會從中擷取宣告。 在此範例案例中,sts1 會針對使用者 Frank 發出此權杖,而應用程式會快取此權杖。 下列程式碼範例展示如何在 ASP.NET 應用程式中擷取啟動權杖:
// Get the Bootstrap Token
SecurityToken bootstrapToken = null;

IClaimsPrincipal claimsPrincipal = Thread.CurrentPrincipal as IClaimsPrincipal;
if ( claimsPrincipal != null )
{
    IClaimsIdentity claimsIdentity = (IClaimsIdentity)claimsPrincipal.Identity;
    bootstrapToken = claimsIdentity.BootstrapToken;
}
WIF 提供 CreateChannelActingAs 方法,其會建立指定類型的通道,以指定的安全性權杖作為 ActAs 元素,來增強權杖發行要求。 您可以將啟動權杖傳遞至此方法,然後在傳回的通道上呼叫必要的服務方法。 在此範例案例中,Frank 的身分識別具有 Actor 屬性,其會設定為 web1 的身分識別。
下列程式碼片段展示如何使用 CreateChannelActingAs 呼叫 Web 服務,然後在傳回的通道上呼叫其中一個服務方法 ComputeResponse:
// Get the channel factory to the backend service from the application state
ChannelFactory<IService2Channel> factory = (ChannelFactory<IService2Channel>)Application[Global.CachedChannelFactory];

// Create and setup channel to talk to the backend service
IService2Channel channel;
lock (factory)
{
// Setup the ActAs to point to the caller's token so that we perform a
// delegated call to the backend service
// on behalf of the original caller.
    channel = factory.CreateChannelActingAs<IService2Channel>(callerToken);
}

string retval = null;

// Call the backend service and handle the possible exceptions
try
{
    retval = channel.ComputeResponse(value);
    channel.Close();
} catch (Exception exception)
{
    StringBuilder sb = new StringBuilder();
    sb.AppendLine("An unexpected exception occurred.");
    sb.AppendLine(exception.StackTrace);
    channel.Abort();
    retval = sb.ToString();
}
Web 服務特定變更
由於 Web 服務是使用 WCF 所建置並針對 WIF 啟用,因此一旦使用具有適當發行者位址的 IssuedSecurityTokenParameters 來設定繫結,WIF 就會自動處理 ActA 的驗證。
Web 服務會公開應用程式所需的特定方法。 服務上不需要任何特定的程式碼變更。 下列程式碼範例展示如何使用 IssuedSecurityTokenParameters 設定 Web 服務:
// Configure the issued token parameters with the correct settings
IssuedSecurityTokenParameters itp = new IssuedSecurityTokenParameters( "http://docs.oasis-open.org/wss/oasis-wss-saml-token-profile-1.1#SAMLV1.1" );
itp.IssuerMetadataAddress = new EndpointAddress( "http://localhost:6000/STS/mex" );
itp.IssuerAddress = new EndpointAddress( "http://localhost:6000/STS" );

// Create the security binding element
SecurityBindingElement sbe = SecurityBindingElement.CreateIssuedTokenForCertificateBindingElement( itp );
sbe.MessageSecurityVersion = MessageSecurityVersion.WSSecurity11WSTrust13WSSecureConversation13WSSecurityPolicy12BasicSecurityProfile10;

// Create the HTTP transport binding element
HttpTransportBindingElement httpBE = new HttpTransportBindingElement();

// Create the custom binding using the prepared binding elements
CustomBinding binding = new CustomBinding( sbe, httpBE );

using ( ServiceHost host = new ServiceHost( typeof( Service2 ), new Uri( "http://localhost:6002/Service2" ) ) )
{
    host.AddServiceEndpoint( typeof( IService2 ), binding, "" );
    host.Credentials.ServiceCertificate.SetCertificate( "CN=localhost", StoreLocation.LocalMachine, StoreName.My );

// Enable metadata generation via HTTP GET
    ServiceMetadataBehavior smb = new ServiceMetadataBehavior();
    smb.HttpGetEnabled = true;
    host.Description.Behaviors.Add( smb );
    host.AddServiceEndpoint( typeof( IMetadataExchange ), MetadataExchangeBindings.CreateMexHttpBinding(), "mex" );

// Configure the service host to use WIF
    ServiceConfiguration configuration = new ServiceConfiguration();
    configuration.IssuerNameRegistry = new TrustedIssuerNameRegistry();

    FederatedServiceCredentials.ConfigureServiceHost( host, configuration );

    host.Open();

    Console.WriteLine( "Service2 started, press ENTER to stop ..." );
    Console.ReadLine();

    host.Close();
}