逐步解說︰透過命令列發佈 Visual Studio 擴充功能
本逐步解說顯示如何使用命令列將 Visual Studio 擴充功能發佈至 Visual Studio Marketplace。 將擴充功能新增至 Marketplace 時,開發人員可以使用擴充功能和更新對話框來瀏覽該處是否有新的和更新的擴充功能。
VsixPublisher.exe 是將 Visual Studio 擴充功能發佈至 Marketplace 的命令列工具。 存取處 ${VSInstallDir}\VSSDK\VisualStudioIntegration\Tools\Bin\VsixPublisher.exe。 此工具可用的命令包括:publish、deletePublisher、deleteExtension、login、logout。
命令
publish
將擴充功能發佈到 Marketplace。 擴充功能可以是 vsix、exe/msi 檔案或連結。 如果已存在同版本的擴充功能,則會覆寫該擴充功能。 如果擴充功能尚未存在,則會建立新的擴充功能。
| 命令選項 | 描述 |
|---|---|
| 承載 (必要) | 可以是發佈承載的路徑,也可以是要用作「更多資訊 URL」的連結。 |
| publishManifest (必要) | 要使用的發佈資訊清單檔案的路徑。 |
| ignoreWarnings | 發佈擴充功能時要忽略的警告清單。 發佈擴充功能時,這些警告會顯示為命令列訊息。 (例如:「VSIXValidatorWarning01、VSIXValidatorWarning02」) |
| personalAccessToken | 用來驗證發行者的個人存取權杖 (PAT)。 如果未提供,則會從登入的使用者取得 PAT。 |
VsixPublisher.exe publish -payload "{path to vsix}" -publishManifest "{path to vs-publish.json}" -ignoreWarnings "VSIXValidatorWarning01,VSIXValidatorWarning02"
deletePublisher
刪除 Marketplace 上的發行者。
| 命令選項 | 描述 |
|---|---|
| publisherName (必要) | 發行者的名稱 (例如:識別碼)。 |
| personalAccessToken (必要) | 用來驗證發行者的個人存取權杖。 |
VsixPublisher.exe deletePublisher -publisherName "{Publisher Name}" -personalAccessToken "{Personal Access Token}"
deleteExtension
從 Marketplace 刪除擴充功能。
| 命令選項 | 描述 |
|---|---|
| extensionName (必要) | 要刪除之擴充功能的名稱。 |
| publisherName (必要) | 發行者的名稱 (例如:識別碼)。 |
| personalAccessToken | 用來驗證發行者的個人存取權杖。 如果未提供,則會從登入的使用者取得 PAT。 |
VsixPublisher.exe deleteExtension -extensionName "{Extension Name}" -publisherName "{Publisher Name}"
login
將發行者登入到機器。
| 命令選項 | 描述 |
|---|---|
| personalAccessToken (必要) | 用來驗證發行者的個人存取權杖。 |
| publisherName (必要) | 發行者的名稱 (例如:識別碼)。 |
| overwrite | 指定應以新的個人存取權杖覆寫任何現有的發行者。 |
VsixPublisher.exe login -personalAccessToken "{Personal Access Token}" -publisherName "{Publisher Name}"
登出
將發行者登出機器。
| 命令選項 | 描述 |
|---|---|
| publisherName (必要) | 發行者的名稱 (例如:識別碼)。 |
| ignoreMissingPublisher | 指定如果指定的發行者尚未登入,工具不應該錯誤。 |
VsixPublisher.exe logout -publisherName "{Publisher Name}"
createPublisher
警告
此命令已不再適用。 您可以瀏覽至 Visual Studio Marketplace 來建立新的發行者。
publishManifest 檔案
publishManifest 檔案是由 publish 命令使用。 它代表 Marketplace 需要知道之擴充功能的所有中繼資料。 如果上傳的擴充功能來自 VSIX 擴充功能,則「身分識別」屬性僅可有「internalName」 設定。 這是因為其餘的「身分識別」屬性都可以從 vsixmanifest 檔案產生。 如果擴充功能是 msi/exe 或連結擴充功能,使用者必須在「身分識別」屬性中提供必要的欄位。 資訊清單的其餘部分包含 Marketplace 特有的資訊 (例如:類別、是否啟用 Q&A 等等)。
VSIX 擴充功能 publishManifest 檔案範例:
{
    "$schema": "http://json.schemastore.org/vsix-publish",
    "categories": [ "build", "coding" ],  // The categories of the extension. Between 1 and 3 categories are required.
    "identity": {
        "internalName": "MyVsixExtension" // If not specified, we try to generate the name from the display name of the extension in the vsixmanifest file.
                                            // Required if the display name is not the actual name of the extension.
    },
    "overview": "overview.md",            // Path to the "readme" file that gets uploaded to the Marketplace. Required.
    "priceCategory": "free",              // Either "free", "trial", or "paid". Defaults to "free".
    "publisher": "MyPublisherName",       // The name of the publisher. Required.
    "private": false,                     // Specifies whether or not the extension should be public when uploaded. Defaults to false.
    "qna": true,                          // Specifies whether or not the extension should have a Q&A section. Defaults to true.
    "repo": "https://github.com/MyPublisherName/MyVsixExtension" // Not required.
}
MSI/EXE 或 LINK publishManifest 檔案範例:
{
    "$schema": "http://json.schemastore.org/vsix-publish",
    "categories": [ "build", "coding" ],
    "identity": {
        "description": "My extension.", // The description of the extension. Required for non-vsix extensions.
        "displayName": "My Extension",  // The display name of the extension. Required for non-vsix extensions.
        "icon": "\\path\\to\\icon.ico", // The path to an icon file (can be relative to the json file location). Required for non-vsix extensions.
        "installTargets": [             // The installation targets for the extension. Required for non-vsix extensions.
            {
                "sku": "Microsoft.VisualStudio.Community",
                "version": "[10.0, 16.0)"
            }
        ],
        "internalName": "MyExtension",
        "language": "en-US",            // The default language id of the extension. Can be in the "1033" or "en-US" format. Required for non-vsix extensions.
        "tags": [ "tag1", "tag2" ],     // The tags for the extension. Not required.
        "version": "3.7.0",             // The version of the extension. Required for non-vsix extensions.
        "vsixId": "MyExtension",        // The vsix id of the extension. Not required but useful for showing updates to installed extensions.
    },
    "overview": "overview.md",
    "priceCategory": "free",
    "publisher": "MyPublisherName",
    "private": false,
    "qna": true,
    "repo": "https://github.com/MyPublisherName/MyVsixExtension"
}
資產檔案
資產檔案可用來內嵌讀我檔案中的影像等項目。 例如,如果擴充功能具有下列「概觀」Markdown 文件:
TestExtension
...
This is test extension.

為了解決上一個範例中的「images/testlogo.png」,使用者可以在其資訊清單中提供「assetFiles」,如下所示:
{
    "assetFiles": [
        {
            "pathOnDisk": "\\path\\to\\logo.png",
            "targetPath": "images/logo.png"
        }
    ],
    // other required fields
}
發佈逐步解說
必要條件
若要依照本逐步解說執行作業,您必須安裝 Visual Studio SDK。 如需詳細資訊,請參閱安裝 Visual Studio SDK。
建立 Visual Studio 擴充功能
在此情況下,我們將使用預設的 VSPackage 擴充功能,但對於每種擴充功能,相同的步驟都有效。
- 在 C# 建立具有功能表命令的 VSPackage,名為「TestPublish」。 如需詳細資訊,請參閱建立您的第一個擴充功能:Hello World。
封裝您的延伸模組
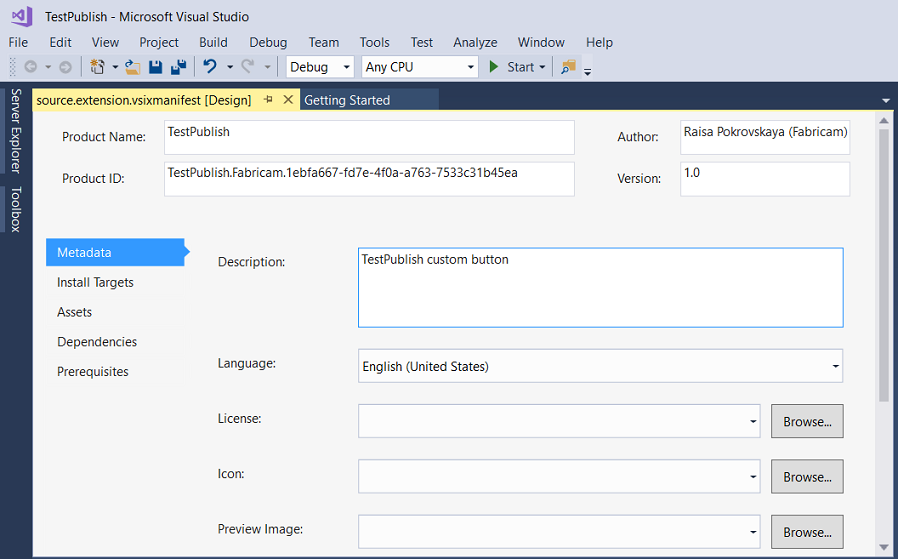
使用產品名稱、作者和版本的正確資訊來更新擴充功能 vsixmanifest。

在發行模式中建置您的擴充功能。 現在,您的擴充功能將被封裝為 \bin\Release 資料夾中的 VSIX。
您可以按兩下 VSIX 以確認安裝。
測試擴充功能
在散發擴充功能之前,請先建置並測試以確保將其正確安裝在 Visual Studio 的實驗執行個體。
在 Visual Studio 中,開始偵錯。 開啟 Visual Studio 的實驗執行個體。
在實驗執行個體中,前往工具功能表,然後按一下擴充功能和 更新...。TestPublish 擴充功能應該會出現在中央窗格中並啟用。
在 工具功能表上,確定您看到測試命令。
透過命令列將擴充功能發佈到 Marketplace
請確定您已建置擴充功能的最新發行版本。
請確定您已建立 publishmanifest.json 和 overview.md 檔案。
開啟命令列並瀏覽至 ${VSInstallDir}\VSSDK\VisualStudioIntegration\Tools\Bin\ 目錄。
若要發佈新的擴充功能,請使用下列命令:
VsixPublisher.exe publish -payload "{Path to vsix file}" -publishManifest "{path to publishManifest file}" -personalAccessToken "{Personal Access Token that is used to authenticate the publisher. If not provided, the pat is acquired from the logged-in users.}"成功發佈擴充功能時,您會看到下列命令列訊息:
Uploaded 'MyVsixExtension' to the Marketplace.您可以瀏覽至 Visual Studio Marketplace 來確認您發佈的新擴充功能
從 Visual Studio Marketplace 安裝擴充功能
發行擴充功能之後,請在 Visual Studio 中進行安裝及測試。
在 Visual Studio 的工具功能表上,按一下擴充功能與更新...。
按一下線上,然後搜尋 TestPublish。
按一下下載]。 然後將會排程該擴充功能以進行安裝。
若要完成安裝,請關閉 Visual Studio 的所有執行個體。
刪除擴充功能
您可以使用電腦移除 Visual Studio Marketplace 的擴充功能。
透過命令列從 Marketplace 移除擴充功能
如果要移除擴充功能,請使用下列命令:
VsixPublisher.exe deleteExtension -publisherName "TestVSIXPublisher" -extensionName "MyVsixExtension"成功刪除擴充功能時,您會看到下列命令列訊息:
Removed 'MyVsixExtension' from the Marketplace.
從您的電腦移除擴充功能
在 Visual Studio 的工具功能表上,按一下擴充功能與更新。
選取「MyVsixExtension」,然後按一下解除安裝。 然後將會排程該擴充功能以解除安裝。
若要完成解除安裝,請關閉 Visual Studio 的所有執行個體。