使用 WPF 和 Entity Framework 6 建立簡單的數據應用程式
警告
如果您使用 Visual Studio 2022,您應該在本教學課程中使用 Visual Studio 2022 17.3 版 Preview 3 或更新版本。
本逐步解說示範如何在 Visual Studio 中建立基本的「表單透過數據」應用程式。 應用程式使用 SQL Server LocalDB、Northwind 資料庫、Entity Framework 6(而非 Entity Framework Core),以及適用於 .NET Framework 的 Windows Presentation Foundation(不是 .NET Core 或 .NET 5 或更新版本)。 它示範如何使用主從視圖執行基本數據系結,而且它也具有自定義的系結導覽器,其中包含 [移動下一個]、[移動上一個]、[移至開頭]、[移至結尾]、[更新] 和 [刪除]。
本文著重於在 Visual Studio 中使用數據工具,而且不會嘗試在任何深度說明基礎技術。 它假設您已熟悉 XAML、Entity Framework 和 SQL。 此範例也不會示範 Model-View-ViewModel (MVVM) 架構,這是 WPF 應用程式的標準。 不過,您可以將此程式碼複製到您自己的MVVM應用程式,但修改較少。
本教學課程的最終程式代碼可在 GitHub 中找到,Visual Studio 教學課程範例 - EF6。
安裝並連線到 Northwind 資料庫
此範例使用 SQL Server Express LocalDB 和 Northwind 範例資料庫。 如果該產品 ADO.NET 數據提供者支援 Entity Framework,它也應該與其他 SQL 資料庫產品搭配使用。
如果您沒有 SQL Server Express LocalDB,請透過 Visual Studio Installer加以安裝。 在 Visual Studio Installer中,您可以將 SQL Server Express LocalDB 安裝為 資料儲存和處理 工作負載的一部分,或安裝為個別元件。
依照下列步驟安裝 Northwind 範例資料庫:
在 Visual Studio 中,開啟 [SQL Server 物件總管] 視窗。 (SQL Server 物件總管 會安裝為 Visual Studio Installer中 資料儲存和處理 工作負載的一部分。)展開 SQL Server 節點。 以滑鼠右鍵點擊您的 LocalDB 實例,然後選取 新增查詢。
查詢編輯器視窗隨即開啟。
將 Northwind Transact-SQL 文稿 複製到剪貼簿。 此 T-SQL 腳本會從頭開始建立 Northwind 資料庫,並填入數據。
將 T-SQL 文稿貼到查詢編輯器中,然後選擇 [執行] 按鈕。
在短時間內,查詢會完成執行,並建立 Northwind 資料庫。
設定專案
在 Visual Studio 中,建立新的 C# WPF 應用程式 (.NET Framework) 專案。
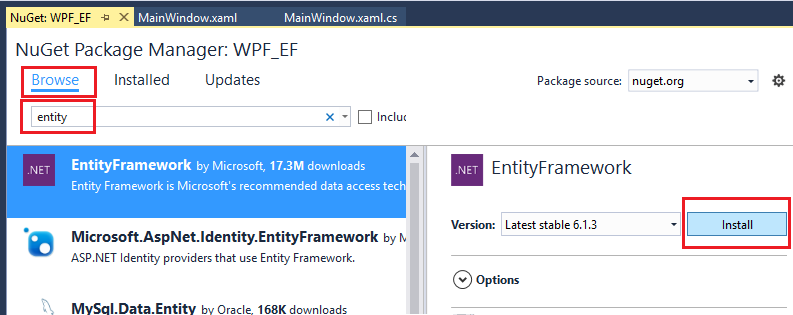
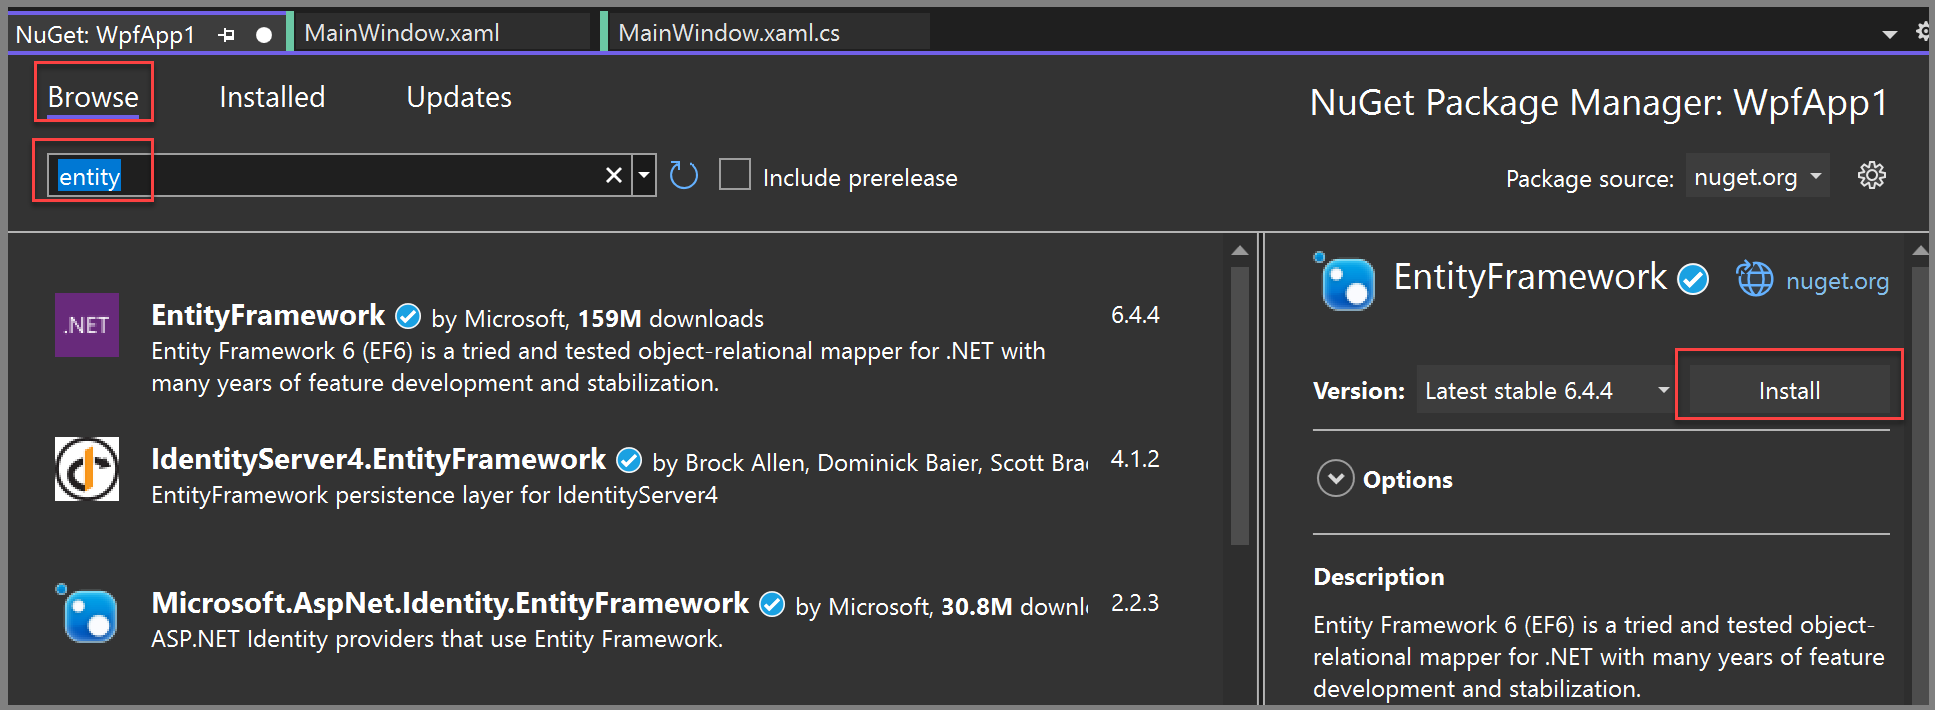
新增 Entity Framework 6 的 NuGet 套件。 在 [方案總管]中,選取項目節點。 在主選單中,選擇「專案>管理 NuGet 套件」。
在 [NuGet 套件管理員]中,按兩下 [瀏覽] 連結。 Entity Framework 可能是清單中的最上層套件。 點擊右窗格中 [安裝],然後遵循提示。 [輸出] 視窗會告訴您安裝完成的時間。
現在您可以使用 Visual Studio,根據 Northwind 資料庫建立模型。
建立模型
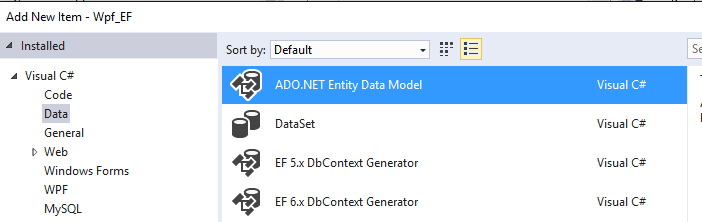
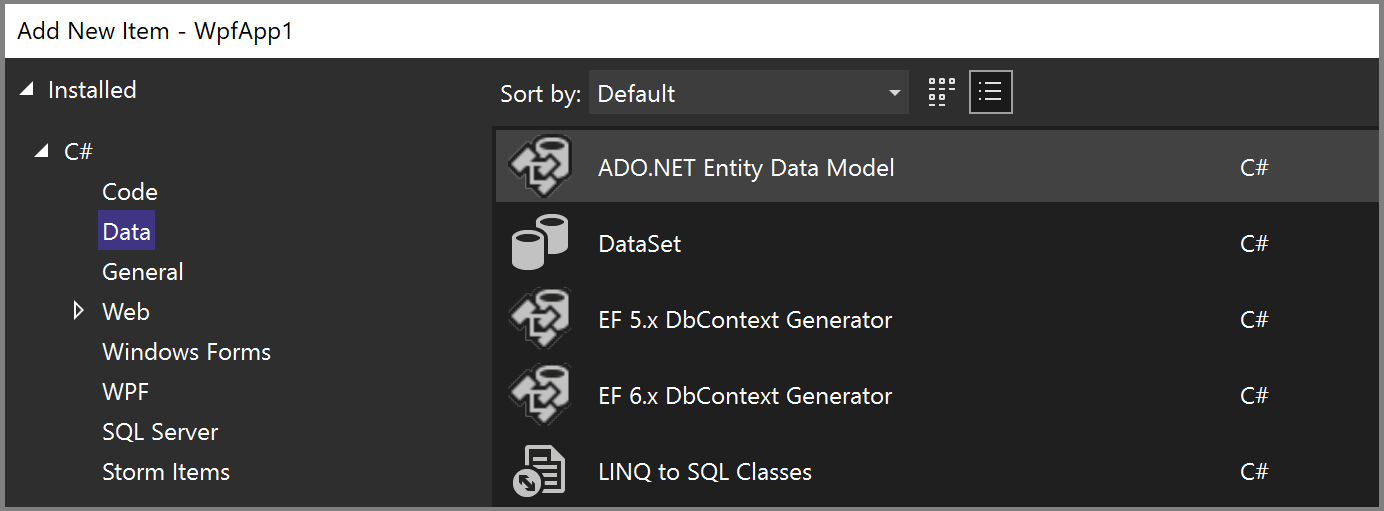
以滑鼠右鍵按下 [方案總管] 中的項目節點,然後選擇 [[新增>新專案]。 在左窗格中的 C# 節點下,選擇 [資料],然後在中間窗格中,選擇 [實體數據模型] ADO.NET 。
呼叫模型
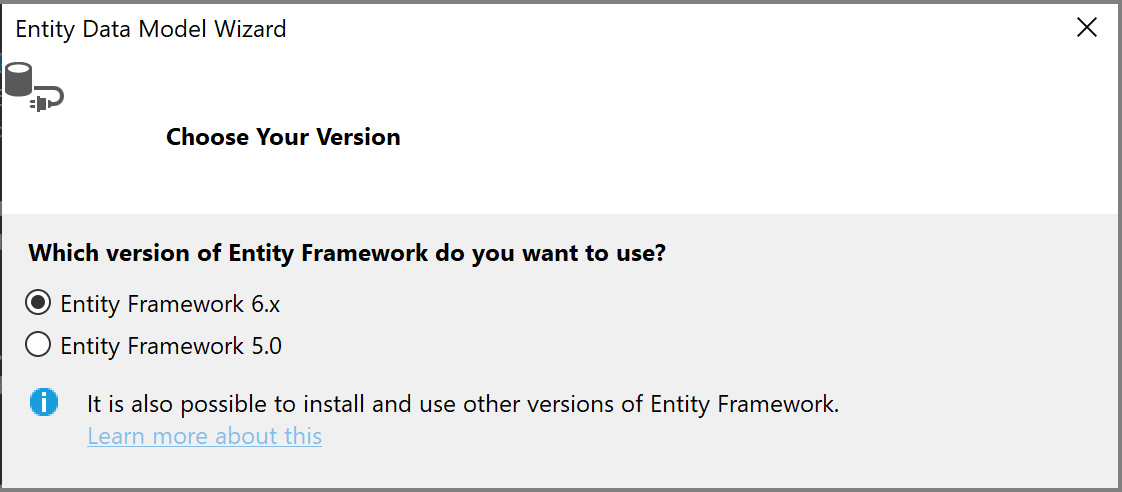
Northwind_model並選擇 ,然後新增。 實體數據模型精靈開啟。 從資料庫 中,選擇EF 設計工具,然後選取 [下一步]。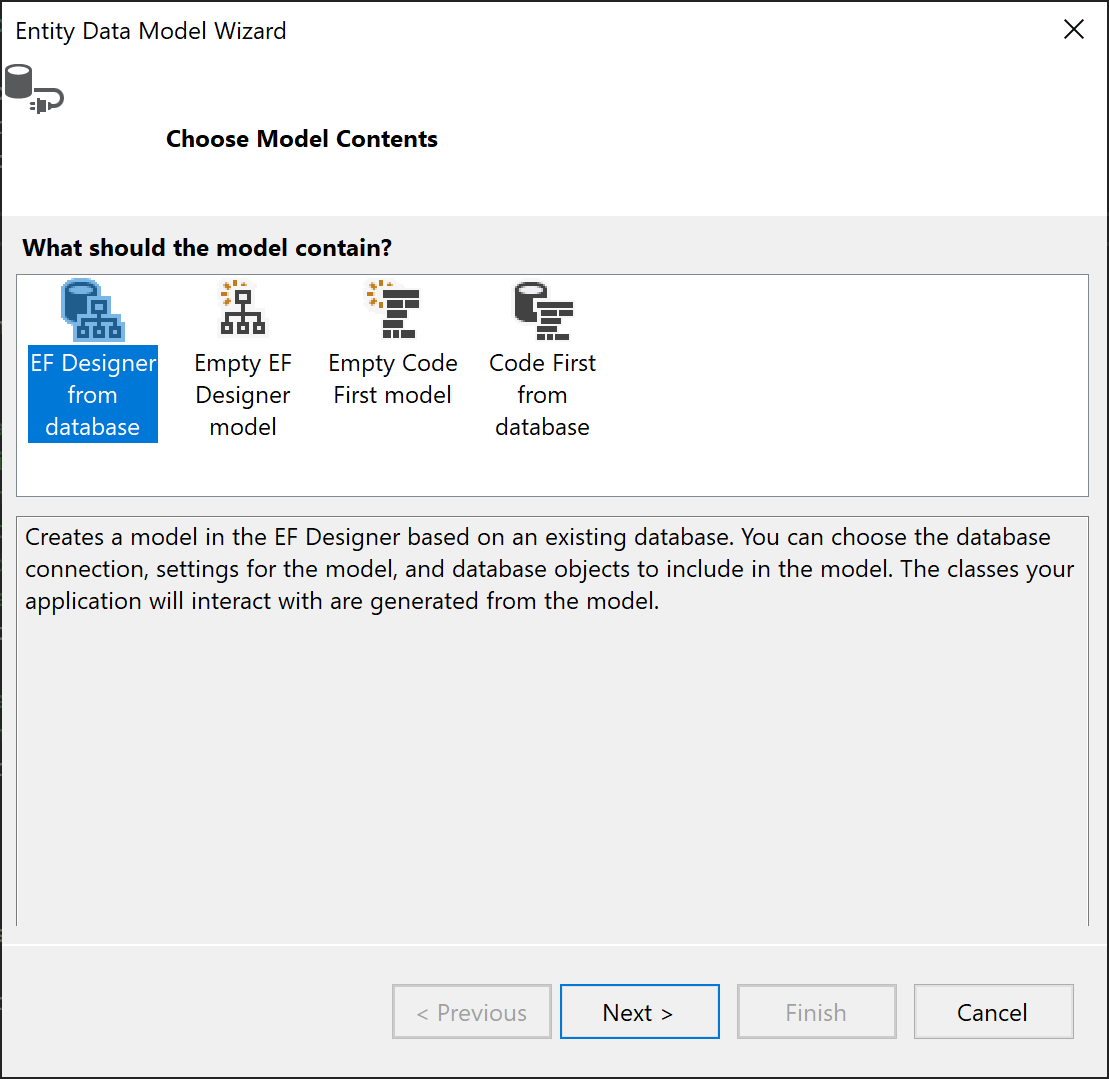
在下一個畫面中,選擇您的 LocalDB Northwind 連線(例如,(localdb)\MSSQLLocalDB),指定 Northwind 資料庫,然後按一下 下一步。
如果您沒有看到連線,選擇 [新增連線],然後在 [選擇數據源] 對話框中,選擇 [Microsoft SQL Server],然後選擇 [繼續],在 [連接屬性] 對話框中,輸入
(localdb)\MSSQLLocalDB,在 [選取或輸入資料庫名稱],選擇 [Northwind],然後按 [確定 ]。如果出現提示,請選擇您使用的 Entity Framework 版本。
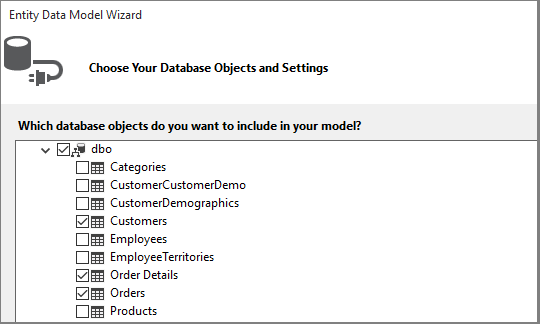
在精靈的下一頁,選擇要包含在 Entity Framework 模型中的數據表、預存程式和其他資料庫物件。 展開樹檢視中的 dbo 節點,然後選擇 Customers、Orders和 [訂單詳細數據]。 保留預設設定,然後按下[完成]。
精靈會產生代表 Entity Framework 模型的 C# 類別。 這些類別是簡單的舊 C# 類別,我們將它們綁定到 WPF 的使用者介面。
.edmx檔案描述關聯性和其他元數據,這些元數據會將類別與資料庫中的對象產生關聯。.tt檔案是 T4 範本,可產生在模型上運作的程式代碼,並將變更儲存至資料庫。 您可以在 [方案總管] 的 [Northwind_model] 節點底下看到所有這些檔案:
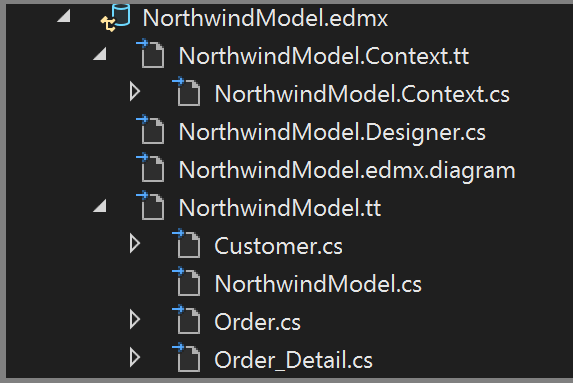
.edmx檔案的設計工具介面可讓您修改模型中的某些屬性和關聯性。 我們不會在本逐步解說中使用設計器。.tt檔案是通用的,您需要調整其中一個檔案以配合 WPF 資料繫結,這需要 ObservableCollections。 在 [方案總管]中,展開 [Northwind_model] 節點,直到您找到 [Northwind_model.tt] 為止。 (請確定您不在 .Context.tt 檔案中,而檔案位於.edmx檔案正下方。將出現的兩個 ICollection 替換為 ObservableCollection<T>。
請在第 51 行附近將第一個出現的 HashSet<T> 替換成 ObservableCollection<T>。 請勿取代第二次出現的「HashSet」。
以 System.Collections.ObjectModel取代唯一出現的 System.Collections.Generic (約第 431 行)。
按 F5 或 Ctrl+F5 來建置並執行專案。 應用程式第一次執行時,數據源精靈可以看到模型類別。
現在您已準備好將此模型連結至 XAML 頁面,以便檢視、巡覽及修改數據。
將數據系結至 XAML 頁面
您可以撰寫自己的數據系結程序代碼,但更容易讓Visual Studio為您執行。
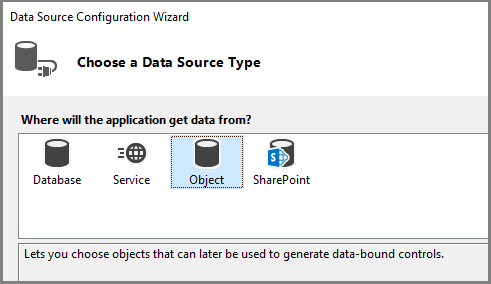
從主選單中,選擇 [專案]>[新增數據源],以顯示 [數據源組態精靈]。 選擇 [物件,因為您要繫結至模型類別,而不是資料庫:
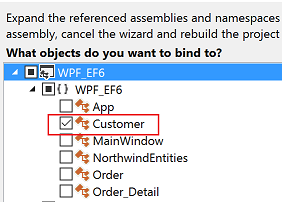
展開項目的節點,然後選取 [Customer]。 (訂單的來源會自動從 Customer 中的 Orders 導覽屬性產生。
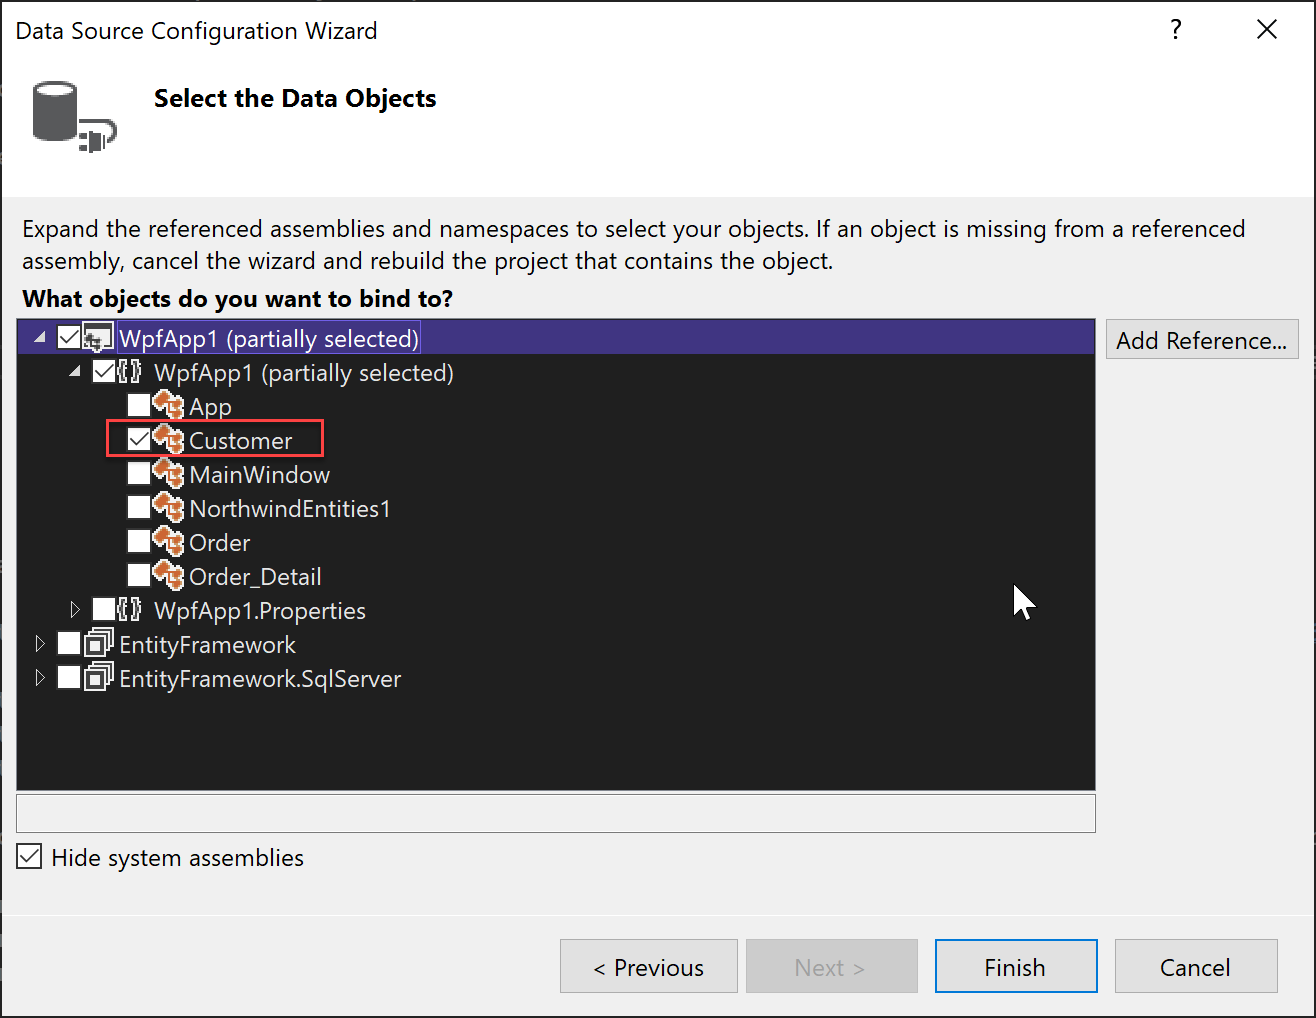
點選 [完成] 。
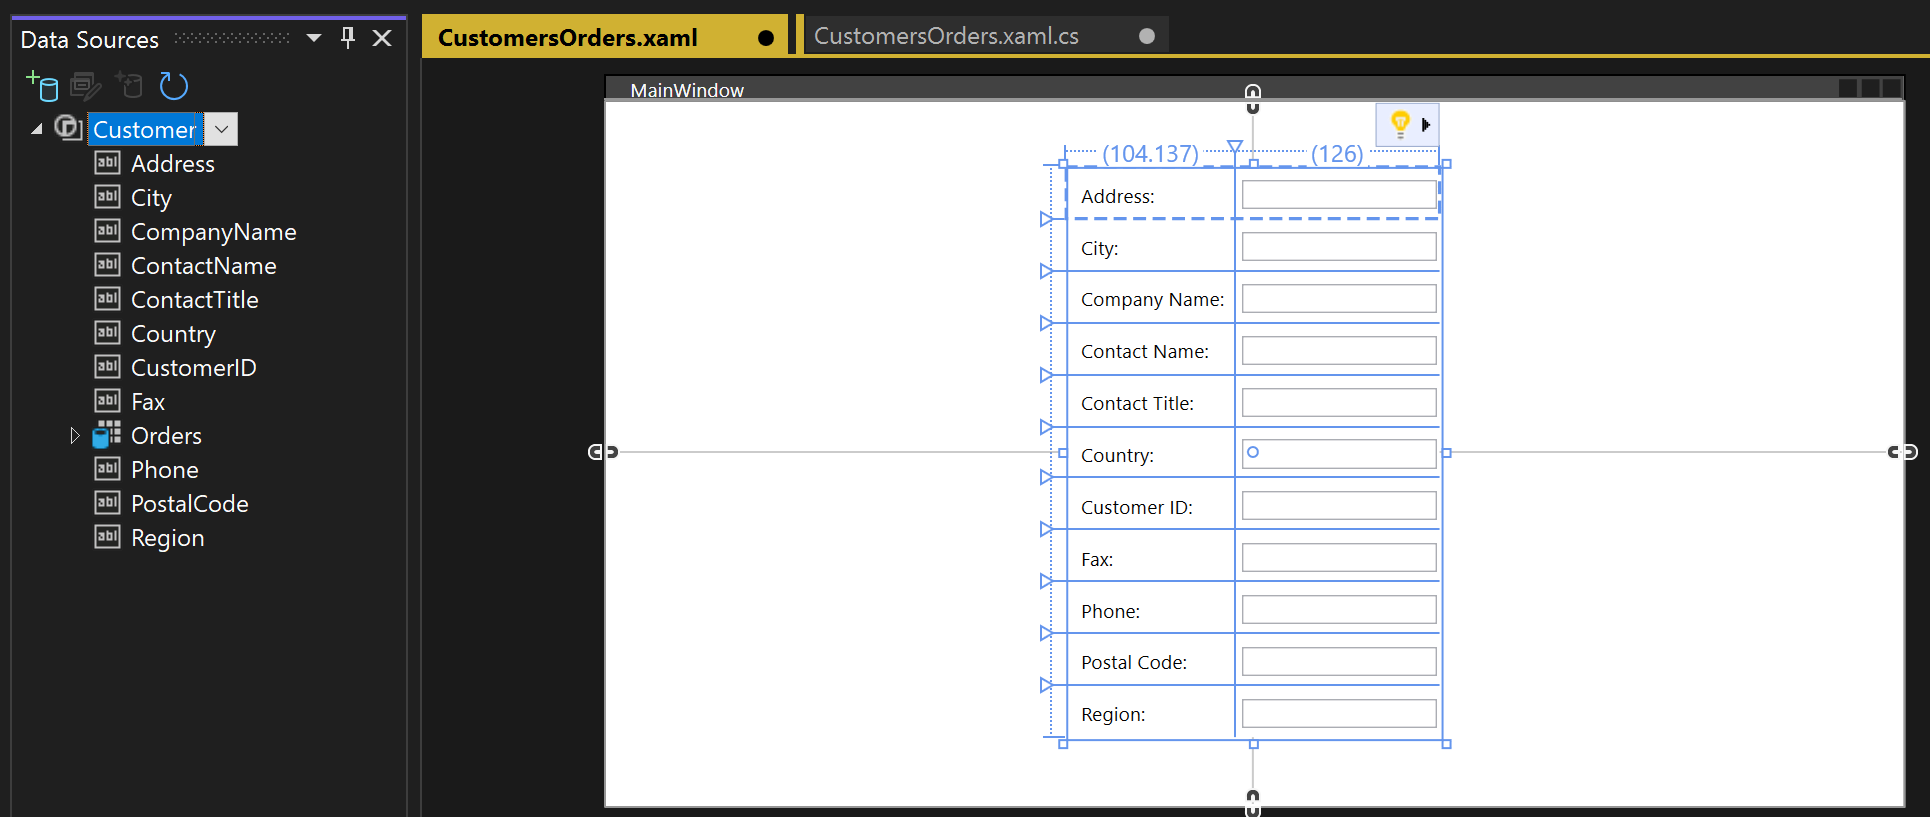
請在程式碼檢視中移動至 MainWindow.xaml。 為了此範例的目的,我們將 XAML 保持簡單。 將 MainWindow 標題更改為更具描述性的內容,並將其高度和寬度目前增加到 600 x 800。 您隨時可以變更它。 現在,將這三個數據列定義新增至主要方格、一個用於瀏覽按鈕的數據列、一個用於客戶詳細數據,另一個用於顯示其訂單的方格:
    <Grid.RowDefinitions>
        <RowDefinition Height="auto"/>
        <RowDefinition Height="auto"/>
        <RowDefinition Height="*"/>
    </Grid.RowDefinitions>
現在開啟 MainWindow.xaml,這樣就可以在設計檢視中檢視它。 這會導致 資料來源 視窗在 [工具箱] 旁的 [Visual Studio] 視窗邊界中顯示為選項。 按下索引標籤以開啟視窗,或按 Shift+Alt+D,或選擇 [檢視>其他 Windows>資料源]。 我們將在每個個別的文本框中顯示 Customers 類別的每個屬性。 首先,點擊 [Customers] 的組合框中箭號,然後選擇 [Details]。 然後,將節點拖曳到設計介面的中央部分,以便設計器知道您想將其置於中間列。 如果您遺失或放錯位置,您可以之後在 XAML 中手動指定資料列(
Grid.Row="1")。 根據預設,控件會垂直放置在網格線元素中,但此時,您可以依您喜歡的方式排列這些控制件。 例如,將 名稱 文字框放在位址上方可能很合理。 本文的範例應用程式會將字段重新排序,並將其重新排列為兩個數據行。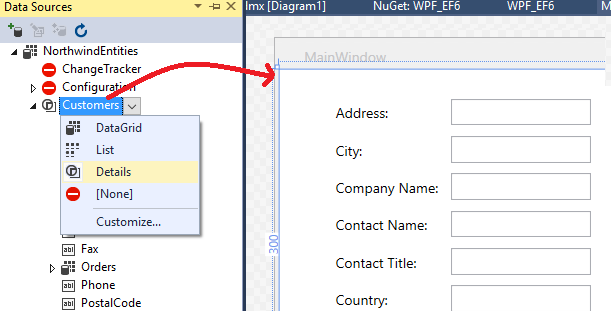
在 XAML 檢視中,您現在可以在父方格的第 1 列(中間列)中看到新的
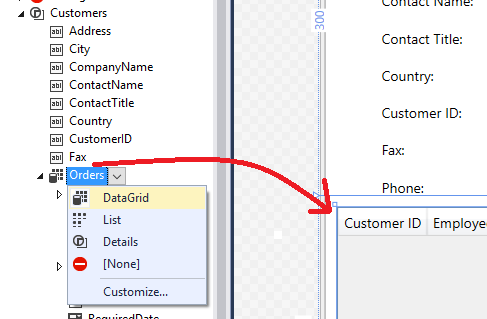
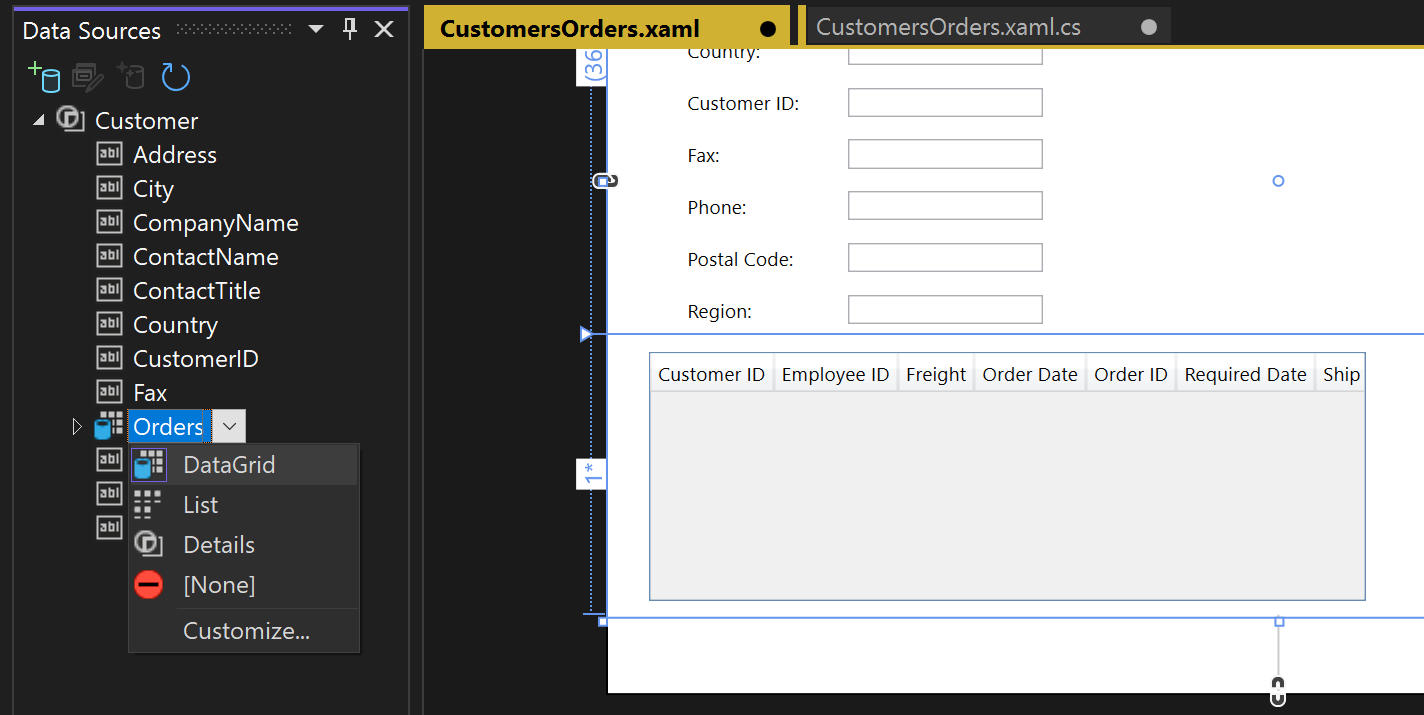
Grid專案。 父方格具有一個DataContext屬性,此屬性參考的是已被新增至Windows.Resources元素的 CollectionViewSource。 在該數據內容的情況下,當第一個文本框綁定到 Address時,該名稱會映射到CollectionViewSource中目前Customer物件的Address屬性。<Grid DataContext="{StaticResource customerViewSource}">當客戶顯示在視窗的上半部時,您想在下半部查看他們的訂單。 您可以在單一方格檢視控件中顯示訂單。 若要讓主要詳細數據系結如預期般運作,請務必系結至 Customers 類別中的 Orders 屬性,而不是系結至個別的 Orders 節點。 將 Customers 類的 Orders 屬性拖曳到表單的下半部分,以便設計工具將其置於第 2 行:
Visual Studio 已產生將 UI 控件連線到模型中事件的所有系結程序代碼。 為了查看某些數據,您只需要撰寫一些程式碼來填入模型。 首先,流覽至 MainWindow.xaml.cs,並將數據成員新增至數據內容的MainWindow類別。 這個物件已為您產生,其作用就像控件一樣,追蹤模型中的變更和事件。 您也會將客戶和訂單的 CollectionViewSource 資料成員,以及相關聯的建構函式初始化邏輯新增至現有的建構函式
MainWindow()。 類別的頂端看起來應該像這樣:public partial class MainWindow : Window { NorthwindEntities context = new NorthwindEntities(); CollectionViewSource custViewSource; CollectionViewSource ordViewSource; public MainWindow() { InitializeComponent(); custViewSource = ((CollectionViewSource)(FindResource("customerViewSource"))); ordViewSource = ((CollectionViewSource)(FindResource("customerOrdersViewSource"))); DataContext = this; }如果尚未存在,請為 System.Data.Entity 新增
using指示詞,以將Load擴充方法納入範圍:using System.Data.Entity;現在,向下捲動並尋找
Window_Loaded事件處理程式。 請注意,Visual Studio 已新增 CollectionViewSource 物件。 這代表您在建立模型時選取的 NorthwindEntities 物件。 您已經新增過了,所以不需要再加在這裡。 讓我們取代Window_Loaded中的程序代碼,讓 方法現在看起來像這樣:private void Window_Loaded(object sender, RoutedEventArgs e) { // Load is an extension method on IQueryable, // defined in the System.Data.Entity namespace. // This method enumerates the results of the query, // similar to ToList but without creating a list. // When used with Linq to Entities, this method // creates entity objects and adds them to the context. context.Customers.Load(); // After the data is loaded, call the DbSet<T>.Local property // to use the DbSet<T> as a binding source. custViewSource.Source = context.Customers.Local; }按 F5。 您應該會看到第一個擷取到 CollectionViewSource 的客戶詳細數據。 您也應該在資料網格中看到他們的訂單。 格式不正確,因此讓我們來修正此問題。 您也可以建立方法來檢視其他記錄,並執行基本建立、讀取、更新和刪除 (CRUD) 作業。
調整頁面設計,並新增新客戶和訂單的方格
Visual Studio 所產生的預設排列不適合您的應用程式,因此我們將在這裡提供最終的 XAML,以複製到您的程式代碼。 您也需要一些「表單」(實際上是 Grids),讓用戶能夠新增客戶或訂單。 若要能夠新增客戶和訂單,您需要一組未系結至 CollectionViewSource的數據個別文本框。 您可以透過在處理常式方法中設定 Visible 屬性來控制使用者在任一時間看到的方格。 最後,您會將 [刪除] 按鈕新增至 [訂單] 方格中的每個數據列,讓用戶能夠刪除個別訂單。
首先,將這些樣式新增至mainWindow.xaml 中的 Windows.Resources 元素:
<Style x:Key="Label" TargetType="{x:Type Label}" BasedOn="{x:Null}">
    <Setter Property="HorizontalAlignment" Value="Left"/>
    <Setter Property="VerticalAlignment" Value="Center"/>
    <Setter Property="Margin" Value="3"/>
    <Setter Property="Height" Value="23"/>
</Style>
<Style x:Key="CustTextBox" TargetType="{x:Type TextBox}" BasedOn="{x:Null}">
    <Setter Property="HorizontalAlignment" Value="Right"/>
    <Setter Property="VerticalAlignment" Value="Center"/>
    <Setter Property="Margin" Value="3"/>
    <Setter Property="Height" Value="26"/>
    <Setter Property="Width" Value="120"/>
</Style>
接下來,以下列標記取代整個外部方格:
<Grid>
     <Grid.RowDefinitions>
         <RowDefinition Height="auto"/>
         <RowDefinition Height="auto"/>
         <RowDefinition Height="*"/>
     </Grid.RowDefinitions>
     <Grid x:Name="existingCustomerGrid" Grid.Row="1" HorizontalAlignment="Left" Margin="5" Visibility="Visible" VerticalAlignment="Top" Background="AntiqueWhite" DataContext="{StaticResource customerViewSource}">
         <Grid.ColumnDefinitions>
             <ColumnDefinition Width="Auto" MinWidth="233"/>
             <ColumnDefinition Width="Auto" MinWidth="397"/>
         </Grid.ColumnDefinitions>
         <Grid.RowDefinitions>
             <RowDefinition Height="Auto"/>
             <RowDefinition Height="Auto"/>
             <RowDefinition Height="Auto"/>
             <RowDefinition Height="Auto"/>
             <RowDefinition Height="Auto"/>
             <RowDefinition Height="Auto"/>
         </Grid.RowDefinitions>
         <Label Content="Customer ID:" Grid.Row="0" Style="{StaticResource Label}"/>
         <TextBox x:Name="customerIDTextBox" Grid.Row="0" Style="{StaticResource CustTextBox}"
                  Text="{Binding CustomerID, Mode=TwoWay, NotifyOnValidationError=true, ValidatesOnExceptions=true}"/>
         <Label Content="Company Name:" Grid.Row="1" Style="{StaticResource Label}"/>
         <TextBox x:Name="companyNameTextBox" Grid.Row="1" Style="{StaticResource CustTextBox}"
                  Text="{Binding CompanyName, Mode=TwoWay, NotifyOnValidationError=true, ValidatesOnExceptions=true}"/>
         <Label Content="Contact Name:" Grid.Row="2" Style="{StaticResource Label}"/>
         <TextBox x:Name="contactNameTextBox" Grid.Row="2" Style="{StaticResource CustTextBox}"
                  Text="{Binding ContactName, Mode=TwoWay, NotifyOnValidationError=true, ValidatesOnExceptions=true}"/>
         <Label Content="Contact title:" Grid.Row="3" Style="{StaticResource Label}"/>
         <TextBox x:Name="contactTitleTextBox" Grid.Row="3" Style="{StaticResource CustTextBox}"
                  Text="{Binding ContactTitle, Mode=TwoWay, NotifyOnValidationError=true, ValidatesOnExceptions=true}"/>
         <Label Content="Address:" Grid.Row="4" Style="{StaticResource Label}"/>
         <TextBox x:Name="addressTextBox" Grid.Row="4" Style="{StaticResource CustTextBox}"
                  Text="{Binding Address, Mode=TwoWay, NotifyOnValidationError=true, ValidatesOnExceptions=true}"/>
         <Label Content="City:" Grid.Column="1" Grid.Row="0" Style="{StaticResource Label}"/>
         <TextBox x:Name="cityTextBox" Grid.Column="1" Grid.Row="0" Style="{StaticResource CustTextBox}"
                  Text="{Binding City, Mode=TwoWay, NotifyOnValidationError=true, ValidatesOnExceptions=true}"/>
         <Label Content="Country:" Grid.Column="1" Grid.Row="1" Style="{StaticResource Label}"/>
         <TextBox x:Name="countryTextBox" Grid.Column="1" Grid.Row="1" Style="{StaticResource CustTextBox}"
                  Text="{Binding Country, Mode=TwoWay, NotifyOnValidationError=true, ValidatesOnExceptions=true}"/>
         <Label Content="Fax:" Grid.Column="1" Grid.Row="2" Style="{StaticResource Label}"/>
         <TextBox x:Name="faxTextBox" Grid.Column="1" Grid.Row="2" Style="{StaticResource CustTextBox}"
                  Text="{Binding Fax, Mode=TwoWay, NotifyOnValidationError=true, ValidatesOnExceptions=true}"/>
         <Label Content="Phone:" Grid.Column="1" Grid.Row="3" Style="{StaticResource Label}"/>
         <TextBox x:Name="phoneTextBox" Grid.Column="1" Grid.Row="3" Style="{StaticResource CustTextBox}"
                  Text="{Binding Phone, Mode=TwoWay, NotifyOnValidationError=true, ValidatesOnExceptions=true}"/>
         <Label Content="Postal Code:" Grid.Column="1" Grid.Row="4" VerticalAlignment="Center" Style="{StaticResource Label}"/>
         <TextBox x:Name="postalCodeTextBox" Grid.Column="1" Grid.Row="4" Style="{StaticResource CustTextBox}"
                  Text="{Binding PostalCode, Mode=TwoWay, NotifyOnValidationError=true, ValidatesOnExceptions=true}"/>
         <Label Content="Region:" Grid.Column="1" Grid.Row="5" Style="{StaticResource Label}"/>
         <TextBox x:Name="regionTextBox" Grid.Column="1" Grid.Row="5" Style="{StaticResource CustTextBox}"
                  Text="{Binding Region, Mode=TwoWay, NotifyOnValidationError=true, ValidatesOnExceptions=true}"/>
     </Grid>
     <Grid x:Name="newCustomerGrid" Grid.Row="1" HorizontalAlignment="Left" VerticalAlignment="Top" Margin="5" DataContext="{Binding RelativeSource={RelativeSource FindAncestor, AncestorType={x:Type Window}}, Path=newCustomer, UpdateSourceTrigger=Explicit}" Visibility="Collapsed" Background="CornflowerBlue">
         <Grid.ColumnDefinitions>
             <ColumnDefinition Width="Auto" MinWidth="233"/>
             <ColumnDefinition Width="Auto" MinWidth="397"/>
         </Grid.ColumnDefinitions>
         <Grid.RowDefinitions>
             <RowDefinition Height="Auto"/>
             <RowDefinition Height="Auto"/>
             <RowDefinition Height="Auto"/>
             <RowDefinition Height="Auto"/>
             <RowDefinition Height="Auto"/>
             <RowDefinition Height="Auto"/>
         </Grid.RowDefinitions>
         <Label Content="Customer ID:" Grid.Row="0" Style="{StaticResource Label}"/>
         <TextBox x:Name="add_customerIDTextBox" Grid.Row="0" Style="{StaticResource CustTextBox}"
                  Text="{Binding CustomerID, Mode=TwoWay, NotifyOnValidationError=true, ValidatesOnExceptions=true}"/>
         <Label Content="Company Name:" Grid.Row="1" Style="{StaticResource Label}"/>
         <TextBox x:Name="add_companyNameTextBox" Grid.Row="1" Style="{StaticResource CustTextBox}"
                  Text="{Binding CompanyName, Mode=TwoWay, NotifyOnValidationError=true, ValidatesOnExceptions=true }"/>
         <Label Content="Contact Name:" Grid.Row="2" Style="{StaticResource Label}"/>
         <TextBox x:Name="add_contactNameTextBox" Grid.Row="2" Style="{StaticResource CustTextBox}"
                  Text="{Binding ContactName, Mode=TwoWay, NotifyOnValidationError=true, ValidatesOnExceptions=true}"/>
         <Label Content="Contact title:" Grid.Row="3" Style="{StaticResource Label}"/>
         <TextBox x:Name="add_contactTitleTextBox" Grid.Row="3" Style="{StaticResource CustTextBox}"
                  Text="{Binding ContactTitle, Mode=TwoWay, NotifyOnValidationError=true, ValidatesOnExceptions=true}"/>
         <Label Content="Address:" Grid.Row="4" Style="{StaticResource Label}"/>
         <TextBox x:Name="add_addressTextBox" Grid.Row="4" Style="{StaticResource CustTextBox}"
                  Text="{Binding Address, Mode=TwoWay, NotifyOnValidationError=true, ValidatesOnExceptions=true}"/>
         <Label Content="City:" Grid.Column="1" Grid.Row="0" Style="{StaticResource Label}"/>
         <TextBox x:Name="add_cityTextBox" Grid.Column="1" Grid.Row="0" Style="{StaticResource CustTextBox}"
                  Text="{Binding City, Mode=TwoWay, NotifyOnValidationError=true, ValidatesOnExceptions=true}"/>
         <Label Content="Country:" Grid.Column="1" Grid.Row="1" Style="{StaticResource Label}"/>
         <TextBox x:Name="add_countryTextBox" Grid.Column="1" Grid.Row="1" Style="{StaticResource CustTextBox}"
                  Text="{Binding Country, Mode=TwoWay, NotifyOnValidationError=true, ValidatesOnExceptions=true}"/>
         <Label Content="Fax:" Grid.Column="1" Grid.Row="2" Style="{StaticResource Label}"/>
         <TextBox x:Name="add_faxTextBox" Grid.Column="1" Grid.Row="2" Style="{StaticResource CustTextBox}"
                  Text="{Binding Fax, Mode=TwoWay, NotifyOnValidationError=true, ValidatesOnExceptions=true}"/>
         <Label Content="Phone:" Grid.Column="1" Grid.Row="3" Style="{StaticResource Label}"/>
         <TextBox x:Name="add_phoneTextBox" Grid.Column="1" Grid.Row="3" Style="{StaticResource CustTextBox}"
                  Text="{Binding Phone, Mode=TwoWay, NotifyOnValidationError=true, ValidatesOnExceptions=true}"/>
         <Label Content="Postal Code:" Grid.Column="1" Grid.Row="4" VerticalAlignment="Center" Style="{StaticResource Label}"/>
         <TextBox x:Name="add_postalCodeTextBox" Grid.Column="1" Grid.Row="4" Style="{StaticResource CustTextBox}"
                  Text="{Binding PostalCode, Mode=TwoWay, NotifyOnValidationError=true, ValidatesOnExceptions=true}"/>
         <Label Content="Region:" Grid.Column="1" Grid.Row="5" Style="{StaticResource Label}"/>
         <TextBox x:Name="add_regionTextBox" Grid.Column="1" Grid.Row="5" Style="{StaticResource CustTextBox}"
                  Text="{Binding Region, Mode=TwoWay, NotifyOnValidationError=true, ValidatesOnExceptions=true}"/>
     </Grid>
     <Grid x:Name="newOrderGrid" Grid.Row="1" HorizontalAlignment="Left" VerticalAlignment="Top" Margin="5" DataContext="{Binding Path=newOrder, Mode=TwoWay}" Visibility="Collapsed" Background="LightGreen">
         <Grid.ColumnDefinitions>
             <ColumnDefinition Width="Auto" MinWidth="233"/>
             <ColumnDefinition Width="Auto" MinWidth="397"/>
         </Grid.ColumnDefinitions>
         <Grid.RowDefinitions>
             <RowDefinition Height="Auto"/>
             <RowDefinition Height="Auto"/>
             <RowDefinition Height="Auto"/>
             <RowDefinition Height="Auto"/>
             <RowDefinition Height="Auto"/>
             <RowDefinition Height="Auto"/>
             <RowDefinition Height="Auto"/>
         </Grid.RowDefinitions>
         <Label Content="New Order Form" FontWeight="Bold"/>
         <Label Content="Employee ID:"  Grid.Row="1" Style="{StaticResource Label}"/>
         <TextBox x:Name="add_employeeIDTextBox" Grid.Row="1" Style="{StaticResource CustTextBox}"
                  Text="{Binding EmployeeID, Mode=TwoWay, NotifyOnValidationError=true, ValidatesOnExceptions=true}"/>
         <Label Content="Order Date:"  Grid.Row="2" Style="{StaticResource Label}"/>
         <DatePicker x:Name="add_orderDatePicker" Grid.Row="2"  HorizontalAlignment="Right" Width="120"
                 SelectedDate="{Binding OrderDate, Mode=TwoWay, NotifyOnValidationError=true, ValidatesOnExceptions=true, UpdateSourceTrigger=PropertyChanged}"/>
         <Label Content="Required Date:" Grid.Row="3" Style="{StaticResource Label}"/>
         <DatePicker x:Name="add_requiredDatePicker" Grid.Row="3" HorizontalAlignment="Right" Width="120"
                  SelectedDate="{Binding RequiredDate, Mode=TwoWay, NotifyOnValidationError=true, ValidatesOnExceptions=true, UpdateSourceTrigger=PropertyChanged}"/>
         <Label Content="Shipped Date:"  Grid.Row="4"  Style="{StaticResource Label}"/>
         <DatePicker x:Name="add_shippedDatePicker"  Grid.Row="4"  HorizontalAlignment="Right" Width="120"
                 SelectedDate="{Binding ShippedDate, Mode=TwoWay, NotifyOnValidationError=true, ValidatesOnExceptions=true, UpdateSourceTrigger=PropertyChanged}"/>
         <Label Content="Ship Via:"  Grid.Row="5" Style="{StaticResource Label}"/>
         <TextBox x:Name="add_ShipViaTextBox"  Grid.Row="5" Style="{StaticResource CustTextBox}"
                  Text="{Binding ShipVia, Mode=TwoWay, NotifyOnValidationError=true, ValidatesOnExceptions=true}"/>
         <Label Content="Freight"  Grid.Row="6" Style="{StaticResource Label}"/>
         <TextBox x:Name="add_freightTextBox" Grid.Row="6" Style="{StaticResource CustTextBox}"
                  Text="{Binding Freight, Mode=TwoWay, NotifyOnValidationError=true, ValidatesOnExceptions=true}"/>
     </Grid>
     <DataGrid x:Name="ordersDataGrid" SelectionUnit="Cell" SelectionMode="Single" AutoGenerateColumns="False" CanUserAddRows="false" IsEnabled="True" EnableRowVirtualization="True" Width="auto" ItemsSource="{Binding Source={StaticResource customerOrdersViewSource}}" Margin="10,10,10,10" Grid.Row="2" RowDetailsVisibilityMode="VisibleWhenSelected">
         <DataGrid.Columns>
             <DataGridTemplateColumn>
                 <DataGridTemplateColumn.CellTemplate>
                     <DataTemplate>
                         <Button Content="Delete" Command="{StaticResource DeleteOrderCommand}" CommandParameter="{Binding}"/>
                     </DataTemplate>
                 </DataGridTemplateColumn.CellTemplate>
             </DataGridTemplateColumn>
             <DataGridTextColumn x:Name="customerIDColumn" Binding="{Binding CustomerID}" Header="Customer ID" Width="SizeToHeader"/>
             <DataGridTextColumn x:Name="employeeIDColumn" Binding="{Binding EmployeeID}" Header="Employee ID" Width="SizeToHeader"/>
             <DataGridTextColumn x:Name="freightColumn" Binding="{Binding Freight}" Header="Freight" Width="SizeToHeader"/>
             <DataGridTemplateColumn x:Name="orderDateColumn" Header="Order Date" Width="SizeToHeader">
                 <DataGridTemplateColumn.CellTemplate>
                     <DataTemplate>
                         <DatePicker SelectedDate="{Binding OrderDate, Mode=TwoWay, NotifyOnValidationError=true, ValidatesOnExceptions=true, UpdateSourceTrigger=PropertyChanged}"/>
                     </DataTemplate>
                 </DataGridTemplateColumn.CellTemplate>
             </DataGridTemplateColumn>
             <DataGridTextColumn x:Name="orderIDColumn" Binding="{Binding OrderID}" Header="Order ID" Width="SizeToHeader"/>
             <DataGridTemplateColumn x:Name="requiredDateColumn" Header="Required Date" Width="SizeToHeader">
                 <DataGridTemplateColumn.CellTemplate>
                     <DataTemplate>
                         <DatePicker SelectedDate="{Binding RequiredDate, Mode=TwoWay, NotifyOnValidationError=true, ValidatesOnExceptions=true, UpdateSourceTrigger=PropertyChanged}"/>
                     </DataTemplate>
                 </DataGridTemplateColumn.CellTemplate>
             </DataGridTemplateColumn>
             <DataGridTextColumn x:Name="shipAddressColumn" Binding="{Binding ShipAddress}" Header="Ship Address" Width="SizeToHeader"/>
             <DataGridTextColumn x:Name="shipCityColumn" Binding="{Binding ShipCity}" Header="Ship City" Width="SizeToHeader"/>
             <DataGridTextColumn x:Name="shipCountryColumn" Binding="{Binding ShipCountry}" Header="Ship Country" Width="SizeToHeader"/>
             <DataGridTextColumn x:Name="shipNameColumn" Binding="{Binding ShipName}" Header="Ship Name" Width="SizeToHeader"/>
             <DataGridTemplateColumn x:Name="shippedDateColumn" Header="Shipped Date" Width="SizeToHeader">
                 <DataGridTemplateColumn.CellTemplate>
                     <DataTemplate>
                         <DatePicker SelectedDate="{Binding ShippedDate, Mode=TwoWay, NotifyOnValidationError=true, ValidatesOnExceptions=true, UpdateSourceTrigger=PropertyChanged}"/>
                     </DataTemplate>
                 </DataGridTemplateColumn.CellTemplate>
             </DataGridTemplateColumn>
             <DataGridTextColumn x:Name="shipPostalCodeColumn" Binding="{Binding ShipPostalCode}" Header="Ship Postal Code" Width="SizeToHeader"/>
             <DataGridTextColumn x:Name="shipRegionColumn" Binding="{Binding ShipRegion}" Header="Ship Region" Width="SizeToHeader"/>
             <DataGridTextColumn x:Name="shipViaColumn" Binding="{Binding ShipVia}" Header="Ship Via" Width="SizeToHeader"/>
         </DataGrid.Columns>
     </DataGrid>
 </Grid>
新增按鈕以巡覽、新增、更新和刪除
在 Windows Forms 應用程式中,您會取得 BindingNavigator 物件,其中包含用來瀏覽資料庫中數據列並執行基本 CRUD 作業的按鈕。 WPF 不提供 BindingNavigator,但很容易建立一個。 您可以使用水準 StackPanel 內的按鈕來執行此動作,並將按鈕與綁定到後置程式碼中的方法的命令產生關聯。
命令邏輯有四個部分:(1) 命令、(2) 系結、(3) 按鈕,以及 (4) 程式代碼後置中的命令處理程式。
在 XAML 中新增命令、系結和按鈕
首先,在
Windows.Resources元素內的 MainWindow.xaml 檔案中新增命令:<RoutedUICommand x:Key="FirstCommand" Text="First"/> <RoutedUICommand x:Key="LastCommand" Text="Last"/> <RoutedUICommand x:Key="NextCommand" Text="Next"/> <RoutedUICommand x:Key="PreviousCommand" Text="Previous"/> <RoutedUICommand x:Key="DeleteCustomerCommand" Text="Delete Customer"/> <RoutedUICommand x:Key="DeleteOrderCommand" Text="Delete Order"/> <RoutedUICommand x:Key="UpdateCommand" Text="Update"/> <RoutedUICommand x:Key="AddCommand" Text="Add"/> <RoutedUICommand x:Key="CancelCommand" Text="Cancel"/>CommandBinding 會將
RoutedUICommand事件對應到程式碼後端中的方法。 將這個CommandBindings元素新增在Windows.Resources結尾標記之後:<Window.CommandBindings> <CommandBinding Command="{StaticResource FirstCommand}" Executed="FirstCommandHandler"/> <CommandBinding Command="{StaticResource LastCommand}" Executed="LastCommandHandler"/> <CommandBinding Command="{StaticResource NextCommand}" Executed="NextCommandHandler"/> <CommandBinding Command="{StaticResource PreviousCommand}" Executed="PreviousCommandHandler"/> <CommandBinding Command="{StaticResource DeleteCustomerCommand}" Executed="DeleteCustomerCommandHandler"/> <CommandBinding Command="{StaticResource DeleteOrderCommand}" Executed="DeleteOrderCommandHandler"/> <CommandBinding Command="{StaticResource UpdateCommand}" Executed="UpdateCommandHandler"/> <CommandBinding Command="{StaticResource AddCommand}" Executed="AddCommandHandler"/> <CommandBinding Command="{StaticResource CancelCommand}" Executed="CancelCommandHandler"/> </Window.CommandBindings>現在,使用導覽、新增、刪除和更新按鈕來新增
StackPanel。 首先,將此樣式新增至Windows.Resources:<Style x:Key="NavButton" TargetType="{x:Type Button}" BasedOn="{x:Null}"> <Setter Property="FontSize" Value="24"/> <Setter Property="FontFamily" Value="Segoe UI Symbol"/> <Setter Property="Margin" Value="2,2,2,0"/> <Setter Property="Width" Value="40"/> <Setter Property="Height" Value="auto"/> </Style>其次,將這個程式代碼貼到 XAML 頁面頂端外部
Grid元素的RowDefinitions之後:<StackPanel Orientation="Horizontal" Margin="2,2,2,0" Height="36" VerticalAlignment="Top" Background="Gainsboro" DataContext="{StaticResource customerViewSource}" d:LayoutOverrides="LeftMargin, RightMargin, TopMargin, BottomMargin"> <Button Name="btnFirst" Content="|◄" Command="{StaticResource FirstCommand}" Style="{StaticResource NavButton}"/> <Button Name="btnPrev" Content="◄" Command="{StaticResource PreviousCommand}" Style="{StaticResource NavButton}"/> <Button Name="btnNext" Content="►" Command="{StaticResource NextCommand}" Style="{StaticResource NavButton}"/> <Button Name="btnLast" Content="►|" Command="{StaticResource LastCommand}" Style="{StaticResource NavButton}"/> <Button Name="btnDelete" Content="Delete Customer" Command="{StaticResource DeleteCustomerCommand}" FontSize="11" Width="120" Style="{StaticResource NavButton}"/> <Button Name="btnAdd" Content="New Customer" Command="{StaticResource AddCommand}" FontSize="11" Width="80" Style="{StaticResource NavButton}"/> <Button Content="New Order" Name="btnNewOrder" FontSize="11" Width="80" Style="{StaticResource NavButton}" Click="NewOrder_click"/> <Button Name="btnUpdate" Content="Commit" Command="{StaticResource UpdateCommand}" FontSize="11" Width="80" Style="{StaticResource NavButton}"/> <Button Content="Cancel" Name="btnCancel" Command="{StaticResource CancelCommand}" FontSize="11" Width="80" Style="{StaticResource NavButton}"/> </StackPanel>
將命令處理程式新增至 MainWindow 類別
除了新增和刪除方法之外,後端代碼非常簡潔。 巡覽是藉由呼叫 CollectionViewSource 的 View 屬性的方法來執行。
DeleteOrderCommandHandler 會示範如何在訂單上執行串聯刪除。 我們必須先刪除與其相關聯的Order_Details。
UpdateCommandHandler 會將新的客戶或訂單新增至集合,否則只會使用使用者在文本框中所做的變更來更新現有的客戶或訂單。
將這些處理程式方法新增至 MainWindow.xaml.cs中的MainWindow類別。 如果您的 CollectionViewSource for the Customers 數據表有不同的名稱,則您需要在每個方法中調整名稱:
private void LastCommandHandler(object sender, ExecutedRoutedEventArgs e)
{
    custViewSource.View.MoveCurrentToLast();
}

private void PreviousCommandHandler(object sender, ExecutedRoutedEventArgs e)
{
    custViewSource.View.MoveCurrentToPrevious();
}

private void NextCommandHandler(object sender, ExecutedRoutedEventArgs e)
{
    custViewSource.View.MoveCurrentToNext();
}

private void FirstCommandHandler(object sender, ExecutedRoutedEventArgs e)
{
    custViewSource.View.MoveCurrentToFirst();
}

private void DeleteCustomerCommandHandler(object sender, ExecutedRoutedEventArgs e)
{
    // If existing window is visible, delete the customer and all their orders.
    // In a real application, you should add warnings and allow the user to cancel the operation.
    var cur = custViewSource.View.CurrentItem as Customer;

    var cust = (from c in context.Customers
                where c.CustomerID == cur.CustomerID
                select c).FirstOrDefault();

    if (cust != null)
    {
        foreach (var ord in cust.Orders.ToList())
        {
            Delete_Order(ord);
        }
        context.Customers.Remove(cust);
    }
    context.SaveChanges();
    custViewSource.View.Refresh();
}

// Commit changes from the new customer form, the new order form,
// or edits made to the existing customer form.
private void UpdateCommandHandler(object sender, ExecutedRoutedEventArgs e)
{
    if (newCustomerGrid.IsVisible)
    {
        // Create a new object because the old one
        // is being tracked by EF now.
        Customer newCustomer = new Customer
        {
            Address = add_addressTextBox.Text,
            City = add_cityTextBox.Text,
            CompanyName = add_companyNameTextBox.Text,
            ContactName = add_contactNameTextBox.Text,
            ContactTitle = add_contactTitleTextBox.Text,
            Country = add_countryTextBox.Text,
            CustomerID = add_customerIDTextBox.Text,
            Fax = add_faxTextBox.Text,
            Phone = add_phoneTextBox.Text,
            PostalCode = add_postalCodeTextBox.Text,
            Region = add_regionTextBox.Text
        };

        // Perform very basic validation
        if (newCustomer.CustomerID.Length == 5)
        {
            // Insert the new customer at correct position:
            int len = context.Customers.Local.Count();
            int pos = len;
            for (int i = 0; i < len; ++i)
            {
                if (String.CompareOrdinal(newCustomer.CustomerID, context.Customers.Local[i].CustomerID) < 0)
                {
                    pos = i;
                    break;
                }
            }
            context.Customers.Local.Insert(pos, newCustomer);
            custViewSource.View.Refresh();
            custViewSource.View.MoveCurrentTo(newCustomer);
        }
        else
        {
            MessageBox.Show("CustomerID must have 5 characters.");
        }

        newCustomerGrid.Visibility = Visibility.Collapsed;
        existingCustomerGrid.Visibility = Visibility.Visible;
    }
    else if (newOrderGrid.IsVisible)
    {
        // Order ID is auto-generated so we don't set it here.
        // For CustomerID, address, etc we use the values from current customer.
        // User can modify these in the datagrid after the order is entered.

        Customer currentCustomer = (Customer)custViewSource.View.CurrentItem;

        Order newOrder = new Order()
        {
            OrderDate = add_orderDatePicker.SelectedDate,
            RequiredDate = add_requiredDatePicker.SelectedDate,
            ShippedDate = add_shippedDatePicker.SelectedDate,
            CustomerID = currentCustomer.CustomerID,
            ShipAddress = currentCustomer.Address,
            ShipCity = currentCustomer.City,
            ShipCountry = currentCustomer.Country,
            ShipName = currentCustomer.CompanyName,
            ShipPostalCode = currentCustomer.PostalCode,
            ShipRegion = currentCustomer.Region
        };

        try
        {
            newOrder.EmployeeID = Int32.Parse(add_employeeIDTextBox.Text);
        }
        catch
        {
            MessageBox.Show("EmployeeID must be a valid integer value.");
            return;
        }

        try
        {
            // Exercise for the reader if you are using Northwind:
            // Add the Northwind Shippers table to the model.

            // Acceptable ShipperID values are 1, 2, or 3.
            if (add_ShipViaTextBox.Text == "1" || add_ShipViaTextBox.Text == "2"
                || add_ShipViaTextBox.Text == "3")
            {
                newOrder.ShipVia = Convert.ToInt32(add_ShipViaTextBox.Text);
            }
            else
            {
                MessageBox.Show("Shipper ID must be 1, 2, or 3 in Northwind.");
                return;
            }
        }
        catch
        {
            MessageBox.Show("Ship Via must be convertible to int");
            return;
        }

        try
        {
            newOrder.Freight = Convert.ToDecimal(add_freightTextBox.Text);
        }
        catch
        {
            MessageBox.Show("Freight must be convertible to decimal.");
            return;
        }

        // Add the order into the EF model
        context.Orders.Add(newOrder);
        ordViewSource.View.Refresh();
    }

    // Save the changes, either for a new customer, a new order
    // or an edit to an existing customer or order.
    context.SaveChanges();
}

// Sets up the form so that user can enter data. Data is later
// saved when user clicks Commit.
private void AddCommandHandler(object sender, ExecutedRoutedEventArgs e)
{
    existingCustomerGrid.Visibility = Visibility.Collapsed;
    newOrderGrid.Visibility = Visibility.Collapsed;
    newCustomerGrid.Visibility = Visibility.Visible;

    // Clear all the text boxes before adding a new customer.
    foreach (var child in newCustomerGrid.Children)
    {
        var tb = child as TextBox;
        if (tb != null)
        {
            tb.Text = "";
        }
    }
}

private void NewOrder_click(object sender, RoutedEventArgs e)
{
    var cust = custViewSource.View.CurrentItem as Customer;
    if (cust == null)
    {
        MessageBox.Show("No customer selected.");
        return;
    }

    existingCustomerGrid.Visibility = Visibility.Collapsed;
    newCustomerGrid.Visibility = Visibility.Collapsed;
    newOrderGrid.UpdateLayout();
    newOrderGrid.Visibility = Visibility.Visible;
}

// Cancels any input into the new customer form
private void CancelCommandHandler(object sender, ExecutedRoutedEventArgs e)
{
    add_addressTextBox.Text = "";
    add_cityTextBox.Text = "";
    add_companyNameTextBox.Text = "";
    add_contactNameTextBox.Text = "";
    add_contactTitleTextBox.Text = "";
    add_countryTextBox.Text = "";
    add_customerIDTextBox.Text = "";
    add_faxTextBox.Text = "";
    add_phoneTextBox.Text = "";
    add_postalCodeTextBox.Text = "";
    add_regionTextBox.Text = "";

    existingCustomerGrid.Visibility = Visibility.Visible;
    newCustomerGrid.Visibility = Visibility.Collapsed;
    newOrderGrid.Visibility = Visibility.Collapsed;
}

private void Delete_Order(Order order)
{
    // Find the order in the EF model.
    var ord = (from o in context.Orders.Local
               where o.OrderID == order.OrderID
               select o).FirstOrDefault();

    // Delete all the order_details that have
    // this Order as a foreign key
    foreach (var detail in ord.Order_Details.ToList())
    {
        context.Order_Details.Remove(detail);
    }

    // Now it's safe to delete the order.
    context.Orders.Remove(ord);
    context.SaveChanges();

    // Update the data grid.
    ordViewSource.View.Refresh();
}

private void DeleteOrderCommandHandler(object sender, ExecutedRoutedEventArgs e)
{
    // Get the Order in the row in which the Delete button was clicked.
    Order obj = e.Parameter as Order;
    Delete_Order(obj);
}
執行應用程式
若要開始偵錯,請按 F5。 您應該會在方格中看到客戶和訂單數據,而流覽按鈕應該如預期般運作。 點擊 提交,然後在數據輸入後,將新的客戶或訂單新增至模型。 按一下 取消,即可取消新的客戶或新訂單表單的操作並不儲存資料。 您可以直接在文字框中對現有的客戶和訂單進行編輯,這些變更會自動寫入模型。
相關內容
- 適用於 .NET 的 Visual Studio 資料工具
- Entity Framework 文件