使用 ADO.NET 建立簡單的資料應用程式
注意
資料集和相關類別是 2000 年代初的舊版 .NET Framework 技術,可讓應用程式在應用程式與資料庫中斷連線時使用記憶體中的資料。 這些技術特別適用於可讓使用者修改資料並將變更保存回資料庫的應用程式。 雖然已證明資料集是非常成功的技術,但建議新的 .NET 應用程式使用 Entity Framework Core。 Entity Framework 提供更自然的方式,將表格式資料作為物件模型使用,而且具有更簡單的程式設計介面。
建立應用程式來管理資料庫中的資料時,您會執行基本工作,例如定義連接字串、插入資料及執行預存程序。 遵循本主題,您可以探索如何使用 Visual C# 或 Visual Basic 和 ADO.NET,與簡單的 Windows Forms「資料表單」應用程式內的資料庫互動。 所有 .NET 資料技術,包括資料集、LINQ to SQL 和 Entity Framework,最終都會執行與本文所示非常類似的步驟。
本文示範快速將資料從資料庫取出的簡單方式。 如果您的應用程式需要以非一般的方式修改資料並更新資料庫,您應該考慮使用 Entity Framework,並使用資料繫結來自動同步使用者介面控制項以變更基礎資料。
重要
為了簡化程式碼,它不會包含已準備好投入生產環境的例外狀況處理。
注意
本教學課程的完整程式碼可以在 C# 和 Visual Basic 的 Visual Studio 文件 GitHub 存放庫中存取。
必要條件
若要建立應用程式,您需要:
已安裝 .NET 桌面開發和資料儲存和處理工作負載的 Visual Studio。 若要安裝,請開啟 Visual Studio 安裝程式並選擇您要修改 Visual Studio 版本旁的 [修正] (或 [其他]>[修改])。
SQL Server Express LocalDB。 如果您沒有 SQL Server Express LocalDB,您可以從 SQL Server 下載頁面來安裝它。
本主題假設您熟悉 Visual Studio IDE 的基本功能,且可以建立 Windows Forms 應用程式、將表單加入至該專案、將按鈕和其他控制項放置在這些表單上、設定這些控制項的屬性,以及編碼簡單事件。 如果您不熟悉這些工作,建議您先完成使用 Visual Basic 在 Visual Studio 中建立 Windows Forms 應用程式教學課程,或在 Visual Studio 中使用 C# 建立 Windows Forms 應用程式教學課程,然後再開始本逐步解說。
設定範例資料庫
依照下列步驟建立範例資料庫:
在 Visual Studio 中,開啟 [伺服器總管] 視窗。
以滑鼠右鍵按一下 [資料連線],然後選擇 [建立新的 SQL Server 資料庫]。
在 [伺服器名稱] 文字方塊中,輸入 (localdb)\mssqllocaldb。
在 [新增資料庫名稱] 文字方塊中,輸入銷售,然後選擇 [確定]。
空的銷售資料庫即會建立並新增至 [伺服器總管] 中的 [資料連線] 節點。
以滑鼠右鍵按一下 [銷售] 資料連線,然後選取 [新增查詢]。
查詢編輯器視窗會隨即開啟。
將銷售 Transact-SQL 指令碼複製到剪貼簿。
將 T-SQL 指令碼貼入查詢編輯器中,然後選擇 [執行] 按鈕。
查詢會在短時間內完成執行,並建立資料庫物件。 資料庫包含兩個資料表:客戶和訂單。 資料表一開始不包含任何資料,但是當您執行建立的應用程式時,您可以新增資料。 資料庫也包含四個簡單的預存程序。
建立表單並加入控制項
使用 Windows Forms 應用程式 (.NET Framework) 範本建立 C# 或 Visual Basic 專案,然後將其命名為 SimpleDataApp。
Visual Studio 會建立專案和數個檔案,包括名為 Form1 的空白 Windows 表單。
將兩個 Windows 表單新增至專案,使其具有三種形式,然後提供下列名稱:
導覽
NewCustomer
FillOrCancel
為每個表單加入下圖中顯示的文字方塊、按鈕和其他控制項。 對每個控制項設定資料表描述的屬性。
注意
加入群組方塊和標籤控制項會更清楚,但是不在程式碼中使用。
巡覽表單
![[巡覽] 對話方塊](media/simpleappnav.png?view=vs-2022)
| 瀏覽表單的控制項 | 屬性 |
|---|---|
| Button | Name = btnGoToAdd |
| Button | Name = btnGoToFillOrCancel |
| Button | Name = btnExit |
NewCustomer 表單
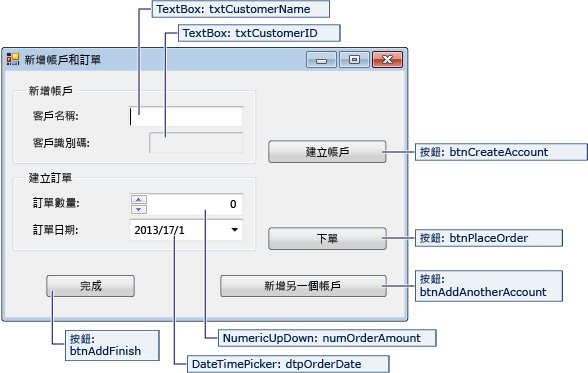
| NewCustomer 表單的控制項 | 屬性 |
|---|---|
| TextBox | Name = txtCustomerName |
| TextBox | Name = txtCustomerID Readonly = True |
| Button | Name = btnCreateAccount |
| NumericUpdown | DecimalPlaces = 0 Maximum = 5000 Name = numOrderAmount |
| DateTimePicker | Format = Short Name = dtpOrderDate |
| Button | Name = btnPlaceOrder |
| Button | Name = btnAddAnotherAccount |
| Button | Name = btnAddFinish |
FillOrCancel 表單
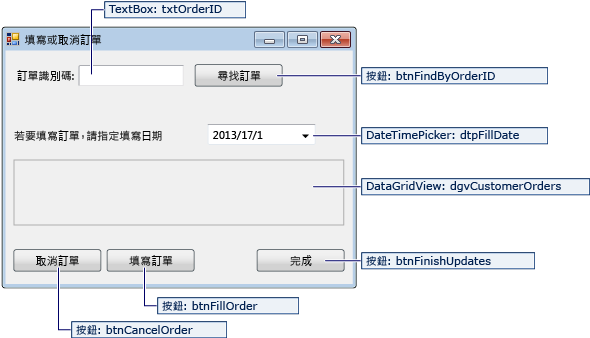
| FillOrCancel 表單的控制項 | 屬性 |
|---|---|
| TextBox | Name = txtOrderID |
| Button | Name = btnFindByOrderID |
| DateTimePicker | Format = Short Name = dtpFillDate |
| DataGridView | Name = dgvCustomerOrders Readonly = True RowHeadersVisible = False |
| Button | Name = btnCancelOrder |
| Button | Name = btnFillOrder |
| Button | Name = btnFinishUpdates |
儲存連接字串
當您的應用程式嘗試開啟資料庫的連接時,應用程式必須存取連接字串。 若要避免在每個表單上手動輸入字串,請將字串儲存在專案的 App.config 檔案中,並建立方法以在方法從應用程式中的任何表單呼叫時傳回字串。
您可以在 [伺服器總管] 中的 [銷售] 資料連線上按一下滑鼠右鍵,然後選擇 [屬性] 來尋找連接字串。 找出 ConnectionString 屬性,然後使用 Ctrl+A、Ctrl+C 來選取字串,並將字串複製到剪貼簿。
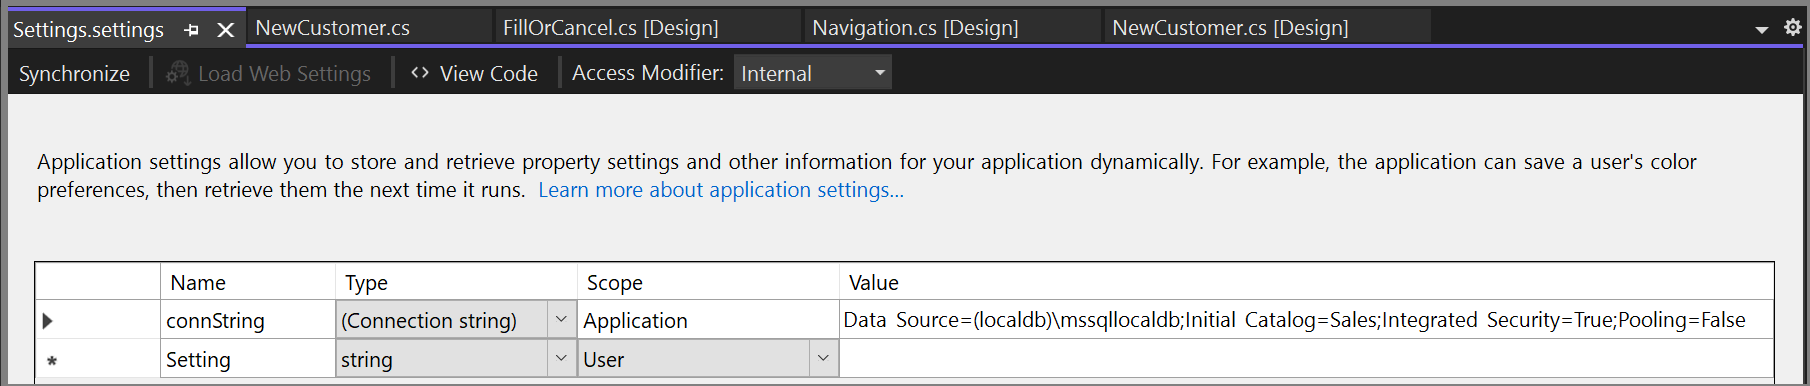
如果您使用 C#,請在 [方案總管] 中,展開專案底下的 [屬性] 節點,然後開啟 Settings.settings 檔案。 如果您使用 Visual Basic,請在 [方案總管] 中,按一下 [顯示所有檔案]、展開 [我的專案] 節點,然後開啟 Settings.settings 檔案。
在 [名稱] 資料行中,輸入
connString。在 [類型] 清單中,選取 [(連接字串)]。
在 [範圍] 清單中,選取 [應用程式]。
在 [值] 資料行中,輸入您的連接字串 (不含任何外部引號),然後儲存您的變更。

警告
在實際的應用程式中,您應該安全地儲存連接字串,如連接字串和組態檔中所述。 為了獲得最佳安全性,請使用不依賴將密碼儲存在連接字串中的驗證方法,例如內部部署 SQL Server 資料庫的 Windows 驗證。 請參閱儲存和編輯連接字串。
撰寫表單的程式碼
本節包含每個表單用途的簡短概觀。 其中也提供程式碼,可在按一下表單上的按鈕時定義基礎邏輯。
導覽表單
當您執行應用程式時,瀏覽表單隨即開啟。 [新增帳戶] 按鈕會開啟 NewCustomer 表單。 [填寫或取消訂單] 按鈕會開啟 FillOrCancel 表單。 [結束] 按鈕會關閉應用程式。
讓瀏覽表單成為啟動表單
如果您使用 C#,在 [方案總管] 中開啟 Program.cs,然後將 Application.Run 這一行變更如下:Application.Run(new Navigation());
如果您使用 Visual Basic,在 [方案總管] 中開啟 [屬性] 視窗,選取 [應用程式] 索引標籤,然後在 [啟動表單] 清單上選取 SimpleDataApp.Navigation。
建立自動產生的事件處理常式
按兩下瀏覽表單上的三個按鈕,以建立空的事件處理常式方法。 按兩下按鈕也會在設計工具程式碼檔案中新增自動產生的程式碼,可讓按鈕按一下以引發事件。
注意
如果您略過設計工具中的按兩下動作,且只複製程式碼並貼到程式碼檔案中,別忘了將事件處理常式設定為正確的方法。 您可以在 [屬性] 視窗中執行此動作。 切換至 [事件] 索引標籤 (使用閃電工具列按鈕),並尋找 Click 處理常式。
新增導覽表單邏輯的程式碼
在瀏覽表單的字碼頁中,完成三個按鈕 Click 事件處理常式的方法本文,如下列程式碼所示。
/// <summary>
/// Opens the NewCustomer form as a dialog box,
/// which returns focus to the calling form when it is closed.
/// </summary>
private void btnGoToAdd_Click(object sender, EventArgs e)
{
    Form frm = new NewCustomer();
    frm.Show();
}

/// <summary>
/// Opens the FillorCancel form as a dialog box.
/// </summary>
private void btnGoToFillOrCancel_Click(object sender, EventArgs e)
{
    Form frm = new FillOrCancel();
    frm.ShowDialog();
}

/// <summary>
/// Closes the application (not just the Navigation form).
/// </summary>
private void btnExit_Click(object sender, EventArgs e)
{
    this.Close();
}
注意
本教學課程的程式碼適用於 C# 和 Visual Basic。 若要將此頁面上的程式碼語言在 C# 與 Visual Basic 之間切換,請使用每個程式碼範例頂端的程式碼語言切換器。
NewCustomer 表單
當您輸入客戶名稱,然後選取 [建立帳戶] 按鈕時,NewCustomer 表單會建立客戶帳戶,SQL Server 會傳回 IDENTITY 值做為新的客戶識別碼。 然後您可以排序新帳戶,方法是指定數量和訂單日期,然後選取 [訂購] 按鈕。
建立自動產生的事件處理常式
按兩下這四個按鈕的每一個按鈕,為 NewCustomer 表單上的每個按鈕建立空的 Click 事件處理常式。 按兩下按鈕也會在設計工具程式碼檔案中新增自動產生的程式碼,可讓按鈕按一下以引發事件。
新增 NewCustomer 表單邏輯的程式碼
若要完成 NewCustomer 表單邏輯,請遵循下列步驟。
將
System.Data.SqlClient命名空間帶入範圍,讓您不需要完全符合其成員的名稱。將一些變數和協助程式方法新增至類別,如下列程式碼所示。
// Storage for IDENTITY values returned from database. private int parsedCustomerID; private int orderID; /// <summary> /// Verifies that the customer name text box is not empty. /// </summary> private bool IsCustomerNameValid() { if (txtCustomerName.Text == "") { MessageBox.Show("Please enter a name."); return false; } else { return true; } } /// <summary> /// Verifies that a customer ID and order amount have been provided. /// </summary> private bool IsOrderDataValid() { // Verify that CustomerID is present. if (txtCustomerID.Text == "") { MessageBox.Show("Please create customer account before placing order."); return false; } // Verify that Amount isn't 0. else if ((numOrderAmount.Value < 1)) { MessageBox.Show("Please specify an order amount."); return false; } else { // Order can be submitted. return true; } } /// <summary> /// Clears the form data. /// </summary> private void ClearForm() { txtCustomerName.Clear(); txtCustomerID.Clear(); dtpOrderDate.Value = DateTime.Now; numOrderAmount.Value = 0; this.parsedCustomerID = 0; }完成四個按鈕 Click 事件處理常式的方法本文,如下列程式碼所示。
/// <summary>
/// Creates a new customer by calling the Sales.uspNewCustomer stored procedure.
/// </summary>
private void btnCreateAccount_Click(object sender, EventArgs e)
{
    if (IsCustomerNameValid())
    {
        // Create the connection.
        using (SqlConnection connection = new SqlConnection(Properties.Settings.Default.connString))
        {
            // Create a SqlCommand, and identify it as a stored procedure.
            using (SqlCommand sqlCommand = new SqlCommand("Sales.uspNewCustomer", connection))
            {
                sqlCommand.CommandType = CommandType.StoredProcedure;

                // Add input parameter for the stored procedure and specify what to use as its value.
                sqlCommand.Parameters.Add(new SqlParameter("@CustomerName", SqlDbType.NVarChar, 40));
                sqlCommand.Parameters["@CustomerName"].Value = txtCustomerName.Text;

                // Add the output parameter.
                sqlCommand.Parameters.Add(new SqlParameter("@CustomerID", SqlDbType.Int));
                sqlCommand.Parameters["@CustomerID"].Direction = ParameterDirection.Output;

                try
                {
                    connection.Open();

                    // Run the stored procedure.
                    sqlCommand.ExecuteNonQuery();

                    // Customer ID is an IDENTITY value from the database.
                    this.parsedCustomerID = (int)sqlCommand.Parameters["@CustomerID"].Value;

                    // Put the Customer ID value into the read-only text box.
                    this.txtCustomerID.Text = Convert.ToString(parsedCustomerID);
                }
                catch
                {
                    MessageBox.Show("Customer ID was not returned. Account could not be created.");
                }
                finally
                {
                    connection.Close();
                }
            }
        }
    }
}

/// <summary>
/// Calls the Sales.uspPlaceNewOrder stored procedure to place an order.
/// </summary>
private void btnPlaceOrder_Click(object sender, EventArgs e)
{
    // Ensure the required input is present.
    if (IsOrderDataValid())
    {
        // Create the connection.
        using (SqlConnection connection = new SqlConnection(Properties.Settings.Default.connString))
        {
            // Create SqlCommand and identify it as a stored procedure.
            using (SqlCommand sqlCommand = new SqlCommand("Sales.uspPlaceNewOrder", connection))
            {
                sqlCommand.CommandType = CommandType.StoredProcedure;

                // Add the @CustomerID input parameter, which was obtained from uspNewCustomer.
                sqlCommand.Parameters.Add(new SqlParameter("@CustomerID", SqlDbType.Int));
                sqlCommand.Parameters["@CustomerID"].Value = this.parsedCustomerID;

                // Add the @OrderDate input parameter.
                sqlCommand.Parameters.Add(new SqlParameter("@OrderDate", SqlDbType.DateTime, 8));
                sqlCommand.Parameters["@OrderDate"].Value = dtpOrderDate.Value;

                // Add the @Amount order amount input parameter.
                sqlCommand.Parameters.Add(new SqlParameter("@Amount", SqlDbType.Int));
                sqlCommand.Parameters["@Amount"].Value = numOrderAmount.Value;

                // Add the @Status order status input parameter.
                // For a new order, the status is always O (open).
                sqlCommand.Parameters.Add(new SqlParameter("@Status", SqlDbType.Char, 1));
                sqlCommand.Parameters["@Status"].Value = "O";

                // Add the return value for the stored procedure, which is  the order ID.
                sqlCommand.Parameters.Add(new SqlParameter("@RC", SqlDbType.Int));
                sqlCommand.Parameters["@RC"].Direction = ParameterDirection.ReturnValue;

                try
                {
                    //Open connection.
                    connection.Open();

                    // Run the stored procedure.
                    sqlCommand.ExecuteNonQuery();

                    // Display the order number.
                    this.orderID = (int)sqlCommand.Parameters["@RC"].Value;
                    MessageBox.Show("Order number " + this.orderID + " has been submitted.");
                }
                catch
                {
                    MessageBox.Show("Order could not be placed.");
                }
                finally
                {
                    connection.Close();
                }
            }
        }
    }
}

/// <summary>
/// Clears the form data so another new account can be created.
/// </summary>
private void btnAddAnotherAccount_Click(object sender, EventArgs e)
{
    this.ClearForm();
}

/// <summary>
/// Closes the form/dialog box.
/// </summary>
private void btnAddFinish_Click(object sender, EventArgs e)
{
    this.Close();
}
FillOrCancel 表單
當您輸入訂單 ID 然後選取 [尋找訂單] 按鈕時,FillorCancel 表單會執行查詢來傳回訂單。 傳回的資料列會顯示在唯讀的資料格。 如果您選取 [取消訂單] 按鈕,可以將訂單標示為已取消 (X),或者如果您選取 [填寫訂單] 按鈕,可以將訂單標示為已填寫 (F)。 如果您再次選取 [尋找訂單] 按鈕,則會顯示更新的資料列。
建立自動產生的事件處理常式
按兩下按鈕,為 FillOrCancel 表單上的四個按鈕建立空的 Click 事件處理常式。 按兩下按鈕也會在設計工具程式碼檔案中新增自動產生的程式碼,可讓按鈕按一下以引發事件。
新增 FillOrCancel 表單邏輯的程式碼
若要完成 FillOrCancel 表單邏輯,請遵循下列步驟。
將下列兩個命名空間帶入範圍,讓您不需要完全符合其成員的名稱。
將變數和協助程式方法新增至 類別,如下列程式碼所示。
// Storage for the order ID value. private int parsedOrderID; /// <summary> /// Verifies that an order ID is present and contains valid characters. /// </summary> private bool IsOrderIDValid() { // Check for input in the Order ID text box. if (txtOrderID.Text == "") { MessageBox.Show("Please specify the Order ID."); return false; } // Check for characters other than integers. else if (Regex.IsMatch(txtOrderID.Text, @"^\D*$")) { // Show message and clear input. MessageBox.Show("Customer ID must contain only numbers."); txtOrderID.Clear(); return false; } else { // Convert the text in the text box to an integer to send to the database. parsedOrderID = Int32.Parse(txtOrderID.Text); return true; } }完成四個按鈕 Click 事件處理常式的方法本文,如下列程式碼所示。
/// <summary>
/// Executes a t-SQL SELECT statement to obtain order data for a specified
/// order ID, then displays it in the DataGridView on the form.
/// </summary>
private void btnFindByOrderID_Click(object sender, EventArgs e)
{
    if (IsOrderIDValid())
    {
        using (SqlConnection connection = new SqlConnection(Properties.Settings.Default.connString))
        {
            // Define a t-SQL query string that has a parameter for orderID.
            const string sql = "SELECT * FROM Sales.Orders WHERE orderID = @orderID";

            // Create a SqlCommand object.
            using (SqlCommand sqlCommand = new SqlCommand(sql, connection))
            {
                // Define the @orderID parameter and set its value.
                sqlCommand.Parameters.Add(new SqlParameter("@orderID", SqlDbType.Int));
                sqlCommand.Parameters["@orderID"].Value = parsedOrderID;

                try
                {
                    connection.Open();

                    // Run the query by calling ExecuteReader().
                    using (SqlDataReader dataReader = sqlCommand.ExecuteReader())
                    {
                        // Create a data table to hold the retrieved data.
                        DataTable dataTable = new DataTable();

                        // Load the data from SqlDataReader into the data table.
                        dataTable.Load(dataReader);

                        // Display the data from the data table in the data grid view.
                        this.dgvCustomerOrders.DataSource = dataTable;

                        // Close the SqlDataReader.
                        dataReader.Close();
                    }
                }
                catch
                {
                    MessageBox.Show("The requested order could not be loaded into the form.");
                }
                finally
                {
                    // Close the connection.
                    connection.Close();
                }
            }
        }
    }
}

/// <summary>
/// Cancels an order by calling the Sales.uspCancelOrder
/// stored procedure on the database.
/// </summary>
private void btnCancelOrder_Click(object sender, EventArgs e)
{
    if (IsOrderIDValid())
    {
        // Create the connection.
        using (SqlConnection connection = new SqlConnection(Properties.Settings.Default.connString))
        {
            // Create the SqlCommand object and identify it as a stored procedure.
            using (SqlCommand sqlCommand = new SqlCommand("Sales.uspCancelOrder", connection))
            {
                sqlCommand.CommandType = CommandType.StoredProcedure;

                // Add the order ID input parameter for the stored procedure.
                sqlCommand.Parameters.Add(new SqlParameter("@orderID", SqlDbType.Int));
                sqlCommand.Parameters["@orderID"].Value = parsedOrderID;

                try
                {
                    // Open the connection.
                    connection.Open();

                    // Run the command to execute the stored procedure.
                    sqlCommand.ExecuteNonQuery();
                }
                catch
                {
                    MessageBox.Show("The cancel operation was not completed.");
                }
                finally
                {
                    // Close connection.
                    connection.Close();
                }
            }
        }
    }
}

/// <summary>
/// Fills an order by calling the Sales.uspFillOrder stored
/// procedure on the database.
/// </summary>
private void btnFillOrder_Click(object sender, EventArgs e)
{
    if (IsOrderIDValid())
    {
        // Create the connection.
        using (SqlConnection connection = new SqlConnection(Properties.Settings.Default.connString))
        {
            // Create command and identify it as a stored procedure.
            using (SqlCommand sqlCommand = new SqlCommand("Sales.uspFillOrder", connection))
            {
                sqlCommand.CommandType = CommandType.StoredProcedure;

                // Add the order ID input parameter for the stored procedure.
                sqlCommand.Parameters.Add(new SqlParameter("@orderID", SqlDbType.Int));
                sqlCommand.Parameters["@orderID"].Value = parsedOrderID;

                // Add the filled date input parameter for the stored procedure.
                sqlCommand.Parameters.Add(new SqlParameter("@FilledDate", SqlDbType.DateTime, 8));
                sqlCommand.Parameters["@FilledDate"].Value = dtpFillDate.Value;

                try
                {
                    connection.Open();

                    // Execute the stored procedure.
                    sqlCommand.ExecuteNonQuery();
                }
                catch
                {
                    MessageBox.Show("The fill operation was not completed.");
                }
                finally
                {
                    // Close the connection.
                    connection.Close();
                }
            }
        }
    }
}

/// <summary>
/// Closes the form.
/// </summary>
private void btnFinishUpdates_Click(object sender, EventArgs e)
{
    this.Close();
}
測試您的應用程式
執行應用程式,並嘗試建立一些客戶和訂單,以確認一切如預期般運作。 若要確認資料庫已隨著變更而更新,請在 [伺服器總管] 中開啟 [資料表] 節點,以滑鼠右鍵按一下 [客戶] 和 [訂單] 節點,然後選擇 [顯示資料表資料]。