練習 - 使用來自您登錄的模組
在上一個練習中,您已將 CDN 和網站模組發佈至您玩具公司的登錄。 現在,您要向開發玩具狗的小組展示如何使用這些模組進行自己的部署。
在本練習中,您將會:
- 建立 Bicep 檔案,包含來自您私人登錄的模組。
- 新增登錄中模組的參考。
- 建置並檢查 Bicep 檔案,以了解模組還原程序的運作方式。
- 切換至使用登錄別名。
- 將 Bicep 檔案部署至 Azure。
建立 Bicep 檔案
在 Visual Studio Code 中建立名為 main.bicep 的新檔案。
儲存空檔案,讓 Visual Studio Code 載入 Bicep 工具。
您可以選取 [檔案] > [另存新檔],或在 Windows 中選取 Ctrl+S (macOS 為 ⌘+S)。 請務必記住您儲存檔案的位置。 例如,您可能需要建立範本資料夾來儲存檔案。
將模組新增至 Bicep 檔案
在 main.bicep 檔案中新增下列參數和變數:
@description('The Azure region into which the resources should be deployed.')
param location string = 'westus3'

@description('The name of the App Service app.')
param appServiceAppName string = 'toy-${uniqueString(resourceGroup().id)}'

@description('The name of the App Service plan SKU.')
param appServicePlanSkuName string = 'F1'

var appServicePlanName = 'toy-dog-plan'
在參數和變數下方,使用下列程式碼新增來自您登錄的網站模組。 以您的私人登錄名稱取代
YOUR_CONTAINER_REGISTRY_NAME。module website 'br:YOUR_CONTAINER_REGISTRY_NAME.azurecr.io/website:v1' = { name: 'toy-dog-website' params: { appServiceAppName: appServiceAppName appServicePlanName: appServicePlanName appServicePlanSkuName: appServicePlanSkuName location: location } }請注意,當您開始輸入時,Bicep 會在模組識別碼底下顯示紅色波浪線,但隨後會消失。 發生此行為的原因是 Visual Studio Code 的 Bicep 擴充功能會從登錄讀取模組,並儲存至本機檔案系統。
在您所建立的模組下方,使用下列程式碼新增來自您登錄的 CDN 模組。 以您的私人登錄名稱取代
YOUR_CONTAINER_REGISTRY_NAME。module cdn 'br:YOUR_CONTAINER_REGISTRY_NAME.azurecr.io/cdn:v1' = { name: 'toy-dog-cdn' params: { httpsOnly: true originHostName: website.outputs.appServiceAppHostName } }儲存檔案。
建置並檢查 Bicep 檔案
請將 Bicep 檔案建置到 JSON ARM 範本。 您通常不需要這麼建置,但在學習模組的運作方式時,這會有所幫助。
在 Visual Studio Code 終端機中執行下列命令,將 Bicep 檔案建置到 JSON 檔案:
az bicep build --file main.bicepBicep 會在 main.bicep 所在資料中,建立名為 main.json 的檔案。
開啟 main.json 檔案。
請注意,在 JSON ARM 範本的
resources區段中,從大約第 134 行開始,某些資源具有Microsoft.Resources/deployments類型。 這些資源代表您從登錄新增的模組中所定義的模組部署。
在 Visual Studio Code 終端機中執行下列命令,將 Bicep 檔案建置到 JSON 檔案:
bicep build main.bicepBicep 會在 main.bicep 所在資料中,建立名為 main.json 的檔案。
開啟 main.json 檔案。
請注意,在 JSON ARM 範本的
resources區段中,從大約第 134 行開始,某些資源具有Microsoft.Resources/deployments類型。 這些資源代表您從登錄新增的模組中所定義的模組部署。
建立登錄別名
您決定建立登錄別名,而不是在 Bicep 檔案中內嵌登錄 URL。 此方法可讓 Bicep 檔案更容易讀取。
在 Visual Studio Code 中,建立名為 bicepconfig.json 的新檔案。 此檔案所在的資料夾應與 main.bicep 檔案相同。
將下列程式碼貼入 bicepconfig.json 檔案中。 以您的私人登錄名稱取代
YOUR_CONTAINER_REGISTRY_NAME。{ "moduleAliases": { "br": { "ToyCompanyRegistry": { "registry": "YOUR_CONTAINER_REGISTRY_NAME.azurecr.io" } } } }儲存檔案。
使用登錄別名
請更新 Bicep 檔案以使用登錄別名,而不要直接參考登錄。
開啟 main.bicep 檔案。
尋找
website模組的定義,並變更定義以包含登錄別名:module website 'br/ToyCompanyRegistry:website:v1' = { name: 'toy-dog-website' params: { appServiceAppName: appServiceAppName appServicePlanName: appServicePlanName appServicePlanSkuName: appServicePlanSkuName location: location } }提示
請務必將模組路徑的開頭從
br:變更為br/。 此外,在ToyCompanyRegistry之後,將斜線 (/) 字元變更為冒號 (:)。對
cdn模組進行類似的變更:module cdn 'br/ToyCompanyRegistry:cdn:v1' = { name: 'toy-dog-cdn' params: { httpsOnly: true originHostName: website.outputs.appServiceAppHostName } }儲存檔案。
驗證 Bicep 檔案
完成上述所有變更之後,main.bicep 檔案看起來應該像下列範例:
@description('The Azure region into which the resources should be deployed.')
param location string = 'westus3'
@description('The name of the App Service app.')
param appServiceAppName string = 'toy-${uniqueString(resourceGroup().id)}'
@description('The name of the App Service plan SKU.')
param appServicePlanSkuName string = 'F1'
var appServicePlanName = 'toy-dog-plan'
module website 'br/ToyCompanyRegistry:website:v1' = {
  name: 'toy-dog-website'
  params: {
    appServiceAppName: appServiceAppName
    appServicePlanName: appServicePlanName
    appServicePlanSkuName: appServicePlanSkuName
    location: location
  }
}
module cdn 'br/ToyCompanyRegistry:cdn:v1' = {
  name: 'toy-dog-cdn'
  params: {
    httpsOnly: true
    originHostName: website.outputs.appServiceAppHostName
  }
}
如果檔案不符,請複製範例,或是將您的範本調整為與範例相符。
部署至 Azure
在 Visual Studio Code 終端機中執行下列程式碼,將 Bicep 範本部署到 Azure: 此過程可能需要幾分鐘的時間才能成功完成部署。
az deployment group create \
   --template-file main.bicep
New-AzResourceGroupDeployment -TemplateFile main.bicep
檢查部署
前往 Azure 入口網站,並確定您在沙箱訂用帳戶中:
- 在頁面右上角選取您的虛擬人偶。
- 選取 [切換目錄]。 在清單中,選擇 [Microsoft Learn 沙箱] 目錄。
在左側面板中,選取 [資源群組]。
選取 [沙箱資源群組名稱]。
選取左側功能表中的 [部署]。
![顯示資源群組的 Azure 入口網站螢幕擷取畫面,其中已醒目提示 [部署] 功能表項目。](media/7-deployments.png)
請注意,此時會列出三個部署:
- 主要代表父代 Bicep 檔案的部署。
- toy-dog-cdn 和 toy-dog-website 代表您在 main.bicep 檔案中包含的模組。
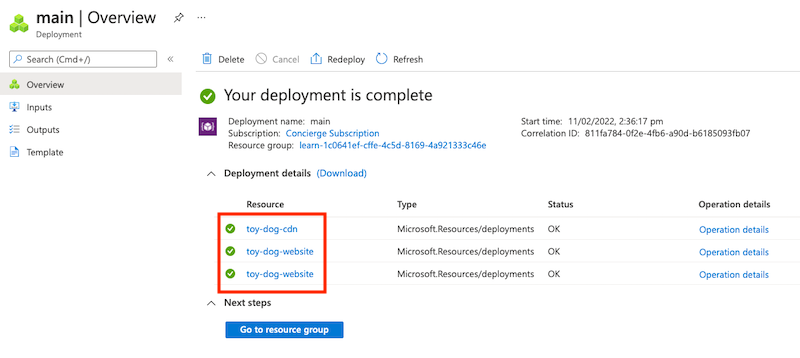
選取主要部署,並展開 [部署詳細資料]。
請注意,兩個模組都會列出,而且類型會顯示為
Microsoft.Resources/deployments。toy-dog-website模組會列出兩次,因為其輸出也會在範本內參考。
選取 toy-dog-cdn 和 toy-dog-website 部署,並檢閱其中部署的資源。 請注意,這些資源會對應至個別模組中定義的資源。