練習 - 將單元測試新增至您的應用程式
在本單元中,我們會將單元測試新增至我們使用 Microsoft Azure Pipelines 建立的自動化組建。 迴歸錯誤 (bug) 正在您小組的程式碼中蔓延,並中斷了排行榜的篩選功能。 具體來說,就是不斷出現錯誤的遊戲模式。
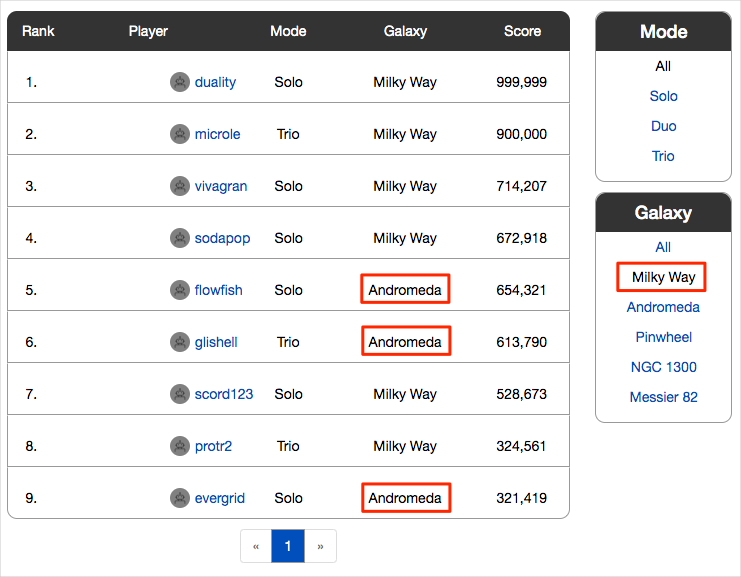
下圖說明問題。 當使用者選取 [Milky Way] 以便只顯示該遊戲地圖的分數時,他們會得到來自其他遊戲地圖 (例如 Andromeda) 的結果。

小組想要在錯誤到達測試人員之前攔截錯誤。 單元測試就是適合用來自動測試迴歸錯誤 (bug) 的絕佳方式。
現在在流程中新增單元測試,將為小組在改進 Space Game Web 應用程式時提供一個有利的開端。 應用程式會使用文件資料庫來儲存高分記錄和玩家設定檔。 現在,其會使用本機測試資料。 他們計劃稍後將應用程式連線到即時資料庫。
有許多適用於 C# 應用程式的單元測試架構。 我們將使用 NUnit,因為其在社群中大受歡迎。
以下是您正在使用的單元測試:
[TestCase("Milky Way")]
[TestCase("Andromeda")]
[TestCase("Pinwheel")]
[TestCase("NGC 1300")]
[TestCase("Messier 82")]
public void FetchOnlyRequestedGameRegion(string gameRegion)
{
    const int PAGE = 0; // take the first page of results
    const int MAX_RESULTS = 10; // sample up to 10 results

    // Form the query predicate.
    // This expression selects all scores for the provided game region.
    Expression<Func<Score, bool>> queryPredicate = score => (score.GameRegion == gameRegion);

    // Fetch the scores.
    Task<IEnumerable<Score>> scoresTask = _scoreRepository.GetItemsAsync(
        queryPredicate, // the predicate defined above
        score => 1, // we don't care about the order
        PAGE,
        MAX_RESULTS
    );
    IEnumerable<Score> scores = scoresTask.Result;

    // Verify that each score's game region matches the provided game region.
    Assert.That(scores, Is.All.Matches<Score>(score => score.GameRegion == gameRegion));
}
您可以依照遊戲類型和遊戲地圖的任意組合來篩選排行榜。
此測試會查詢排行榜中的高分記錄,並確認每個結果均符合所提供的遊戲地圖。
在 NUnit 測試方法中,TestCase 提供要用來測試該方法的內嵌資料。 在這裡,NUnit 會呼叫 FetchOnlyRequestedGameRegion 單元測試方法,如下所示:
FetchOnlyRequestedGameRegion("Milky Way");
FetchOnlyRequestedGameRegion("Andromeda");
FetchOnlyRequestedGameRegion("Pinwheel");
FetchOnlyRequestedGameRegion("NGC 1300");
FetchOnlyRequestedGameRegion("Messier 82");
請注意測試結尾處對 Assert.That 方法的呼叫。 「判斷提示」是您宣告為 true 的條件或陳述式。 如果條件結果為 false,那可能表示您的程式碼中有錯誤 (bug)。 NUnit 會使用您指定的內嵌資料來執行每個測試方法,並將結果記錄為通過或失敗的測試。
許多單元測試架構都提供類似自然語言的驗證方法。 這些方法可讓您輕鬆地閱讀測試,並協助您將測試對應到應用程式的需求。
請考慮此範例中所做的判斷提示:
Assert.That(scores, Is.All.Matches<Score>(score => score.GameRegion == gameRegion));
您可能會將下列這一行讀為:
判斷提示每個傳回分數的遊戲區域均符合所提供的遊戲區域。
以下是您將遵循的程序:
- 從 GitHub 存放庫中,擷取包含單元測試的分支。
- 在本機執行測試以確認它們會通過。
- 將工作新增至您的管線設定,以執行測試並收集結果。
- 將分支推送至您的 GitHub 存放庫。
- 監看您的 Azure Pipelines 專案自動建置應用程式並執行測試。
從 GitHub 擷取分支
現在,您將從 GitHub 擷取 unit-tests 分支並簽出 (或切換至) 該分支。
此分支包含您在先前課程模組中使用的 Space Game 專案,以及您首先要處理的 Azure Pipelines 設定。
在 Visual Studio Code 中,開啟整合式終端。
執行下列
git命令,以從 Microsoft 存放庫擷取名為unit-tests的分支,並切換至該分支。git fetch upstream unit-tests git checkout -B unit-tests upstream/unit-tests此命令的格式可讓您從名為
upstream的 Microsoft GitHub 存放庫取得起始程式碼。 不久之後,您會將此分支推送至自己名為origin的 GitHub 存放庫。選擇性地在 Visual Studio Code 中開啟 azure-pipelines.yml 檔案,並讓您自己熟悉初始組態。 此設定類似您在使用 Azure Pipelines 建立組建管線課程模組中建立的基本設定。 其只會建置應用程式的發行設定。
在本機執行測試
在您將任何測試提交到管線之前,最好先在本機執行所有測試。 在此您將新增該徽章。
在 Visual Studio Code 中,開啟整合式終端。
執行
dotnet build以建置解決方案中的每個專案。dotnet build --configuration Release執行下列
dotnet test命令來執行單元測試:dotnet test --configuration Release --no-build--no-build旗標會指定在執行專案之前不先建置該專案。 您不必建置專案,因為您已在上一個步驟中建置。您應該會看到五個測試全都通過。
Starting test execution, please wait...
A total of 1 test files matched the specified pattern.

Passed!  - Failed:     0, Passed:     5, Skipped:     0, Total:     5, Duration: 57 ms
在此範例中,測試執行時間大約少於一秒。
請注意,總共有五個測試。 雖然我們只定義了一個測試方法
FetchOnlyRequestedGameRegion,但該測試會執行五次,針對每個遊戲地圖各執行一次,如TestCase內嵌資料中所指定的。第二次執行測試。 此時,提供
--logger選項以將結果寫入至記錄檔。dotnet test Tailspin.SpaceGame.Web.Tests --configuration Release --no-build --logger trx您可以從輸出中看到已在 TestResults 目錄中建立 TRX 檔案。
TRX 檔案是一份 XML 文件,其中包含測試回合的結果。 它是一種適用於測試結果的熱門格式,因為 Visual Studio 和其他工具可協助您將結果視覺化。
您稍後將看到 Azure Pipelines 如何協助您在測試結果透過管線執行時,將其視覺化並進行追蹤。
注意
TRX 檔案不應包含在原始檔控制中。 .gitignore 檔案可讓您指定您希望 Git 忽略的暫存檔和其他檔案。 專案的 .gitignore 檔案已經設定為忽略 TestResults 目錄中的所有項目。
在 Visual Studio Code 中,選擇性地從 Tailspin.SpaceGame.Web.Tests 資料夾中開啟 DocumentDBRepository_GetItemsAsyncShould.cs,然後檢查測試程式碼。 即使您對於建置 .NET 應用程式並未特別感興趣,您可能還是會發現它很實用,因為其類似您可能在其他單元測試架構中看到的程式碼。
將工作新增至您的管線設定
在這裡,您將設定組建管線來執行單元測試和收集結果。
在 Visual Studio Code 中修改 azure-pipelines.yml,如下所示:
trigger:
- '*'

pool:
  vmImage: 'ubuntu-20.04'
  demands:
  - npm

variables:
  buildConfiguration: 'Release'
  wwwrootDir: 'Tailspin.SpaceGame.Web/wwwroot'
  dotnetSdkVersion: '6.x'

steps:
- task: UseDotNet@2
  displayName: 'Use .NET SDK $(dotnetSdkVersion)'
  inputs:
    version: '$(dotnetSdkVersion)'

- task: Npm@1
  displayName: 'Run npm install'
  inputs:
    verbose: false

- script: './node_modules/.bin/node-sass $(wwwrootDir) --output $(wwwrootDir)'
  displayName: 'Compile Sass assets'

- task: gulp@1
  displayName: 'Run gulp tasks'

- script: 'echo "$(Build.DefinitionName), $(Build.BuildId), $(Build.BuildNumber)" > buildinfo.txt'
  displayName: 'Write build info'
  workingDirectory: $(wwwrootDir)

- task: DotNetCoreCLI@2
  displayName: 'Restore project dependencies'
  inputs:
    command: 'restore'
    projects: '**/*.csproj'

- task: DotNetCoreCLI@2
  displayName: 'Build the project - $(buildConfiguration)'
  inputs:
    command: 'build'
    arguments: '--no-restore --configuration $(buildConfiguration)'
    projects: '**/*.csproj'

- task: DotNetCoreCLI@2
  displayName: 'Run unit tests - $(buildConfiguration)'
  inputs:
    command: 'test'
    arguments: '--no-build --configuration $(buildConfiguration)'
    publishTestResults: true
    projects: '**/*.Tests.csproj'

- task: DotNetCoreCLI@2
  displayName: 'Publish the project - $(buildConfiguration)'
  inputs:
    command: 'publish'
    projects: '**/*.csproj'
    publishWebProjects: false
    arguments: '--no-build --configuration $(buildConfiguration) --output $(Build.ArtifactStagingDirectory)/$(buildConfiguration)'
    zipAfterPublish: true

- task: PublishBuildArtifacts@1
  displayName: 'Publish Artifact: drop'
  condition: succeeded()
此版本導入了這個
DotNetCoreCLI@2建置工作。- task: DotNetCoreCLI@2 displayName: 'Run unit tests - $(buildConfiguration)' inputs: command: 'test' arguments: '--no-build --configuration $(buildConfiguration)' publishTestResults: true projects: '**/*.Tests.csproj'此建置工作會執行
dotnet test命令。請注意,此工作並未指定您在手動執行測試時所使用的
--logger trx引數。publishTestResults引數會為您新增該項目。 此引數會指示管線將 TRX 檔案產生至暫存目錄,您可以透過$(Agent.TempDirectory)內建變數來存取該目錄。 其也會將工作結果發佈至管線。projects引數會指定所有符合 "**/*.Tests.csproj" 的 C# 專案。"**" 部分會符合所有目錄,而 "*.Tests.csproj" 部分會符合其檔案名稱結尾為 ".Tests.csproj" 的所有專案。unit-tests分支只包含一個單元測試專案 Tailspin.SpaceGame.Web.Tests.csproj。 指定模式可讓您執行更多測試專案,而不需修改您的組建組態。
將分支推送至 GitHub
接著,您會將變更推送至 GitHub,並看到此管線執行。 請留意您目前是在 unit-tests 分支上。
在整合式終端中,將 azure-pipelines.yml 新增至索引、認可變更,然後將分支向上推送至 GitHub。
git add azure-pipelines.yml
git commit -m "Run and publish unit tests"
git push origin unit-tests
觀察 Azure Pipelines 執行測試
您可以在這裡查看管線中的測試回合,然後從 Microsoft Azure Test Plans 將結果視覺化。 Azure Test Plans 提供成功測試應用程式所需的所有工具。 您可以建立並執行手動測試計畫、產生自動化測試,並收集專案關係人的意見反應。
從 Azure Pipelines 追蹤組建的每個步驟。
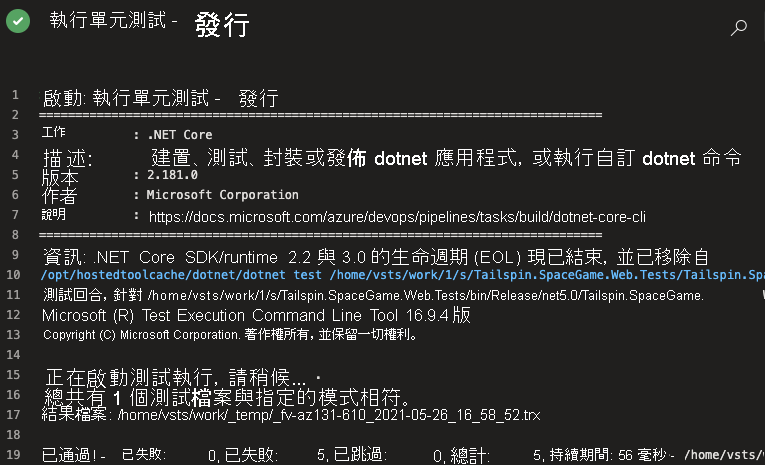
您會看到 [執行單元測試-發行] 工作會執行單元測試,就像您從命令列手動執行的一樣。

巡覽回到管線摘要。
移至 [測試] 索引標籤。
您會看到測試回合的摘要。 已通過五個測試。
![Azure Pipelines 的螢幕擷取畫面,其中顯示共包含 5 個測試回合和 100% 通過的 [測試] 索引標籤。](../../azure-devops/run-quality-tests-build-pipeline/media/4-test-tab-summary.png)
在 Azure DevOps 中,選取 [測試計畫],然後選取 [執行]。
![Azure DevOps 導覽功能表的螢幕擷取畫面,其中已醒目提示 [測試計畫] 區段和 [執行] 索引標籤。](../../azure-devops/run-quality-tests-build-pipeline/media/4-test-plans-runs.png)
您會看到最新的測試回合,包括剛執行的測試回合。
按兩下最新的測試回合。
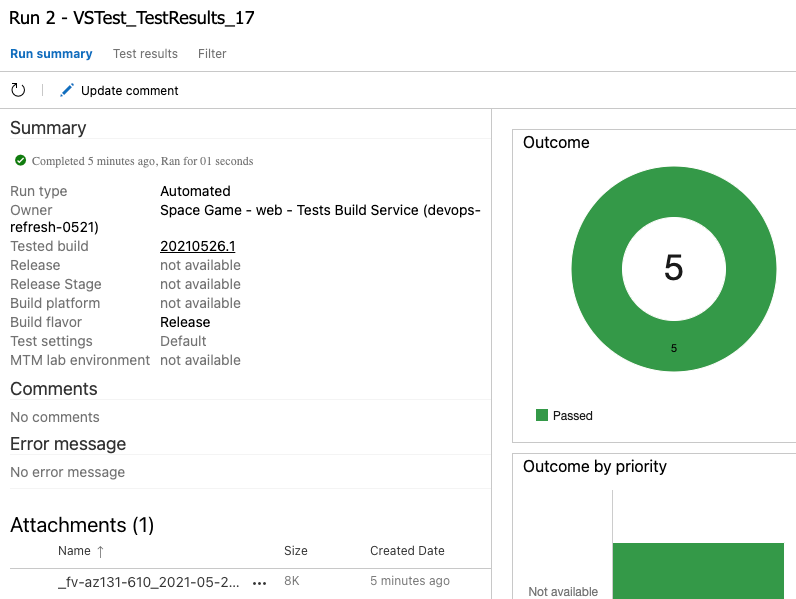
您會看到結果的摘要。

在此範例中,所有五個測試皆已通過。 如果有任何測試失敗,您可以移至建置工作以取得更多詳細資料。
您也可以下載 TRX 檔案,以便透過 Visual Studio 或其他視覺效果工具來檢查。
雖然您只新增了一個測試,但這是很好的開端,並且修正了立即的問題。 現在,小組有一個位置可以新增更多測試,並在改善其程序時執行這些測試。
將分支合併至主要
在真實案例中,如果您滿意結果,可將 unit-tests 分支合併至 main,但為了簡潔起見,我們現在會略過該流程。