練習 - 為您的套件建立管線
在這裡,您將會為 Tailspin.SpaceGame.Web.Models 專案取得小組的新程式碼,而此專案現在與 Tailspin.SpaceGame.Web 專案分開。 您將為模型專案建立 Azure Pipelines 專案,並查看 Azure Artifacts 中在您摘要具有版本號碼 1.0.0 的成品。
對專案所做的變更有哪些?
回想一下,Space Game 網站是 ASP.NET Core 的應用程式。 其會使用 Model-View-Controller (MVC) 模式,將資料與在使用者介面中顯示該資料的方式分開。 Andy 和 Mara 想要將模型類別移至不同的程式庫,讓多個專案可以使用這些類別。
為了這樣做,他們建立一個新的 C# 專案,稱為 Tailspin.SpaceGame.Web.Models,其中只包含模型類別。 同時,他們從現有的專案 Tailspin.SpaceGame.Web 中移除模型類別。 它們會將現有專案中的模型類別取代為 Tailspin.SpaceGame.Web.Models 專案的參考。
若要組建這些專案,Andy 和 Mara 會使用兩個管線,每個專案各一個。 您已有第一個專案及其相關聯的 Azure Pipelines 設定。 在這裡,您將在 GitHub 上派生第二個專案,並建立 Azure Pipelines 設定來組建此專案。 您會將產生的套件發佈至 Azure Artifacts。
準備 Visual Studio Code
先前,您會設定 Visual Studio Code 來使用 Tailspin.SpaceGame.Web 專案。 您可以在這裡開啟 Visual Studio Code 的第二個執行個體,以便使用 Tailspin.SpaceGame.Web.Models 專案。
開啟 Visual Studio Code 的第二個執行個體。
從 Visual Studio Code 開啟整合式終端機。
瀏覽至 mslearn-tailspin-spacegame-web 專案所在位置的父目錄。 以下是移至主目錄的範例:
cd ~
取得原始程式碼
從 GitHub 取得 Tailspin.SpaceGame.Web.Models 專案的原始程式碼,並設定 Visual Studio Code,讓您可以使用這些檔案。
建立分支
第一個步驟是派生 mslearn-tailspin-spacegame-web-models 存放庫,讓您可以使用和修改來源檔案。 回想一下,Mara 會將 Models 目錄放在新的專案中,並將其從 Web 專案中移除。
若要將 mslearn-tailspin-spacegame-web-models 專案派生至您的 GitHub 帳戶:
- 從網頁瀏覽器,移至 GitHub 並登入。
- 移至 mslearn-tailspin-spacegame-web-models 專案。
- 請選取分叉。
- 若要將存放庫派生到您的帳戶,請遵循指示。
在本機複製您的分支
若要將 mslearn-tailspin-spacegame-web-models 專案複製到您的電腦:
在 GitHub 上,移至 mslearn-tailspin-spacegame-web-models 專案的分支。
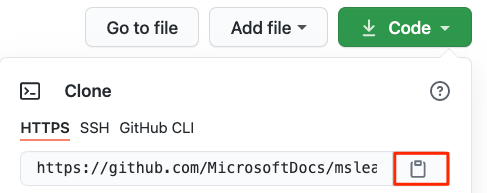
選取 [程式碼]。 然後,從 [HTTPS] 索引標籤中,選取所顯示 URL 旁的按鈕,將 URL 複製到剪貼簿。

從 Visual Studio Code 中,移至終端機視窗並執行此
git clone命令。 以您剪貼簿的內容取代所顯示的 URL。git clone https://github.com/your-name/mslearn-tailspin-spacegame-web-models.git移至 mslearn-tailspin-spacegame-web-models 目錄。 這是您存放庫的根目錄。
cd mslearn-tailspin-spacegame-web-models
開啟專案並檢查組態
在 Visual Studio Code 中,您的終端機視窗會指向 mslearn-tailspin-spacegame-web-models 專案的根目錄。 從檔案總管中開啟專案,讓您可以檢視其結構及使用檔案。
開啟專案最簡單的方式是在目前的目錄中重新開啟 Visual Studio Code。 若要執行此作業,請在整合式終端中執行下列命令:
code -r .您會看到在 [檔案總管] 中的目錄和檔案樹狀目錄。
開啟整合式終端。 此終端會進入 Web 專案的根目錄。
開啟 azure-pipelines.yml 檔案。
您會看到組建套件的步驟、版本的設定,以及套件新增至 Azure Artifacts。
此
DotNetCoreCLI@2會組建專案:- task: DotNetCoreCLI@2 displayName: 'Build the project - $(buildConfiguration)' inputs: command: 'build' arguments: '--no-restore --configuration $(buildConfiguration)' projects: '**/*.csproj'此
DotNetCoreCLI@2工作會封裝版本為 1.0.0 的專案:- task: DotNetCoreCLI@2 displayName: 'Pack the project - $(buildConfiguration)' inputs: command: 'pack' projects: '**/*.csproj' arguments: '--no-build --configuration $(buildConfiguration)' versioningScheme: byPrereleaseNumber majorVersion: '1' minorVersion: '0' patchVersion: '0'開發套件時,通常會使用
byPrereleaseNumber版本設定配置。 這會將唯一的發行前版本尾碼 (例如 "-CI-20190621-042647") 附加至版本號碼的結尾。 在此範例之後,完整的版本號碼將是 "1.0.0-CI-20190621-042647"。此
NuGetCommand@2工作會將套件推送至您的 Tailspin.SpaceGame.Web.Models Azure Artifacts 摘要:- task: NuGetCommand@2 displayName: 'Publish NuGet package' inputs: command: push feedPublish: '$(System.TeamProject)/Tailspin.SpaceGame.Web.Models' allowPackageConflicts: true condition: succeeded()feedPublish會指定要發行的摘要名稱。 名稱的格式為<projectName>/<feedName>,其中:$(System.TeamProject)是預先定義的變數,會參考您的專案名稱,例如 "Space Game - web - Dependencies"。Tailspin.SpaceGame.Web.Models是您在上一個練習中提供的摘要名稱。
設定權限
在設定並執行管線之前,您需要為建置服務提供正確的權限。
- 在 Azure DevOps 中,前往您的專案。
- 從左側功能表中選取 [成品]。
- 選取畫面右上方的 [設定] 圖示,然後選取 [權限] 索引標籤。
- 選取 [新增使用者/群組] 按鈕。
- 在 [使用者/群組] 欄位中,輸入 Space Game - web - Dependencies Build Service,選取 [參與者] 角色,然後選取 [儲存]。
在 Azure Pipelines 中建立管線
您已在先前的課程模組中了解如何設定 Azure Pipelines。 如果您需要複習,請前往使用 Azure Pipelines 建立組建管線。
以下是設定第二個管線來建置套件,並將該套件上傳至 Azure Artifacts 的方式。
從 Azure DevOps 中,移至 Space Game - web - Dependencies 專案。
從左側功能表中,選取 [管線]。
選取 [新增管線]。
從 [連線] 索引標籤選取 [GitHub]。
從 [選取] 索引標籤中,選取 mslearn-tailspin-spacegame-web-models。
出現提示時,請輸入 GitHub 認證。 從出現的頁面中,向下捲動至底端,然後選取 [核准並安裝]。
從 [檢閱] 索引標籤中,您會看到新管線的 azure-pipelines.yml 檔案。
選取執行。
監看管線執行。
移至 [成品] 索引標籤。
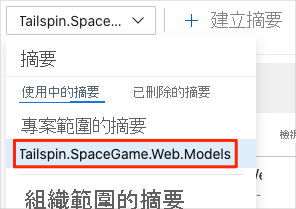
從頂端的下拉式清單中,選取 Tailspin.SpaceGame.Web.Models。

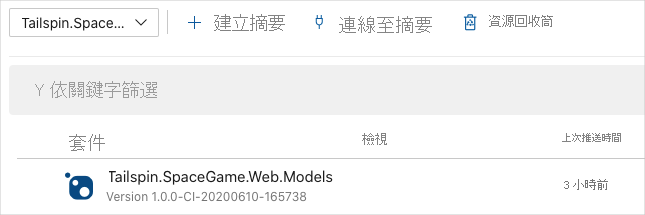
在 Azure Artifacts 中,您會看到產生的套件 Tailspin.SpaceGame.Web.Models。

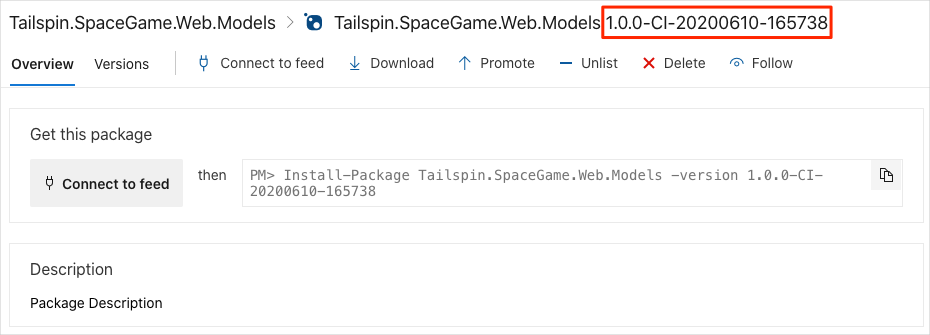
選取套件以移至 [詳細資料] 頁面。 然後,將版本號碼複製到您稍後可以輕鬆存取的位置。

您將在下一個單元中使用此版本號碼。