練習:上傳資料
現在您可以上傳用來定型機器學習模型的影像。 上傳影像的方式有兩種:
- 在自訂視覺入口網站中,選取、上傳然後標記影像。
- 在 Jupyter Notebook 等工具中,可使用自訂視覺 SDK 中包含的影像。
有大量的資料、影像類別和標記需上傳時,使用自訂視覺 SDK 會更快速。 不過您可以選擇後續小節中說明的其中一個選項。 完成這些步驟,以最適合您的方式上傳資料集內的影像。
選項 1:使用自訂視覺入口網站上傳和標記影像
每個子資料夾必須個別上傳和標記影像。 在此練習中,您可能會想要根據上傳速度,在四或五個子資料夾中上傳影像。 請記住,定型機器學習課程模組時,若有更多且不同的範例會產生更好的結果。
在自訂視覺入口網站中建立專案:
前往 https://www.customvision.ai/projects 並註冊。 選取 [新增專案]。
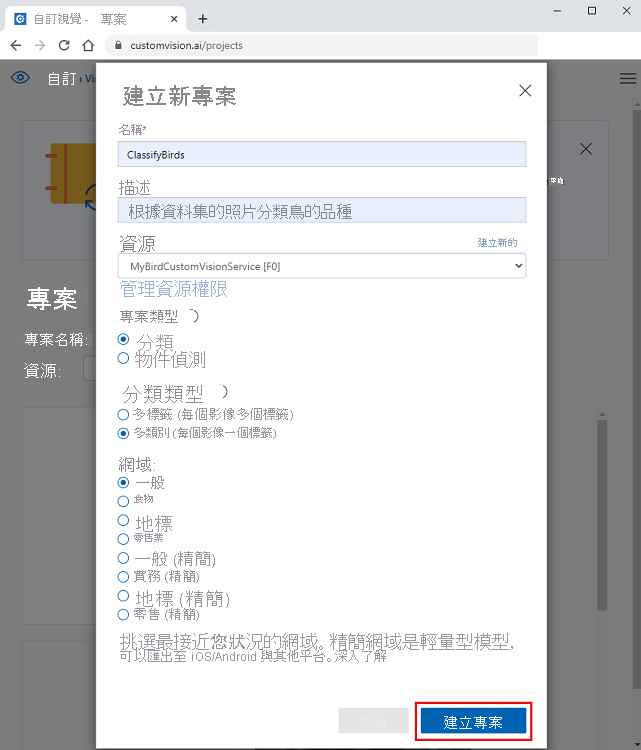
在 [建立新專案] 中:
[名稱] 請輸入您選擇的專案名稱。
[描述] 請輸入模型的簡短描述。
[資源群組] 請選取在 Azure 入口網站中建立的資源群組。
[專案類型] 請選取 [分類]。
[分類類型] 請選取 [多類別 (每個影像單一標記)]。
[領域] 請選取 [一般]。
選取建立專案。

注意
如果您想要匯出模型以部署到行動裝置,或是 TensorFlow.js 或 IoT,請在 [領域] 下,選取 [精簡] 模型選項。 您可在建立專案之後,於設定中變更此選項。
新增某個鳥類物種的影像和標記:
在自訂視覺專案中,選取 [新增影像]。
![螢幕擷取畫面中將自訂視覺專案裡的 [新增影像] 按鈕醒目提示。](../../advocates/cv-classify-bird-species/media/custom-vision-add-images.png)
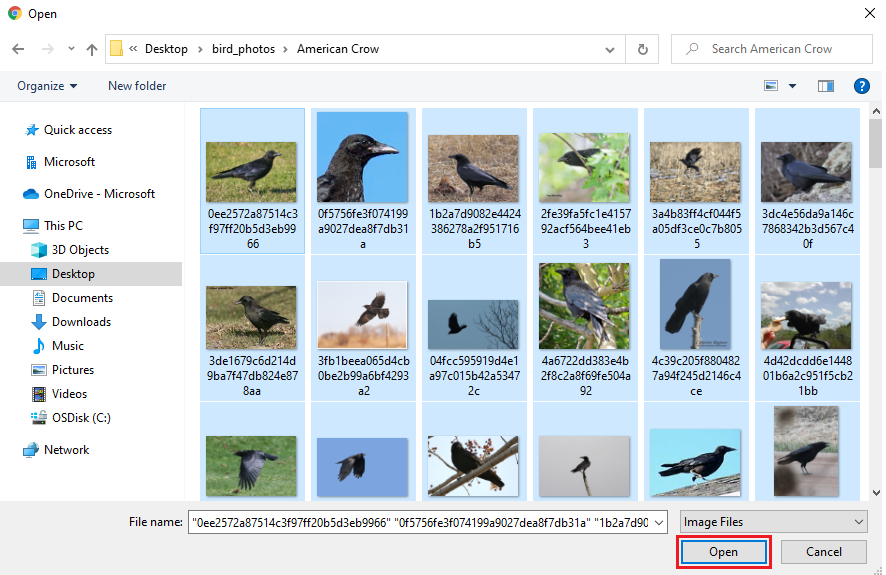
在 [開啟] 中,前往 birds-photo 資料夾 (您已從資料集 zip 檔將影像檔解壓縮至此資料夾中)。
開啟一個鳥類物種的資料夾。
按下 Ctrl + A,選取該物種資料夾中的所有影像,然後選取 [開啟]。

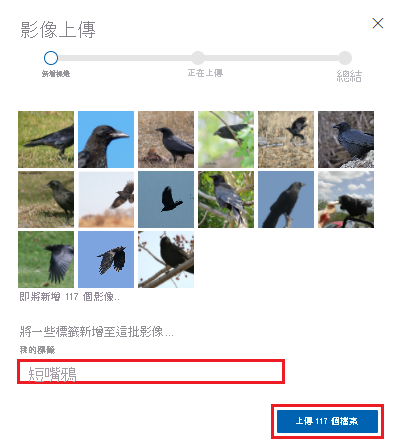
在 [影像上傳] 裡的 [我的標記] 中新增描述,指出相片中顯示的鳥類物種為何。
選取 [上傳 <數目> 個檔案]。

重複上述步驟,上傳所下載資料集中每個鳥類物種資料夾中的相片。
選項 2:使用 Python 和自訂視覺 SDK 上傳和標記影像
自訂視覺 SDK 提供下列程式設計語言版本:Python、.NET、Node.js、Go 和 Java。 我們使用的是 Python。 若您尚未安裝 Python,建議透過 Anaconda 安裝取得。 下載 Anaconda 時便會取得 Python。
若您偏好從 GitHub 下載程式碼,則可使用下列命令來複製存放庫:
git clone https://github.com/MicrosoftDocs/mslearn-cv-classify-bird-species.git
請遵循下列步驟來建立虛擬環境,並將程式碼貼至環境:
開啟您選擇的 IDE。 然後,執行下列命令來匯入套件:
!pip install azure-cognitiveservices-vision-customvision匯入執行指令碼所需的套件:
from azure.cognitiveservices.vision.customvision.training import CustomVisionTrainingClient
from azure.cognitiveservices.vision.customvision.training.models import ImageFileCreateEntry
from azure.cognitiveservices.vision.customvision.training.models import ImageFileCreateBatch
from msrest.authentication import ApiKeyCredentials
import numpy as np
現在請使用下列程式碼來建立自訂視覺專案。 執行程式碼之前,請將
<endpoint>和<key>預留位置取代為您自訂視覺資源的值。取得自訂視覺資源值的方式:
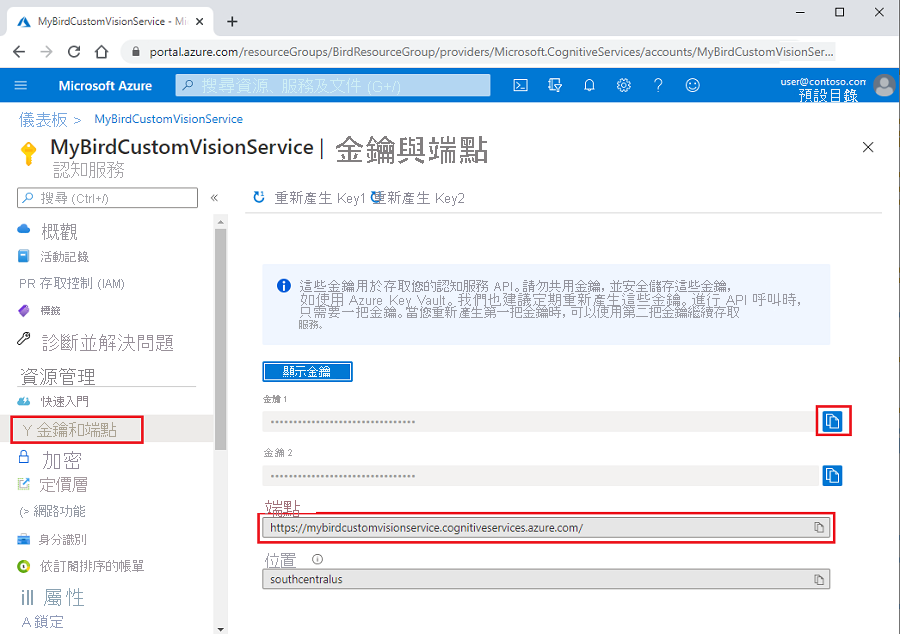
在 Azure 入口網站中,前往您的自訂視覺資源。
在資源功能表中的 [資源管理] 下,選取 [金鑰與端點]。
從 [端點] 方塊中複製此值。 在程式碼中,將
<endpoint>預留位置取代為此值。[金鑰 1] 請選取複製圖示來複製金鑰。 在程式碼中,將
<key>預留位置取代為此值。
程式碼看起來會像是以下範例:
ENDPOINT = "<endpoint>"

# Replace with a valid key
training_key = "<key>"
credentials = ApiKeyCredentials(in_headers={"Training-key": training_key})
publish_iteration_name = "classifyBirdModel"

trainer = CustomVisionTrainingClient(ENDPOINT, credentials)

# Create a new project
print ("Creating project...")
project = trainer.create_project("Bird Classification")

print("Project created!")
將下載的 bird-photos.zip 檔案解壓縮到儲存 Jupyter Notebook 檔案的相同目錄中。 新增下列程式碼,變更為您專案中的鳥類相片目錄。
# Change to the directory for the bird photos
import os
os.chdir('./bird-photos/custom-photos')
警告
只執行此資料格中的程式碼一次。 如果您嘗試執行該資料格多次,但沒有重新啟動 Python 核心,那麼資料格執行將會失敗。
新增下列程式碼,取得鳥類類型標記的清單。 系統會根據 bird-photos/custom-photos 目錄中的資料夾名稱來建立標記:
# Create a tag list from folders in bird directory
tags = [name for name in os.listdir('.') if os.path.isdir(name)]
print(tags)
接下來,我們會建立三個將在
for迴圈中呼叫的函式:createTag函式會在自訂視覺專案中建立類別標記。createImageList函式會使用標記名稱和標記識別碼來建立影像清單。image_list函式會分批上傳清單中影像。
建立三個函式的方式:
在 Jupyter Notebook 檔案中,新增
createTag函式程式碼。 此函式會在自訂視覺專案中建立影像名稱標記。tag_id = createTag(tag) print(f"tag creation done with tag id {tag_id}") image_list = createImageList(tag, tag_id) print("image_list created with length " + str(len(image_list))) # Break list into lists of 25 and upload in batches for i in range(0, len(image_list), 25): batch = ImageFileCreateBatch(images=image_list[i:i + 25]) print(f'Upload started for batch {i} total items {len(image_list)} for tag {tag}...') uploadImageList(batch) print(f"Batch {i} Image upload completed. Total uploaded {len(image_list)} for tag {tag}")接下來,新增
createImageList函式的程式碼。 此函數會採用兩個參數:資料夾名稱清單中的一個tag名稱,以及我們在自訂視覺專案中所建立標記的tag_id。 此函式會使用base_image_url值,將目錄設定為包含從資料夾名稱所建立tag影像的資料夾。 然後,我們會將每個影像附加至清單,然後使用此清單來分批上傳給所建立的tag:def createImageList(tag, tag_id): # Set directory to current tag. base_image_url = f"./{tag}/" photo_name_list = os.listdir(base_image_url) image_list = [] for file_name in photo_name_list: with open(base_image_url+file_name, "rb") as image_contents: image_list.append(ImageFileCreateEntry(name=base_image_url+file_name, contents=image_contents.read(), tag_ids=[tag_id])) return image_list要新增的最後一個程式碼是用於建立
uploadImageList函式。 我們會傳入從資料夾建立的image_list,然後將該清單上傳給tag:def uploadImageList(image_list): upload_result = trainer.create_images_from_files(project_id=project.id, batch=image_list) if not upload_result.is_batch_successful: print("Image batch upload failed.") for image in upload_result.images: print("Image status: ", image.status) exit(-1)
現在要為主要方法新增程式碼。 此方法會針對每個標記呼叫我們所建立的三個函式。 我們將在從 bird-photos/custom-photos 目錄中資料夾建立的
tags集合中,對每個標記 (資料夾名稱) 執行迴圈。 以下是for迴圈中的步驟:呼叫先前建立的
createTag函數,在自訂視覺專案中建立類別tag。呼叫先前建立的
createImageList函數,並使用自訂視覺所傳回的tag名稱和tag_id值。 函式會傳回要上傳的影像清單。呼叫先前建立的
imageList函數,分為 25 個批次上傳image_list的影像。 由於若嘗試一次上傳整個資料集,自訂視覺則會逾時,因此分為 25 個批次上傳。for tag in tags: tag_id = createTag(tag) print(f"tag creation done with tag id {tag_id}") image_list = createImageList(tag, tag_id) print("image_list created with length " + str(len(image_list))) # Break list into lists of 25 and upload in batches. for i in range(0, len(image_list), 25): batch = ImageFileCreateBatch(images=image_list[i:i + 25]) print(f'Upload started for batch {i} total items {len (image_list)} for tag {tag}...') uploadImageList(batch) print(f"Batch {i} Image upload completed. Total uploaded {len(image_list)} for tag {tag}")警告
只執行此資料格中的程式碼一次。 如果嘗試執行資料格多次,但沒有刪除自訂視覺專案,資料格執行將會失敗。