練習 - 使用 Grid 來建置使用者介面
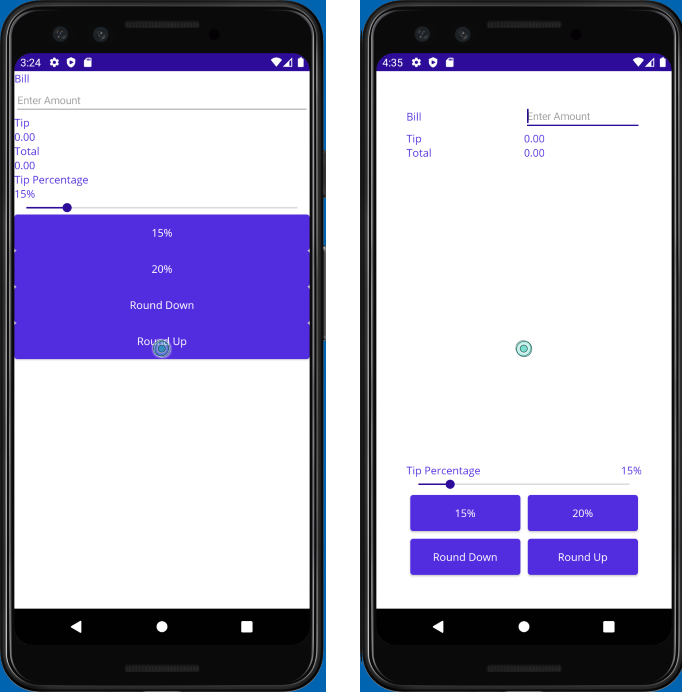
在此練習中,您會使用 Grid 以在使用者介面 (UI) 中排列檢視。 您會使用 TipCalculator 專案的另一個版本,並加以調整,讓 UI 更直覺。 您也會將按鈕移到頁面底部。 這次您會使用 Grid 版面配置,而不是使用 VerticalStackLayout 和 HorizontalStackLayout。 下圖顯示初始 UI,以及按照此練習中的步驟操作產生的 UI:

開啟入門解決方案
入門方案包含一個功能完整的小費計算機應用程式。
使用 Visual Studio,在您前一個練習開頭所複製存放庫的 exercise3/TipCalculator 資料夾中,開啟入門解決方案。
開啟 MainPage.xaml。 請注意,所有檢視都使用一個
VerticalStackLayout面板顯示:<?xml version="1.0" encoding="utf-8" ?> <ContentPage xmlns="http://schemas.microsoft.com/dotnet/2021/maui" xmlns:x="http://schemas.microsoft.com/winfx/2009/xaml" xmlns:local="clr-namespace:TipCalculator" x:Class="TipCalculator.MainPage"> <VerticalStackLayout> <Label Text="Bill" /> <Entry x:Name="billInput" Placeholder="Enter Amount" Keyboard="Numeric" /> <Label Text="Tip" /> <Label x:Name="tipOutput" Text="0.00" /> <Label Text="Total" /> <Label x:Name="totalOutput" Text="0.00" /> <Label Text="Tip Percentage" /> <Label x:Name="tipPercent" Text="15%" /> <Slider x:Name="tipPercentSlider" Minimum="0" Maximum="100" Value="15" /> <Button Text="15%" Clicked="OnNormalTip" /> <Button Text="20%" Clicked="OnGenerousTip" /> <Button x:Name="roundDown" Text="Round Down" /> <Button x:Name="roundUp" Text="Round Up" /> </VerticalStackLayout> </ContentPage>
建立格線版面配置
將版面配置面板從
VerticalStackLayout變成邊框間距為40單位的Grid。針對
Grid定義七個資料列與兩個資料行。 除了第四個資料列以外,讓所有資料列都變成Auto大小。 第四個資料列應使用Star,以便取得格線中所有剩餘空間。 針對兩個資料行使用Star大小。<Grid RowDefinitions="Auto, Auto, Auto, *, Auto, Auto, Auto" ColumnDefinitions="*, *" Padding="40"> ... </Grid>
將檢視放置在資料格中
將
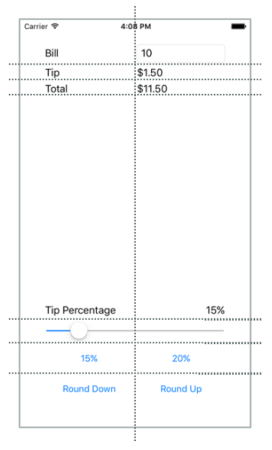
Grid.Row和Grid.Column的設定新增至每一個檢視,以將其指派給Grid中的適當資料格。 使用下列螢幕擷取畫面,以協助判斷每個檢視應該放置的位置:
以下範例示範如何為 Bill
Label及billInputEntry檢視設定位置:... <Label Text="Bill" Grid.Row="0" Grid.Column="0"/> <Entry x:Name="billInput" Placeholder="Enter Amount" Keyboard="Numeric" Grid.Row="0" Grid.Column="1"/> ...將 Label 上的
VerticalOptions屬性設定為Center,以對齊 BillLabel和Entry。將
Grid.ColumnSpan的設定新增至Slider,讓它橫跨兩個資料行:<Slider ... Grid.ColumnSpan="2" ... />找出含有 Tip Percentage 文字的
Label。 設定它,使其佔據其矩形的左下角位置:<Label Text="Tip Percentage" VerticalOptions="End" HorizontalOptions="Start" ... />找出名為 tipPercent 的
Label。 設定它,使其佔據其矩形的右下角位置:<Label x:Name="tipPercent" VerticalOptions="End" HorizontalOptions="End" ... />針對所有四個按鈕,將
Margin屬性設為5。
頁面的完整 Extensible Application Markup Language (XAML) 標記看起來應該像這樣:
<ContentPage xmlns="http://schemas.microsoft.com/dotnet/2021/maui"
             xmlns:x="http://schemas.microsoft.com/winfx/2009/xaml"
             xmlns:local="clr-namespace:TipCalculator"
             x:Class="TipCalculator.MainPage">
    <Grid RowDefinitions="Auto, Auto, Auto, *, Auto, Auto, Auto"
          ColumnDefinitions="*, *"
          Padding="40">

        <Label Text="Bill" VerticalOptions="Center" Grid.Row="0" Grid.Column="0"/>
        <Entry x:Name="billInput" Placeholder="Enter Amount" Keyboard="Numeric" Grid.Row="0" Grid.Column="1"/>

        <Label Text="Tip" Grid.Row="1" Grid.Column="0"/>
        <Label x:Name="tipOutput" Text="0.00" Grid.Row="1" Grid.Column="1"/>

        <Label Text="Total" Grid.Row="2" Grid.Column="0"/>
        <Label x:Name="totalOutput" Text="0.00" Grid.Row="2" Grid.Column="1"/>

        <Label Text="Tip Percentage" VerticalOptions="End" HorizontalOptions="Start" Grid.Row="3" Grid.Column="0"/>
        <Label x:Name="tipPercent" Text="15%" VerticalOptions="End" HorizontalOptions="End" Grid.Row="3" Grid.Column="1"/>
        <Slider x:Name="tipPercentSlider" Minimum="0" Maximum="100" Value="15" Grid.Row="4" Grid.Column="0" Grid.ColumnSpan="2"/>

        <Button Text="15%" Clicked="OnNormalTip" Margin="5" Grid.Row="5" Grid.Column="0"/>
        <Button Text="20%" Clicked="OnGenerousTip" Margin="5" Grid.Row="5" Grid.Column="1"/>

        <Button x:Name="roundDown" Margin="5" Text="Round Down" Grid.Row="6" Grid.Column="0"/>
        <Button x:Name="roundUp"   Margin="5" Text="Round Up" Grid.Row="6" Grid.Column="1"/>

    </Grid>
</ContentPage>
檢查結果
執行應用程式,並查看 UI 中的差異。 您已使用 Grid 來改善現有 UI 的美觀問題。 Grid 的功能比 StackLayout 更強大。 特別是,Grid 可以更加輕鬆地跨資料列對齊檢視。