練習:建立您的第一個 XAML 頁面
您所在的電力公司中,有工程師會定期至客戶處巡視,以維修設備和處理其他電氣維護工作。 應用程式有部分功能可供工程師在訪查時做筆記。 應用程式會顯示簡單的文字編輯器,讓工程師輸入詳細資訊並儲存起來。
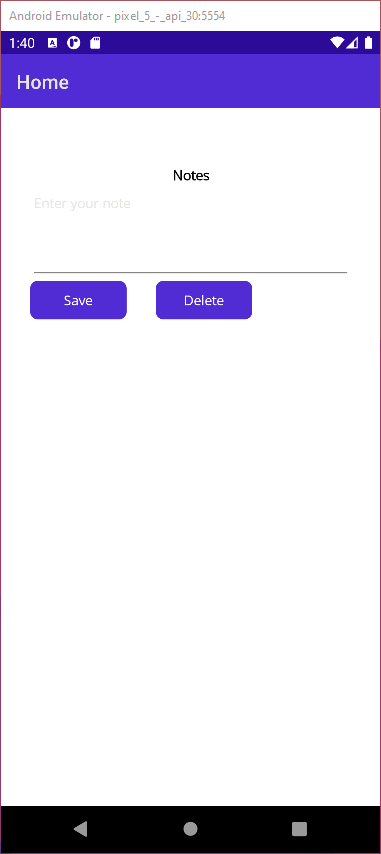
在 Android 上,應用程式外觀如下:

您接到要求,需要在此頁面上新增更多功能。 在開始之前,您想要先了解這個頁面的建立方式,因此查看了原始程式碼。 您發現此 UI 完全是使用 C# 程式碼建立而成。 雖然這是可行的方式,但負責處理配置的程式碼,以及用來控制 UI 運作方式的程式碼,全都混雜在一起。 您意識到,不久後應用程式的這兩個部分就有固定在一起的風險,會導致未來的維護工作更加困難,且應用程式可能會隨著功能繼續增加而更容易出問題。 您決定要將 UI 設計和 UI 邏輯分開,便從應用程式中取出用來定義配置的 C# 程式碼,並以 XAML 頁面取而代之。
本課程模組使用 .NET 8.0 SDK。 確認您已在慣用的命令終端中執行下列命令來安裝 .NET 8.0:
dotnet --list-sdks
類似下列範例的輸出隨即出現:
6.0.317 [C:\Program Files\dotnet\sdk]
7.0.401 [C:\Program Files\dotnet\sdk]
8.0.100 [C:\Program Files\dotnet\sdk]
確定已列出開頭為 8 的版本。 如果未列出任何項目或找不到命令,請安裝最新的 .NET 8.0 SDK。
檢閱現有的應用程式
將本次練習的 GitHub 存放庫複製到本機電腦上。
注意
最好將練習內容複製或下載至簡短的資料夾路徑,例如 C:\dev,以避免組建產生的檔案超過最大路徑長度。
前往存放庫本機複本中的 exercise1 資料夾。
開啟此資料夾中的 Notes.sln Visual Studio 方案檔,或 Visual Studio Code 中的資料夾。
在 [方案總管] 視窗中,展開 [Notes] 專案、展開 MainPage.xaml 檔案,然後開啟 MainPage.xaml.cs 檔案。
檢閱此檔案中的 MainPage 型別。 建構函式含有以下程式碼,用於建立 UI:
public MainPage()
{
    var notesHeading = new Label() { Text = "Notes", HorizontalOptions = LayoutOptions.Center, FontAttributes = FontAttributes.Bold };

    editor = new Editor() { Placeholder = "Enter your note", HeightRequest = 100 };
    editor.Text = File.Exists(_fileName) ? File.ReadAllText(_fileName) : string.Empty;

    var buttonsGrid = new Grid() { HeightRequest = 40.0 };
    buttonsGrid.ColumnDefinitions.Add(new ColumnDefinition() { Width = new GridLength(1.0, GridUnitType.Auto) });
    buttonsGrid.ColumnDefinitions.Add(new ColumnDefinition() { Width = new GridLength(30.0, GridUnitType.Absolute) });
    buttonsGrid.ColumnDefinitions.Add(new ColumnDefinition() { Width = new GridLength(1.0, GridUnitType.Auto) });

    var saveButton = new Button() { WidthRequest = 100, Text = "Save" };
    saveButton.Clicked += OnSaveButtonClicked;
    Grid.SetColumn(saveButton, 0);
    buttonsGrid.Children.Add(saveButton);

    var deleteButton = new Button() { WidthRequest = 100, Text = "Delete" };
    deleteButton.Clicked += OnDeleteButtonClicked;
    Grid.SetColumn(deleteButton, 2);
    buttonsGrid.Children.Add(deleteButton);

    var stackLayout = new VerticalStackLayout
    {
        Padding = new Thickness(30, 60, 30, 30),
        Children = { notesHeading, editor, buttonsGrid }
    };

    this.Content = stackLayout;
}
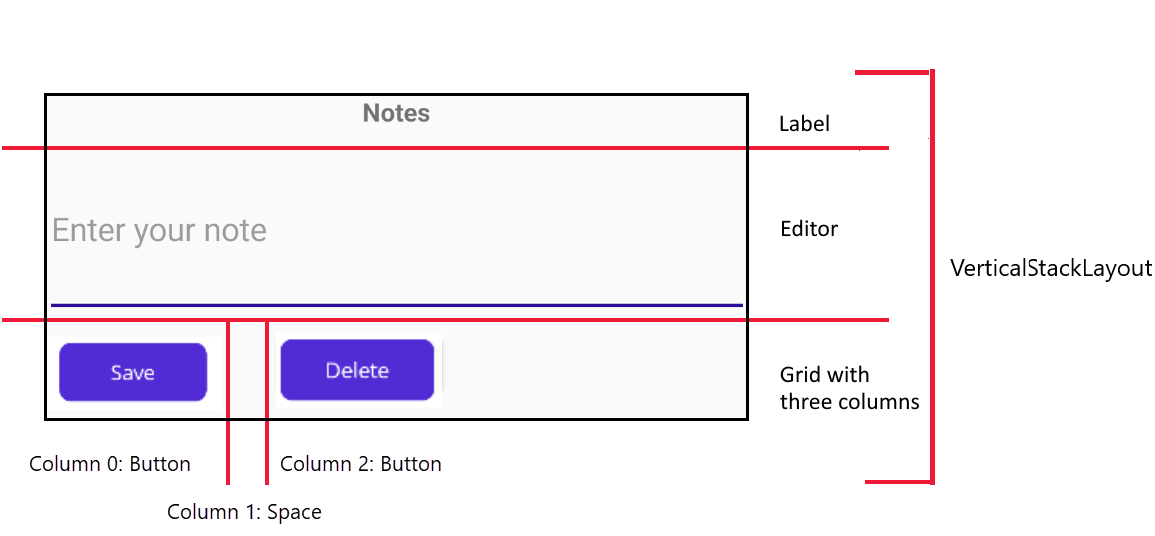
UI 的組成包括內有
Label的VerticalStackLayout、Editor,以及有三欄的Grid。 第一欄用於裝載 saveButton 控制項,第二欄為空格字元,第三欄裝載 deleteButton 控制項。下列圖表說明此 UI 結構:

請注意,MainPage 類別也包含按鈕的事件處理方式,以及一些用於初始化
Editor控制項的程式碼。 此程式與 UI 定義無所區別。在 Windows 上編譯並執行應用程式,看看效果如何。 請選取 F5 來建置並執行應用程式。
當您完成後,關閉應用程式,並返回 Visual Studio 或 Visual Studio Code。
建立 UI 的 XAML 版本
請開啟 MainPage.xaml 檔案。 此頁面中的標記呈現的是空白的 MAUI 內容頁:
<ContentPage xmlns="http://schemas.microsoft.com/dotnet/2021/maui"
             xmlns:x="http://schemas.microsoft.com/winfx/2009/xaml"
             x:Class="Notes.MainPage">

</ContentPage>
新增
VerticalStackLayout控制項到內容頁:<ContentPage ...> <VerticalStackLayout Margin="30,60,30,30"> </VerticalStackLayout> </ContentPage>將
Label控制項新增到VerticalStackLayout。 將此控制項的 Text、HorizontalTextAlignment 和 FontAttributes 屬性設為如下所示:<ContentPage ...> <VerticalStackLayout ...> <Label Text="Notes" HorizontalOptions="Center" FontAttributes="Bold" /> </VerticalStackLayout> </ContentPage>將
Editor控制項新增至VerticalStackLayout:<ContentPage ...> <VerticalStackLayout ...> <Label .../> <Editor x:Name="editor" Placeholder="Enter your note" HeightRequest="100" /> </VerticalStackLayout> </ContentPage>將子
Grid系新增至VerticalStackLayout。 此Grid應為有三欄,第一欄和第三欄會自動調整大小,而第二欄的寬度為 30:<ContentPage ...> <VerticalStackLayout ...> <Label .../> <Editor .../> <Grid ColumnDefinitions="Auto, 30, Auto"> </Grid> </VerticalStackLayout> </ContentPage>將
Button新增至子系Grid的第一欄。 這是 [儲存] 按鈕:<ContentPage ...> <VerticalStackLayout ...> <Label .../> <Editor .../> <Grid ...> <Button Grid.Column="0" Text="Save" WidthRequest="100" Clicked="OnSaveButtonClicked" /> </Grid> </VerticalStackLayout> </ContentPage>將另一個
Button新增至子系Grid的第三欄。 選取 [刪除] 按鈕:<ContentPage ...> <VerticalStackLayout ...> <Label .../> <Editor .../> <Grid ...> <Button ... /> <Button Grid.Column="2" Text="Delete" WidthRequest="100" Clicked="OnDeleteButtonClicked" /> </Grid> </VerticalStackLayout> </ContentPage>
移除程式碼後置檔案的配置程式碼
在 [方案總管] 視窗中,展開 [MainPage.xaml] 節點,並開啟 MainPage.xaml.cs 檔案。
從 [MainPage] 類別移除 [編輯器] 欄位。
在 MainPage 建構函式中的 MainPage.xaml.cs 檔案,移除所有用於建立使用者介面元素的程式碼,取代為呼叫 InitializeComponent 方法。 新增程式碼,以確認用來儲存筆記的檔案是否存在,若存在則讀取內容,並填入 [編輯器] 控制項的 [文字] 欄位。 建構函式應會如下所示:
public partial class MainPage : ContentPage
{
    string _fileName = Path.Combine(FileSystem.AppDataDirectory, "notes.txt");

    public MainPage()
    {
        InitializeComponent();

        if (File.Exists(_fileName))
        {
            editor.Text = File.ReadAllText(_fileName);
        }
    }

    ...
}
選取 [建置] 功能表中的 [重建方案]。 確認應用程式組建無任何錯誤。
執行應用程式。 運作效果應會和之前一樣。
若有時間,請使用 Android 模擬器部署並執行應用程式。 應用程式 UI 應會和此練習開頭的影像一模一樣。