練習 - 升階至開發階段
小組已經有方案,並已準備好開始實作其發行管線。 您的 Azure DevOps 專案已設定,且您的 Azure App 服務 實例已準備好接收組建成品。
此時,請記住小組的管線只有兩個階段。 第一個階段會產生組建成品。 第二個階段會將 Space Game Web 應用程式部署至 App Service。 在此,您要跟著 Andy 和 Mara,看他們如何修改管線。 他們將部署到對應至開發階段的App Service環境。
開發階段類似於在 Azure Pipelines 建立發行管線課程模組中所建立的部署階段。 在那裡,您已使用 CI 觸發程序來啟動組建程序。 在此執行同樣的作業。
從 GitHub 擷取分支
在此,您會從 GitHub 擷取 release 分支。 您也會簽出或切換至分支。
此分支會作為您的發行分支。 其中包含先前課程模組中使用的Space Game專案。 其也包含可供開始使用的 Azure Pipelines 設定。
若要擷取並切換至分支:
在 Visual Studio Code 中,開啟整合式終端。
若要從 Microsoft 存放庫擷取名為
git的分支,並切換至該分支,請執行下列release命令。git fetch upstream release git checkout -B release upstream/release這些命令的格式可讓您從稱為
upstream的 Microsoft GitHub 存放庫取得起始程式碼。 不久之後,您會將此分支推送至 GitHub 存放庫,稱為origin。您可以選擇性地從 Visual Studio Code 開啟 azure-pipelines.yml。 熟悉初始組態。
此設定類似於您在使用 Azure Pipelines 建立發行管線課程模組中所建立的基本設定。 其只會建置應用程式的發行設定。 基於學習目的,此設定並不會執行您在先前的課程模組中設定的品質或安全性檢查。
注意
更健全的設定可能會指定參與組建流程的分支。 例如,為協助驗證程式碼品質,您可以在每次在任何分支上推送變更時執行單元測試。 您也可以將應用程式部署到執行更詳盡測試的環境。 但是,只有當您有提取要求、有候選版,或將程式碼合併到 main 時,才會進行此部署。
如需詳細資訊,請參閱使用 Git 和 GitHub 在組建管線實作程式碼流程和組建管線觸發程序。
將變更升階至開發階段
在這裡,您會修改管線設定,以將組建升階到開發階段。
在 Visual Studio Code 中修改 azure-pipelines.yml。
trigger:
- '*'

variables:
  buildConfiguration: 'Release'
  releaseBranchName: 'release'

stages:
- stage: 'Build'
  displayName: 'Build the web application'
  jobs:
  - job: 'Build'
    displayName: 'Build job'
    pool:
      vmImage: 'ubuntu-20.04'
      demands:
      - npm

    variables:
      wwwrootDir: 'Tailspin.SpaceGame.Web/wwwroot'
      dotnetSdkVersion: '6.x'

    steps:
    - task: UseDotNet@2
      displayName: 'Use .NET SDK $(dotnetSdkVersion)'
      inputs:
        version: '$(dotnetSdkVersion)'

    - task: Npm@1
      displayName: 'Run npm install'
      inputs:
        verbose: false

    - script: './node_modules/.bin/node-sass $(wwwrootDir) --output $(wwwrootDir)'
      displayName: 'Compile Sass assets'

    - task: gulp@1
      displayName: 'Run gulp tasks'

    - script: 'echo "$(Build.DefinitionName), $(Build.BuildId), $(Build.BuildNumber)" > buildinfo.txt'
      displayName: 'Write build info'
      workingDirectory: $(wwwrootDir)

    - task: DotNetCoreCLI@2
      displayName: 'Restore project dependencies'
      inputs:
        command: 'restore'
        projects: '**/*.csproj'

    - task: DotNetCoreCLI@2
      displayName: 'Build the project - $(buildConfiguration)'
      inputs:
        command: 'build'
        arguments: '--no-restore --configuration $(buildConfiguration)'
        projects: '**/*.csproj'

    - task: DotNetCoreCLI@2
      displayName: 'Publish the project - $(buildConfiguration)'
      inputs:
        command: 'publish'
        projects: '**/*.csproj'
        publishWebProjects: false
        arguments: '--no-build --configuration $(buildConfiguration) --output $(Build.ArtifactStagingDirectory)/$(buildConfiguration)'
        zipAfterPublish: true

    - publish: '$(Build.ArtifactStagingDirectory)'
      artifact: drop

- stage: 'Dev'
  displayName: 'Deploy to the dev environment'
  dependsOn: Build
  condition: |
    and
    (
      succeeded(),
      eq(variables['Build.SourceBranchName'], variables['releaseBranchName'])
    )
  jobs:
  - deployment: Deploy
    pool:
      vmImage: 'ubuntu-20.04'
    environment: dev
    variables:
    - group: Release
    strategy:
      runOnce:
        deploy:
          steps:
          - download: current
            artifact: drop
          - task: AzureWebApp@1
            displayName: 'Azure App Service Deploy: website'
            inputs:
              azureSubscription: 'Resource Manager - Tailspin - Space Game'
              appName: '$(WebAppNameDev)'
              package: '$(Pipeline.Workspace)/drop/$(buildConfiguration)/*.zip'
這與您在上一個課程模組中建置的設定類似。 在那裡,您和小組建置了持續部署的概念證明。 但請注意上述程式碼範例中所醒目提示的這些差異:
- 此設定會在檔案頂端定義變數。 整個管線都會用到這些變數。 變數會定義要建置的設定 (
Release)。 變數也會定義發行分支的名稱 (release)。 - 概念證明內的部署階段現在稱為開發。
- 開發階段會使用條件來指示系統,要求系統只在上一個階段成功且目前的分支是
release時,才執行開發階段。 此設定可確保發行功能只會部署到開發環境。 - 部署步驟會
WebAppNameDev使用 變數來部署至與 開發 環境相關聯的App Service實例。
注意
實務上,您也可以從其他分支 (例如
main) 進行部署。 您可以納入邏輯來允許從多個分支 (例如release和main) 將變更升階至開發階段。- 此設定會在檔案頂端定義變數。 整個管線都會用到這些變數。 變數會定義要建置的設定 (
在整合式終端中,將 azure-pipelines.yml 新增至索引。 認可變更,並將其推送至 GitHub。
提示
執行這些 Git 命令之前,請先儲存 azure-pipelines.yml。
git add azure-pipelines.yml
git commit -m "Deploy to the Dev stage"
git push origin release
在 Azure Pipelines 中,移至該組建。 在組建執行時加以追蹤。
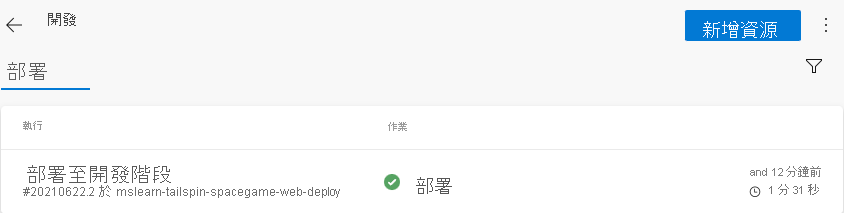
組建完成後,若要返回 [摘要] 頁面,請選取 [返回] 按鈕。
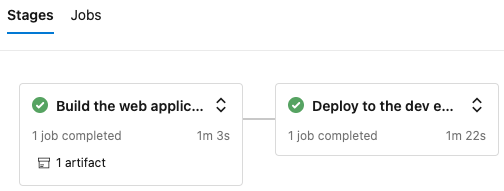
您會看到部署已順利完成。
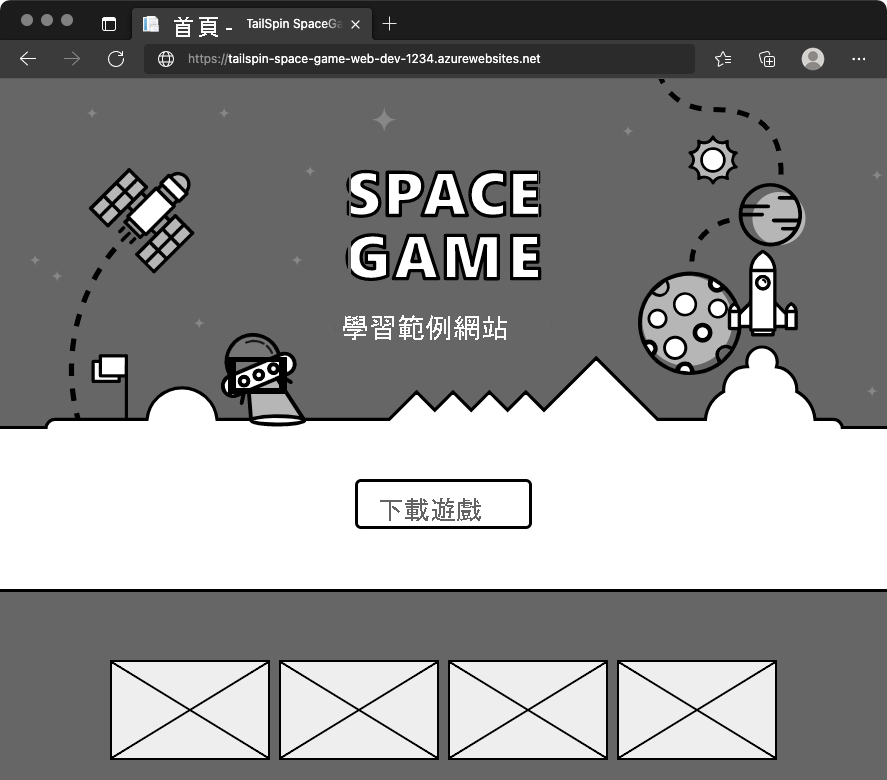
從網頁瀏覽器,移至與您的開發環境 App Service 實例相關聯的 URL。
如果您的瀏覽器索引標籤仍保持開啟,請重新整理頁面。 如果您不記得 URL,請在 Azure 入口網站的 [App Service 詳細資料] 頁面中找到該 URL。
您會看到 Space Game 網站已部署至 App Service,且正在執行。
(選擇性步驟) 在 Azure Pipelines 中選取 [環境]。 然後,選取 [開發] 環境。
Azure Pipelines 會記錄您的部署歷程記錄。 在歷程記錄中,您可以透過環境的變更逆向追蹤到程式碼認可和工作項目。