練習 - 從受 Microsoft Entra 保護的 API 傳回產品數據
在此練習中,您會更新訊息延伸模組,以從自定義 API 擷取數據。 您可以根據使用者查詢從自定義 API 取得數據,並將搜尋結果中的數據傳回給使用者。
安裝和設定Dev Proxy
在此練習中,您會使用 Dev Proxy,這是可模擬 API 的命令行工具。 當您想要測試應用程式而不需建立實際的 API 時,這會很有用。
若要完成此練習,您必須安裝 最新版的開發人員 Proxy ,並下載此課程模組的開發 Proxy 預設。
默認會模擬 CRUD (使用記憶體內部數據存放區建立、讀取、更新、刪除) API,並受到 Microsoft Entra 保護。 這表示您可以測試您的應用程式,就像是呼叫需要驗證的實際 API 一樣。
若要下載預設值,請在終端機中執行下列命令:
devproxy preset get learn-copilot-me-plugin
取得用戶查詢值
建立方法,以依據 參數的名稱取得用戶查詢值。
在 Visual Studio 和 ProductsPlugin 專案中:
在 [協助程式] 資料夾中,建立名為 MessageExtensionHelpers.cs 的新檔案
在 檔案中,新增下列程序代碼:
using Microsoft.Bot.Schema.Teams;

internal class MessageExtensionHelpers
{
    internal static string GetQueryParameterValueByName(IList<MessagingExtensionParameter> parameters, string name) => parameters.FirstOrDefault(p => p.Name == name)?.Value as string ?? string.Empty;
}
Save your changes
接下來,更新 OnTeamsMessagingExtensionQueryAsync 方法以使用新的協助程式方法。
在 [搜尋] 資料夾中,開 啟 [SearchApp.cs
在 OnTeamsMessagingExtensionQueryAsync 方法中,取代下列程序代碼:
var text = query?.Parameters?[0]?.Value as string ?? string.Empty;跟
var text = MessageExtensionHelpers.GetQueryParameterValueByName(query.Parameters, "ProductName");將游標移至 文字 變數、使用
Ctrl + R、Ctrl + R,然後將變數重新命名為 名稱Save your changes
OnTeamsMessagingExtensionQueryAsync 方法現在看起來應該像這樣:
protected override async Task<MessagingExtensionResponse> OnTeamsMessagingExtensionQueryAsync(ITurnContext<IInvokeActivity> turnContext, MessagingExtensionQuery query, CancellationToken cancellationToken)
{
    var userTokenClient = turnContext.TurnState.Get<UserTokenClient>();
    var tokenResponse = await AuthHelpers.GetToken(userTokenClient, query.State, turnContext.Activity.From.Id, turnContext.Activity.ChannelId, connectionName, cancellationToken);

    if (!AuthHelpers.HasToken(tokenResponse))
    {
        return await AuthHelpers.CreateAuthResponse(userTokenClient, connectionName, (Activity)turnContext.Activity, cancellationToken);
    }

    var name = MessageExtensionHelpers.GetQueryParameterValueByName(query.Parameters, "ProductName");

    var card = await File.ReadAllTextAsync(Path.Combine(".", "Resources", "card.json"), cancellationToken);
    var template = new AdaptiveCardTemplate(card);

    return new MessagingExtensionResponse
    {
        ComposeExtension = new MessagingExtensionResult
        {
            Type = "result",
            AttachmentLayout = "list",
            Attachments = [
                new MessagingExtensionAttachment
                    {
                        ContentType = AdaptiveCard.ContentType,
                        Content = JsonConvert.DeserializeObject(template.Expand(new { title = name })),
                        Preview = new ThumbnailCard { Title = name }.ToAttachment()
                    }
            ]
        }
    };
}
從自定義 API 取得數據
若要從自定義 API 取得數據,您必須在要求的 Authorization 標頭中傳送存取令牌,並將回應還原串行化為代表產品數據的模型。
首先,建立代表從自定義 API 傳回之產品數據的模型。
在 Visual Studio 和 ProductsPlugin 專案中:
建立名為 Models 的資料夾
在 Models 資料夾中,建立名為 Product.cs 的新檔案
在 檔案中,新增下列程序代碼:
using System.Text.Json.Serialization;

internal class Product
{
    [JsonPropertyName("productId")]
    public int Id { get; set; }
    [JsonPropertyName("imageUrl")]
    public string ImageUrl { get; set; }
    [JsonPropertyName("name")]
    public string Name { get; set; }
    [JsonPropertyName("category")]
    public string Category { get; set; }
    [JsonPropertyName("callVolume")]
    public int CallVolume { get; set; }
    [JsonPropertyName("releaseDate")]
    public string ReleaseDate { get; set; }
}
Save your changes
接下來,建立服務類別,從自定義 API 擷取產品數據。
建立名為 Services 的資料夾
在 [服務] 資料夾中,建立名為 ProductService.cs 的新檔案
在 檔案中,新增下列程序代碼:
using System.Net.Http.Headers;

internal class ProductsService
{
    private readonly HttpClient _httpClient;
    private readonly string _baseUri = "https://api.contoso.com/v1/";

    internal ProductsService(string token)
    {
        _httpClient = new HttpClient();
        _httpClient.DefaultRequestHeaders.Accept.Add(new MediaTypeWithQualityHeaderValue("application/json"));
        _httpClient.DefaultRequestHeaders.Authorization = new AuthenticationHeaderValue("Bearer", token);
    }

    internal async Task<Product[]> GetProductsByNameAsync(string name)
    {
        var response = await _httpClient.GetAsync($"{_baseUri}products?name={name}");
        response.EnsureSuccessStatusCode();
        var jsonString = await response.Content.ReadAsStringAsync();
        return System.Text.Json.JsonSerializer.Deserialize<Product[]>(jsonString);
    }
}
Save your changes
ProductsService 類別包含從自定義 API 取得產品數據的方法。 類別建構函式會採用存取令牌作為參數,並在 Authorization 標頭中設定具有存取令牌的 HttpClient 實例。
接下來,更新 OnTeamsMessagingExtensionQueryAsync 方法,以使用 ProductsService 類別從自定義 API 取得產品數據。
在 [搜尋] 資料夾中,開 啟 [SearchApp.cs
在 OnTeamsMessagingExtensionQueryAsync 方法中,在 名稱 變數宣告之後新增下列程式代碼,以從自定義 API 取得產品數據:
var productService = new ProductsService(tokenResponse.Token);
var products = await productService.GetProductsByNameAsync(name);
Save your changes
建立搜尋結果
現在您已有產品數據,您可以將它包含在傳回給使用者的搜尋結果中。
首先,讓我們更新現有的調適型卡片範本,以顯示產品資訊。
在 Visual Studio 和 ProductsPlugin 項目中繼續:
在 [ 資源] 資料夾中,將 card.json 重新命名為 Product.json
在 Resources 資料夾中,建立名為 Product.data.json 的新檔案。 此檔案包含 Visual Studio 用來產生調適型卡片範例數據。
在 檔案中,新增下列 JSON:
{
  "callVolume": 36,
  "category": "Enterprise",
  "imageUrl": "https://raw.githubusercontent.com/SharePoint/sp-dev-provisioning-templates/master/tenant/productsupport/source/Product%20Imagery/Contoso4.png",
  "name": "Contoso Quad",
  "productId": 1,
  "releaseDate": "2019-02-09"
}
Save your changes
在 [ 資源] 資料夾中,開 啟 [Product.json
在 檔案中,將內容取代為下列 JSON:
{
  "type": "AdaptiveCard",
  "$schema": "http://adaptivecards.io/schemas/adaptive-card.json",
  "version": "1.5",
  "body": [
    {
      "type": "TextBlock",
      "text": "${name}",
      "wrap": true,
      "style": "heading"
    },
    {
      "type": "TextBlock",
      "text": "${category}",
      "wrap": true
    },
    {
      "type": "Container",
      "items": [
        {
          "type": "Image",
          "url": "${imageUrl}",
          "altText": "${name}"
        }
      ],
      "minHeight": "350px",
      "verticalContentAlignment": "Center",
      "horizontalAlignment": "Center"
    },
    {
      "type": "FactSet",
      "facts": [
        {
          "title": "Call Volume",
          "value": "${formatNumber(callVolume,0)}"
        },
        {
          "title": "Release Date",
          "value": "${formatDateTime(releaseDate,'dd/MM/yyyy')}"
        }
      ]
    }
  ]
}
Save your changes
調適型卡片範本會使用系結運算式來顯示產品資訊。 ${name}、${category}、${imageUrl}、${callVolume}和 ${releaseDate} 表達式會取代為產品數據中的對應值。 formatNumber 和 formatDateTime 範本函式可用來將 callVolume 和 releaseDate 值分別格式化為數位和日期。
花點時間探索Visual Studio中的調適型卡片預覽。 預覽會顯示當產品數據系結至範本時,調適型卡片範本的外觀。 它會使用 來自Product.data.json 檔案的範例數據來產生預覽。
接下來,更新應用程式指令清單中的 validDomains 屬性以包含 raw.githubusercontent.com 網域,讓調適型卡片範本中的影像可以在 Microsoft Teams 中顯示。
在 TeamsApp 專案中:
在 appPackage 資料夾中,開 啟 manifest.json
在 檔案中,將 GitHub 網域新增至 validDomains 屬性:
  "validDomains": [
    "token.botframework.com",
    "raw.githubusercontent.com",
    "${{BOT_DOMAIN}}"
  ],
Save your changes
接下來,更新 OnTeamsMessagingExtensionQueryAsync 方法,以建立包含產品資訊的附件清單。
在 ProductsPlugin 專案中:
在 [搜尋] 資料夾中,開 啟 [SearchApp.cs
將 card.json 更新為 Product.json,以反映檔名中的變更。 取代下列程式代碼:
var card = await File.ReadAllTextAsync(Path.Combine(".", "Resources", "card.json"), cancellationToken);跟
var card = await File.ReadAllTextAsync(Path.Combine(".", "Resources", "Product.json"), cancellationToken);在 範本 變數宣告之後新增下列程式代碼,以建立附件清單:
 var attachments = products.Select(product =>
 {
     var content = template.Expand(product);

     return new MessagingExtensionAttachment
     {
         ContentType = AdaptiveCard.ContentType,
         Content = JsonConvert.DeserializeObject(content),
         Preview = new ThumbnailCard
         {
             Title = product.Name,
             Subtitle = product.Category,
             Images = [new() { Url = product.ImageUrl }]
         }.ToAttachment()
     };
 }).ToList();
更新 return 語句以包含 附件 變數:
return new MessagingExtensionResponse
{
    ComposeExtension = new MessagingExtensionResult
    {
        Type = "result",
        AttachmentLayout = "list",
        Attachments = attachments
    }
};
儲存變更
建立和更新資源
一切就緒之後,請執行 準備 Teams 應用程式相依性 程式,以建立新的資源並更新現有的資源。
在 Visual Studio 中繼續:
- 在 方案總管 中,以滑鼠右鍵按兩下TeamsApp專案
- 展開 [Teams 工具組] 功能表,選取 [準備 Teams 應用程式相依性]
- 在 [ Microsoft 365 帳戶 ] 對話框中,選取 [ 繼續]
- 在 [ 布建] 對話框中,選取 [ 布建]
- 在 [Teams 工具組] 警告 對話框中,選取 [ 布建]
- 在 [Teams 工具組資訊 ] 對話框中,選取交叉圖示以關閉對話方塊
執行和偵錯
布建資源之後,請啟動偵錯會話來測試訊息擴充功能。
首先,啟動開發人員 Proxy 以模擬自定義 API。
開啟終端機視窗
執行下列命令以啟動 Dev Proxy:
devproxy --config-file "~appFolder/presets/learn-copilot-me-plugin/products-api-config.json"如果出現提示,請接受憑證警告
注意事項
當開發人員 Proxy 執行時,它會作為整個系統的 Proxy。
接下來,在Visual Studio中啟動偵錯會話:
若要開始新的偵錯會話,請按 F5 或從工具列選取 [開始 ]
等候瀏覽器視窗開啟,且應用程式安裝對話框出現在 Microsoft Teams Web 用戶端中。 如果出現提示,請輸入您的Microsoft 365 帳戶認證。
在應用程式安裝對話框中,選取 [ 新增]
開啟新的或現有的Microsoft Teams 聊天
在訊息撰寫區域中,選 + 取以開啟應用程式選擇器
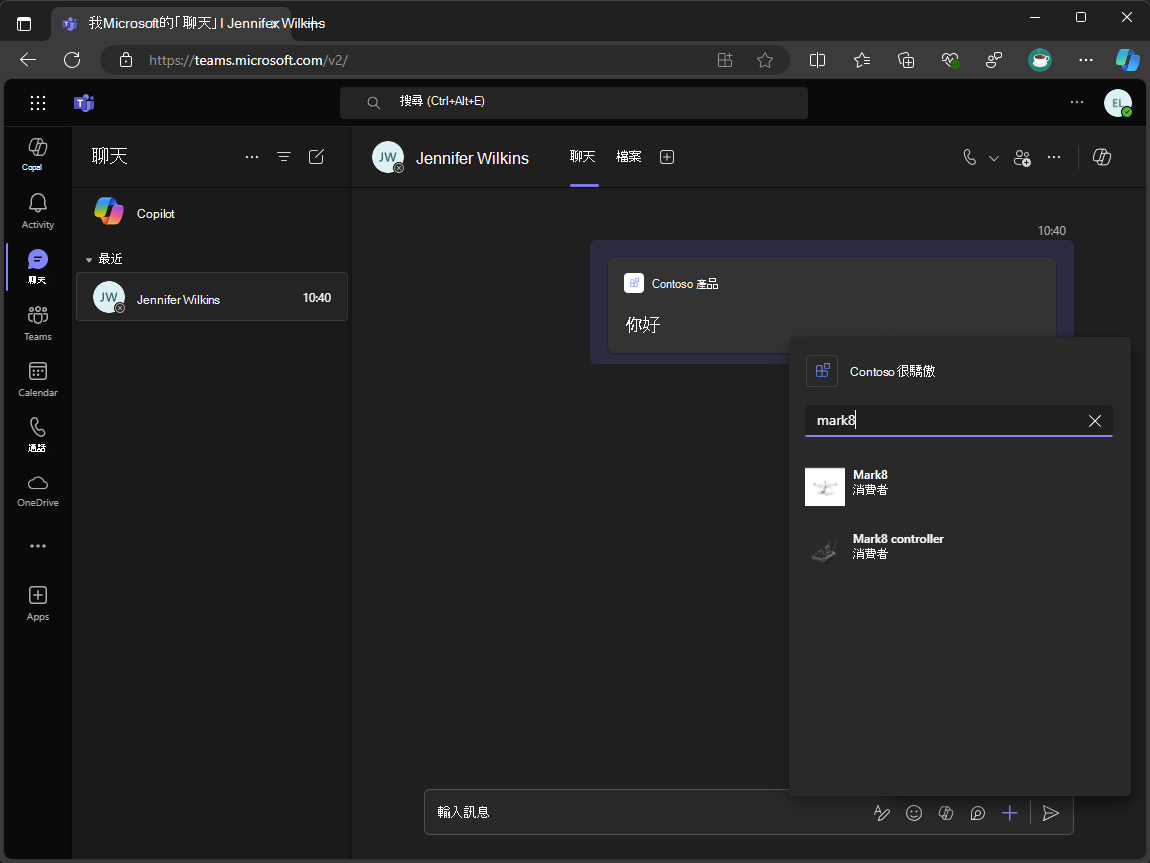
在應用程式清單中,選取 [Contoso 產品 ] 以開啟訊息擴充功能
在文本框中,輸入 mark8
等候搜尋完成並顯示結果
在結果清單中,選取要在撰寫消息框中內嵌卡片的搜尋結果
返回 Visual Studio,然後從工具列中選取 [ 停止 ],或按 Shift + F5 停止偵錯會話。 此外,使用 Ctrl + C 關閉開發人員Proxy。
