練習 - 匯入外部內容
在此練習中,您會使用程式代碼來擴充自定義 Microsoft Graph 連接器,以將本機 Markdown 檔案匯入至 Microsoft 365。
開始之前
執行此練習之前,請務必完成本課程模組中的上一個練習。
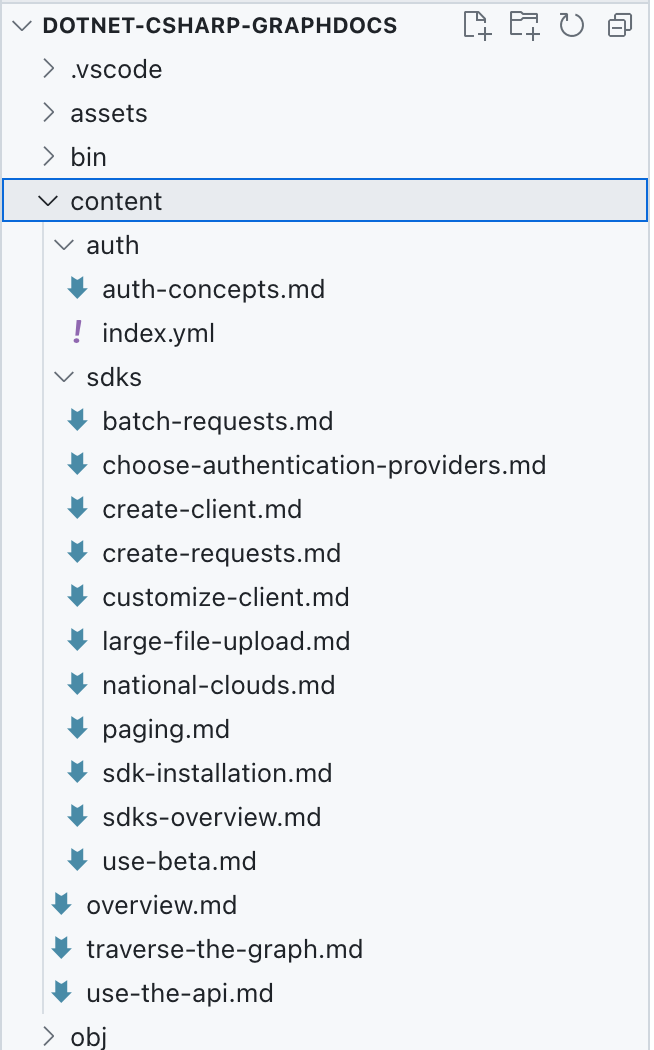
若要遵循此練習,請從 GitHub 複製此練習中使用的範例內容檔案,並將其儲存在專案中名為 content 的檔案夾中。

若要讓程式代碼正常運作, 內容資料夾 及其內容必須複製到組建輸出資料夾。
在程式代碼編輯器中:
開啟 .csproj 檔案,並在標記之前
</Project>新增下列程式代碼:<ItemGroup> <ContentFiles Include="content\**" CopyToOutputDirectory="PreserveNewest" /> </ItemGroup> <Target Name="CopyContentFolder" AfterTargets="Build"> <Copy SourceFiles="@(ContentFiles)" DestinationFiles="@(ContentFiles->'$(OutputPath)\content\%(RecursiveDir)%(Filename)%(Extension)')" /> </Target>儲存變更。
新增連結庫以剖析 Markdown 和 YAML
您要建置的 Microsoft Graph 連接器會將本機 Markdown 檔案匯入至 Microsoft 365。 這些檔案中的每一個都包含具有 YAML 格式元數據的標頭,也稱為 frontmatter。 此外,每個檔案的內容都是以 Markdown 撰寫。 若要擷取元數據並將主體轉換成 HTML,您可以使用自訂連結庫:
- 開啟終端機,並將工作目錄變更為您的專案。
- 若要新增 Markdown 處理連結庫,請執行下列命令:
dotnet add package Markdig。 - 若要新增 YAML 處理連結庫,請執行下列命令:
dotnet add package YamlDotNet。
定義類別以代表匯入的檔案
為了簡化使用匯入的 Markdown 檔案及其內容,讓我們使用必要的屬性來定義類別。
在程式代碼編輯器中:
開啟 ContentService.cs 檔案。
新增 語
using句,並更新 類別,Document如下所示:using YamlDotNet.Serialization; public interface IMarkdown { string? Markdown { get; set; } } class Document : IMarkdown { [YamlMember(Alias = "title")] public string? Title { get; set; } [YamlMember(Alias = "description")] public string? Description { get; set; } public string? Markdown { get; set; } public string? Content { get; set; } public string? RelativePath { get; set; } public string? IconUrl { get; set; } public string? Url { get; set; } }介面
IMarkdown代表本機 Markdown 檔案的內容。 它必須個別定義,以支援還原串行化檔案內容。 類別Document代表具有剖析之 YAML 屬性和 HTML 內容的最終檔。YamlMember屬性會將屬性對應至每個文件標頭中的元數據。儲存變更。
實作載入 Markdown 檔案
下一個步驟是實作邏輯,以載入本機 Markdown 檔案、擷取元數據,並將內容轉換成 HTML。
首先,新增協助程式方法以輕鬆地使用 Markdig 和連結 YamlDotNet 庫。
在程式代碼編輯器中:
建立名為 MarkdownExtensions.cs 的新檔案。
在 檔案中,新增下列程序代碼:
// from: https://khalidabuhakmeh.com/parse-markdown-front-matter-with-csharp
using Markdig;
using Markdig.Extensions.Yaml;
using Markdig.Syntax;
using YamlDotNet.Serialization;

public static class MarkdownExtensions
{
  private static readonly IDeserializer YamlDeserializer =
      new DeserializerBuilder()
      .IgnoreUnmatchedProperties()
      .Build();

  private static readonly MarkdownPipeline Pipeline
      = new MarkdownPipelineBuilder()
      .UseYamlFrontMatter()
      .Build();
}
屬性
YamlDeserializer會在您要擷取的每個 Markdown 檔案中,為 YAML 區塊定義新的還原串行化程式。 您可以將還原串行化程式設定為忽略不是檔案還原串行化之類別一部分的所有屬性。屬性
Pipeline會定義 Markdown 剖析器的處理管線。 您可以將它設定為剖析 YAML 標頭。 如果沒有此設定,則會捨棄標頭中的資訊。接下來,使用下列程式代碼擴
MarkdownExtensions充 類別:public static T GetContents<T>(this string markdown) where T : IMarkdown, new() { var document = Markdown.Parse(markdown, Pipeline); var block = document .Descendants<YamlFrontMatterBlock>() .FirstOrDefault(); if (block == null) return new T { Markdown = markdown }; var yaml = block // this is not a mistake // we have to call .Lines 2x .Lines // StringLineGroup[] .Lines // StringLine[] .OrderByDescending(x => x.Line) .Select(x => $"{x}\n") .ToList() .Select(x => x.Replace("---", string.Empty)) .Where(x => !string.IsNullOrWhiteSpace(x)) .Aggregate((s, agg) => agg + s); var t = YamlDeserializer.Deserialize<T>(yaml); t.Markdown = markdown.Substring(block.Span.End + 1); return t; }方法
GetContents會將標頭中具有YAML元數據的Markdown字串轉換成指定的型別,以實作IMarkdown介面。 從 Markdown 字串中,它會擷取 YAML 標頭,並將其還原串行化為指定的類型。 然後,它會擷取發行項的本文,並將它Markdown設定為 屬性以供進一步處理。儲存變更。
擷取 Markdown 和 YAML 內容
在協助程式方法就緒后,實 Extract 作 方法以載入本機 Markdown 檔案,並從中擷取資訊。
在程式代碼編輯器中:
開啟 ContentService.cs 檔案。
在檔案頂端,新增下列using語句:
using Markdig;接下來,在類別中
ContentService,Extract使用下列程式代碼實作 方法:static IEnumerable<Document> Extract() { var docs = new List<Document>(); var contentFolder = "content"; var baseUrl = new Uri("https://learn.microsoft.com/graph/"); var contentFolderPath = Path.Combine(Directory.GetCurrentDirectory(), contentFolder); var files = Directory.GetFiles(contentFolder, "*.md", SearchOption.AllDirectories); foreach (var file in files) { try { var contents = File.ReadAllText(file); var doc = contents.GetContents<Document>(); doc.Content = Markdown.ToHtml(doc.Markdown ?? ""); doc.RelativePath = Path.GetRelativePath(contentFolderPath, file); doc.Url = new Uri(baseUrl, doc.RelativePath!.Replace(".md", "")).ToString(); doc.IconUrl = "https://raw.githubusercontent.com/waldekmastykarz/img/main/microsoft-graph.png"; docs.Add(doc); } catch (Exception ex) { Console.WriteLine(ex.Message); } } return docs; }方法會從從 內容 資料夾載入 Markdown 檔案開始。 針對每個檔案,它會將其內容載入為字串。 它會使用
GetContents稍早在 類別中定義的擴充方法,將字串轉換成物件,其中包含儲存在不同屬性中的MarkdownExtensions元數據和內容。 接下來,它會將 Markdown 字串轉換成 HTML。 它會使用檔案的相對路徑,在因特網上建置其URL。 最後,它會儲存檔案的相對路徑,並將 物件新增至集合以供進一步處理。儲存變更。
將內容轉換成外部專案
讀取外部內容之後,下一個步驟是將它轉換成外部專案,這會載入至 Microsoft 365。
從實作 GetDocId 方法開始,此方法會根據每個外部項目的相對檔案路徑產生唯一標識符。
在程式代碼編輯器中:
確認您正在編輯 ContentService.cs 檔案。
在類別中
ContentService,新增下列方法:static string GetDocId(Document doc) { var id = doc.RelativePath! .Replace(Path.DirectorySeparatorChar.ToString(), "__") .Replace(".md", ""); return id; }方法
GetDocId會使用文件的相對檔案路徑,並以雙底線取代所有目錄分隔符。 這是必要的,因為無法在外部專案標識碼中使用路徑分隔符。儲存變更。
現在,實作 Transform 方法,將代表本機 Markdown 檔案的物件從 Microsoft Graph 轉換成外部專案。
在程式代碼編輯器中:
確認您位於 ContentService.cs 檔案中。
使用下
Transform列程式代碼實作 方法:static IEnumerable<ExternalItem> Transform(IEnumerable<Document> documents) { return documents.Select(doc => { var docId = GetDocId(doc); return new ExternalItem { Id = docId, Properties = new() { AdditionalData = new Dictionary<string, object> { { "title", a.Title ?? "" }, { "description", a.Description ?? "" }, { "url", new Uri(baseUrl, a.RelativePath!.Replace(".md", "")).ToString() } } }, Content = new() { Value = a.Content ?? "", Type = ExternalItemContentType.Html }, Acl = new() { new() { Type = AclType.Everyone, Value = "everyone", AccessType = AccessType.Grant } } }; }); }首先,您要定義基底 URL。 您可以使用此 URL 來建置每個專案的完整 URL,以便在向使用者顯示專案時,流覽至原始專案。 接下來,您會將每個項目從
DocsArticle轉換成ExternalItem。 首先,您會根據每個項目的相對檔案路徑,取得其唯一標識符。 然後,您會建立 的新實例,ExternalItem並使用 來自DocsArticle的信息填入其屬性。 然後,您會將專案的內容設定為從本機檔案擷取的 HTML 內容,並將專案內容類型設定為 HTML。 最後,您會設定項目的許可權,讓組織中的每個人都能看見該專案。儲存變更。
將外部專案載入 Microsoft 365
處理內容的最後一個步驟是將已轉換的外部專案載入Microsoft 365。
在程式代碼編輯器中:
確認您正在編輯 ContentService.cs 檔案。
在類別中
ContentService,Load使用下列程式代碼實作 方法:static async Task Load(IEnumerable<ExternalItem> items) { foreach (var item in items) { Console.Write(string.Format("Loading item {0}...", item.Id)); try { await GraphService.Client.External .Connections[Uri.EscapeDataString(ConnectionConfiguration. ExternalConnection.Id!)] .Items[item.Id] .PutAsync(item); Console.WriteLine("DONE"); } catch (Exception ex) { Console.WriteLine("ERROR"); Console.WriteLine(ex.Message); } } }針對每個外部專案,您會使用 Microsoft Graph .NET SDK 來呼叫 Microsoft Graph API 並上傳專案。 在要求中,您會指定先前建立之外部聯機的標識碼、要上傳之專案的標識碼,以及完整項目的內容。
儲存變更。
新增內容載入命令
您必須先使用叫用內容載入邏輯的命令來擴充主控台應用程式,才能測試程式代碼。
在程式代碼編輯器中:
開啟 Program.cs 檔案。
使用下列程式代碼新增命令以載入內容:
var loadContentCommand = new Command("load-content", "Loads content   into the external connection");
loadContentCommand.SetHandler(ContentService.LoadContent);
使用根命令註冊新定義的命令,以便使用下列程式代碼加以叫用:
rootCommand.AddCommand(loadContentCommand);儲存變更。
測試程式碼
最後一件事是測試 Microsoft Graph 連接器是否正確匯入外部內容。
- 開啟終端機。
- 將工作目錄變更為您的專案。
- 執行 命令來建置
dotnet build專案。 - 執行 命令開始
dotnet run -- load-content載入內容。 - 等候命令完成並載入內容。