練習 - 新增參數與裝飾項目
注意
當您第一次啟動沙箱並接受條款時,您的 Microsoft 帳戶會與名為「Microsoft Learn 沙箱」的新 Azure 目錄建立關聯。 系統也會將您新增至名為「指引訂用帳戶」的特殊訂用帳戶。
您要針對 HR 應用程式移轉過程所需,建立 Bicep 範本來部署 Azure 資源。 在此練習中,您將建立 Azure App Service 方案與 App Service 應用程式。 您會將裝飾項目套用至每個參數,確保所有參數都會包含您預期的值。
在此過程期間,您將執行下列工作:
- 建立包含參數與變數的 Bicep 檔案。
- 為參數新增裝飾項目。
- 測試部署以確定範本有效。
此練習使用適用於 Visual Studio Code 的 Bicep 延伸模組。 請務必在 Visual Studio Code 中安裝此延伸模組。
建立具有參數的 Bicep 範本
打開 Visual Studio Code。
建立名為 main.bicep 的新檔案。
儲存空檔案,讓 Visual Studio Code 載入 Bicep 工具。
您可以選取 [檔案]>[另存新檔],或在 Windows 中選取Ctrl+S (macOS 為 ⌘+S)。 請務必記住您儲存檔案的位置。 例如,您可能需要建立指令碼資料夾來儲存檔案。
在檔案中新增下列內容。 很快就會開始部署範本。 請自行輸入此內容,而不要複製並貼上,如此才能了解工具在寫入 Bicep 檔案上的助益。
param environmentName string = 'dev'
param solutionName string = 'toyhr${uniqueString(resourceGroup().id)}'
param appServicePlanInstanceCount int = 1
param appServicePlanSku object = {
  name: 'F1'
  tier: 'Free'
}
param location string = 'eastus'

var appServicePlanName = '${environmentName}-${solutionName}-plan'
var appServiceAppName = '${environmentName}-${solutionName}-app'
您會在此建立幾個參數,而這些參數會使用各種不同的類型。 您會定義每個參數的預設值。 有一些預設值包括字串插補和
uniqueString()函式。提示
uniqueString()函式可用於建立全域唯一的資源名稱, 並會在每次部署至相同的資源群組時,傳回相同的字串,以及在部署至不同的資源群組或訂用帳戶時,傳回不同的字串。您也會定義變數,以建構 Azure App Service 方案與 App Service 應用程式的名稱。 這些變數的值包含一些您先前所指定的參數。 執行部署的使用者可以覆寫參數值,但無法覆寫變數的值。
提示
您指定的
location參數應設為westus3。 一般而言,您會使用resourceGroup().location屬性,在與資源群組相同的位置建立資源。 但當您使用 Microsoft Learn 沙箱時,則須使用與資源群組位置不符的特定 Azure 區域。在 Visual Studio Code 的 main.bicep 檔案中,於檔案底部新增下列程式碼:
resource appServicePlan 'Microsoft.Web/serverfarms@2023-12-01' = {
  name: appServicePlanName
  location: location
  sku: {
    name: appServicePlanSku.name
    tier: appServicePlanSku.tier
    capacity: appServicePlanInstanceCount
  }
}

resource appServiceApp 'Microsoft.Web/sites@2023-12-01' = {
  name: appServiceAppName
  location: location
  properties: {
    serverFarmId: appServicePlan.id
    httpsOnly: true
  }
}
請注意,這些資源會使用您定義的參數值。
儲存對檔案所做的變更。
新增參數描述
在 Visual Studio Code 的 main.bicep 檔案中,將
@description裝飾項目直接新增至您在上一個工作中所建立的每個參數上方。 這些參數應該類似於下列範例:@description('The name of the environment. This must be dev, test, or prod.') param environmentName string = 'dev' @description('The unique name of the solution. This is used to ensure that resource names are unique.') param solutionName string = 'toyhr${uniqueString(resourceGroup().id)}' @description('The number of App Service plan instances.') param appServicePlanInstanceCount int = 1 @description('The name and tier of the App Service plan SKU.') param appServicePlanSku object = { name: 'F1' tier: 'Free' } @description('The Azure region into which the resources should be deployed.') param location string = 'eastus'儲存對檔案所做的變更。
限制輸入值
您的玩具公司會將 HR 應用程式部署至三種環境中:dev、test 和 prod。 您需要將 environmentName 參數限制為只允許這三個值。
在 Visual Studio Code 的 main.bicep 檔案中,尋找
environmentName參數。 在其@description裝飾項目下,插入@allowed裝飾項目。 完成之後,參數看起來應該像這樣:@description('The name of the environment. This must be dev, test, or prod.') @allowed([ 'dev' 'test' 'prod' ]) param environmentName string = 'dev'請注意,您要將
environmentName參數的參數值限制為僅限dev、test和prod。 若未來要新增更多環境,才需要更新此清單。儲存對檔案所做的變更。
限制輸入長度
使用您的 solutionName 參數來產生資源的名稱。 您要強制執行長度下限 5 個字元和長度上限 30 個字元。
在 Visual Studio Code 的 main.bicep 檔案中,尋找
solutionName參數。 在@description裝飾項目下,新增@minLength與@maxLength裝飾項目。 完成之後,參數看起來應該像這樣:@description('The unique name of the solution. This is used to ensure that resource names are unique.') @minLength(5) @maxLength(30) param solutionName string = 'toyhr${uniqueString(resourceGroup().id)}'儲存對檔案所做的變更。
限制數值
接下來,您要確定 appServicePlanInstanceCount 參數只允許 1 到 10 之間的值。
在 Visual Studio Code 的 main.bicep 檔案中,尋找
appServicePlanInstanceCount參數。 在@description裝飾項目下,新增@minValue與@maxValue裝飾項目。 完成之後,參數看起來應該像這樣:@description('The number of App Service plan instances.') @minValue(1) @maxValue(10) param appServicePlanInstanceCount int = 1儲存對檔案所做的變更。
驗證 Bicep 檔案
完成上述所有變更之後,Bicep 檔案看起來應該像下列範例:
@description('The name of the environment. This must be dev, test, or prod.')
@allowed([
  'dev'
  'test'
  'prod'
])
param environmentName string = 'dev'
@description('The unique name of the solution. This is used to ensure that resource names are unique.')
@minLength(5)
@maxLength(30)
param solutionName string = 'toyhr${uniqueString(resourceGroup().id)}'
@description('The number of App Service plan instances.')
@minValue(1)
@maxValue(10)
param appServicePlanInstanceCount int = 1
@description('The name and tier of the App Service plan SKU.')
param appServicePlanSku object = {
name: 'F1'
tier: 'Free'
}
@description('The Azure region into which the resources should be deployed.')
param location string = 'eastus'
var appServicePlanName = '${environmentName}-${solutionName}-plan'
var appServiceAppName = '${environmentName}-${solutionName}-app'
resource appServicePlan 'Microsoft.Web/serverfarms@2023-12-01' = {
name: appServicePlanName
location: location
sku: {
name: appServicePlanSku.name
tier: appServicePlanSku.tier
capacity: appServicePlanInstanceCount
}
}
resource appServiceApp 'Microsoft.Web/sites@2023-12-01' = {
name: appServiceAppName
location: location
properties: {
serverFarmId: appServicePlan.id
httpsOnly: true
}
}
否則,請複製範例或調整範本,以符合範例。
將 Bicep 範本部署至 Azure
若要將此範本部署至 Azure,您必須從 Visual Studio Code 終端機登入您的 Azure 帳戶。 請確定您已安裝 Azure CLI,並記得使用您用來啟動沙箱的相同帳戶登入。
在 [終端機] 功能表上,選取 [新增終端機]。 終端機視窗通常隨即在畫面的下半部開啟。
如果終端視窗在右側顯示 bash,表示已開啟正確的殼層。 或者,如果您在右側看到 Bash 殼層圖示,則可以加以選取來啟動殼層。

如果出現 bash 以外的殼層,請選取殼層下拉式清單箭號,然後選取 [Git Bash]。
![Visual Studio Code 終端視窗的螢幕擷取畫面,其中顯示終端殼層下拉式清單並已選取 [Git Bash (預設)]。](../includes/media/select-shell-bash.png)
在終端機中,前往您儲存範本的目錄。 例如,若將範本儲存於 templates 資料夾,則可使用此命令:
cd templates
安裝 Bicep
執行以下命令,確保您有最新版本 Bicep:
az bicep install && az bicep upgrade
登入 Azure
在 Visual Studio Code 終端中,執行下列命令以登入 Azure:
az login在開啟的瀏覽器中,登入您的 Azure 帳戶。
Visual Studio Code 終端機會顯示與此帳戶相關聯的訂用帳戶清單。
將您在此工作階段中執行的所有 Azure CLI 命令,設定為預設的訂用帳戶。
az account set --subscription "Concierge Subscription"注意
如果您最近使用多個沙箱,則終端機可能會顯示多個「指引訂用帳戶」執行個體。 在此情況下,請使用接下來的兩個步驟來將其設定為預設訂用帳戶。 如果上述命令成功,且只列出一個「指引訂用帳戶」,則請略過接下來的兩個步驟。
取得指引訂用帳戶識別碼。
 az account list \
   --refresh \
   --query "[?contains(name, 'Concierge Subscription')].id" \
   --output table
使用訂用帳戶識別碼設定預設訂用帳戶。 將 {your subscription ID} 取代為最新的指引訂用帳戶識別碼。
az account set --subscription {your subscription ID}
設定預設資源群組
使用 Azure CLI 時,您可以設定預設的資源群組,並省略本練習中其餘的 Azure CLI 命令參數。 將預設值設定為在沙箱環境中為您建立的資源群組。
az configure --defaults group="<rgn>[sandbox resource group name]</rgn>"
使用 Azure CLI 將範本部署至 Azure
從 Visual Studio Code 中的終端執行下列程式碼,將 Bicep 範本部署到 Azure。 因為參數值已指定預設值,所以不需要再指定。 此程序可能需要一到兩分鐘的時間才能完成,之後就能看到部署成功。
az deployment group create --template-file main.bicep
您會在終端中看到 Running...。
若要將此範本部署至 Azure,請從 Visual Studio Code 終端登入 Azure 帳戶。 請確定您已安裝 Azure PowerShell,並登入啟動沙箱的相同帳戶。
在 [終端機] 功能表上,選取 [新增終端機]。 終端機視窗通常隨即在畫面的下半部開啟。
如果終端視窗在右側顯示 pwsh 或 powershell,表示已開啟正確的殼層。 或者,如果您在右側看到 PowerShell 殼層圖示,則可以加以選取來啟動殼層。
![Visual Studio Code 終端機視窗的螢幕擷取畫面,其中殼層下拉式清單中顯示 [pwsh] 選項。](../includes/media/pwsh.png)
如果出現 pwsh 或 powershell 以外的殼層,則請選取殼層下拉式箭頭,然後選取 [PowerShell]。
![Visual Studio Code 終端機視窗的螢幕擷取畫面,其中顯示終端機殼層下拉式清單且已選取 [PowerShell]。](../includes/media/select-shell-powershell.png)
在終端機中,前往您儲存範本的目錄。 例如,若將範本儲存在 templates 資料夾,則可使用此命令:
Set-Location -Path templates
安裝 Bicep CLI
若要從 Azure PowerShell 使用 Bicep,請安裝 Bicep CLI。
使用 Azure PowerShell 登入 Azure
在 Visual Studio Code 終端中,執行下列命令:
Connect-AzAccount瀏覽器隨即開啟,讓您可以登入您的 Azure 帳戶。
登入 Azure 之後,您會在終端機中看到與此帳戶相關聯的訂用帳戶清單。
如果您已啟動沙箱,則會顯示名為「指引訂用帳戶」的訂用帳戶。 請在接下來的練習中使用此訂用帳戶。
將您在此工作階段中執行的所有 Azure PowerShell 命令,設定為預設的訂用帳戶。
$context = Get-AzSubscription -SubscriptionName 'Concierge Subscription'
Set-AzContext $context
注意
如果您最近使用多個沙箱,則終端機可能會顯示多個「指引訂用帳戶」執行個體。 在此情況下,請使用接下來的兩個步驟來將其設定為預設訂用帳戶。 如果上述命令成功,且只列出一個「指引訂用帳戶」,則請略過接下來的兩個步驟。
取得訂用帳戶識別碼。 執行下列命令會列出您的訂用帳戶與其識別碼。 尋找
Concierge Subscription,然後複製第二個資料行的識別碼。 其看起來像aaaa0a0a-bb1b-cc2c-dd3d-eeeeee4e4e4e。Get-AzSubscription將您使用中的訂用帳戶變更為「指引訂用帳戶」。 請務必將 {Your subscription ID} 取代為您複製的訂用帳戶。
$context = Get-AzSubscription -SubscriptionId {Your subscription ID}
Set-AzContext $context
設定預設資源群組
您可以設定預設資源群組,並省略本練習中其餘的 Azure PowerShell 命令參數。 將此預設值設定為在沙箱環境中為您建立的資源群組。
Set-AzDefault -ResourceGroupName <rgn>[sandbox resource group name]</rgn>
使用 PowerShell 將範本部署至 Azure
在終端中使用下列 Azure PowerShell 命令,將範本部署到 Azure。 因為參數值已指定預設值,所以不需要再指定。 此程序可能需要一到兩分鐘的時間才能完成,之後就能看到部署成功。
New-AzResourceGroupDeployment -TemplateFile main.bicep
確認您的部署
前往 Azure 入口網站,並確定您在沙箱訂用帳戶中:
- 在頁面右上角選取您的虛擬人偶。
- 選取 [切換目錄]。 在清單中,選擇 [Microsoft Learn 沙箱] 目錄。
在左側面板中,選取 [資源群組]。
選取 [沙箱資源群組名稱]。
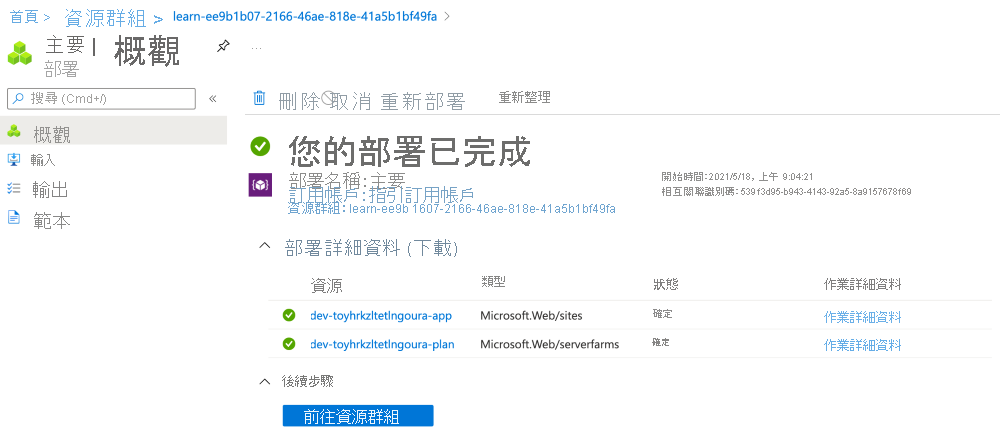
在 [概觀] 中,您會看到一個部署成功。

選取 [1 成功] 以查看部署的詳細資料。

選取名為 main 的部署,並查看已部署的資源,然後選取 [部署詳細資料] 來予以展開。 此案例會有 App Service 方案與應用程式。

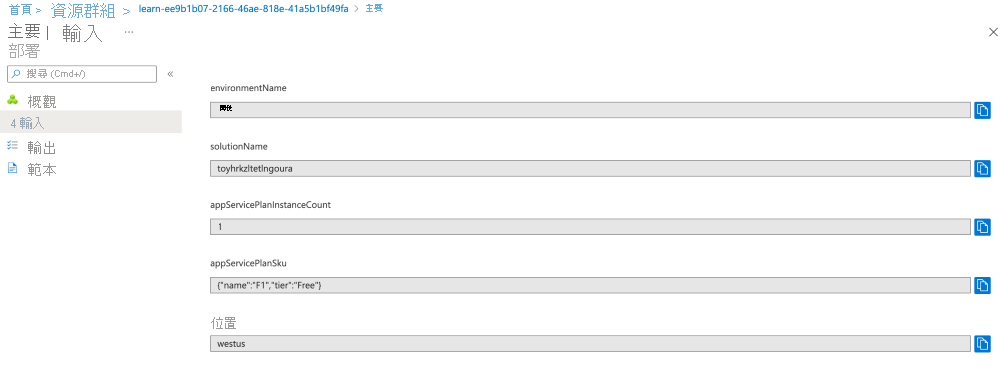
從左側功能表中選取 [輸入]。
![特定部署之 Azure 入口網站的螢幕擷取畫面,其中反白顯示 [輸入] 功能表項目。](media/3-menu-inputs.png)
請注意其中也列出了參數與其值。

將頁面在瀏覽器中保持開啟。 您稍後將再次檢查部署。