練習 - 設定自訂路由器
警告
此內容會參考 CentOS,這是生命週期結束 (EOL) 狀態的 Linux 發行版本。 請據以考慮您的使用和規劃。 如需詳細資訊,請參閱 CentOS 生命週期結束指導。
請使用下列指示設定 FRR 的基礎結構,並產生預設路由:
az network vnet subnet create  -n <NVA-Subnet-name> -g <resource-group-name> --vnet-name <vnet-name>  --address-prefix 10.0.2.0/24

az network nic create -g <resource-group-name> --vnet-name <vnet-name>  --subnet <NVA-Subnet-name> -n <NVA-nic-name>

az vm availability-set create --name <nva-availability-set-name> --resource-group <resource-group-name> --location <your-preferred-azure-region>

az vm create --name <nva-vm-name>  --resource-group <resource-group-name>  --location <your-preferred-azure-region> --image OpenLogic:CentOS:8_5:8.5.2022012100 --size Standard_D1_v2        --availability-set <nva-availability-set-name>  --authentication-type password  --admin-username <vm-admin-user-name>  --admin-password <vm-admin-username-password> --storage-sku Standard_LRS  --nics <NVA-nic-name>
在 NVA 上設定 FRR 路由
現在,您將要設定 FRR 軟體。
更新下列指令碼中的 routeServerSubnetPrefix & bgpNvaSubnetGateway 變數。
#
# IP prefix of the RouteServerSubnet in the Firewall VNet.
#
routeServerSubnetPrefix="<azure-route-server-subnet-prefix>"

#
# The first IP address of the subnet to which the "eth0" device is attached.
#
bgpNvaSubnetGateway="<nva-azure-subnet-first-ip-address>"

# Install FRR
sudo dnf install frr -y

# Configure FRR to run the bgpd daemon
sudo sed -i 's/bgpd=no/bgpd=yes/g' /etc/frr/daemons
sudo touch /etc/frr/bgpd.conf
sudo chown frr /etc/frr/bgpd.conf
sudo chmod 640 /etc/frr/bgpd.conf

# Start FRR daemons
sudo systemctl enable frr --now


# Add static routes to ensure reachability for Route Servers (Route Server are not-directly-connected external BGP neighbours).

# Please note that this configuration is transient and will be lost if the VM is rebooted.

# On CentOS VMs, you can add these routes to /etc/sysconfig/network-scripts/route-eth<X> to make them persistent across reboots.

sudo ip route add $routeServerSubnetPrefix via $bgpNvaSubnetGateway dev eth0
複製上述編輯後的指令碼。
登入 NVA VM 殼層。
將剪貼簿中所複製的指令碼以純文字形式貼到 NVA 殼層中 (Ctrl-Shift-V)。
執行指令碼,並等候一分鐘左右讓指令碼完成。
確定執行後未回報任何錯誤。
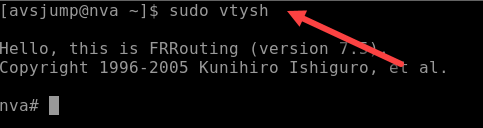
執行 sudo vtysh
確定 FRR 正在執行,且其命令殼層已啟動。
設定 NVA 的 BGP 芳鄰和預設路由
此步驟會將 FRR NVA 設定為以 Azure 路由伺服器作為其 BGP 芳鄰。 NVA 中也會新增預設路由 (0.0.0.0/0)。
更新下方指令碼中的下列變數。
- <防火牆私人 IP 位址>
- <路由伺服器執行個體 #0 的 IP 位址>
- <路由伺服器執行個體 #1 的 IP 位址>
conf term
!
route-map SET-NEXT-HOP-FW permit 10
set ip next-hop <Firewall Private IP address>
exit
!
router bgp 65111
no bgp ebgp-requires-policy
neighbor <IP address of Route Server instance #0> remote-as 65515
neighbor <IP address of Route Server instance #0> ebgp-multihop 2
neighbor <IP address of Route Server instance #1> remote-as 65515
neighbor <IP address of Route Server instance #1> ebgp-multihop 2
network 0.0.0.0/0
!
address-family ipv4 unicast
  neighbor <IP address of Route Server instance #0> route-map SET-NEXT-HOP-FW out
  neighbor <IP address of Route Server instance #1> route-map SET-NEXT-HOP-FW out
exit-address-family
!
exit
!
exit
!
write file
!
登入 FRR 殼層。
貼上含有更新後變數的指令碼。
執行
show ip bgp以確認 NVA 尚未得知路由,但自己的預設路由除外。執行
show ip bgp sum以確認 NVA 尚未建立 BGP 工作階段。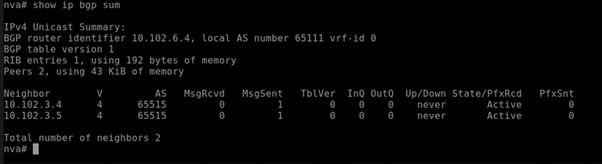
設定 Azure 路由伺服器對等互連
下列步驟會建立 FRR NVA 與 Azure 路由伺服器之間的 BGP 對等體關聯性。
在 Azure CLI 命令提示字元上執行下列命令:
 az network routeserver peering create  --name <nva-vm-name>  --peer-ip <private-ip-of-nva-vm-name>  --peer-asn <asn-value-other-than-65515-65520>  --routeserver <routeserver-name>  --resource-group <resource-group-name>`

 az network routeserver update --name <routeserver-name>  --resource-group <resource-group-name>   --allow-b2b-traffic true`
登入 FRR 殼層。
執行
show ip bgp以確認 NVA 現已得知來自 Azure 路由伺服器的路由。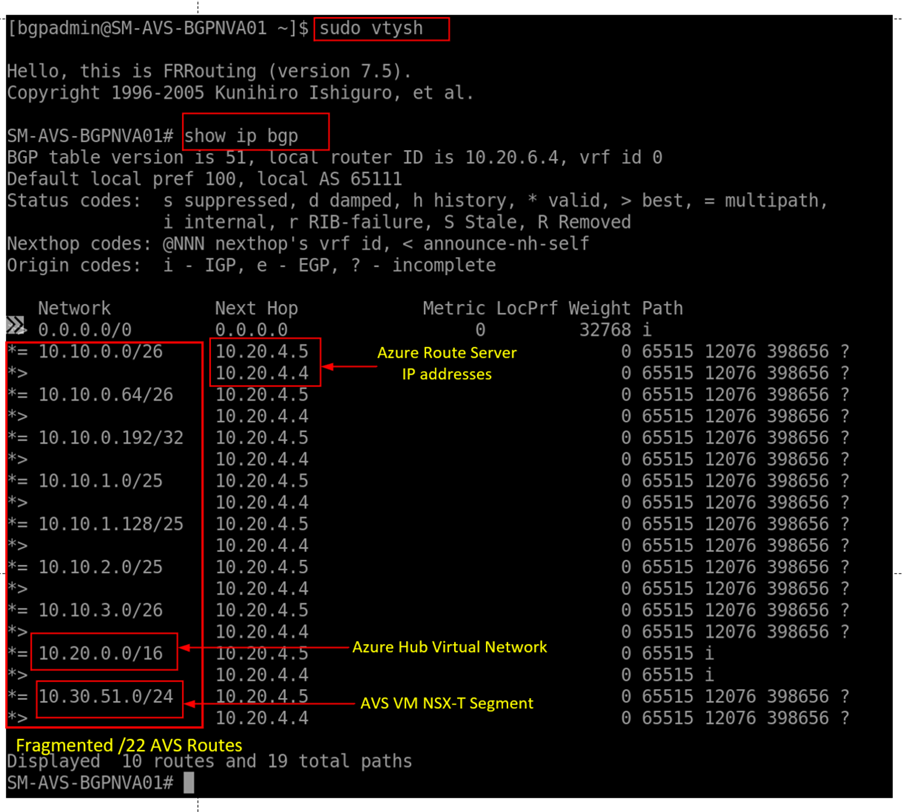
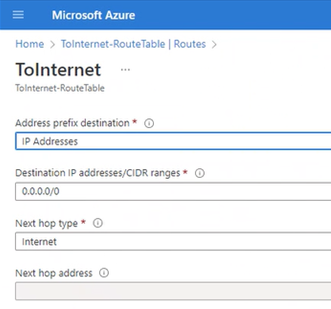
確定 Azure 防火牆具有直接與網際網路連線的能力。 您可以使用 Azure 入口網站來確定這一點,方法是檢查與 Azure 防火牆的子網路相關聯的路由表。
至此,您已設定 Azure VMware 解決方案私人雲端,以實作安全的輸出網際網路連線。 您部署了 Azure 路由伺服器,以在 Azure VMware 解決方案私人雲端與 NVA 之間進行有效的路由交換。 接著,您部署了 Azure 防火牆作為所有網際網路繫結流量的出口。 這是使用 FRR 這個自訂路由器的後續操作,會將以 Azure 防火牆作為下一個躍點的預設路由插入到 Azure VMware 解決方案私人雲端。
在下一個單元,您會了解如何在 Azure 防火牆中實作更細緻的存取控制,以允許/拒絕來自 Azure VMware 解決方案私人雲端的網路流量。