設定 TLS 1.3
適用於:SQL Server 2022 (16.x) 和更新版本
本篇文章說明如何︰
- 設定 SQL Server 2022 (16.x) 的執行個體,以使用傳輸層安全性 (TLS) 1.3 和 TLS 1.2
- 確認通訊協定可正常運作
- 停用較舊的不安全通訊協定,包括 TLS 1.0 及 1.1
需求
SQL Server 2022 (16.x) 中的 TLS 1.3 支援需要:
- Windows Server 2022
- 含累積更新 1 或更新版本的 SQL Server 2022 (16.x)
- SQL Server 執行個體使用 TCP/IP 作為網路通訊協定
- 隨私密金鑰一起安裝的有效 X.509 伺服器憑證
重要
本文件假設您的需求短期內同時包含 TLS 1.3 和 TLS 1.2,而長期只包含 TLS 1.3。
SQL Server 和 TLS
SQL Server 不會自行執行 TLS 作業,而是由 Windows 使用安全通道 SSP 執行這項工作。 安全通道是一個安全性支援提供者 (SSP),其中包含並公開 Microsoft 對 TLS 等網際網路標準安全性通訊協定的實作。 安全通道是 Windows OpenSSL 對 Linux 的內容。
若要為 SQL Server 設定 TLS,需要為 Windows 設定 TLS。
對於 Windows Server 2022 上的 SQL Server 2022 (16.x),SQL Server 支援 TLS 1.0、1.1、1.2 和 1.3。 要確認這一點,請使用 GitHub at TlsTest 中提供的 .NET 程式碼。 此工具的輸出如下所示:
Trying Ssl2
Authentication failed, see inner exception.
Exception: The client and server cannot communicate, because they do not possess a common algorithm.
Trying Ssl3
Authentication failed, see inner exception.
Exception: The client and server cannot communicate, because they do not possess a common algorithm.
Trying Tls
Tls using TLS_ECDHE_RSA_WITH_AES_256_CBC_SHA
Trying Tls11
Tls11 using TLS_ECDHE_RSA_WITH_AES_256_CBC_SHA
Trying Tls12
Tls12 using TLS_ECDHE_RSA_WITH_AES_256_GCM_SHA384
Trying Tls13
Tls13 using TLS_AES_256_GCM_SHA384
將 Windows 設定為僅使用 TLS 1.2 和 TLS 1.3
Windows 在 HKEY_LOCAL_MACHINE\SYSTEM\CurrentControlSet\Control\SecurityProviders\SCHANNEL 下有一組登錄機碼,可控制 TLS 通訊協定版本和加密套件。 在此案例中,只有影響伺服器的通訊協定版本很重要,因為 SQL Server 執行個體會充當伺服器。
下列 PowerShell 腳本會更新登錄,以在伺服器使用時啟用或停用 TLS 1.0 和 TLS 1.1:
警告
繼續之前,請先備份登錄。 如有必要,這能讓您在未來還原登錄。
# Learn more at https://learn.microsoft.com/en-us/windows-server/security/tls/tls-registry-settings?tabs=diffie-hellman
Set-StrictMode -Version Latest

$base = 'HKLM:\SYSTEM\CurrentControlSet\Control\SecurityProviders\SCHANNEL\Protocols\'
$protocols = [ordered]@{
    "SSL 2.0" = $false
    "SSL 3.0" = $false
    "TLS 1.0" = $false
    "TLS 1.1" = $false
    "TLS 1.2" = $true
    "TLS 1.3" = $true
}

foreach ($version in $protocols.Keys) {

    $enabledValue = $protocols[$version]
    $path = $base + $version + '\Server'

    New-Item $path -Force | Out-Null
    New-ItemProperty -Path $path `
                     -Name 'Enabled' `
                     -Value $enabledValue `
                     -PropertyType 'DWord' `
                     -Force | Out-Null

    Write-Host "$version is $enabledValue."
}
此程式碼可在 GitHub 上取得。
執行此腳本之後,請重新啟動 SQL Server 處理序,讓新的 TLS 設定生效。 如果現在執行文章開頭所述的程式碼,它會傳回:
Trying Ssl2
Authentication failed, see inner exception.
Exception: The client and server cannot communicate, because they do not possess a common algorithm.
Trying Ssl3
Authentication failed, see inner exception.
Exception: The client and server cannot communicate, because they do not possess a common algorithm.
Trying Tls
Received an unexpected EOF    or 0 bytes from the transport stream.
Exception:
Trying Tls11
Received an unexpected EOF or 0 bytes from the transport stream.
Exception:
Trying Tls12
Tls12 using TLS_ECDHE_RSA_WITH_AES_256_GCM_SHA384
Trying Tls13
Tls13 using TLS_AES_256_GCM_SHA384
請注意,SSL 2.0、SSL 3.0、TLS 1.0 和 TLS 1.1 全都無法連線,但 TLS 1.2 和 TLS 1.3 均成功。
登錄更新之後,Windows 和 SQL Server 的這個執行個體僅允許 TLS 1.2 和 TLS 1.3 連線。 稍後,當更多用戶端支援 TLS 1.3 時,您還可以停用 TLS 1.2。
設定 SQL Server 執行個體以強制執行嚴格加密
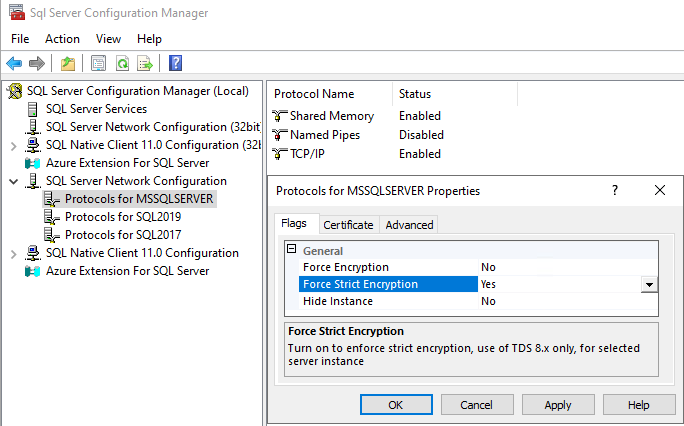
最後一個步驟是將執行個體設定為使用 Force Strict Encryption。 使用 Force Strict Encryption 時,SQL 執行個體會使用支援的表格式資料流 版本 (TDS 8.0 或更新版本)。
使用 SQL Server 組態管理員來設定此設定。
展開 [SQL Server 網路設定]
以滑鼠右鍵按一下 [
<instance name>的通訊協定],然後選取 [屬性]預設執行個體名稱是 MSSQLSERVER。
在 [旗標] 索引標籤上,將 [強制執行嚴格加密] 設定為 [是]

確認安全性
本節展示如何使用 Wireshark、OpenSSL 和 Nmap 來驗證加密。
Wireshark
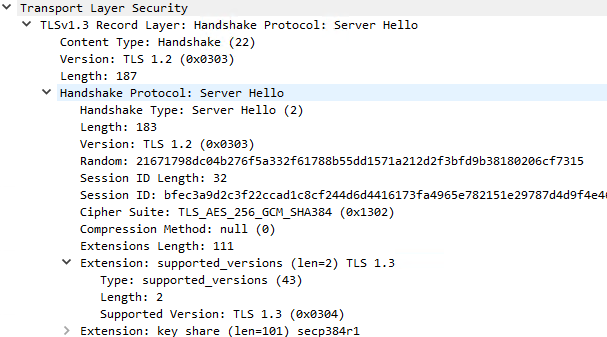
您可以使用網路 Sniffer 來判定 TLS 通訊協定版本和已同意的加密套件。 您可能會發現某些資料令人困惑。 如果您從 Wireshark 查看下面的螢幕擷取畫面,它會顯示封包是 TLS v1.3 記錄層,但通訊協定版本是 TLS 1.2,而交握通訊協定版本也是 TLS 1.2。 這是 TLS 1.2 規格的所有部分,正確且符合預期。 同意的通訊協定版本位於 [延伸模組] 區段中,如您所見,supported_versions 是 TLS 1.3。

OpenSSL
您也可使用 openssl 來探索已同意的 TLS 資訊。
請使用下列 命令:
openssl s_client 127.0.0.1:1433
此指令會傳回結果,如:
Post-Handshake New Session Ticket arrived:
SSL-Session:
   Protocol   : TLSv1.3
   Cipher     : TLS_AES_256_GCM_SHA384
   Session-ID : 516D56D99088BCDE1 <snip> 098EDB1A
   Session-ID-ctx:
   Resumption PSD: B2B9CB92B59aa1 <snip> BD824CBA
   PSK identity: None
Nmap
目前版本的 Nmap,即版本 7.94,在使用下列項目時,似乎不會偵測到 TLS 1.3:
nmap -sV --script ssl-enum-ciphers -p 1433 127.0.0.1.