將資料庫複製到新伺服器陣列以升級到 SharePoint Server 2019
適用於:


 Subscription Edition
  SharePoint in Microsoft 365
當您從 SharePoint Server 2016 升級至 SharePoint Server 2019 時,必須使用資料庫附加升級,這表示您僅會升級環境的內容,而不是組態設定。 設定新的 SharePoint Server 2019 環境之後,您可以將內容和服務應用程式資料庫從 SharePoint Server 2016 環境複製到 SharePoint Server 2019 環境。 您可以使用備份和還原程式來複製資料庫,也可以選擇在 SharePoint Server 2016 環境中將資料庫設定為唯讀,讓使用者可以繼續存取其資訊,但不能變更它。 本文包含您複製資料庫所要採取的步驟。
升級程序階段 2:將資料庫複製到新的伺服器陣列

|
|
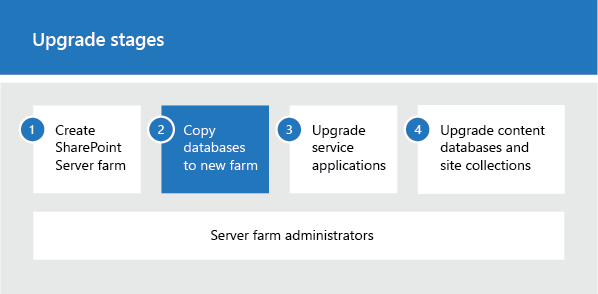
這是將 SharePoint Server 2016 數據和網站升級至 SharePoint Server 2019 程式的第二個階段。 程序中包含必須依序完成的下列階段: 建立資料庫連結升級的 SharePoint Server 2019 伺服器陣列 將資料庫複製到新的伺服器陣列,以升級至 SharePoint Server 2019 (此階段) 將服務應用程式升級至 SharePoint Server 2019 將內容資料庫升級至 SharePoint Server 2019。 如需完整程序的概觀,請參閱SharePoint Server 2019 升級程序概觀。 |
開始之前
複製資料庫之前,請檢閱下列資訊,並採取建議的動作。
請確定您用來複製資料庫的帳戶可以存取 SharePoint Server 2016 和 SharePoint Server 2019 環境中的 SQL Server Management Studio,並可存取可從這兩個環境存取的網路位置,以儲存資料庫的複本。
請確定將資料庫設為唯讀和讀寫所用帳戶,為所有要升級之內容資料庫的 db_owner 固定資料庫角色成員。
備份資料庫之前,請先檢查及修復所有資料庫一致性錯誤。
將舊版資料庫設為唯讀
若要維護使用者對原始環境的存取權,請在備份資料庫之前,將 SharePoint Server 2016 資料庫設定為唯讀。 即使您不想要長期維持存取權,請將資料庫設定為唯讀,以確保您擷取備份中的所有數據,以便在不允許進行其他變更的情況下還原和升級環境的目前狀態。 如果資料庫設定為唯讀,用戶可以繼續檢視內容。 不過,他們將無法新增或變更內容。
注意事項
[!附註] 此時不要將搜尋資料庫設定為唯讀。 最好不要中斷搜尋經驗,直到在您準備好要升級 Search 服務應用程式為止。 當您將 服務應用程式升級 (將 SharePoint Server 2016 數據和網站升級至 SharePoint Server 2019) 程式的第四個階段時,將會處理這些資料庫。
重要事項
[!重要事項] 在 SharePoint Server 2016 環境中執行此步驟。
使用 SQL Server 工具將資料庫設為唯讀
確認執行此程序的使用者帳戶為 db_owner 固定資料庫角色的成員。
In SQL Server Management Studio, in Object Explorer, connect to an instance of the Database Engine, expand the server, and then expand Databases.
Find the database that you want to configure to be read-only, right-click the database, and then click Properties.
在 [ 資料庫屬性] 對話框的 [ 選取頁面] 區段中,按兩下 [ 選項]。
In the details pane, under Other options, in the State section, next to Database Read-Only, click the arrow, and then select True.
您可以使用 Transact-SQL,設定 READ_ONLY 資料庫可用性選項。 如需如何使用 ALTER DATABASE 陳述式之 SET 子句的詳細資訊,請參閱< 設定資料庫選項>。
使用 SQL Server 工具備份 SharePoint Server 2016 資料庫
備份 SQL Server Management Studio 的資料庫。 若您必須重新啟用原始伺服器陣列,且必須進行資料庫附加升級,資料庫的備份複本可保證您的資料安全無虞。 在 SharePoint Server 2016 伺服器陣列中重複下列資料庫的程式:
所有內容資料庫 (預設資料庫名稱:WSS_Content_ ID
下列服務應用程式資料庫:
| 服務應用程式 | 預設資料庫名稱 |
|---|---|
| Business Data Connectivity |
BDC_Service_DB_ ID |
| Managed Metadata |
Managed Metadata Service_ ID |
| PerformancePoint |
PerformancePoint Service Application_ ID |
| Secure Store |
Secure_Store_Service_DB_ ID |
您不需要備份設定或系統管理內容資料庫,因為當您設定 SharePoint Server 2019 伺服器陣列時,會重新建立這些資料庫。 不支援升級組態或管理內容資料庫以及管理中心網站集合。
完成此程序後,即建立了唯讀內容資料庫備份。
重要事項
[!重要事項] 在 SharePoint Server 2016 環境中執行此步驟。
使用 SQL Server 工具備份資料庫
確認執行此程序的使用者帳戶為 db_owner 固定資料庫角色的成員。
In Management Studio, in Object Explorer, connect to an instance of the Database Engine, expand the server, and then expand Databases.
Right-click the database that you want to back up, point to Tasks, and then click Back Up.
[ 備份資料庫] 對話框隨即出現。
In the Source area, in the Database box, verify the database name.
In the Backup type box, select Full.
Under Backup component, select Database.
In the Backup set area, in the Name box, either accept the backup set name that is suggested or type a different name for the backup set.
In the Destination area, specify the type of backup destination by selecting Disk or Tape, and then specify a destination. To create a different destination, click Add.
Click OK to start the backup process.
重複上述程式,以備份 SharePoint Server 2019 在環境中使用的所有內容和適當的服務應用程式資料庫。
將備份檔複製到 SharePoint Server 2019 環境
將您在上一個程式中建立的備份檔,從 SharePoint Server 2016 環境複製到 SharePoint Server 2019 環境。
還原資料庫的備份複本
設定新的 SharePoint Server 2019 伺服器陣列之後,您可以將資料庫的備份複本還原到 SQL Server。 請先從一個資料庫開始,確認還原作業一切正常,然後再還原其他資料庫。
重要事項
[!重要事項] 請務必保留原始備份複本,以防升級失敗,且必須疑難排解並重試。 > 在 SharePoint Server 2016 環境中執行此步驟。
使用 SQL Server 工具還原資料庫的備份複本
確認執行此程序的使用者帳戶為 db_owner 固定資料庫角色的成員。
連接到適當的 SQL Server 2014 Database Engine 執行個體後,在 [物件總管] 中展開伺服器名稱。
Right-click Databases, and then click Restore Database.
[ 還原資料庫] 對話框隨即出現。
在 [ 還原資料庫 ] 對話框的 [ 一般 ] 頁面上,於 [至資料庫] 列表中輸入要還原的 資料庫 名稱。
提示
[!提示] 當您輸入還原資料庫的名稱時,不需要使用原始名稱。 若要將資料庫名稱從包含冗長 GUID 的名稱改為好記的名稱,此時就能變更。 請務必也變更檔案系統 (MDF 與 LDF 檔案) 的資料庫及記錄檔名稱,如此名稱才會相符。
In the To a point in time text box, keep the default (Most recent possible).
To specify the source and location of the backup sets to restore, click From device, and then use the ellipsis ( ...) to select the backup file.
在 [ 指定備份] 對話框的 [ 備份媒體 ] 方塊中,確定已選取 [檔案 ]。
In the Backup location area, click Add.
在 [ 尋找備份檔] 對話框中,選取您要還原的檔案,按兩下 [ 確定],然後在 [ 指定備份 ] 對話框中,按兩下 [ 確定]。
在 [還原資料庫] 對話框的 [選取要還原的備份集] 方格底下,選取最近一次完整備份旁的 [還原] 複選框。
在 [ 還原資料庫 ] 對話框的 [ 選項] 頁面上,選取 [ 還原選項] 底下的 [ 覆寫現有的資料庫 ] 複選框。
Click OK to start the restore process.
將資料庫設為讀寫。
您無法升級已設成唯讀的資料庫。 您必須先將 SharePoint Server 2019 伺服器陣列上的資料庫設回讀寫,才能附加並升級它們。
重要事項
在 SharePoint Server 2019 環境中執行此步驟。
使用 SQL Server 工具將資料庫設為讀寫
In SQL Server Management Studio, in Object Explorer, connect to an instance of the Database Engine, expand the server, and then expand Databases.
Select the database that you want to configure to be read-write, right-click the database, and then click Properties.
在 [ 資料庫屬性] 對話框的 [ 選取頁面] 區段中,按兩下 [ 選項]。
In the details pane, under Other options, in the State section, next to Database Read-Only, click the arrow, and then select False.
|
|
這是將 SharePoint Server 2016 數據和網站升級至 SharePoint Server 2019 程式的第二個階段。 下一個階段: 將服務應用程式升級到 SharePoint Server 2016 如需完整程序的概觀,請參閱SharePoint Server 2019 升級程序概觀。 |
另請參閱
概念
建立資料庫連結升級的 SharePoint Server 2019 伺服器陣列