Active Directory Federation Services (AD FS) 在 SharePoint Server 中設定 OIDC 驗證
適用於:
 Subscription Edition SharePoint in Microsoft 365
必要條件
當您使用 OpenID Connect (OIDC) 驗證來設定 SharePoint Server 與 Active Directory 同盟服務 (AD FS) 時,您需要下列資源來執行設定:
- SharePoint Server 訂閱版本 伺服器陣列。
- 已建立 Windows Server 2016 或更新版本中的 AD FS,且已在檔案中
.cer匯出 AD FS 簽署憑證的公鑰。
本文針對AD FS OIDC 設定使用下列範例值:
| 值 | 連結 |
|---|---|
| SharePoint 網站 URL | https://spsites.contoso.local/ |
| AD FS 網站 URL | https://adfs.contoso.local/adfs/ |
| AD FS 驗證端點 | https://adfs.contoso.local/adfs/oauth2/authorize |
| RegisteredIssuerName URL | https://adfs.contoso.local/adfs/ |
| AD FS SignoutURL | https://adfs.contoso.local/adfs/oauth2/logout |
| 身分識別宣告類型 | http://schemas.xmlsoap.org/ws/2005/05/identity/claims/emailaddress |
| Windows 網站集合管理員 | contoso\yvand |
| Email ad FS) 網站集合管理員的同盟 (值 | yvand@contoso.local |
步驟 1:設定識別提供者
執行下列步驟以使用AD FS 設定 OIDC:
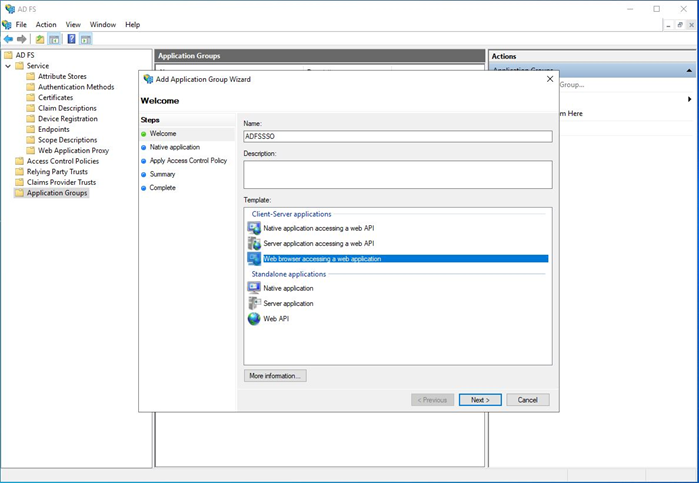
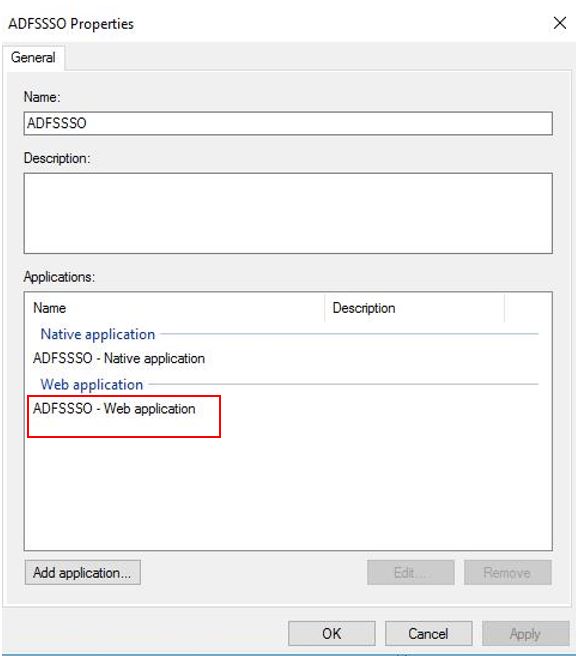
在 [AD FS 管理] 中,以滑鼠右鍵按兩下 [應用程式 群組],然後選取 [新增應用程式群組]。
移至 [歡迎使用] 頁面,在 [名稱] 欄位中輸入 ADFSSSO,然後在 [用戶端-伺服器應用程式] 下,選取存取 Web 應用程式範本的網頁瀏覽器。 然後,選取 [下一步]。
移至 [ 原生應用程式] 頁面,然後複製 [用戶端標識符] 值。 稍後會在 SharePoint 設定期間使用它作為參數的
DefaultClientIdentifier值。在 [ 重新導向 URL] 字 段下,輸入 並選取
https://spsites.contoso.local/[ 新增]。 然後,選取 [下一步]。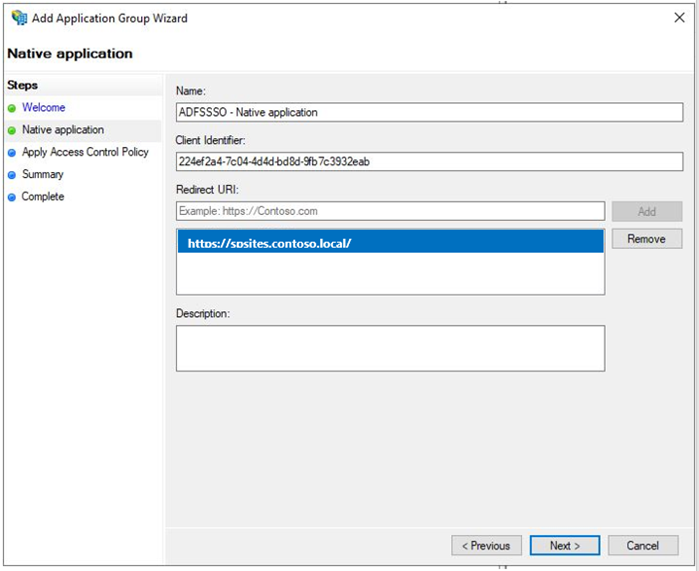
移至 [ 摘要] 頁面,然後選取 [ 下一步]。
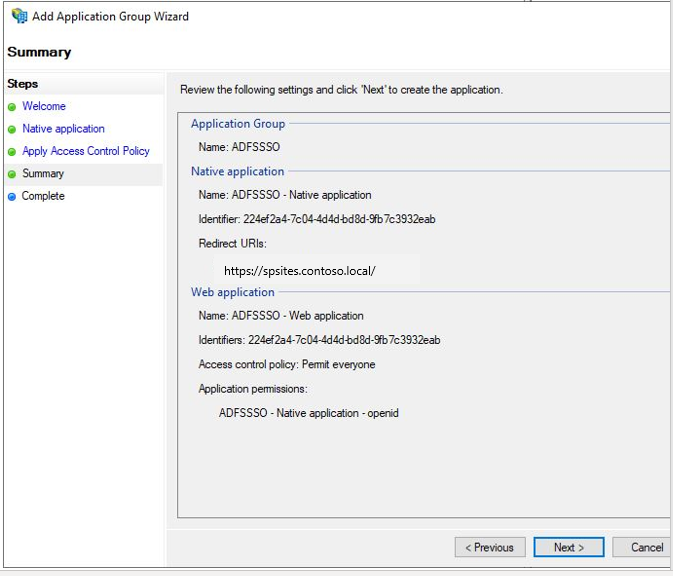
移至 [ 完成] 頁面,然後選取 [ 關閉]。
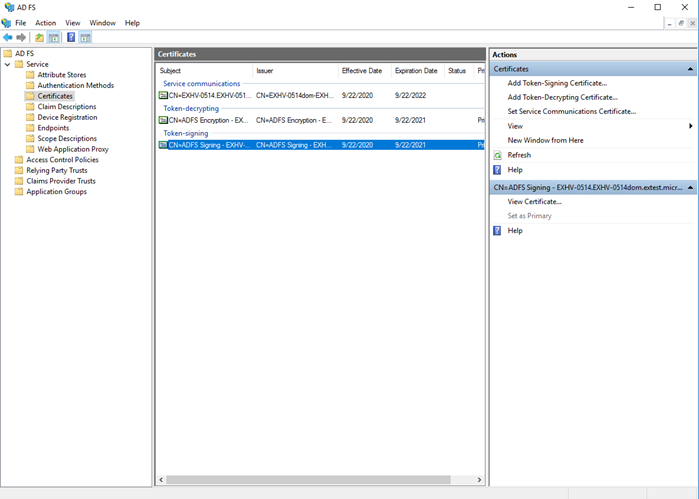
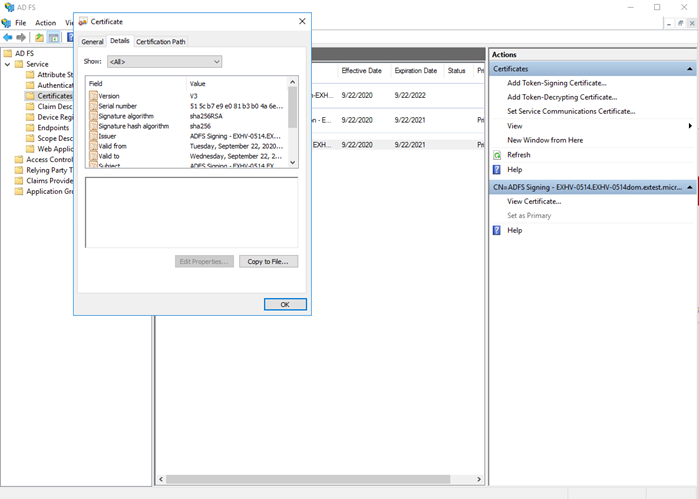
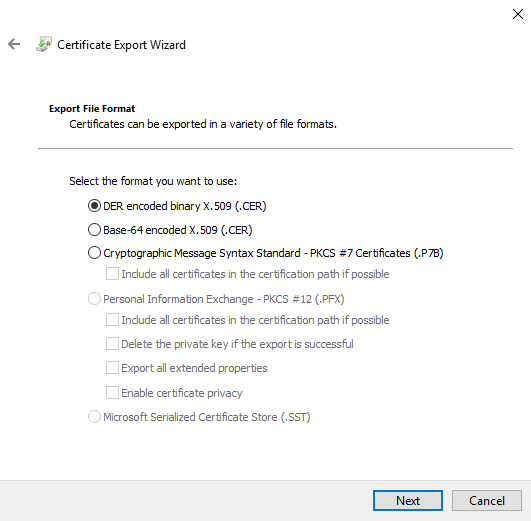
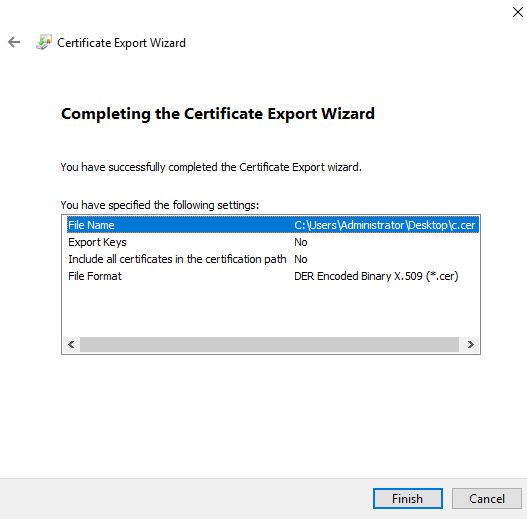
從 AD FS 匯出 令牌簽署 憑證。 此令牌簽署憑證將用於 SharePoint 安裝程式。 下列影像顯示如何從 AD FS 匯出 令牌簽署 憑證:
請確定必要的宣告識別碼包含在
id_token來自AD FS的中。 讓我們將電子郵件視為範例:我們假設您的 AD FS 已設定從屬性存放區讀取識別碼宣告的規則,例如 AD。 請執行下列步驟,為先前在 AD FS 中建立的這個特定 Web 應用程式建立發行 轉換規則 :
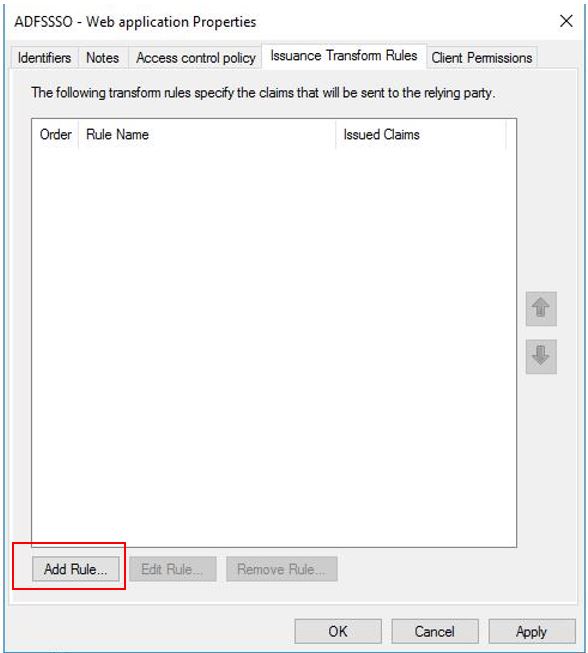
開啟您建立的 Web 應用程式,並移至 [ 問題轉換規則] 索引 標籤。
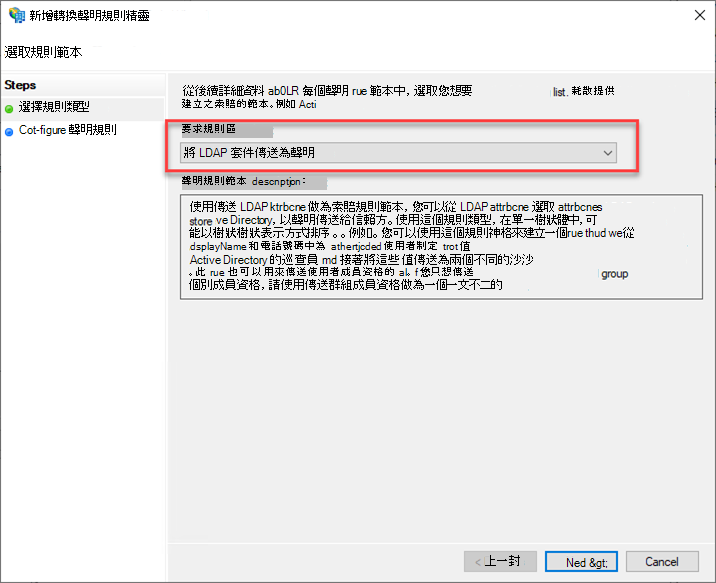
選 取 [新增規則] ,然後從選項清單中選取 [將 LDAP 屬性傳送為宣告 ]。
將您的宣告規則命名為 AD,然後從 [屬性存放區] 下拉功能表中選取 [Active Directory]。 使用下拉式方塊建立兩個對應,如下所示:
屬性 值 電子郵件位址 電子郵件位址 Token-Groups - 依功能變數名稱限定 角色 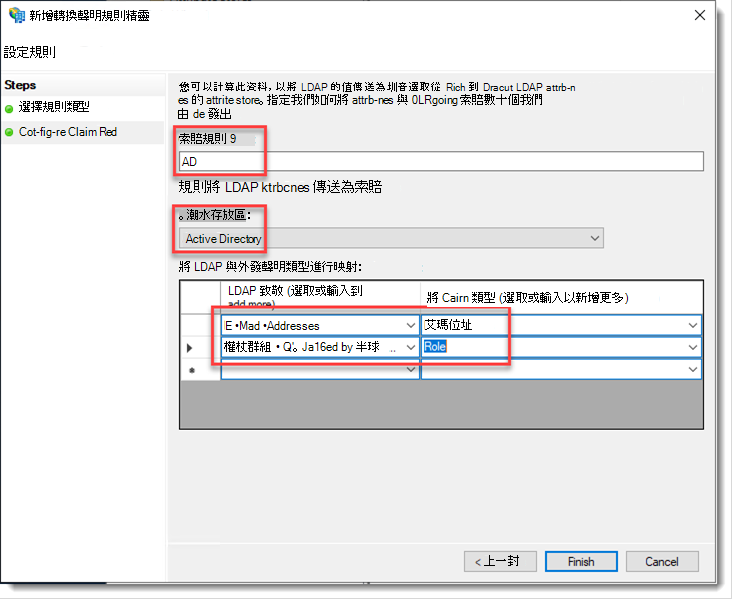
選 取 [完成 ] 以關閉 [規則精靈],然後選取 [ 確定 ] 以關閉 Web 應用程式屬性。 再選取一次 [確定 ] 以完成規則。
如果您要使用 SharePoint Server 設定 OIDC,則必須在您所建立 Web 應用程式的 AD FS 伺服器端設定 nbf 宣告。 如果此 Web 應用程式中不存在 nbf 宣告,請執行下列步驟來建立它:
開啟您建立的 Web 應用程式,並移至 [ 問題轉換規則] 索引 標籤。
選 取 [新增規則] ,然後選取 [ 套用]。 在 [新增轉換宣告規則精靈] 中,從 [宣告規則] 範本選項中選取 [使用自定義規則傳送宣告]。
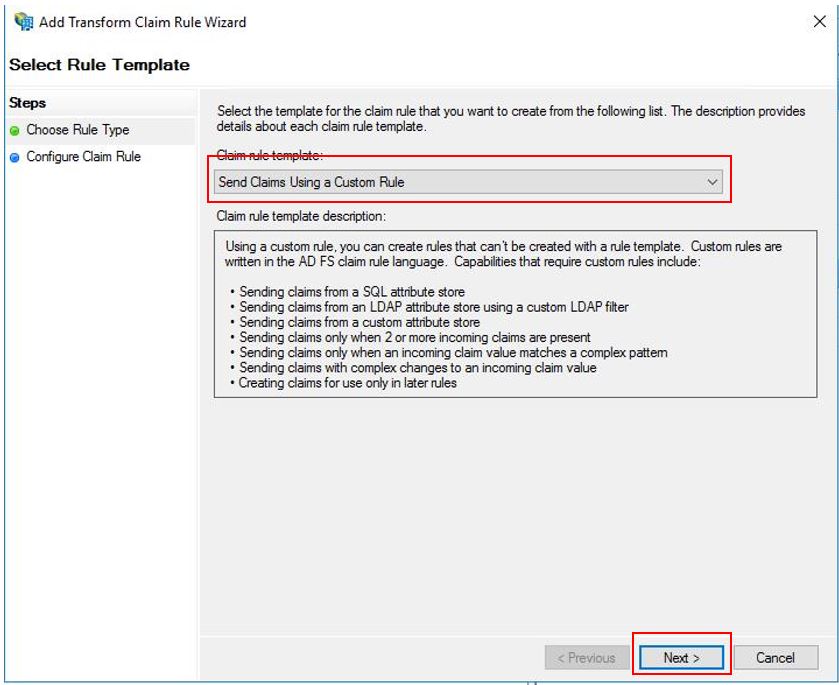
選 取 [下一步 ],然後在 [ 自定義規則 ] 字段中輸入下列字串:
c:[Type == "http://schemas.microsoft.com/ws/2008/06/identity/claims/windowsaccountname"] => issue(Type = "nbf", Value = "0");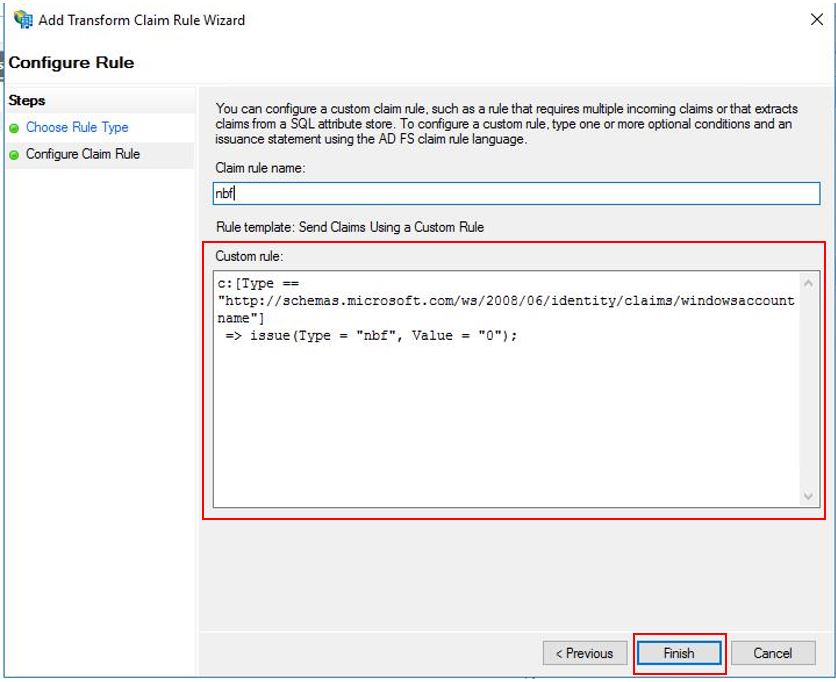
選取 [完成]。
步驟 2:變更 SharePoint 伺服器陣列屬性
在此步驟中,您必須根據 SharePoint Server 伺服器陣列的版本來修改 SharePoint Server 伺服器陣列屬性。
- 如需設定 SharePoint Server 訂閱版本 24H1 版之 SharePoint 伺服器陣組屬性的詳細資訊,請參閱設定 SPSE 版本 24H1 或更新版本。
- 如需針對 24H1 之前的 SharePoint Server 訂閱版本 版本設定 SharePoint 伺服器陣列屬性的詳細資訊,請參閱在版本 24H1 之前設定 SPSE。
使用早期發行功能喜好設定 SharePoint Server 訂閱版本 版本 24H1 或更新版本
從 SharePoint Server 訂閱版本 版本 24H1 (2024 年 3 月) 開始,如果 SharePoint 伺服器數位設定為 [早期發行] 功能喜好設定,您可以使用 SharePoint 憑證管理來管理 Nonce Cookie 憑證,以設定 SharePoint Server 伺服器數組屬性。 nonce Cookie 憑證是基礎結構的一部分,以確保 OIDC 驗證令牌的安全。 執行下列 PowerShell 腳本來設定:
重要事項
若要使用此腳本,SharePoint 伺服器陣列必須設定為 [早期發行],如上所述。 如果不是,腳本將會完成,但不會發生錯誤,但會呼叫 $farm。UpdateNonceCertificate () 不會執行任何動作。 如果您不想要設定伺服器陣列以進行早期發行,則必須改用 [在版本 24H1 之前設定 SPSE] 步驟。
注意事項
以伺服器陣組管理員身分啟動SharePoint管理命令介面,以執行下列腳本。 請仔細閱讀下列 PowerShell 腳本中所述的指示。 您必須在特定位置輸入您自己的環境特定值。
# Set up farm properties to work with OIDC

# Create the Nonce certificate
$cert = New-SelfSignedCertificate -CertStoreLocation Cert:\LocalMachine\My -Provider 'Microsoft Enhanced RSA and AES Cryptographic Provider' -Subject "CN=SharePoint Cookie Cert"

# Import certificate to Certificate Management
$certPath = "<path and file name to save the exported cert.  ex: c:\certs\nonce.pfx>"
$certPassword = ConvertTo-SecureString -String "<password>" -Force -AsPlainText
Export-PfxCertificate -Cert $cert -FilePath $certPath -Password $certPassword
$nonceCert = Import-SPCertificate -Path $certPath -Password $certPassword -Store "EndEntity" -Exportable:$true

# Update farm property
$farm = Get-SPFarm
$farm.UpdateNonceCertificate($nonceCert,$true)
在版本 24H1 之前設定 SharePoint Server 訂閱版本
# Set up farm properties to work with OIDC
$cert = New-SelfSignedCertificate -CertStoreLocation Cert:\LocalMachine\My -Provider 'Microsoft Enhanced RSA and AES Cryptographic Provider' -Subject "CN=SharePoint Cookie Cert"
$rsaCert = [System.Security.Cryptography.X509Certificates.RSACertificateExtensions]::GetRSAPrivateKey($cert)
$fileName = $rsaCert.key.UniqueName

# If you have multiple SharePoint servers in the farm, you need to export the certificate by Export-PfxCertificate and import the certificate to all other SharePoint servers in the farm by Import-PfxCertificate.

# After the certificate is successfully imported to SharePoint Server, we will need to grant access permission to the certificate's private key.

$path = "$env:ALLUSERSPROFILE\Microsoft\Crypto\RSA\MachineKeys\$fileName"
$permissions = Get-Acl -Path $path

# Replace the <web application pool account> with the real application pool account of your web application
$access_rule = New-Object System.Security.AccessControl.FileSystemAccessRule(<Web application pool account>, 'Read', 'None', 'None', 'Allow')
$permissions.AddAccessRule($access_rule)
Set-Acl -Path $path -AclObject $permissions

# Update farm properties
$farm = Get-SPFarm
$farm.Properties['SP-NonceCookieCertificateThumbprint']=$cert.Thumbprint
$farm.Properties['SP-NonceCookieHMACSecretKey']='seed'
$farm.Update()
步驟 3:設定 SharePoint 以信任識別提供者
在此步驟中,您將建立 SPTrustedTokenIssuer ,以儲存 SharePoint 信任 AD FS 作為 OIDC 提供者所需的設定。 以伺服器陣組管理員身分啟動 SharePoint 管理命令介面,並執行下列腳本來建立它:
注意事項
請仔細閱讀下列 PowerShell 腳本中所述的指示。 您必須在數個位置輸入環境特定的值。
# Define claim types
$email = New-SPClaimTypeMapping "http://schemas.xmlsoap.org/ws/2005/05/identity/claims/emailaddress" -IncomingClaimTypeDisplayName "EmailAddress" -SameAsIncoming

# Public key of the AD FS signing certificate
$signingCert = New-Object System.Security.Cryptography.X509Certificates.X509Certificate2("C:\Data\Claims\ADFS Signing.cer")
# Set the AD FS URL where users are redirected to authenticate
$authendpointurl = "https://adfs.contoso.local/adfs/oauth2/authorize"
$registeredissuernameurl = "https://adfs.contoso.local/adfs"
$signouturl = "https://adfs.contoso.local/adfs/oauth2/logout"

# Replace <Client Identifier> with the value you saved in step #3 of AD FS Setup section
$clientIdentifier = "<Your Client Identifier>"

# Create a new SPTrustedIdentityTokenIssuer in SharePoint
New-SPTrustedIdentityTokenIssuer -Name "Contoso.local" -Description "Contoso.local" -ImportTrustCertificate $signingCert -ClaimsMappings $email -IdentifierClaim $email.InputClaimType  -RegisteredIssuerName $registeredissuernameurl  -AuthorizationEndPointUri $authendpointurl -SignOutUrl $signouturl -DefaultClientIdentifier $clientIdentifier
New-SPTrustedIdentityTokenIssuer PowerShell Cmdlet 會使用下列參數擴充以支援 OIDC:
| 參數 | 描述 |
|---|---|
| 名稱 | 為新的令牌簽發者提供名稱。 |
| 描述 | 提供新令牌簽發者的描述。 |
| ImportTrustCertificate | 匯入 X509 憑證清單,用來從 OIDC 識別碼進行 id_token 驗證。 如果 OIDC IDP 使用多個憑證來數字簽署 id_token,請匯入這些憑證,然後 SharePoint 會藉由比對使用這些憑證所產生的數位簽名來進行驗證 id_token 。 |
| ClaimsMappings |
SPClaimTypeMapping對象,用來識別中的哪個宣告id_token會被視為 SharePoint 中的識別碼。 |
| IdentifierClaim | 指定標識碼的類型。 |
| RegisteredIssuerName | 指定發出的簽發者標識 id_token碼。 它會用來驗證 id_token。 |
| AuthorizationEndPointUrl | 指定 OIDC 識別提供者的授權端點。 |
| SignoutUrl | 指定 OIDC 識別提供者的註銷端點。 |
| DefaultClientIdentifier | 指定 client_id SharePoint 伺服器的 ,由 OID 識別提供者指派。 這會針對 中的 aud 宣告 id_token進行驗證。 |
| ResponseTypesSupported | 指定IDP的回應類型,此令牌簽發者可接受此類型。 它可以接受兩個字串: id_token 和 code id_token。 如果未提供此參數,則會使用 code id_token 作為預設值。 |
重要事項
相關的憑證必須新增至 SharePoint 跟證書頒發機構單位證書存儲,而且有兩個可能的選項可以執行此動作:
如果 AD FS 簽署憑證是由證書頒發機構單位所發行, (基於安全性原因的最佳做法) 。
簽發者憑證的公鑰 (和所有中繼) 必須新增至存放區。 啟動 SharePoint 管理命令介面,並執行下列腳本來新增憑證:
$rootCert = New-Object System.Security.Cryptography.X509Certificates.X509Certificate2("C:\Data\Claims\ADFS Signing issuer.cer")
New-SPTrustedRootAuthority -Name "adfs.contoso.local signing root authority" -Certificate $rootCert
如果 AD FS 簽署憑證是自我簽署憑證 (基於安全性考慮,) 。
AD FS 簽署憑證的公鑰必須新增至存放區。 啟動 SharePoint 管理命令介面,並執行下列腳本來新增憑證:
$rootCert = New-Object System.Security.Cryptography.X509Certificates.X509Certificate2("C:\Data\Claims\ADFS Signing.cer")
New-SPTrustedRootAuthority -Name "adfs.contoso.local signing certificate" -Certificate $rootCert
步驟 4:設定 SharePoint Web 應用程式
在此步驟中,您會使用 SPTrustedIdentityTokenIssuer 在上一個步驟中建立的 ,在 SharePoint 中設定 Web 應用程式以使用 AD FS OIDC 驗證。
重要事項
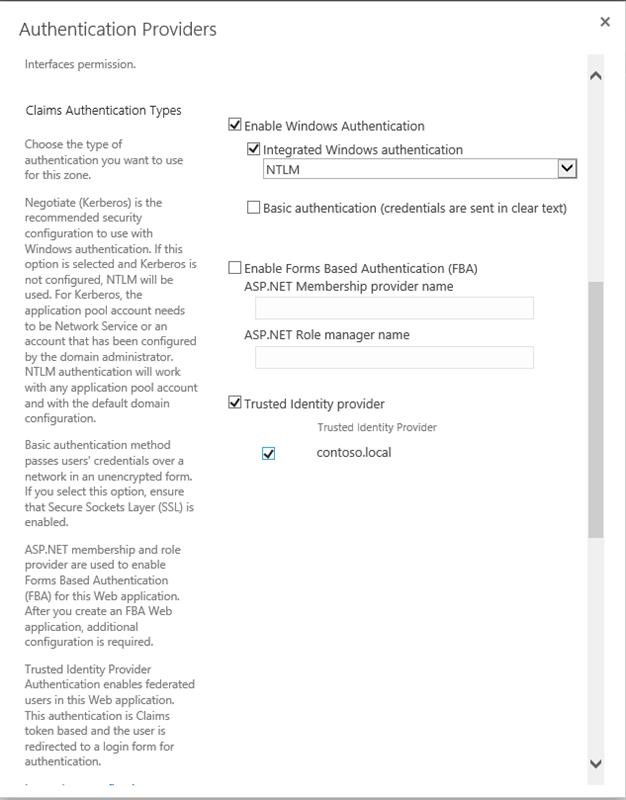
- SharePoint Web 應用程式的預設區域必須啟用 Windows 驗證。 這是搜尋編目程式的必要專案。
- 將使用AD FS OIDC 同盟的SharePointURL必須使用 HTTPS 進行設定。
您可以透過下列方式來完成此設定:
在預設區域中建立新的 Web 應用程式,並同時使用 Windows 和 AD FS OIDC 驗證。 若要建立新的 Web 應用程式,請執行下列動作:
啟動 SharePoint 管理指令介面並執行下列腳本來建立新的
SPAuthenticationProvider:# This script creates a trusted authentication provider for OIDC $sptrust = Get-SPTrustedIdentityTokenIssuer "contoso.local" $trustedAp = New-SPAuthenticationProvider -TrustedIdentityTokenIssuer $sptrust遵循 在 SharePoint Server 中建立 Web 應用程式 來建立新的 Web 應用程式,以在 contoso.local 上啟用名為 SharePoint - OIDC 的 HTTPS/SSL。
開啟 SharePoint 管理中心網站。
開啟您建立的 Web 應用程式,選擇功能區中的 [驗證提供者],按兩下 [預設] 區域的連結,然後挑選 contoso.local 作為 [信任的識別提供者]。
流覽至 [系統設定>] [設定替代存取對應>] [替代存取對應集合]。
使用新的 Web 應用程式篩選顯示器,並確認您看到下列資訊:

擴充現有的 Web 應用程式,以在新區域上設定 AD FS OIDC 驗證。 若要擴充現有的 Web 應用程式,請執行下列動作:
啟動 SharePoint 管理命令介面並執行 PowerShell 以擴充 Web 應用程式:
範例:
# Get the trusted provider
$sptrust = Get-SPTrustedIdentityTokenIssuer "Contoso.local"
$ap = New-SPAuthenticationProvider -TrustedIdentityTokenIssuer $sptrust
# Get the web app
$wa = Get-SPWebApplication http://spsites
# Extend the web app to the "Intranet" zone using trusted provider auth and a SharePoint managed certificate called "SharePoint OIDC Site"
New-SPWebApplicationExtension -Identity $wa -Name "spsites" -port 443 -HostHeader 'spsites.contoso.local'-AuthenticationProvider $ap -SecureSocketsLayer -UseServerNameIndication -Certificate 'SharePoint OIDC Site' -Zone 'Intranet' -URL 'https://spsites.contoso.local'
流覽至 [系統設定>] [設定替代存取對應>] [替代存取對應集合]。
使用已擴充的 Web 應用程式篩選顯示器,並確認您看到下列資訊:

步驟 5:確定已使用 SSL 憑證設定 Web 應用程式
由於 OpenID Connect 1.0 驗證只能與 HTTPS 通訊協定搭配使用,因此必須在對應的 Web 應用程式上設定憑證。 如果您尚未這麼做,請執行下列步驟來設定憑證:
產生月臺憑證:
注意事項
如果您已經產生憑證,您可以略過此步驟。
開啟 SharePoint PowerShell 控制台。
執行下列腳本來產生自我簽署憑證,並將其新增至 SharePoint 伺服器陣列:
New-SPCertificate -FriendlyName "Contoso SharePoint (2021)" -KeySize 2048 -CommonName spsites.contoso.local -AlternativeNames extranet.contoso.local, onedrive.contoso.local -OrganizationalUnit "Contoso IT Department" -Organization "Contoso" -Locality "Redmond" -State "Washington" -Country "US" -Exportable -HashAlgorithm SHA256 -Path "\\server\fileshare\Contoso SharePoint 2021 Certificate Signing Request.txt"
Move-SPCertificate -Identity "Contoso SharePoint (2021)" -NewStore EndEntity
重要事項
自我簽署憑證僅適用於測試用途。 在生產環境中,強烈建議您改用證書頒發機構單位所簽發的憑證。
設定憑證:
您可以使用下列 PowerShell Cmdlet 將憑證指派給 Web 應用程式:
Set-SPWebApplication -Identity https://spsites.contoso.local -Zone Default -SecureSocketsLayer -Certificate "Contoso SharePoint (2021)"
步驟 6:建立網站集合
在此步驟中,您會建立具有兩個系統管理員的小組網站集合:一位是 Windows 系統管理員,另一位是同盟 (AD FS) 系統管理員。
開啟 SharePoint 管理中心網站。
流覽至 [ 應用程式管理>] [建立網站集合]。
輸入標題、URL,然後選取範本小組網站。
在 [主要網站集合管理員] 區段中,選取書籍圖示以開啟 [人員 選擇器] 對話方塊。
在 [人員 選擇器] 對話框中,輸入 Windows 系統管理員帳戶,例如 yvand。
選取 [ 組織],以篩選左側的清單。 以下是範例輸出:
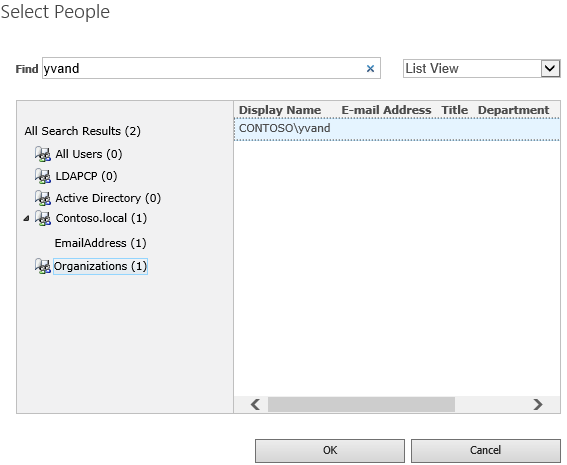
移至帳戶,然後選取 [ 確定]。
在 [次要網站集合管理員] 區段中,選取書籍圖示以開啟 [人員 選擇器] 對話框。
在 [人員 選擇器] 對話框中,輸入 AD FS 系統管理員帳戶的確切電子郵件值,例如 yvand@contoso.local。
選取 [Contoso.local],以篩選左側的清單。 以下是範例輸出:
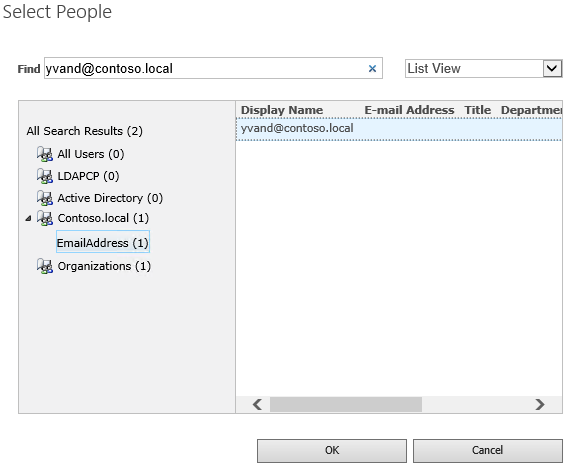
移至帳戶,然後選取 [ 確定]。
選取 [確定 ] 以建立網站集合。
建立網站集合之後,您應該能夠使用 Windows 或同盟 (AD FS OIDC) 網站集合系統管理員帳戶登入。
步驟 7:設定 人員 選擇器
在 OIDC 驗證中,人員 選擇器不會驗證輸入,這可能會導致拼字錯誤或使用者不小心選取錯誤的宣告類型。 您可以使用自定義宣告提供者,或使用包含在 SharePoint Server 訂閱版本 中的新UPA支援宣告提供者來解決此問題。 若要設定 UPA 支援的宣告提供者,請參閱增強 人員 選擇器以進行新式驗證。