實作同盟驗證
適用於: 2013 Subscription Edition
  SharePoint in Microsoft 365
在 SharePoint Server 中實作同盟驗證
本逐步指南說明如何使用 Active Directory 同盟服務 (AD FS) ,在 SharePoint 中設定同盟驗證。
同盟驗證概觀
在同盟驗證中,SharePoint 會處理受信任的外部安全性令牌服務 (STS) 所簽發的 SAML 令牌。 嘗試登入的使用者會重新導向至該 STS,該 STS 會驗證使用者並在成功驗證時產生 SAML 令牌。 然後,SharePoint 會處理此令牌,並使用它來建立自己的令牌,並授權使用者存取網站。
先決條件
若要執行設定,您需要下列資源:
- SharePoint 2013 伺服器陣列或更新版本。
- 已建立AD FS 伺服器陣列第2版或更新版本,並在.cer檔案中匯出AD FS簽署憑證的公鑰。
本文使用下列值:
- SharePoint 網站 URL:
https://spsites.contoso.local/ - AD FS 網站 URL:
https://adfs.contoso.local/adfs/ls/ - 領域 (信賴憑證者標識碼) :
urn:contoso:spsites - 身分識別宣告類型:
http://schemas.xmlsoap.org/ws/2005/05/identity/claims/emailaddress - 角色宣告類型:
http://schemas.microsoft.com/ws/2008/06/identity/claims/role - Windows 網站集合管理員:
contoso\yvand - 同盟 (AD FS) 網站集合管理員的電子郵件值:
yvand@contoso.local
在AD FS中建立信賴憑證者
在此步驟中,您會在AD FS中建立信賴憑證者。 信賴憑證者會儲存使用 SharePoint 所需的設定,以及定義成功驗證時,SAML 令牌中將會插入哪些宣告的宣告規則。
在AD FS 伺服器上,啟動 PowerShell 並執行下列腳本:
### STEP 1: Create the relying party
# Name of the Relying Party
$name = "SPSites"
# Unique identifier of the Relying Party (in SharePoint it's referred to as the realm)
$identifier = "urn:contoso:spsites"
# Authority that authenticates users
$identityProvider = "Active Directory"
# SharePoint URL where user is redirected upon successful authentication
$redirectURL = "https://spsites.contoso.local/_trust/default.aspx"
# Allow everyone to use this relying party
$allowEveryoneRule = '=> issue (Type = "http://schemas.microsoft.com/authorization/claims/permit", value = "true");'
# Create the Relying Party
Add-ADFSRelyingPartyTrust -Name $name -Identifier $identifier -ClaimsProviderName $identityProvider -Enabled $true -WSFedEndpoint $redirectURL -IssuanceAuthorizationRules $allowEveryoneRule -Confirm:$false

### STEP 2: Add claim rules to the relying party
# Rule below configured relying party to issue 2 claims in the SAML token: email and role
$claimsRule = @"
@RuleTemplate = "LdapClaims"
@RuleName = "AD"
c:[Type == "http://schemas.microsoft.com/ws/2008/06/identity/claims/windowsaccountname", Issuer == "AD AUTHORITY"]
=> issue(
store = "Active Directory",
types = ("http://schemas.xmlsoap.org/ws/2005/05/identity/claims/emailaddress", "http://schemas.microsoft.com/ws/2008/06/identity/claims/role"),
query = ";mail,tokenGroups(fullDomainQualifiedName);{0}",
param = c.Value);
"@
# Apply the rule to the Relying Party
Set-ADFSRelyingPartyTrust -TargetName $name -IssuanceTransformRules $claimsRule
當腳本完成時,AD FS 中的信賴憑證者看起來應該像這樣:

設定 SharePoint 以信任 AD FS
在此步驟中,您會建立SPTrustedLoginProvider,以儲存SharePoint信任AD FS所需的組態。 啟動 SharePoint 管理命令介面 並執行下列腳本來建立它:
# Define claim types
$email = New-SPClaimTypeMapping "http://schemas.xmlsoap.org/ws/2005/05/identity/claims/emailaddress" -IncomingClaimTypeDisplayName "EmailAddress" -SameAsIncoming
$role = New-SPClaimTypeMapping "http://schemas.microsoft.com/ws/2008/06/identity/claims/role" -IncomingClaimTypeDisplayName "Role" -SameAsIncoming

# Public key of the AD FS signing certificate
$signingCert = New-Object System.Security.Cryptography.X509Certificates.X509Certificate2("C:\Data\Claims\ADFS Signing.cer")
# Unique realm (corresponds to the unique identifier of the AD FS Relying Party)
$realm = "urn:contoso:spsites"
# Set the AD FS URL where users are redirected to authenticate
$signinurl = "https://adfs.contoso.local/adfs/ls/"

# Create a new SPTrustedIdentityTokenIssuer in SharePoint
New-SPTrustedIdentityTokenIssuer -Name "Contoso.local" -Description "Contoso.local" -Realm $realm -ImportTrustCertificate $signingCert -ClaimsMappings $email,$role -SignInUrl $signinurl -IdentifierClaim $email.InputClaimType
重要事項
請勿使用選項 -UseDefaultConfiguration 搭配 Cmdlet New-SPTrustedIdentityTokenIssuer。 此選項會因其在內部設定使用者身分識別的方式而造成非預期的副作用。
然後,相關憑證必須新增至 SharePoint 跟證書存儲。 有 2 個可能的選項:
- 如果 AD FS 簽署憑證是由證書頒發機構單位發出, (基於安全性考慮的最佳做法)
簽發者憑證的公鑰 (和所有中繼) 必須新增至存放區:啟動 SharePoint 管理命令介面 並執行下列腳本來新增它:
$rootCert = New-Object System.Security.Cryptography.X509Certificates.X509Certificate2("C:\Data\Claims\ADFS Signing issuer.cer")
New-SPTrustedRootAuthority -Name "adfs.contoso.local signing root authority" -Certificate $rootCert
- 如果ADFS簽署憑證是自我簽署憑證 (基於安全性原因不建議)
ADFS 簽署憑證本身的公鑰必須新增至存放區:啟動 SharePoint 管理命令介面 並執行下列腳本來新增它:
$rootCert = New-Object System.Security.Cryptography.X509Certificates.X509Certificate2("C:\Data\Claims\ADFS Signing.cer")
New-SPTrustedRootAuthority -Name "adfs.contoso.local signing certificate" -Certificate $rootCert
設定 SharePoint Web 應用程式
在此步驟中,您會使用上面建立的SPTrustedLoginProvider,將SharePoint中的Web應用程式設定為與AD FS信任同盟。
有一些重要的規則需要遵守:
- SharePoint Web 應用程式的預設區域必須啟用 Windows 驗證。 這是搜尋編目程式的必要專案。
- 將使用AD FS 同盟的SharePointURL必須使用 HTTPS 進行設定。
有兩個可能的組態:
如果您建立新的 Web 應用程式,並在預設區域中同時使用 Windows 和 AD FS 驗證:
啟動 SharePoint 管理命令介面 並執行下列文稿:
# This script creates a new web application and sets Windows and AD FS authentication on the Default zone
# URL of the SharePoint site federated with ADFS
$trustedSharePointSiteUrl = "https://spsites.contoso.local/"
$applicationPoolManagedAccount = "Contoso\spapppool"

$winAp = New-SPAuthenticationProvider -UseWindowsIntegratedAuthentication -DisableKerberos:$true
$sptrust = Get-SPTrustedIdentityTokenIssuer "Contoso.local"
$trustedAp = New-SPAuthenticationProvider -TrustedIdentityTokenIssuer $sptrust

New-SPWebApplication -Name "SharePoint - ADFS on contoso.local" -Port 443 -SecureSocketsLayer -URL $trustedSharePointSiteUrl -ApplicationPool "SharePoint - ADFS on contoso.local" -ApplicationPoolAccount (Get-SPManagedAccount $applicationPoolManagedAccount) -AuthenticationProvider $winAp, $trustedAp
開啟 SharePoint 管理中心 網站。
在 [ 系統設定] 底下,選取 [ 設定替代存取對應]。 [ 替代存取對應集合] 方 塊隨即開啟。
使用新的 Web 應用程式篩選顯示器,並確認您看到如下的內容:

如果您擴充現有的 Web 應用程式,以在新區域上設定 AD FS 驗證:
啟動 SharePoint 管理命令介面並執行下列文稿:
# This script extends an existing web application to set AD FS authentication on a new zone
# URL of the default zone of the web application
$webAppDefaultZoneUrl = "http://spsites/"
# URL of the SharePoint site federated with ADFS
$trustedSharePointSiteUrl = "https://spsites.contoso.local/"

$sptrust = Get-SPTrustedIdentityTokenIssuer "Contoso.local"
$ap = New-SPAuthenticationProvider -TrustedIdentityTokenIssuer $sptrust
$wa = Get-SPWebApplication $webAppDefaultZoneUrl
New-SPWebApplicationExtension -Name "SharePoint - ADFS on contoso.local" -Identity $wa -SecureSocketsLayer -Zone Intranet -Url $trustedSharePointSiteUrl -AuthenticationProvider $ap
開啟 SharePoint 管理中心 網站。
在 [ 系統設定] 底下,選取 [ 設定替代存取對應]。 [ 替代存取對應集合] 方 塊隨即開啟。
使用已擴充的 Web 應用程式篩選顯示器,並確認您看到如下的內容:


在 IIS 中設定 HTTPS 憑證
因為 SharePoint URL 使用 HTTPS 通訊協定 (https://spsites.contoso.local/) ,所以必須在對應的 Internet Information Services (IIS) 網站上設定憑證。
產生月台憑證
注意事項
如果您已經產生憑證,您可以略過此步驟。
開啟 Windows PowerShell 控制台。
執行下列腳本來產生自我簽署憑證,並將其新增至計算機的 MY 存放區:
New-SelfSignedCertificate -DnsName "spsites.contoso.local" -CertStoreLocation "cert:\LocalMachine\My"
重要事項
自我簽署憑證僅適用於測試用途。 在生產環境中,強烈建議您改用證書頒發機構單位所簽發的憑證。
設定憑證
開啟 Internet Information Services Manager 控制台。
展開樹視圖中的伺服器、展開 [ 網站]、選取 contoso.local 網站上的 SharePoint - ADFS ,然後選取 [ 系結]。
選取 [https 系結 ],然後選取 [ 編輯]。
在 [TLS/SSL 憑證] 欄位中,選擇 spsites.contoso.local 憑證,然後選取 [ 確定]。
建立網站集合
在此步驟中,您會建立具有兩個系統管理員的小組網站集合:一位是 Windows 系統管理員,另一位是同盟 (AD FS) 系統管理員。
開啟 SharePoint 管理中心 網站。
在 [ 應用程式管理] 底下,選取 [建立網站集合]。 [ 建立網站集合] 頁面隨即 開啟。
輸入 標題、 URL,然後選取範本 小組網站。
在 [ 主要網站集合管理員] 區段中,按兩下書籍圖示以開啟 [人員選擇器] 對話框。
在 [人員選擇器] 對話框中,輸入 Windows 系統管理員帳戶,例如
yvand。在左側,按兩下 [ 組織] 來篩選清單。 您應該看到如下的輸出:

選取帳戶,然後按兩下 [ 確定]。
在 [ 次要網站集合管理員] 區段中,按兩下書籍圖示以開啟 [人員選擇器] 對話方塊。
在 [人員選擇器] 對話框中,輸入 AD FS 系統管理員帳戶的 確切 電子郵件值,例如
yvand@contoso.local。在左側,按下 Contoso.local 來篩選清單。 您應該看到如下的輸出:
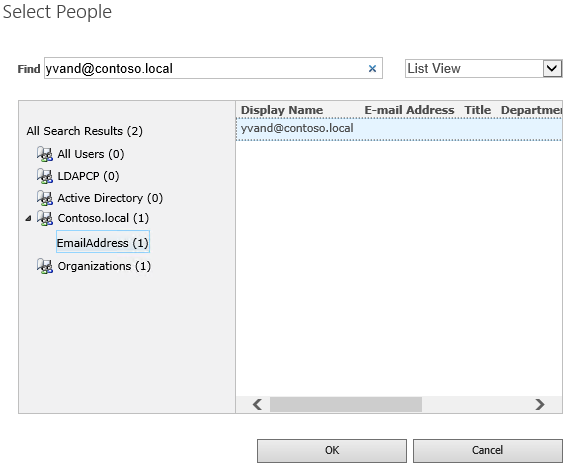
選取帳戶,然後按兩下 [ 確定]。
按兩下 [確定] 以建立網站集合。


建立網站集合之後,您應該能夠使用 Windows 或同盟網站集合系統管理員帳戶登入。
後續步驟
在同盟驗證中,人員選擇器不會驗證輸入,這可能會導致拼字錯誤或使用者不小心選擇錯誤的宣告類型。 這可以使用自定義宣告提供者來解決;例如, LDAPCP。
重要事項
LDAPCP 不是Microsoft產品,Microsoft支援不支援。 若要在內部部署 SharePoint 伺服器數位上下載、安裝及設定 LDAPCP,請參閱 LDAPCP 網站。
在 SharePoint Server 訂閱版本中,原生人員選擇器可以使用使用者配置檔服務應用程式進行同盟驗證來搜尋和解析人員。 瞭解如何設定人員選擇器以使用同盟驗證。