Important
The SharePoint Add-In model in SharePoint Online has been deprecated as of November 27th 2023, checkout the full retirement announcement to learn more.
Deprecation means that the feature will not get any new investments, but it's still supported. SharePoint add-in model is retired fully on April 2nd, 2026 and is no longer available after that time. Primary replacement technology for the SharePoint add-in model is SharePoint Framework (SPFx) which continues to be supported also in future.
Use the client chrome control in SharePoint Add-ins
The chrome control in SharePoint enables you to use the header styling of a specific SharePoint site in your add-in without needing to register a server library or use a specific technology or tool. To use this functionality, you must register a SharePoint JavaScript library through a standard <script> tag. You can provide a placeholder by using an HTML div element and further customize the control by using the available options. The control inherits its appearance from the specified SharePoint website.
Prerequisites for using the examples in this article
To follow the steps in this example, you need the following:
- Visual Studio 2015
- A SharePoint development environment (add-in isolation required for on-premises scenarios)
For guidance about how to set up a development environment that fits your needs, see Two types of SharePoint Add-ins: SharePoint-hosted and provider-hosted.
Core concepts to know before using the chrome control
The following table lists useful articles that can help you understand the concepts involved in a scenario that uses the chrome control.
| Article title | Description |
|---|---|
| SharePoint Add-ins | Learn about the new add-in model in SharePoint that enables you to create add-ins, which are small, easy-to-use solutions for end users. |
| UX design for SharePoint Add-ins | Learn about the user experience (UX) options and alternatives that you have when building SharePoint Add-ins. |
| Host webs, add-in webs, and SharePoint components in SharePoint | Learn about the distinction between host webs and add-in webs. Find out which SharePoint components can be included in a SharePoint Add-in, which components are deployed to the host web, which components are deployed to the add-in web, and how the add-in web is deployed in an isolated domain. |
Code example: Use the chrome control in your cloud-hosted add-in
A cloud-hosted add-in includes at least one remote component. For more information, see Choose patterns for developing and hosting your SharePoint Add-in. To use the chrome control in your cloud-hosted add-in, follow these steps:
- Create the SharePoint Add-in and remote web projects.
- Send default configuration options in the query string.
- Add a webpage to the web project.
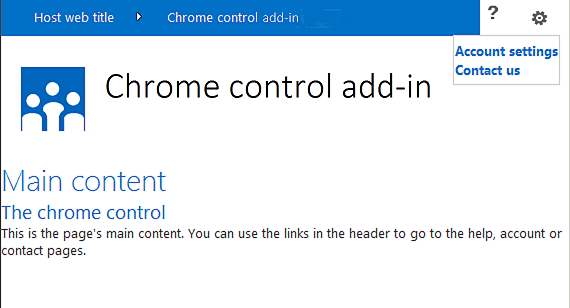
The following figure shows a remote webpage with the chrome control.
Remote webpage with the chrome control
To create the SharePoint Add-in and remote web projects
Open Visual Studio 2015 as administrator. (To do this, right-click the Visual Studio 2015 icon on the Start menu, and select Run as administrator.)
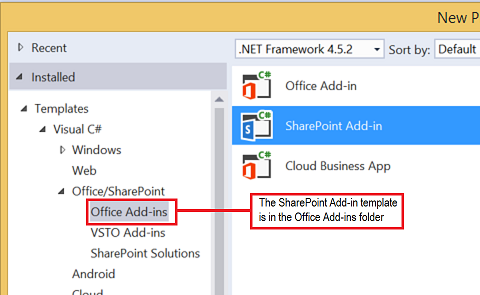
Create a new project by using the SharePoint Add-in template.
The following figure shows the location of the SharePoint Add-in template in Visual Studio 2015, under Templates > Visual C# > Office/SharePoint > Office Add-ins.
SharePoint Add-in Visual Studio template
Provide the URL of the SharePoint website that you want to use for debugging.
Select Provider-hosted as the hosting option for your add-in. For a SharePoint-hosted code sample, see SharePoint-Add-in-JSOM-BasicDataOperations.
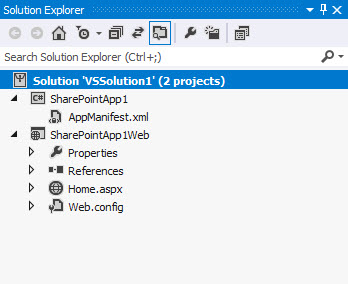
After the wizard finishes, you should have a structure in Solution Explorer that resembles the following figure.
Add-in for SharePoint projects in Solution Explorer
To send default configuration options in the query string
Open the Appmanifest.xml file in the manifest editor.
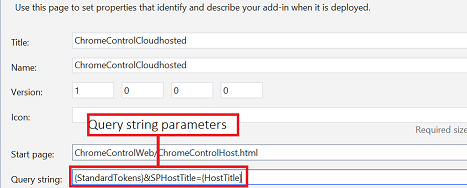
Add the {StandardTokens} token and an additional SPHostTitle parameter to the query string. The following figure shows the manifest editor with the configured query string parameters.
Manifest editor with query string parameters for the chrome control
The chrome control automatically takes the following values from the query string:
- SPHostUrl
- SPHostTitle
- SPAppWebUrl
- SPLanguage
{StandardTokens} include SPHostUrl and SPAppWebUrl.
To add a page that uses the chrome control in the web project
Right-click the web project, and add a new Web Form.
Copy the following markup, and paste it in the ASPX page. The markup performs the following tasks:
Loads the AJAX library from the Microsoft CDN (Content Delivery Network).
Loads the jQuery library from the Microsoft CDN.
Loads the SP.UI.Controls.js file using the jQuery function getScript.
Defines a callback function for the onCssLoaded event.
Prepares the options for the chrome control.
Initializes the chrome control.
<!DOCTYPE html> <html xmlns="http://www.w3.org/1999/xhtml"> <head> <title>Chrome control host page</title> <script src="//ajax.aspnetcdn.com/ajax/4.0/1/MicrosoftAjax.js" type="text/javascript"> </script> <script type="text/javascript" src="//ajax.aspnetcdn.com/ajax/jQuery/jquery-1.7.2.min.js"> </script> <script type="text/javascript" src="ChromeLoader.js"> </script> <script type="text/javascript"> "use strict"; var hostweburl; //load the SharePoint resources $(document).ready(function () { //Get the URI decoded URL. hostweburl = decodeURIComponent( getQueryStringParameter("SPHostUrl") ); // The SharePoint js files URL are in the form: // web_url/_layouts/15/resource var scriptbase = hostweburl + "/_layouts/15/"; // Load the js file and continue to the // success handler $.getScript(scriptbase + "SP.UI.Controls.js", renderChrome) }); // Callback for the onCssLoaded event defined // in the options object of the chrome control function chromeLoaded() { // When the page has loaded the required // resources for the chrome control, // display the page body. $("body").show(); } //Function to prepare the options and render the control function renderChrome() { // The Help, Account and Contact pages receive the // same query string parameters as the main page var options = { "appIconUrl": "siteicon.png", "appTitle": "Chrome control add-in", "appHelpPageUrl": "Help.html?" + document.URL.split("?")[1], // The onCssLoaded event allows you to // specify a callback to execute when the // chrome resources have been loaded. "onCssLoaded": "chromeLoaded()", "settingsLinks": [ { "linkUrl": "Account.html?" + document.URL.split("?")[1], "displayName": "Account settings" }, { "linkUrl": "Contact.html?" + document.URL.split("?")[1], "displayName": "Contact us" } ] }; var nav = new SP.UI.Controls.Navigation( "chrome_ctrl_placeholder", options ); nav.setVisible(true); } // Function to retrieve a query string value. // For production purposes you may want to use // a library to handle the query string. function getQueryStringParameter(paramToRetrieve) { var params = document.URL.split("?")[1].split("&"); var strParams = ""; for (var i = 0; i < params.length; i = i + 1) { var singleParam = params[i].split("="); if (singleParam[0] == paramToRetrieve) return singleParam[1]; } } </script> </head> <!-- The body is initally hidden. The onCssLoaded callback allows you to display the content after the required resources for the chrome control have been loaded. --> <body style="display: none"> <!-- Chrome control placeholder --> <div id="chrome_ctrl_placeholder"></div> <!-- The chrome control also makes the SharePoint Website stylesheet available to your page --> <h1 class="ms-accentText">Main content</h1> <h2 class="ms-accentText">The chrome control</h2> <div id="MainContent"> This is the page's main content. You can use the links in the header to go to the help, account or contact pages. </div> </body> </html>
You can also use the chrome control in a declarative way. In the following code example, the HTML markup declares the control without using JavaScript code to configure and initialize the control. The following markup performs the following tasks:
Provides a placeholder for the SP.UI.Controls.js JavaScript file.
Dynamically loads the SP.UI.Controls.js file.
Provides a placeholder for the chrome control and specifies the options inline with the HTML markup.
<!DOCTYPE html> <html xmlns="http://www.w3.org/1999/xhtml"> <head> <title>Chrome control host page</title> <script src="http://ajax.aspnetcdn.com/ajax/4.0/1/MicrosoftAjax.js" type="text/javascript"> </script> <script type="text/javascript" src="http://ajax.aspnetcdn.com/ajax/jQuery/jquery-1.7.2.min.js"> </script> <script type="text/javascript"> var hostweburl; // Load the SharePoint resources. $(document).ready(function () { // Get the URI decoded add-in web URL. hostweburl = decodeURIComponent( getQueryStringParameter("SPHostUrl") ); // The SharePoint js files URL are in the form: // web_url/_layouts/15/resource.js var scriptbase = hostweburl + "/_layouts/15/"; // Load the js file and continue to the // success handler. $.getScript(scriptbase + "SP.UI.Controls.js") }); // Function to retrieve a query string value. // For production purposes you may want to use // a library to handle the query string. function getQueryStringParameter(paramToRetrieve) { var params = document.URL.split("?")[1].split("&"); var strParams = ""; for (var i = 0; i < params.length; i = i + 1) { var singleParam = params[i].split("="); if (singleParam[0] == paramToRetrieve) return singleParam[1]; } } </script> </head> <body> <!-- Chrome control placeholder Options are declared inline. --> <div id="chrome_ctrl_container" data-ms-control="SP.UI.Controls.Navigation" data-ms-options= '{ "appHelpPageUrl" : "Help.html", "appIconUrl" : "siteIcon.png", "appTitle" : "Chrome control add-in", "settingsLinks" : [ { "linkUrl" : "Account.html", "displayName" : "Account settings" }, { "linkUrl" : "Contact.html", "displayName" : "Contact us" } ] }'> </div> <!-- The chrome control also makes the SharePoint Website style sheet available to your page. --> <h1 class="ms-accentText">Main content</h1> <h2 class="ms-accentText">The chrome control</h2> <div id="MainContent"> This is the page's main content. You can use the links in the header to go to the help, account or contact pages. </div> </body> </html>
The SP.UI.Controls.js library automatically renders the control if it finds the data-ms-control="SP.UI.Controls.Navigation" attribute in a div element.
To edit the StartPage element in the add-in manifest
Double-click the AppManifest.xml file in Solution Explorer.
On the Start page drop-down menu, select the webpage that uses the chrome control.
To build and run the solution
Make sure that the SharePoint Add-in project is set as the startup project.
Select the F5 key. (Note that when you select F5, Visual Studio builds the solution, deploys the add-in, and opens the permissions page for the add-in.)
Select the Trust It button.
Select the ChromeControlCloudhosted add-in icon.
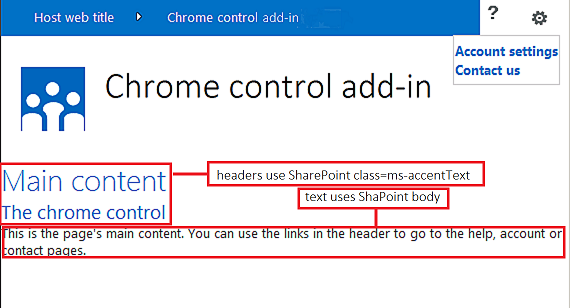
When you use the chrome control in your webpages, you can also use the SharePoint website style sheet, as shown in the following figure.
SharePoint website style sheet used in the page
Troubleshooting the solution
| Problem | Solution |
|---|---|
| Unhandled exception SP is undefined. | Make sure your browser loads the SP.UI.Controls.js file. |
| The chrome control does not render properly. | The chrome control only supports document modes Internet Explorer 8 and later. Make sure your browser renders your page in document mode Internet Explorer 8 or later. |
| Certificate error. | Set the SSL Enabled property of your web project to false. In the SharePoint Add-in project, set the Web Project property to None, and then set the property back to your web project's name. |