裝置方向
請務必考慮您的應用程式的使用方式,以及如何合併橫向來改善用戶體驗。 個別版面配置可以設計成容納多個方向,並充分利用可用空間。 在應用層級,可以停用或啟用輪替。
控制方向
使用 Xamarin.Forms時,控制裝置方向的支援方法是使用每個個別項目的設定。
iOS
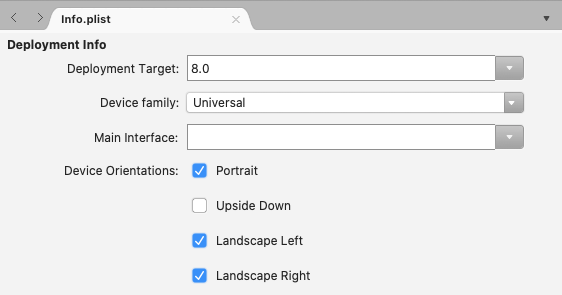
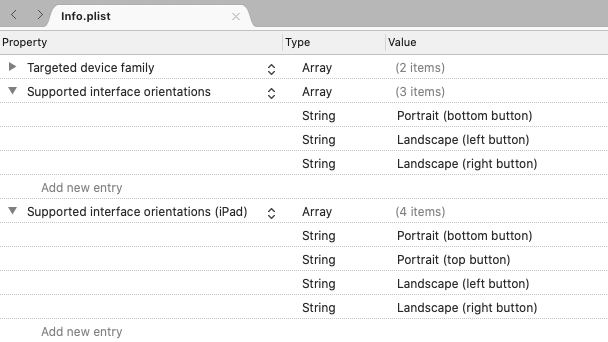
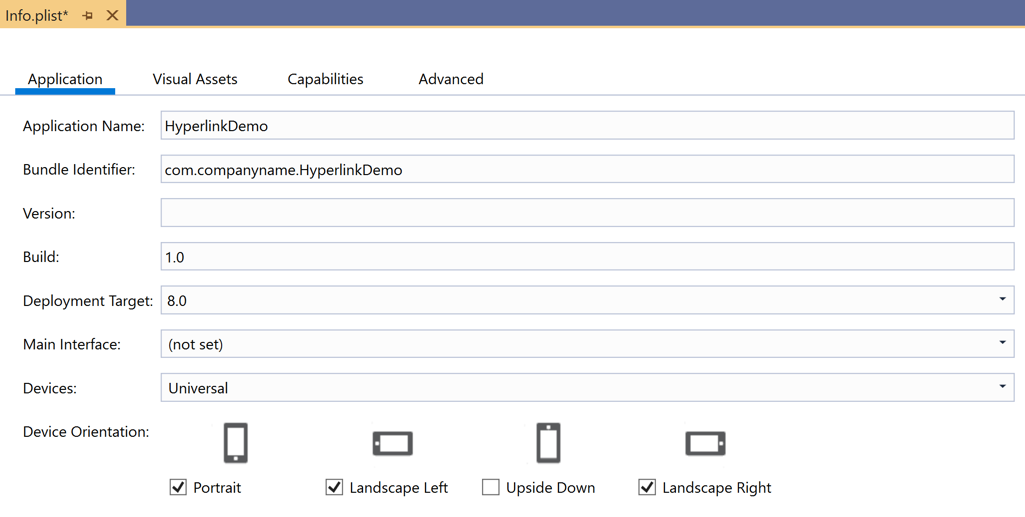
在 iOS 上,會針對使用 Info.plist 檔案的應用程式設定裝置方向。 使用本檔案頂端的 IDE 選項來選取您要檢視的指示:
在 Visual Studio 中,開啟 iOS 專案,然後開啟 Info.plist。 檔案會開啟至組態面板,從 [iPhone 部署資訊] 索引標籤開始:
Android
若要控制 Android 上的方向,請開啟 MainActivity.cs ,並使用裝飾 MainActivity 類別的屬性來設定方向:
namespace MyRotatingApp.Droid
{
    [Activity (Label = "MyRotatingApp.Droid", Icon = "@drawable/icon", Theme = "@style/MainTheme", MainLauncher = true, ConfigurationChanges = ConfigChanges.ScreenSize | ConfigChanges.Orientation, ScreenOrientation = ScreenOrientation.Landscape)] //This is what controls orientation
    public class MainActivity : FormsAppCompatActivity
    {
        protected override void OnCreate (Bundle bundle)
...
Xamarin.Android 支援數個選項來指定方向:
- 橫向 – 不論感測器數據為何,都會強制應用程式方向為橫向。
- 直 向 – 強制應用程式方向為直向,不論感測器數據為何。
- 使用者 – 讓應用程式使用使用者慣用的方向呈現。
- 後置 – 使應用程式的方向與其背後的活動方向相同。
- 感測器 – 使應用程式的方向由感測器決定,即使使用者已停用自動旋轉也一樣。
- SensorLandscape – 讓應用程式在使用感測器數據來變更螢幕面對的方向時使用橫向方向(因此螢幕不會被視為倒置)。
- SensorPortrait – 讓應用程式在使用感測器數據變更螢幕面對的方向時使用直向方向(因此螢幕不會被視為倒置)。
- ReverseLandscape – 讓應用程式使用橫向方向,面向平常的相反方向,以便顯示「倒置」。
- ReversePortrait – 讓應用程式使用直向方向,朝平常相反的方向,以便顯示「倒置」。
- FullSensor – 讓應用程式依賴感測器數據來選取正確的方向(超過可能 4)。
- FullUser – 讓應用程式使用使用者的方向喜好設定。 如果已啟用自動旋轉,則可以使用所有 4 個方向。
- UserLandscape – [不支援] 會導致應用程式使用橫向方向,除非使用者已啟用自動旋轉,在此情況下,它會使用感測器來判斷方向。 此選項將會中斷編譯。
- UserPortrait – [不支援] 會讓應用程式使用直向,除非使用者已啟用自動旋轉,在此情況下,它會使用感測器來判斷方向。 此選項將會中斷編譯。
- 鎖定 – [不支援] 會讓應用程式使用螢幕方向,無論在啟動時為何,都不需要回應裝置實體方向的變更。 此選項將會中斷編譯。
請注意,原生 Android API 可大幅控制如何管理方向,包括明確與使用者表示喜好設定相矛盾的選項。
通用 Windows 平臺
在 通用 Windows 平台 (UWP), 支援的方向是在 Package.appxmanifest 檔案中設定。 開啟指令清單會顯示可選取支援方向的組態面板。
回應方向的變更
Xamarin.Forms 不提供任何原生事件來通知您的應用程式共用程序代碼中的方向變更。 不過,Xamarin.Essentials 包含提供方向變更通知的 [DeviceDisplay] 類別。
若要偵測沒有 Xamarin.Essentials的方向,請監視 SizeChanged 的事件 Page,這會在變更的寬度或高度 Page 時引發。 當的 Page 寬度大於高度時,裝置會處於橫向模式。 如需詳細資訊,請參閱 根據螢幕方向顯示影像。
或者,您也可以在 上覆寫 OnSizeAllocated 方法,並在該處 Page插入任何版面配置變更邏輯。 OnSizeAllocated每當 Page 配置新的大小時,就會呼叫 方法,每當裝置旋轉時就會發生。 請注意,的 OnSizeAllocated 基底實作會執行重要的版面配置函式,因此請務必在覆寫中呼叫基底實作:
protected override void OnSizeAllocated(double width, double height)
{
    base.OnSizeAllocated(width, height); //must be called
}
若無法執行此步驟,將導致無法運作的頁面。
請注意, OnSizeAllocated 當裝置旋轉時,可能會呼叫方法多次。 每次變更您的版面配置會浪費資源,並可能導致閃爍。 請考慮在頁面內使用實例變數來追蹤方向是否為橫向或直向,而且只有在有變更時才重新繪製:
private double width = 0;
private double height = 0;

protected override void OnSizeAllocated(double width, double height)
{
    base.OnSizeAllocated(width, height); //must be called
    if (this.width != width || this.height != height)
    {
        this.width = width;
        this.height = height;
        //reconfigure layout
    }
}
偵測到裝置方向的變更之後,您可能會想要在使用者介面中新增或移除其他檢視,以回應可用空間中的變更。 例如,以直向方式考慮每個平臺上的內建計算機:
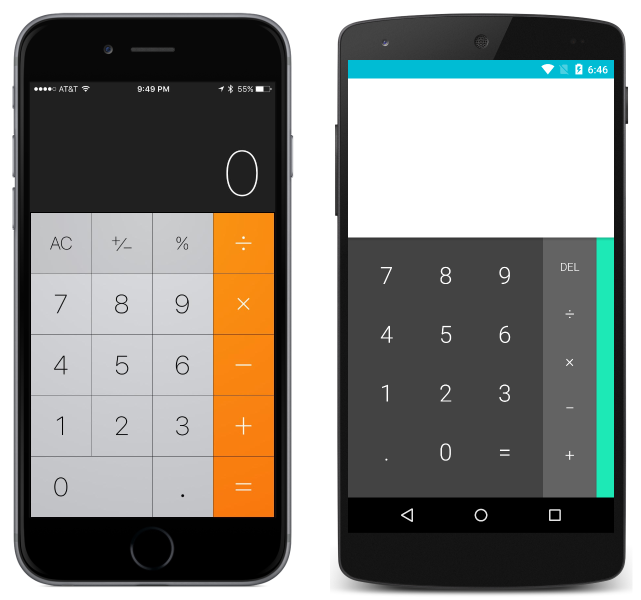
和橫向:
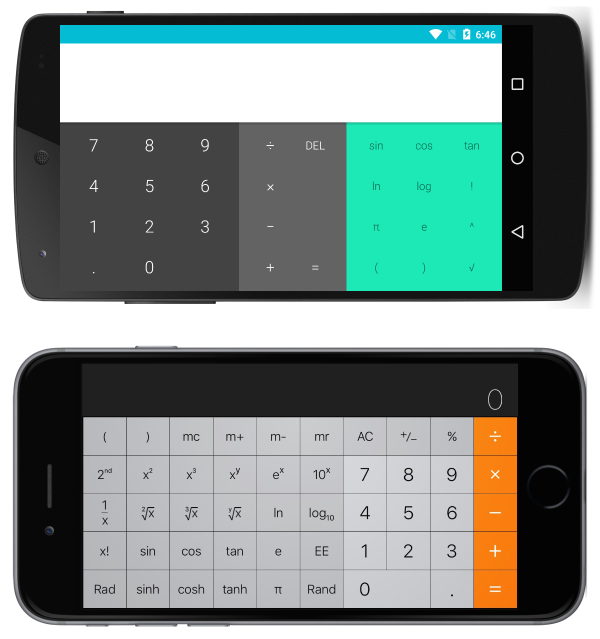
請注意,應用程式會藉由在橫向新增更多功能來利用可用空間。
回應式版面配置
您可以使用內建配置來設計介面,以便在裝置旋轉時正常轉換。 設計介面時,回應方向變更時會繼續吸引人,請考慮下列一般規則:
- 注意比率 – 當對比率 進行特定假設時,方向上的變更可能會導致問題。 例如,在直向中螢幕垂直空間的 1/3 中,可能會有足夠空間的檢視可能不適合橫向垂直空間的 1/3。
- 請小心絕對值 – 在直向中有意義的絕對值 (圖元) 值在橫向中可能沒有意義。 如果需要絕對值,請使用巢狀配置來隔離其影響。 例如,當專案範本具有保證的統一高度時,在中使用
TableViewItemTemplate絕對值是合理的。
在實作多個螢幕大小的介面時,上述規則也適用於,而且通常被視為最佳做法。 本指南的其餘部分將說明使用 中 Xamarin.Forms每個主要版面配置的特定回應式版面配置範例。
注意
為了清楚起見,下列各節示範如何一次只使用一種 類型 Layout 來實作回應式配置。 在實務上,使用每個元件的更簡單或最直覺的版面配置,混合 Layout使用 更簡單或最直覺 Layout 的版面配置。
StackLayout
請考慮以直向顯示的應用程式:
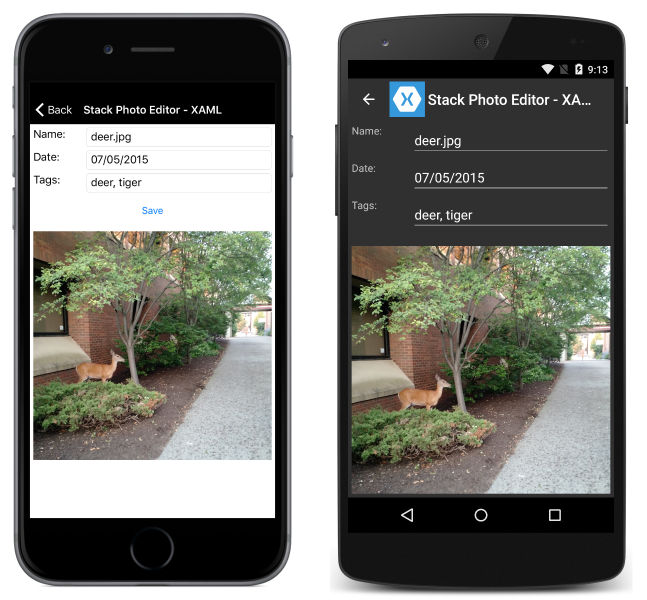
和橫向:
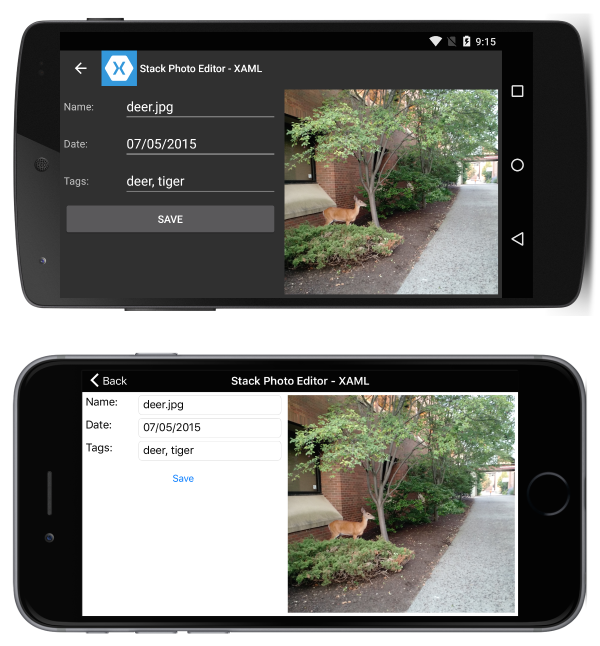
這可透過下列 XAML 來完成:
<?xml version="1.0" encoding="UTF-8"?>
<ContentPage xmlns="http://xamarin.com/schemas/2014/forms"
xmlns:x="http://schemas.microsoft.com/winfx/2009/xaml"
x:Class="ResponsiveLayout.StackLayoutPageXaml"
Title="Stack Photo Editor - XAML">
    <ContentPage.Content>
        <StackLayout Spacing="10" Padding="5" Orientation="Vertical"
        x:Name="outerStack"> <!-- can change orientation to make responsive -->
            <ScrollView>
                <StackLayout Spacing="5" HorizontalOptions="FillAndExpand"
                    WidthRequest="1000">
                    <StackLayout Orientation="Horizontal">
                        <Label Text="Name: " WidthRequest="75"
                            HorizontalOptions="Start" />
                        <Entry Text="deer.jpg"
                            HorizontalOptions="FillAndExpand" />
                    </StackLayout>
                    <StackLayout Orientation="Horizontal">
                        <Label Text="Date: " WidthRequest="75"
                            HorizontalOptions="Start" />
                        <Entry Text="07/05/2015"
                            HorizontalOptions="FillAndExpand" />
                    </StackLayout>
                    <StackLayout Orientation="Horizontal">
                        <Label Text="Tags:" WidthRequest="75"
                            HorizontalOptions="Start" />
                        <Entry Text="deer, tiger"
                            HorizontalOptions="FillAndExpand" />
                    </StackLayout>
                    <StackLayout Orientation="Horizontal">
                        <Button Text="Save" HorizontalOptions="FillAndExpand" />
                    </StackLayout>
                </StackLayout>
            </ScrollView>
            <Image  Source="deer.jpg" />
        </StackLayout>
    </ContentPage.Content>
</ContentPage>
某些 C# 用來根據裝置的方向 outerStack 來變更 的方向:
protected override void OnSizeAllocated (double width, double height){
    base.OnSizeAllocated (width, height);
    if (width != this.width || height != this.height) {
        this.width = width;
        this.height = height;
        if (width > height) {
            outerStack.Orientation = StackOrientation.Horizontal;
        } else {
            outerStack.Orientation = StackOrientation.Vertical;
        }
    }
}
請注意以下要點:
outerStack根據方向調整,將影像和控件呈現為水準或垂直堆疊,以充分利用可用空間。
AbsoluteLayout
請考慮以直向顯示的應用程式:
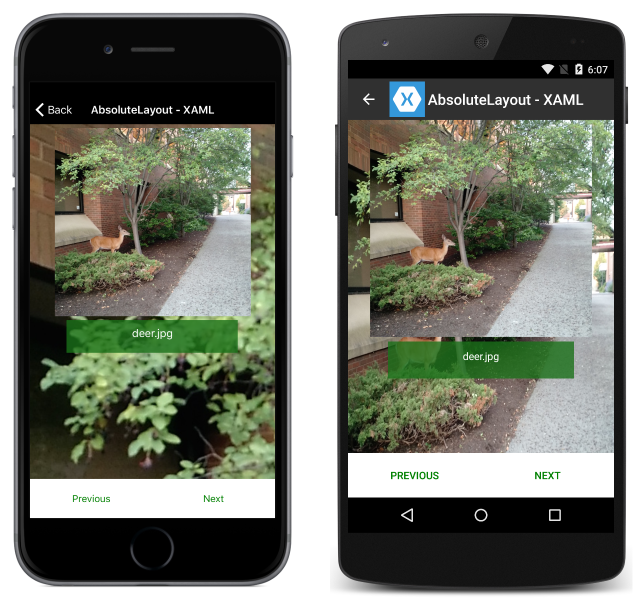
和橫向:
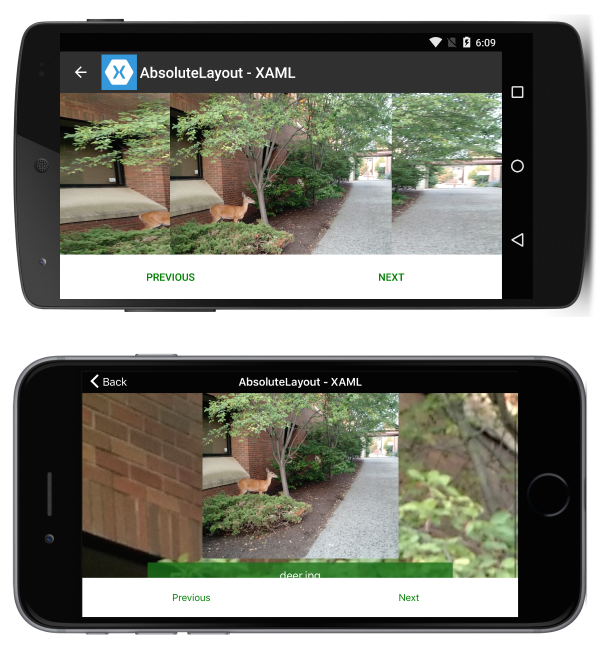
這可透過下列 XAML 來完成:
<?xml version="1.0" encoding="UTF-8"?>
<ContentPage xmlns="http://xamarin.com/schemas/2014/forms"
xmlns:x="http://schemas.microsoft.com/winfx/2009/xaml"
x:Class="ResponsiveLayout.AbsoluteLayoutPageXaml"
Title="AbsoluteLayout - XAML" BackgroundImageSource="deer.jpg">
    <ContentPage.Content>
        <AbsoluteLayout>
            <ScrollView AbsoluteLayout.LayoutBounds="0,0,1,1"
                AbsoluteLayout.LayoutFlags="PositionProportional,SizeProportional">
                <AbsoluteLayout>
                    <Image Source="deer.jpg"
                        AbsoluteLayout.LayoutBounds=".5,0,300,300"
                        AbsoluteLayout.LayoutFlags="PositionProportional" />
                    <BoxView Color="#CC1A7019" AbsoluteLayout.LayoutBounds=".5
                        300,.7,50" AbsoluteLayout.LayoutFlags="XProportional
                        WidthProportional" />
                    <Label Text="deer.jpg" AbsoluteLayout.LayoutBounds = ".5
                        310,1, 50" AbsoluteLayout.LayoutFlags="XProportional
                        WidthProportional" HorizontalTextAlignment="Center" TextColor="White" />
                </AbsoluteLayout>
            </ScrollView>
            <Button Text="Previous" AbsoluteLayout.LayoutBounds="0,1,.5,60"
                AbsoluteLayout.LayoutFlags="PositionProportional
                    WidthProportional"
                BackgroundColor="White" TextColor="Green" BorderRadius="0" />
            <Button Text="Next" AbsoluteLayout.LayoutBounds="1,1,.5,60"
                AbsoluteLayout.LayoutFlags="PositionProportional
                    WidthProportional" BackgroundColor="White"
                    TextColor="Green" BorderRadius="0" />
        </AbsoluteLayout>
    </ContentPage.Content>
</ContentPage>
請注意以下要點:
- 由於頁面已配置的方式,因此不需要程式代碼來引進回應性。
ScrollView正用來允許顯示標籤,即使螢幕的高度小於按鈕和影像固定高度的總和。
RelativeLayout
請考慮以直向顯示的應用程式:
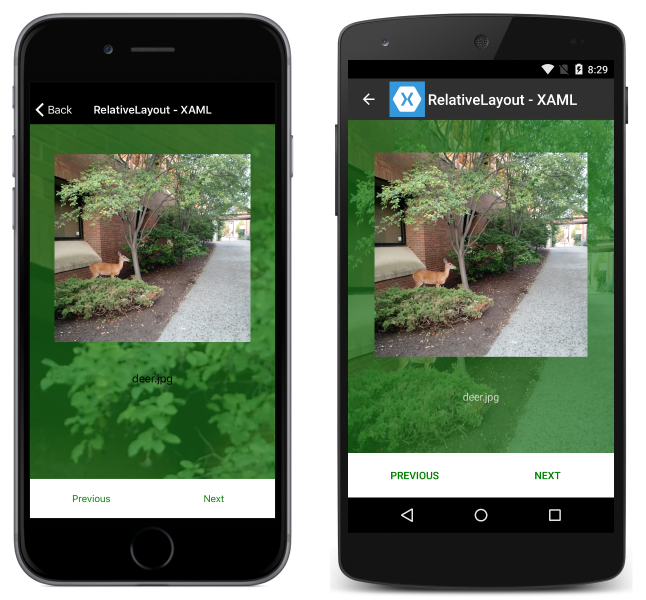
和橫向:
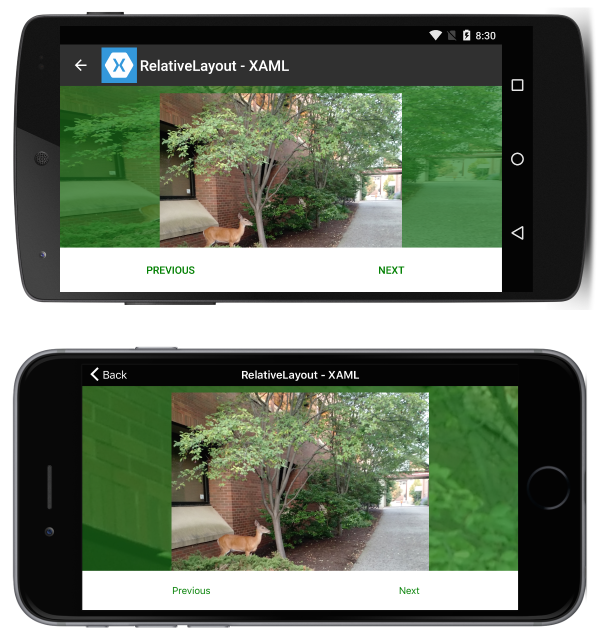
這可透過下列 XAML 來完成:
<?xml version="1.0" encoding="UTF-8"?>
<ContentPage xmlns="http://xamarin.com/schemas/2014/forms"
xmlns:x="http://schemas.microsoft.com/winfx/2009/xaml"
x:Class="ResponsiveLayout.RelativeLayoutPageXaml"
Title="RelativeLayout - XAML"
BackgroundImageSource="deer.jpg">
    <ContentPage.Content>
        <RelativeLayout x:Name="outerLayout">
            <BoxView BackgroundColor="#AA1A7019"
                RelativeLayout.WidthConstraint="{ConstraintExpression
                    Type=RelativeToParent,Property=Width,Factor=1}"
                RelativeLayout.HeightConstraint="{ConstraintExpression
                    Type=RelativeToParent,Property=Height,Factor=1}"
                RelativeLayout.XConstraint="{ConstraintExpression
                    Type=RelativeToParent,Property=Width,Factor=0,Constant=0}"
                RelativeLayout.YConstraint="{ConstraintExpression
                    Type=RelativeToParent,Property=Height,Factor=0,Constant=0}" />
            <ScrollView
                RelativeLayout.WidthConstraint="{ConstraintExpression
                    Type=RelativeToParent,Property=Width,Factor=1}"
                RelativeLayout.HeightConstraint="{ConstraintExpression
                    Type=RelativeToParent,Property=Height,Factor=1,Constant=-60}"
                RelativeLayout.XConstraint="{ConstraintExpression
                    Type=RelativeToParent,Property=Width,Factor=0,Constant=0}"
                RelativeLayout.YConstraint="{ConstraintExpression
                    Type=RelativeToParent,Property=Height,Factor=0,Constant=0}">
                <RelativeLayout>
                    <Image Source="deer.jpg" x:Name="imageDeer"
                        RelativeLayout.WidthConstraint="{ConstraintExpression
                            Type=RelativeToParent,Property=Width,Factor=.8}"
                        RelativeLayout.XConstraint="{ConstraintExpression
                            Type=RelativeToParent,Property=Width,Factor=.1}"
                        RelativeLayout.YConstraint="{ConstraintExpression
                            Type=RelativeToParent,Property=Height,Factor=0,Constant=10}" />
                    <Label Text="deer.jpg" HorizontalTextAlignment="Center"
                        RelativeLayout.WidthConstraint="{ConstraintExpression
                            Type=RelativeToParent,Property=Width,Factor=1}"
                        RelativeLayout.HeightConstraint="{ConstraintExpression
                            Type=RelativeToParent,Property=Height,Factor=0,Constant=75}"
                        RelativeLayout.XConstraint="{ConstraintExpression
                            Type=RelativeToParent,Property=Width,Factor=0,Constant=0}"
                        RelativeLayout.YConstraint="{ConstraintExpression
                            Type=RelativeToView,ElementName=imageDeer,Property=Height,Factor=1,Constant=20}" />
                </RelativeLayout>

            </ScrollView>

            <Button Text="Previous" BackgroundColor="White" TextColor="Green" BorderRadius="0"
                RelativeLayout.YConstraint="{ConstraintExpression
                    Type=RelativeToParent,Property=Height,Factor=1,Constant=-60}"
                RelativeLayout.XConstraint="{ConstraintExpression
                    Type=RelativeToParent,Property=Width,Factor=0,Constant=0}"
                RelativeLayout.HeightConstraint="{ConstraintExpression
                    Type=RelativeToParent,Property=Width,Factor=0,Constant=60}"
                RelativeLayout.WidthConstraint="{ConstraintExpression
                    Type=RelativeToParent,Property=Width,Factor=.5}"
                 />
            <Button Text="Next" BackgroundColor="White" TextColor="Green" BorderRadius="0"
                RelativeLayout.XConstraint="{ConstraintExpression
                    Type=RelativeToParent,Property=Width,Factor=.5}"
                RelativeLayout.YConstraint="{ConstraintExpression
                    Type=RelativeToParent,Property=Height,Factor=1,Constant=-60}"
                RelativeLayout.HeightConstraint="{ConstraintExpression
                    Type=RelativeToParent,Property=Width,Factor=0,Constant=60}"
                RelativeLayout.WidthConstraint="{ConstraintExpression
                    Type=RelativeToParent,Property=Width,Factor=.5}"
                />
        </RelativeLayout>
    </ContentPage.Content>
</ContentPage>
請注意以下要點:
- 由於頁面已配置的方式,因此不需要程式代碼來引進回應性。
ScrollView正用來允許顯示標籤,即使螢幕的高度小於按鈕和影像固定高度的總和。
方格
請考慮以直向顯示的應用程式:
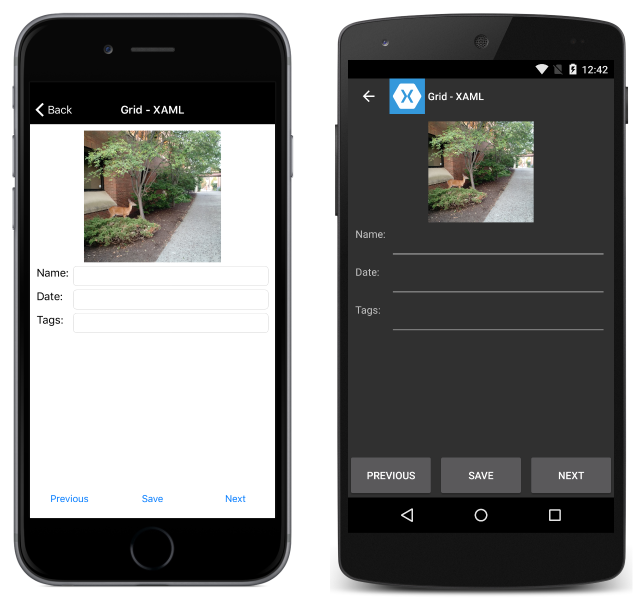
和橫向:
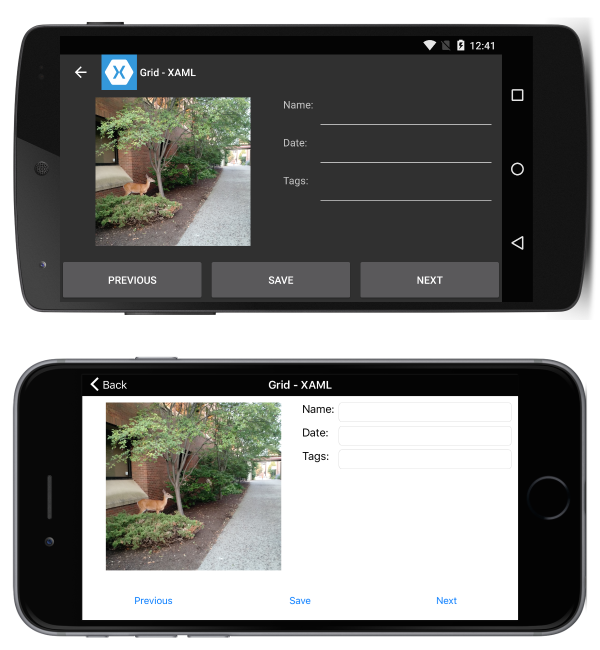
這可透過下列 XAML 來完成:
<?xml version="1.0" encoding="UTF-8"?>
<ContentPage xmlns="http://xamarin.com/schemas/2014/forms"
xmlns:x="http://schemas.microsoft.com/winfx/2009/xaml"
x:Class="ResponsiveLayout.GridPageXaml"
Title="Grid - XAML">
    <ContentPage.Content>
        <Grid x:Name="outerGrid">
            <Grid.RowDefinitions>
                <RowDefinition Height="*" />
                <RowDefinition Height="60" />
            </Grid.RowDefinitions>
            <Grid x:Name="innerGrid" Grid.Row="0" Padding="10">
                <Grid.RowDefinitions>
                    <RowDefinition Height="*" />
                </Grid.RowDefinitions>
                <Grid.ColumnDefinitions>
                    <ColumnDefinition Width="*" />
                    <ColumnDefinition Width="*" />
                </Grid.ColumnDefinitions>
                <Image Source="deer.jpg" Grid.Row="0" Grid.Column="0" HeightRequest="300" WidthRequest="300" />
                <Grid x:Name="controlsGrid" Grid.Row="0" Grid.Column="1" >
                    <Grid.RowDefinitions>
                        <RowDefinition Height="Auto" />
                        <RowDefinition Height="Auto" />
                        <RowDefinition Height="Auto" />
                    </Grid.RowDefinitions>
                    <Grid.ColumnDefinitions>
                        <ColumnDefinition Width="Auto" />
                        <ColumnDefinition Width="*" />
                    </Grid.ColumnDefinitions>
                    <Label Text="Name:" Grid.Row="0" Grid.Column="0" />
                    <Label Text="Date:" Grid.Row="1" Grid.Column="0" />
                    <Label Text="Tags:" Grid.Row="2" Grid.Column="0" />
                    <Entry Grid.Row="0" Grid.Column="1" />
                    <Entry Grid.Row="1" Grid.Column="1" />
                    <Entry Grid.Row="2" Grid.Column="1" />
                </Grid>
            </Grid>
            <Grid x:Name="buttonsGrid" Grid.Row="1">
                <Grid.ColumnDefinitions>
                    <ColumnDefinition Width="*" />
                    <ColumnDefinition Width="*" />
                    <ColumnDefinition Width="*" />
                </Grid.ColumnDefinitions>
                <Button Text="Previous" Grid.Column="0" />
                <Button Text="Save" Grid.Column="1" />
                <Button Text="Next" Grid.Column="2" />
            </Grid>
        </Grid>
    </ContentPage.Content>
</ContentPage>
以及下列程式代碼來處理輪替變更:
private double width;
private double height;

protected override void OnSizeAllocated (double width, double height){
    base.OnSizeAllocated (width, height);
    if (width != this.width || height != this.height) {
        this.width = width;
        this.height = height;
        if (width > height) {
            innerGrid.RowDefinitions.Clear();
            innerGrid.ColumnDefinitions.Clear ();
            innerGrid.RowDefinitions.Add (new RowDefinition{ Height = new GridLength (1, GridUnitType.Star) });
            innerGrid.ColumnDefinitions.Add (new ColumnDefinition { Width = new GridLength (1, GridUnitType.Star) });
            innerGrid.ColumnDefinitions.Add (new ColumnDefinition { Width = new GridLength (1, GridUnitType.Star) });
            innerGrid.Children.Remove (controlsGrid);
            innerGrid.Children.Add (controlsGrid, 1, 0);
        } else {
            innerGrid.RowDefinitions.Clear();
            innerGrid.ColumnDefinitions.Clear ();
            innerGrid.ColumnDefinitions.Add (new ColumnDefinition{ Width = new GridLength (1, GridUnitType.Star) });
            innerGrid.RowDefinitions.Add (new RowDefinition { Height = new GridLength (1, GridUnitType.Auto) });
            innerGrid.RowDefinitions.Add (new RowDefinition { Height = new GridLength (1, GridUnitType.Star) });
            innerGrid.Children.Remove (controlsGrid);
            innerGrid.Children.Add (controlsGrid, 0, 1);
        }
    }
}
請注意以下要點:
- 由於頁面配置的方式,有一種方法可以變更控件的網格線位置。
