縮放轉換
探索 SkiaSharp 縮放比例轉換,以將物件調整為各種大小
如您在「翻譯轉換」文章中所見,翻譯轉換可以將圖形化物件從一個位置移至另一個位置。 相反地,縮放轉換會變更圖形化物件的大小:
縮放轉換通常也會在圖形座標變大時移動。
您稍早看到兩個轉換公式,描述 和 dy的翻譯因數dx效果:
x' = x + dx
y' = y + dy
和 sy 的sx縮放因數是乘法因素,而不是加法因素:
x' = sx ·X
y' = sy ·Y
轉譯因數的預設值為 0;小數字數的預設值為1。
類別 SKCanvas 會定義四 Scale 種方法。 第一 Scale 種方法適用於您想要相同水準和垂直縮放比例的情況:
public void Scale (Single s)
這稱為 異向性 縮放 — 兩個方向的縮放比例相同。 Isotropic 縮放會保留對象的外觀比例。
第二 Scale 種方法可讓您指定水平和垂直縮放的不同值:
public void Scale (Single sx, Single sy)
這會導致 非同向性 調整。
第三 Scale 種方法會結合單 SKPoint 一值中的兩個縮放比例:
public void Scale (SKPoint size)
第四 Scale 個方法將會很快描述。
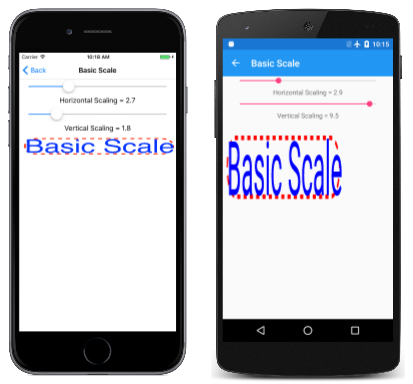
[ 基本小數字數 ] 頁面示範 Scale 方法。 BasicScalePage.xaml 檔案包含兩Slider個元素,可讓您選取介於 0 到 10 之間的水準和垂直縮放比例。 BasicScalePage.xaml.cs程式代碼後置檔案會使用這些值呼叫Scale,再顯示以虛線繪製的圓角矩形,並調整大小以符合畫布左上角的某些文字:
void OnCanvasViewPaintSurface(object sender, SKPaintSurfaceEventArgs args)
{
    SKImageInfo info = args.Info;
    SKSurface surface = args.Surface;
    SKCanvas canvas = surface.Canvas;

    canvas.Clear(SKColors.SkyBlue);

    using (SKPaint strokePaint = new SKPaint
    {
        Style = SKPaintStyle.Stroke,
        Color = SKColors.Red,
        StrokeWidth = 3,
        PathEffect = SKPathEffect.CreateDash(new float[] {  7, 7 }, 0)
    })
    using (SKPaint textPaint = new SKPaint
    {
        Style = SKPaintStyle.Fill,
        Color = SKColors.Blue,
        TextSize = 50
    })
    {
        canvas.Scale((float)xScaleSlider.Value,
                     (float)yScaleSlider.Value);

        SKRect textBounds = new SKRect();
        textPaint.MeasureText(Title, ref textBounds);

        float margin = 10;
        SKRect borderRect = SKRect.Create(new SKPoint(margin, margin), textBounds.Size);
        canvas.DrawRoundRect(borderRect, 20, 20, strokePaint);
        canvas.DrawText(Title, margin, -textBounds.Top + margin, textPaint);
    }
}
您可能想知道:調整因數如何影響 從 方法SKPaint傳MeasureText回的值? 答案是:根本不是。 Scale 是的 SKCanvas方法。 在您使用該物件在畫布上呈現某專案之前,它不會影響您使用物件執行 SKPaint 的任何動作。
如您所見,呼叫之後 Scale 繪製的所有專案會按比例增加:
文字、虛線寬度、該行的虛線長度、圓角的圓角,以及畫布左邊緣和圓角之間的 10 像素邊界,以及圓角的矩形全都受限於相同的縮放比例。
重要
通用 Windows 平台 無法正確轉譯異向性縮放的文字。
單向縮放比例會使筆劃寬度因水平軸和垂直軸對齊的線條而不同。 (這也是從此頁面的第一個圖像中顯而易見的。如果您不希望筆劃寬度受到縮放比例的影響,請將它設定為0,不論設定為何 Scale ,它一律會是一個像素寬。
縮放比例相對於畫布左上角。 這可能是您想要的,但可能不是。 假設您想要將文字和矩形放置在畫布上的其他地方,而您想要相對於其中心來縮放它。 在此情況下,您可以使用 方法的第四個版本 Scale ,其中包含兩個額外的參數來指定縮放中心:
public void Scale (Single sx, Single sy, Single px, Single py)
與參數會定義有時稱為縮放中心但 SkiaSharp 檔中稱為樞紐點的點。pypx 這是相對於畫布左上角的點,不受縮放比例影響。 所有縮放比例都會相對於該中心發生。
[置 中尺規 ] 頁面會顯示其運作方式。 處理程式 PaintSurface 類似於 基本縮放 程式,不同之處在於 margin 值會以水準方式將文字置中,這表示程式在直向模式中效果最佳:
void OnCanvasViewPaintSurface(object sender, SKPaintSurfaceEventArgs args)
{
    SKImageInfo info = args.Info;
    SKSurface surface = args.Surface;
    SKCanvas canvas = surface.Canvas;

    canvas.Clear(SKColors.SkyBlue);

    using (SKPaint strokePaint = new SKPaint
    {
        Style = SKPaintStyle.Stroke,
        Color = SKColors.Red,
        StrokeWidth = 3,
        PathEffect = SKPathEffect.CreateDash(new float[] { 7, 7 }, 0)
    })
    using (SKPaint textPaint = new SKPaint
    {
        Style = SKPaintStyle.Fill,
        Color = SKColors.Blue,
        TextSize = 50
    })
    {
        SKRect textBounds = new SKRect();
        textPaint.MeasureText(Title, ref textBounds);
        float margin = (info.Width - textBounds.Width) / 2;

        float sx = (float)xScaleSlider.Value;
        float sy = (float)yScaleSlider.Value;
        float px = margin + textBounds.Width / 2;
        float py = margin + textBounds.Height / 2;

        canvas.Scale(sx, sy, px, py);

        SKRect borderRect = SKRect.Create(new SKPoint(margin, margin), textBounds.Size);
        canvas.DrawRoundRect(borderRect, 20, 20, strokePaint);
        canvas.DrawText(Title, margin, -textBounds.Top + margin, textPaint);
    }
}
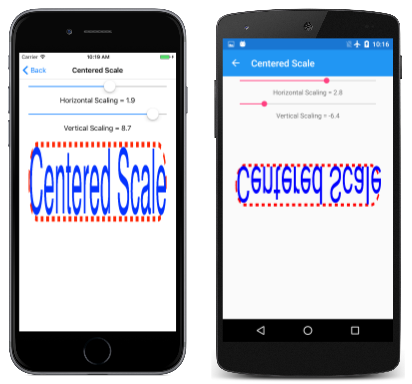
圓角矩形的左上角是位於 margin 畫布左邊的圖元,而 margin 像素則位於頂端。 方法的最後兩個自變數 Scale 會設定為這些值,加上文字的寬度和高度,這也是圓角矩形的寬度和高度。 這表示所有縮放比例都相對於該矩形的中心:
Slider此程式中的專案範圍為 –10 到 10。 如您所見,垂直縮放的負值(例如在中央的Android畫面上)會導致物件繞著經過縮放中心的水平軸翻轉。 水平縮放的負值(例如右邊的 UWP 畫面中)會導致物件繞著垂直軸翻轉,而垂直軸會經過縮放中心。
具有樞紐點的方法 Scale 版本是一系列三 Translate 個 和 Scale 呼叫的快捷方式。 您可以藉由以下列方式取代 Scale [ 置中小 數字數] 頁面中的 方法,來查看其運作方式:
canvas.Translate(-px, -py);
這些是樞紐點座標的負數。
現在再次執行程式。 您會看到矩形和文字已移位,讓中央位於畫布左上角。 你幾乎看不到它。 滑桿當然無法運作,因為現在程式完全不會調整。
現在,在該呼叫之前Translate新增基本Scale呼叫 (不含縮放中心) :
canvas.Scale(sx, sy);
canvas.Translate(–px, –py);
如果您在其他圖形程式設計系統中熟悉此練習,您可能會認為這是錯誤的,但不是。 Skia 處理後續轉換呼叫的方式與您可能熟悉的內容稍有不同。
隨著連續 Scale 和 Translate 呼叫,圓角矩形的中心仍在左上角,但您現在可以相對於畫布左上角來調整它,這也是圓角矩形的中心。
現在,在該 Scale 呼叫之前,使用置中值新增另一個 Translate 呼叫:
canvas.Translate(px, py);
canvas.Scale(sx, sy);
canvas.Translate(–px, –py);
這會將縮放結果移回原始位置。 這三個呼叫相當於:
canvas.Scale(sx, sy, px, py);
個別轉換會複合,讓轉換公式總計如下:
x' = sx ·(x – px) + px
y' = sy ·(y – py) + py
請記住,和 sy 的預設值sx為1。 很容易說服自己,這些公式不會轉換樞紐點(px、py)。 它會維持在與畫布相對的相同位置。
當您合併 Translate 和 Scale 呼叫時,順序很重要。 Translate如果 之後,Scale轉譯因數會透過縮放因數有效地調整。 Translate如果 位於 之前Scale,則不會縮放翻譯因數。 當轉換矩陣的主題引入時,這個程式會變得更清楚(儘管數學更數學)。
類別 SKPath 會定義只讀 Bounds 屬性,這個屬性會傳回 SKRect 定義路徑中座標的範圍。 例如,從稍早建立的 hendecagram 路徑取得 屬性時Bounds,矩形的 和 Top 屬性大約是 –100,Left和 屬性大約是 100,Right而 Width 和 BottomHeight 屬性大約是 200。 (大部分的實際值都少一點,因為星星的點是由半徑為 100 的圓圈所定義,但只有頂點與水準或垂直軸平行。
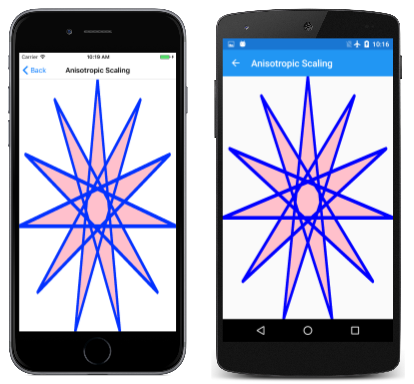
這項資訊的可用性表示,應該可以衍生縮放比例,並轉譯適合調整畫布大小路徑的因素。 [ 非等向性縮放 ] 頁面會以 11 點的星形來示範這一點。 非等向性尺規表示其水準方向和垂直方向不相等,這表示星形不會保留其原始外觀比例。 以下是處理程式中的 PaintSurface 相關程式代碼:
SKPath path = HendecagramPage.HendecagramPath;
SKRect pathBounds = path.Bounds;

using (SKPaint fillPaint = new SKPaint
{
    Style = SKPaintStyle.Fill,
    Color = SKColors.Pink
})
using (SKPaint strokePaint = new SKPaint
{
    Style = SKPaintStyle.Stroke,
    Color = SKColors.Blue,
    StrokeWidth = 3,
    StrokeJoin = SKStrokeJoin.Round
})
{
    canvas.Scale(info.Width / pathBounds.Width,
                 info.Height / pathBounds.Height);
    canvas.Translate(-pathBounds.Left, -pathBounds.Top);

    canvas.DrawPath(path, fillPaint);
    canvas.DrawPath(path, strokePaint);
}
矩形會在此程式 pathBounds 代碼頂端附近取得,稍後再搭配呼叫中 Scale 畫布的寬度和高度使用。 當呼叫由 DrawPath 呼叫轉譯路徑時,該呼叫本身會縮放路徑的座標,但星號會置中於畫布右上角。 它需要向下和向左移。 這是呼叫的 Translate 作業。 的這兩個屬性 pathBounds 大約為 –100,因此翻譯因數約為 100。 Translate由於呼叫是在呼叫之後Scale,這些值會透過縮放比例有效地調整,因此會將星形的中心移至畫布的中心:
另一種您可以思考 Scale 和 Translate 呼叫的方式是決定反向順序的效果:呼叫 Translate 會移動路徑,使其在畫布左上角變成完全可見,但面向。 方法 Scale 接著會讓該星形相對於左上角變大。
實際上,星形似乎比畫布大一點。 問題是筆劃寬度。 的 BoundsSKPath 屬性表示路徑中編碼之座標的維度,這就是程式用來調整座標的維度。 當路徑以特定的筆劃寬度轉譯時,轉譯的路徑會大於畫布。
若要修正此問題,您需要對此進行補償。 此程式中的一個簡單方法是在呼叫之前 Scale 新增下列語句:
pathBounds.Inflate(strokePaint.StrokeWidth / 2,
                   strokePaint.StrokeWidth / 2);
這會將矩形增加 pathBounds 1.5 個單位在所有四邊。 只有當筆觸聯結四捨五入時,這是合理的解決方案。 誤點聯結可能更長,而且難以計算。
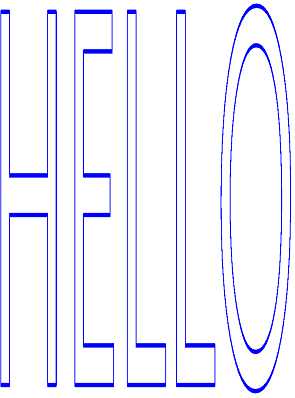
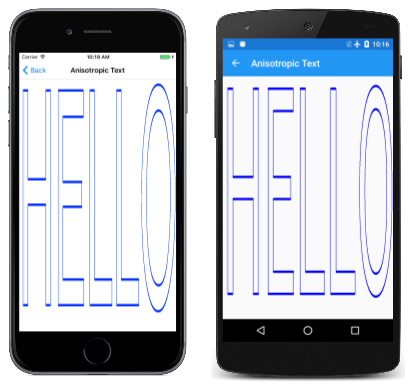
您也可以使用與文字類似的技術,如 Anisotropic Text 頁面所示範。 以下是 類別AnisotropicTextPage中處理程式的相關部份PaintSurface:
using (SKPaint textPaint = new SKPaint
{
    Style = SKPaintStyle.Stroke,
    Color = SKColors.Blue,
    StrokeWidth = 0.1f,
    StrokeJoin = SKStrokeJoin.Round
})
{
    SKRect textBounds = new SKRect();
    textPaint.MeasureText("HELLO", ref textBounds);

    // Inflate bounds by the stroke width
    textBounds.Inflate(textPaint.StrokeWidth / 2,
                       textPaint.StrokeWidth / 2);

    canvas.Scale(info.Width / textBounds.Width,
                 info.Height / textBounds.Height);
    canvas.Translate(-textBounds.Left, -textBounds.Top);

    canvas.DrawText("HELLO", 0, 0, textPaint);
}
這是類似的邏輯,文字會根據傳 MeasureText 回的文字界限矩形來擴充到頁面的大小(這比實際文字要大一點):
如果您需要保留圖形對象的外觀比例,您會想要使用等向性縮放。 [Isotropic Scaling] 頁面會針對 11 點的星形示範這個值。 從概念上講,在頁面中央顯示圖形化物件與等向性縮放的步驟如下:
- 將圖形物件的中央轉譯為左上角。
- 根據水平和垂直頁面維度下限除以圖形化物件維度來縮放物件。
- 將縮放物件的中心轉譯成頁面的中心。
會 IsotropicScalingPage 以反向順序執行這些步驟,再顯示星號:
void OnCanvasViewPaintSurface(object sender, SKPaintSurfaceEventArgs args)
{
    SKImageInfo info = args.Info;
    SKSurface surface = args.Surface;
    SKCanvas canvas = surface.Canvas;

    canvas.Clear();

    SKPath path = HendecagramArrayPage.HendecagramPath;
    SKRect pathBounds = path.Bounds;

    using (SKPaint fillPaint = new SKPaint())
    {
        fillPaint.Style = SKPaintStyle.Fill;

        float scale = Math.Min(info.Width / pathBounds.Width,
                               info.Height / pathBounds.Height);

        for (int i = 0; i <= 10; i++)
        {
            fillPaint.Color = new SKColor((byte)(255 * (10 - i) / 10),
                                          0,
                                          (byte)(255 * i / 10));
            canvas.Save();
            canvas.Translate(info.Width / 2, info.Height / 2);
            canvas.Scale(scale);
            canvas.Translate(-pathBounds.MidX, -pathBounds.MidY);
            canvas.DrawPath(path, fillPaint);
            canvas.Restore();

            scale *= 0.9f;
        }
    }
}
程序代碼也會再顯示星號 10 次,每次減少縮放比例 10%,並逐漸將色彩從紅色變更為藍色:
![[Isotropic 縮放] 頁面的三重螢幕快照](scale-images/isotropicscaling-small.png)