裁剪 SkiaSharp 位圖
建立和繪製 SkiaSharp 位圖一文說明如何將SKBitmap對象傳遞至建SKCanvas構函式。 在該畫布上呼叫的任何繪圖方法都會讓圖形在點陣圖上呈現。 這些繪圖方法包括 DrawBitmap,這表示這項技術允許將部分或所有點陣圖傳輸至另一個位圖,或許套用轉換。
您可以使用這項技術來裁剪點陣圖,方法是使用來源和目的矩形呼叫 DrawBitmap 方法:
canvas.DrawBitmap(bitmap, sourceRect, destRect);
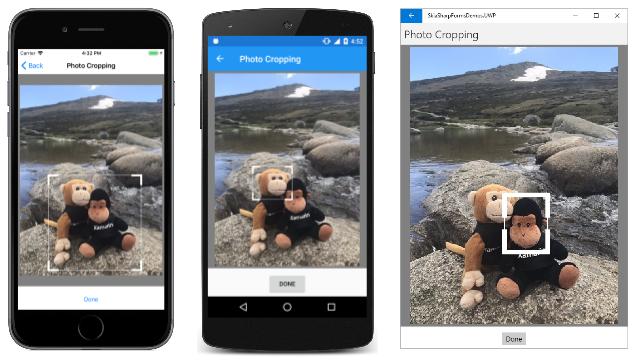
不過,實作裁剪的應用程式通常會提供介面,讓用戶以互動方式選取裁剪矩形:
本文著重於該介面。
封裝裁剪矩形
在名為 CroppingRectangle的類別中隔離一些裁剪邏輯會很有説明。 建構函式參數包含最大矩形,通常是裁剪的位圖大小,以及選擇性的外觀比例。 建構函式會先定義初始裁剪矩形,這會在類型的 SKRect屬性中Rect公開。 這個初始裁剪矩形是位圖矩形的寬度和高度的 80%,但如果指定外觀比例,則會加以調整:
class CroppingRectangle
{
    ···
    SKRect maxRect;             // generally the size of the bitmap
    float? aspectRatio;

    public CroppingRectangle(SKRect maxRect, float? aspectRatio = null)
    {
        this.maxRect = maxRect;
        this.aspectRatio = aspectRatio;

        // Set initial cropping rectangle
        Rect = new SKRect(0.9f * maxRect.Left + 0.1f * maxRect.Right,
                          0.9f * maxRect.Top + 0.1f * maxRect.Bottom,
                          0.1f * maxRect.Left + 0.9f * maxRect.Right,
                          0.1f * maxRect.Top + 0.9f * maxRect.Bottom);

        // Adjust for aspect ratio
        if (aspectRatio.HasValue)
        {
            SKRect rect = Rect;
            float aspect = aspectRatio.Value;

            if (rect.Width > aspect * rect.Height)
            {
                float width = aspect * rect.Height;
                rect.Left = (maxRect.Width - width) / 2;
                rect.Right = rect.Left + width;
            }
            else
            {
                float height = rect.Width / aspect;
                rect.Top = (maxRect.Height - height) / 2;
                rect.Bottom = rect.Top + height;
            }

            Rect = rect;
        }
    }

    public SKRect Rect { set; get; }
    ···
}
其中一個也提供有用的資訊 CroppingRectangle 是值數位 SKPoint ,對應到裁剪矩形的四個角落,順序為左上角、右下、右下和左下:
class CroppingRectangle
{
    ···
    public SKPoint[] Corners
    {
        get
        {
            return new SKPoint[]
            {
                new SKPoint(Rect.Left, Rect.Top),
                new SKPoint(Rect.Right, Rect.Top),
                new SKPoint(Rect.Right, Rect.Bottom),
                new SKPoint(Rect.Left, Rect.Bottom)
            };
        }
    }
    ···
}
這個陣列方法,稱為 HitTest。 參數 SKPoint 是對應至手指觸控或按下滑鼠的點。 方法會傳回索引(0、1、2 或 3),其對應至手指或滑鼠指標所觸碰的角落,在 參數指定的 radius 距離內:
class CroppingRectangle
{
    ···
    public int HitTest(SKPoint point, float radius)
    {
        SKPoint[] corners = Corners;

        for (int index = 0; index < corners.Length; index++)
        {
            SKPoint diff = point - corners[index];

            if ((float)Math.Sqrt(diff.X * diff.X + diff.Y * diff.Y) < radius)
            {
                return index;
            }
        }

        return -1;
    }
    ···
}
如果觸控或滑鼠點不在任何角落的單位內 radius ,此方法會傳回 –1。
中的 CroppingRectangle 最後一個方法稱為 MoveCorner,這是為了回應觸控或滑鼠移動而呼叫。 這兩個參數表示要移動之角落的索引,以及該角落的新位置。 方法的上半部會根據邊角的新位置調整裁剪矩形,但一律在 的界限 maxRect內,也就是點陣圖的大小。 此邏輯也會考慮 MINIMUM 欄位,以避免將裁剪矩形折疊成無專案:
class CroppingRectangle
{
    const float MINIMUM = 10;   // pixels width or height
    ···
    public void MoveCorner(int index, SKPoint point)
    {
        SKRect rect = Rect;

        switch (index)
        {
            case 0: // upper-left
                rect.Left = Math.Min(Math.Max(point.X, maxRect.Left), rect.Right - MINIMUM);
                rect.Top = Math.Min(Math.Max(point.Y, maxRect.Top), rect.Bottom - MINIMUM);
                break;

            case 1: // upper-right
                rect.Right = Math.Max(Math.Min(point.X, maxRect.Right), rect.Left + MINIMUM);
                rect.Top = Math.Min(Math.Max(point.Y, maxRect.Top), rect.Bottom - MINIMUM);
                break;

            case 2: // lower-right
                rect.Right = Math.Max(Math.Min(point.X, maxRect.Right), rect.Left + MINIMUM);
                rect.Bottom = Math.Max(Math.Min(point.Y, maxRect.Bottom), rect.Top + MINIMUM);
                break;

            case 3: // lower-left
                rect.Left = Math.Min(Math.Max(point.X, maxRect.Left), rect.Right - MINIMUM);
                rect.Bottom = Math.Max(Math.Min(point.Y, maxRect.Bottom), rect.Top + MINIMUM);
                break;
        }

        // Adjust for aspect ratio
        if (aspectRatio.HasValue)
        {
            float aspect = aspectRatio.Value;

            if (rect.Width > aspect * rect.Height)
            {
                float width = aspect * rect.Height;

                switch (index)
                {
                    case 0:
                    case 3: rect.Left = rect.Right - width; break;
                    case 1:
                    case 2: rect.Right = rect.Left + width; break;
                }
            }
            else
            {
                float height = rect.Width / aspect;

                switch (index)
                {
                    case 0:
                    case 1: rect.Top = rect.Bottom - height; break;
                    case 2:
                    case 3: rect.Bottom = rect.Top + height; break;
                }
            }
        }

        Rect = rect;
    }
}
方法的下半部會針對選擇性外觀比例進行調整。
請記住,此類別的所有專案都是以像素為單位。
僅用於裁剪的畫布檢視
CroppingRectangle您剛才看到的類別是由 衍生自 SKCanvasView的 PhotoCropperCanvasView 類別所使用。 此類別負責顯示點陣圖和裁剪矩形,以及處理變更裁剪矩形的觸控或滑鼠事件。
建 PhotoCropperCanvasView 構函式需要位圖。 外觀比例是選擇性的。 建構函式會根據此位圖和外觀比例來具現化類型的 CroppingRectangle 物件,並將它儲存為欄位:
class PhotoCropperCanvasView : SKCanvasView
{
    ···
    SKBitmap bitmap;
    CroppingRectangle croppingRect;
    ···
    public PhotoCropperCanvasView(SKBitmap bitmap, float? aspectRatio = null)
    {
        this.bitmap = bitmap;

        SKRect bitmapRect = new SKRect(0, 0, bitmap.Width, bitmap.Height);
        croppingRect = new CroppingRectangle(bitmapRect, aspectRatio);
        ···
    }
    ···
}
因為這個類別衍生自 SKCanvasView,所以不需要安裝 事件的處理程式 PaintSurface 。 您可以改為覆寫其 OnPaintSurface 方法。 方法會顯示點陣圖,並使用儲存為欄位的 SKPaint 幾個物件來繪製目前的裁剪矩形:
class PhotoCropperCanvasView : SKCanvasView
{
    const int CORNER = 50;      // pixel length of cropper corner
    ···
    SKBitmap bitmap;
    CroppingRectangle croppingRect;
    SKMatrix inverseBitmapMatrix;
    ···
    // Drawing objects
    SKPaint cornerStroke = new SKPaint
    {
        Style = SKPaintStyle.Stroke,
        Color = SKColors.White,
        StrokeWidth = 10
    };

    SKPaint edgeStroke = new SKPaint
    {
        Style = SKPaintStyle.Stroke,
        Color = SKColors.White,
        StrokeWidth = 2
    };
    ···
    protected override void OnPaintSurface(SKPaintSurfaceEventArgs args)
    {
        base.OnPaintSurface(args);

        SKImageInfo info = args.Info;
        SKSurface surface = args.Surface;
        SKCanvas canvas = surface.Canvas;

        canvas.Clear(SKColors.Gray);

        // Calculate rectangle for displaying bitmap
        float scale = Math.Min((float)info.Width / bitmap.Width, (float)info.Height / bitmap.Height);
        float x = (info.Width - scale * bitmap.Width) / 2;
        float y = (info.Height - scale * bitmap.Height) / 2;
        SKRect bitmapRect = new SKRect(x, y, x + scale * bitmap.Width, y + scale * bitmap.Height);
        canvas.DrawBitmap(bitmap, bitmapRect);

        // Calculate a matrix transform for displaying the cropping rectangle
        SKMatrix bitmapScaleMatrix = SKMatrix.MakeIdentity();
        bitmapScaleMatrix.SetScaleTranslate(scale, scale, x, y);

        // Display rectangle
        SKRect scaledCropRect = bitmapScaleMatrix.MapRect(croppingRect.Rect);
        canvas.DrawRect(scaledCropRect, edgeStroke);

        // Display heavier corners
        using (SKPath path = new SKPath())
        {
            path.MoveTo(scaledCropRect.Left, scaledCropRect.Top + CORNER);
            path.LineTo(scaledCropRect.Left, scaledCropRect.Top);
            path.LineTo(scaledCropRect.Left + CORNER, scaledCropRect.Top);

            path.MoveTo(scaledCropRect.Right - CORNER, scaledCropRect.Top);
            path.LineTo(scaledCropRect.Right, scaledCropRect.Top);
            path.LineTo(scaledCropRect.Right, scaledCropRect.Top + CORNER);

            path.MoveTo(scaledCropRect.Right, scaledCropRect.Bottom - CORNER);
            path.LineTo(scaledCropRect.Right, scaledCropRect.Bottom);
            path.LineTo(scaledCropRect.Right - CORNER, scaledCropRect.Bottom);

            path.MoveTo(scaledCropRect.Left + CORNER, scaledCropRect.Bottom);
            path.LineTo(scaledCropRect.Left, scaledCropRect.Bottom);
            path.LineTo(scaledCropRect.Left, scaledCropRect.Bottom - CORNER);

            canvas.DrawPath(path, cornerStroke);
        }

        // Invert the transform for touch tracking
        bitmapScaleMatrix.TryInvert(out inverseBitmapMatrix);
    }
    ···
}
類別中的 CroppingRectangle 程式代碼會以點陣圖圖大小為基底裁剪矩形。 不過,類別的 PhotoCropperCanvasView 位圖顯示會根據顯示區域的大小來縮放。 覆bitmapScaleMatrixOnPaintSurface寫中計算的 ,會從點陣圖圖元對應到顯示點陣圖的大小和位置。 接著,這個矩陣會用來轉換裁剪矩形,以便相對於點陣圖顯示。
覆寫的最後 OnPaintSurface 一行會採用的反函數 bitmapScaleMatrix ,並將它儲存為 inverseBitmapMatrix 欄位。 這用於觸控處理。
TouchEffect物件會具現化為欄位,而建構函式會將處理程式附加至 事件,但TouchEffect必須新增至TouchActionEffects衍生專案的SKCanvasView父代集合,如此一來,就會在OnParentSet覆寫中完成:
class PhotoCropperCanvasView : SKCanvasView
{
    ···
    const int RADIUS = 100;     // pixel radius of touch hit-test
    ···
    CroppingRectangle croppingRect;
    SKMatrix inverseBitmapMatrix;

    // Touch tracking
    TouchEffect touchEffect = new TouchEffect();
    struct TouchPoint
    {
        public int CornerIndex { set; get; }
        public SKPoint Offset { set; get; }
    }

    Dictionary<long, TouchPoint> touchPoints = new Dictionary<long, TouchPoint>();
    ···
    public PhotoCropperCanvasView(SKBitmap bitmap, float? aspectRatio = null)
    {
        ···
        touchEffect.TouchAction += OnTouchEffectTouchAction;
    }
    ···
    protected override void OnParentSet()
    {
        base.OnParentSet();

        // Attach TouchEffect to parent view
        Parent.Effects.Add(touchEffect);
    }
    ···
    void OnTouchEffectTouchAction(object sender, TouchActionEventArgs args)
    {
        SKPoint pixelLocation = ConvertToPixel(args.Location);
        SKPoint bitmapLocation = inverseBitmapMatrix.MapPoint(pixelLocation);

        switch (args.Type)
        {
            case TouchActionType.Pressed:
                // Convert radius to bitmap/cropping scale
                float radius = inverseBitmapMatrix.ScaleX * RADIUS;

                // Find corner that the finger is touching
                int cornerIndex = croppingRect.HitTest(bitmapLocation, radius);

                if (cornerIndex != -1 && !touchPoints.ContainsKey(args.Id))
                {
                    TouchPoint touchPoint = new TouchPoint
                    {
                        CornerIndex = cornerIndex,
                        Offset = bitmapLocation - croppingRect.Corners[cornerIndex]
                    };

                    touchPoints.Add(args.Id, touchPoint);
                }
                break;

            case TouchActionType.Moved:
                if (touchPoints.ContainsKey(args.Id))
                {
                    TouchPoint touchPoint = touchPoints[args.Id];
                    croppingRect.MoveCorner(touchPoint.CornerIndex,
                                            bitmapLocation - touchPoint.Offset);
                    InvalidateSurface();
                }
                break;

            case TouchActionType.Released:
            case TouchActionType.Cancelled:
                if (touchPoints.ContainsKey(args.Id))
                {
                    touchPoints.Remove(args.Id);
                }
                break;
        }
    }

    SKPoint ConvertToPixel(Xamarin.Forms.Point pt)
    {
        return new SKPoint((float)(CanvasSize.Width * pt.X / Width),
                           (float)(CanvasSize.Height * pt.Y / Height));
    }
}
處理程式處理的 TouchAction 觸控事件是以裝置無關的單位。 這些必須先使用 ConvertToPixel 類別底部的 方法轉換成圖元,然後使用 轉換成 CroppingRectangle 單位 inverseBitmapMatrix。
針對 Pressed 事件,處理程式會 TouchAction 呼叫 HitTest 的 CroppingRectangle方法。 如果傳回 –1 以外的索引,則會操作裁剪矩形的其中一個角落。 該索引和從角落實際接觸點的位移會儲存在 物件中 TouchPoint ,並新增至 touchPoints 字典。
Moved針對事件,會MoveCorner呼叫的方法來CroppingRectangle移動角落,並可能調整外觀比例。
使用的程式 PhotoCropperCanvasView 隨時都可以存取 CroppedBitmap 屬性。 這個屬性會使用 Rect 的 CroppingRectangle 屬性來建立裁剪大小的新位圖。 使用目的地和來源矩形的 版本 DrawBitmap ,然後擷取原始點陣圖的子集:
class PhotoCropperCanvasView : SKCanvasView
{
    ···
    SKBitmap bitmap;
    CroppingRectangle croppingRect;
    ···
    public SKBitmap CroppedBitmap
    {
        get
        {
            SKRect cropRect = croppingRect.Rect;
            SKBitmap croppedBitmap = new SKBitmap((int)cropRect.Width,
                                                  (int)cropRect.Height);
            SKRect dest = new SKRect(0, 0, cropRect.Width, cropRect.Height);
            SKRect source = new SKRect(cropRect.Left, cropRect.Top,
                                       cropRect.Right, cropRect.Bottom);

            using (SKCanvas canvas = new SKCanvas(croppedBitmap))
            {
                canvas.DrawBitmap(bitmap, source, dest);
            }

            return croppedBitmap;
        }
    }
    ···
}
裝載相片裁剪工具畫布檢視
在處理裁剪邏輯的這兩個類別中, 範例應用程式中的 [相片裁剪 ] 頁面幾乎沒有工作要做。 XAML 檔案會具現化 Grid 來裝載 PhotoCropperCanvasView 和 [完成] 按鈕:
<ContentPage xmlns="http://xamarin.com/schemas/2014/forms"
             xmlns:x="http://schemas.microsoft.com/winfx/2009/xaml"
             x:Class="SkiaSharpFormsDemos.Bitmaps.PhotoCroppingPage"
             Title="Photo Cropping">
    <Grid>
        <Grid.RowDefinitions>
            <RowDefinition Height="*" />
            <RowDefinition Height="Auto" />
        </Grid.RowDefinitions>

        <Grid x:Name="canvasViewHost"
              Grid.Row="0"
              BackgroundColor="Gray"
              Padding="5" />

        <Button Text="Done"
                Grid.Row="1"
                HorizontalOptions="Center"
                Margin="5"
                Clicked="OnDoneButtonClicked" />
    </Grid>
</ContentPage>
PhotoCropperCanvasView無法在 XAML 檔案中具現化 ,因為它需要 類型的SKBitmap參數。
相反地,會 PhotoCropperCanvasView 使用其中一個資源點陣圖,在程式碼後置檔案的建構函式中具現化 :
public partial class PhotoCroppingPage : ContentPage
{
    PhotoCropperCanvasView photoCropper;
    SKBitmap croppedBitmap;

    public PhotoCroppingPage ()
    {
        InitializeComponent ();

        SKBitmap bitmap = BitmapExtensions.LoadBitmapResource(GetType(),
            "SkiaSharpFormsDemos.Media.MountainClimbers.jpg");

        photoCropper = new PhotoCropperCanvasView(bitmap);
        canvasViewHost.Children.Add(photoCropper);
    }

    void OnDoneButtonClicked(object sender, EventArgs args)
    {
        croppedBitmap = photoCropper.CroppedBitmap;

        SKCanvasView canvasView = new SKCanvasView();
        canvasView.PaintSurface += OnCanvasViewPaintSurface;
        Content = canvasView;
    }

    void OnCanvasViewPaintSurface(object sender, SKPaintSurfaceEventArgs args)
    {
        SKImageInfo info = args.Info;
        SKSurface surface = args.Surface;
        SKCanvas canvas = surface.Canvas;

        canvas.Clear();
        canvas.DrawBitmap(croppedBitmap, info.Rect, BitmapStretch.Uniform);
    }
}
然後,使用者可以操作裁剪矩形:
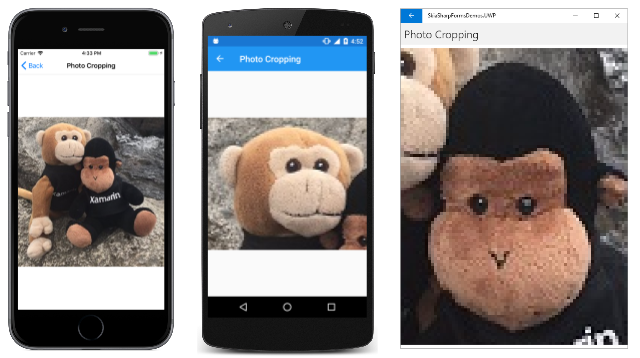
定義良好的裁剪矩形時,按兩下 [ 完成] 按鈕。 處理程式 Clicked 會從 CroppedBitmap 的 PhotoCropperCanvasView屬性取得裁剪的點陣圖,並將頁面的所有內容取代為顯示此裁剪點陣圖的新 SKCanvasView 物件:
請嘗試將 的第二個自變數 PhotoCropperCanvasView 設定為 1.78f (例如):
photoCropper = new PhotoCropperCanvasView(bitmap, 1.78f);
您會看到裁剪矩形僅限於高畫質電視的 16 到 9 外觀比例特性。
將點陣圖分割成磚
Xamarin.Forms一本著名的14-15謎題的版本出現在第22章的建立行動應用程式與Xamarin.Forms,可以下載為XamagonXuzzle。 然而,當它基於您自己的照片庫的圖像時,謎題變得更加有趣(而且往往更具挑戰性)。
這個版本的 14-15 拼圖是範例應用程式的一部分,由一系列標題為 「相片謎題」的頁面組成。
PhotoPuzzlePage1.xaml 檔案包含 Button:
<ContentPage xmlns="http://xamarin.com/schemas/2014/forms"
             xmlns:x="http://schemas.microsoft.com/winfx/2009/xaml"
             x:Class="SkiaSharpFormsDemos.Bitmaps.PhotoPuzzlePage1"
             Title="Photo Puzzle">

    <Button Text="Pick a photo from your library"
            VerticalOptions="CenterAndExpand"
            HorizontalOptions="CenterAndExpand"
            Clicked="OnPickButtonClicked"/>

</ContentPage>
程序代碼後置檔案會實作 Clicked 使用 IPhotoLibrary 相依性服務的處理程式,讓使用者從相片庫挑選相片:
public partial class PhotoPuzzlePage1 : ContentPage
{
    public PhotoPuzzlePage1 ()
    {
        InitializeComponent ();
    }

    async void OnPickButtonClicked(object sender, EventArgs args)
    {
        IPhotoLibrary photoLibrary = DependencyService.Get<IPhotoLibrary>();
        using (Stream stream = await photoLibrary.PickPhotoAsync())
        {
            if (stream != null)
            {
                SKBitmap bitmap = SKBitmap.Decode(stream);

                await Navigation.PushAsync(new PhotoPuzzlePage2(bitmap));
            }
        }
    }
}
然後,方法會巡覽至 PhotoPuzzlePage2,並傳遞至所選取位圖的 constuctor。
從文檔庫選取的相片可能不是面向的,因為它出現在照片庫,但旋轉或顛倒。 (這特別是 iOS 裝置的問題。基於這個理由, PhotoPuzzlePage2 可讓您將影像旋轉成所需的方向。 XAML 檔案包含三個標示為 90° Right 的按鈕(即順時針)、 90° 左 鍵(逆時針),以及 [完成]。
程序代碼後置檔案會實作在SkiaSharp位陣圖上建立和繪製一文中顯示的點陣圖旋轉邏輯。 使用者可以順時針旋轉影像 90 度或逆時針旋轉任意次數:
public partial class PhotoPuzzlePage2 : ContentPage
{
    SKBitmap bitmap;

    public PhotoPuzzlePage2 (SKBitmap bitmap)
    {
        this.bitmap = bitmap;

        InitializeComponent ();
    }

    void OnCanvasViewPaintSurface(object sender, SKPaintSurfaceEventArgs args)
    {
        SKImageInfo info = args.Info;
        SKSurface surface = args.Surface;
        SKCanvas canvas = surface.Canvas;

        canvas.Clear();
        canvas.DrawBitmap(bitmap, info.Rect, BitmapStretch.Uniform);
    }

    void OnRotateRightButtonClicked(object sender, EventArgs args)
    {
        SKBitmap rotatedBitmap = new SKBitmap(bitmap.Height, bitmap.Width);

        using (SKCanvas canvas = new SKCanvas(rotatedBitmap))
        {
            canvas.Clear();
            canvas.Translate(bitmap.Height, 0);
            canvas.RotateDegrees(90);
            canvas.DrawBitmap(bitmap, new SKPoint());
        }

        bitmap = rotatedBitmap;
        canvasView.InvalidateSurface();
    }

    void OnRotateLeftButtonClicked(object sender, EventArgs args)
    {
        SKBitmap rotatedBitmap = new SKBitmap(bitmap.Height, bitmap.Width);

        using (SKCanvas canvas = new SKCanvas(rotatedBitmap))
        {
            canvas.Clear();
            canvas.Translate(0, bitmap.Width);
            canvas.RotateDegrees(-90);
            canvas.DrawBitmap(bitmap, new SKPoint());
        }

        bitmap = rotatedBitmap;
        canvasView.InvalidateSurface();
    }

    async void OnDoneButtonClicked(object sender, EventArgs args)
    {
        await Navigation.PushAsync(new PhotoPuzzlePage3(bitmap));
    }
}
當使用者按兩下 [完成] 按鈕時, Clicked 處理程式會巡覽至 PhotoPuzzlePage3,並在頁面的建構函式中傳遞最終旋轉的點陣圖。
PhotoPuzzlePage3 允許裁剪相片。 程式需要正方形位圖,才能分割成 4 位元組 4 的磚網格線。
PhotoPuzzlePage3.xaml 檔案包含 、Grid要裝載 PhotoCropperCanvasView的 ,以及另一個 Label[完成] 按鈕:
<ContentPage xmlns="http://xamarin.com/schemas/2014/forms"
             xmlns:x="http://schemas.microsoft.com/winfx/2009/xaml"
             x:Class="SkiaSharpFormsDemos.Bitmaps.PhotoPuzzlePage3"
             Title="Photo Puzzle">
    <Grid>
        <Grid.RowDefinitions>
            <RowDefinition Height="Auto" />
            <RowDefinition Height="*" />
            <RowDefinition Height="Auto" />
        </Grid.RowDefinitions>

        <Label Text="Crop the photo to a square"
               Grid.Row="0"
               FontSize="Large"
               HorizontalTextAlignment="Center"
               Margin="5" />

        <Grid x:Name="canvasViewHost"
              Grid.Row="1"
              BackgroundColor="Gray"
              Padding="5" />

        <Button Text="Done"
                Grid.Row="2"
                HorizontalOptions="Center"
                Margin="5"
                Clicked="OnDoneButtonClicked" />
    </Grid>
</ContentPage>
程序代碼後置檔案會具現化 PhotoCropperCanvasView ,並將點陣圖傳遞至其建構函式。 請注意,1 會當做第二個自變數傳遞至 PhotoCropperCanvasView。 此外觀比例 1 會強制裁剪矩形成為正方形:
public partial class PhotoPuzzlePage3 : ContentPage
{
    PhotoCropperCanvasView photoCropper;

    public PhotoPuzzlePage3(SKBitmap bitmap)
    {
        InitializeComponent ();

        photoCropper = new PhotoCropperCanvasView(bitmap, 1f);
        canvasViewHost.Children.Add(photoCropper);
    }

    async void OnDoneButtonClicked(object sender, EventArgs args)
    {
        SKBitmap croppedBitmap = photoCropper.CroppedBitmap;
        int width = croppedBitmap.Width / 4;
        int height = croppedBitmap.Height / 4;

        ImageSource[] imgSources = new ImageSource[15];

        for (int row = 0; row < 4; row++)
        {
            for (int col = 0; col < 4; col++)
            {
                // Skip the last one!
                if (row == 3 && col == 3)
                    break;

                // Create a bitmap 1/4 the width and height of the original
                SKBitmap bitmap = new SKBitmap(width, height);
                SKRect dest = new SKRect(0, 0, width, height);
                SKRect source = new SKRect(col * width, row * height, (col + 1) * width, (row + 1) * height);

                // Copy 1/16 of the original into that bitmap
                using (SKCanvas canvas = new SKCanvas(bitmap))
                {
                    canvas.DrawBitmap(croppedBitmap, source, dest);
                }

                imgSources[4 * row + col] = (SKBitmapImageSource)bitmap;
            }
        }

        await Navigation.PushAsync(new PhotoPuzzlePage4(imgSources));
    }
}
[完成] 按鈕處理程式會取得裁剪位圖的寬度和高度(這兩個值應該相同),然後將它分成 15 個不同的位陣圖,每個點陣圖都是原始的寬度和高度 1/4。 (未建立可能 16 個點陣圖的最後一個。具有 DrawBitmap 來源和目的矩形的方法,允許根據較大位圖的子集建立位圖。
轉換成 Xamarin.Forms 位圖
在 方法中 OnDoneButtonClicked ,為 15 點陣圖建立的陣列型態為 ImageSource:
ImageSource[] imgSources = new ImageSource[15];
ImageSourceXamarin.Forms是封裝位圖的基底類型。 幸運的是,SkiaSharp 允許從SkiaSharp位圖轉換成位圖 Xamarin.Forms 。 SkiaSharp.Views.Forms 元件會SKBitmapImageSource定義衍生自 ImageSource 的類別,但可以根據SkiaSharp SKBitmap 物件來建立。 SKBitmapImageSource甚至會定義 和之間的SKBitmapImageSource轉換,這就是物件以點陣圖的形式儲存在陣列Xamarin.Forms中的方式SKBitmap:SKBitmap
imgSources[4 * row + col] = (SKBitmapImageSource)bitmap;
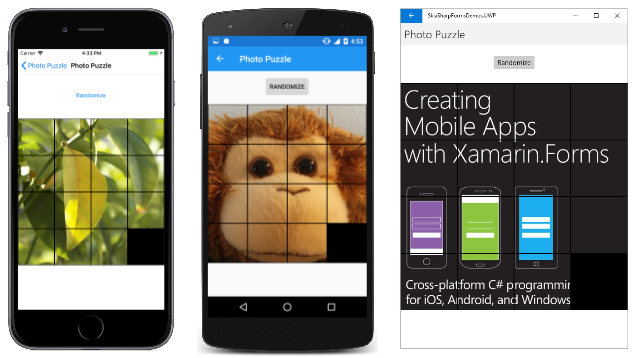
這個點陣陣陣陣會當做建構函式傳遞至 PhotoPuzzlePage4。 該頁面是完全 Xamarin.Forms 的,而且不會使用任何SkiaSharp。 它非常類似於 XamagonXuzzle,因此不會在這裡描述,但它會顯示您選取的相片分成 15 個方形磚:
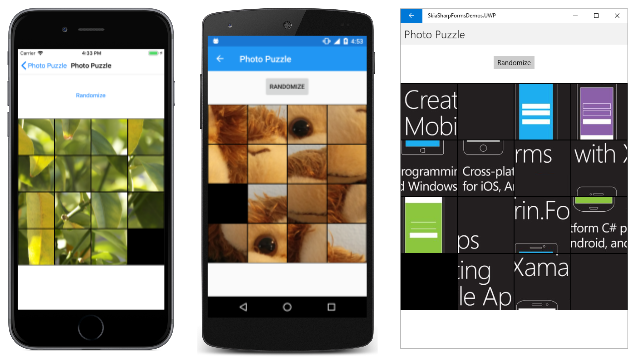
按下 [ 隨機化] 按鈕會混合所有磚:
現在您可以將它們放回正確的順序。 您可以點選與空白方塊位於相同數據列或數據行中的任何磚,將它們移至空白方塊。
