Xamarin.Mac 中的警示
本文涵蓋在 Xamarin.Mac 應用程式中使用警示。 其描述如何從 C# 程式代碼建立和顯示警示,以及回應用戶互動。
在 Xamarin.Mac 應用程式中使用 C# 和 .NET 時,您可以存取開發人員在 和 Xcode 中Objective-C運作的相同警示。
警示是特殊類型的對話框,會在發生嚴重問題(例如錯誤)或警告時出現(例如準備刪除檔案)。 因為警示是對話框,所以也需要用戶回應才能關閉。
在本文中,我們將討論在 Xamarin.Mac 應用程式中使用警示的基本概念。
警示簡介
警示是特殊類型的對話框,會在發生嚴重問題(例如錯誤)或警告時出現(例如準備刪除檔案)。 因為警示會中斷使用者,因為用戶必須先關閉,使用者才能繼續執行其工作,因此請避免顯示警示,除非絕對必要。
Apple 建議下列指導方針:
- 不要只使用警示來提供用戶資訊。
- 請勿顯示常見可復原動作的警示。 即使這種情況可能會導致數據遺失。
- 如果情況值得警示,請避免使用任何其他UI元素或方法來顯示它。
- 警告圖示應該謹慎使用。
- 在警示訊息中清楚且簡潔地描述警示情況。
- 默認按鈕名稱應對應至警示訊息中所描述的動作。
如需詳細資訊,請參閱 Apple OS X Human Interface Guidelines 的警示一節
警示的結構
如上所述,當發生嚴重問題或警告潛在數據遺失時,應該向用戶顯示警示(例如關閉未儲存的檔案)。 在 Xamarin.Mac 中,會在 C# 程式代碼中建立警示,例如:
var alert = new NSAlert () {
  AlertStyle = NSAlertStyle.Critical,
  InformativeText = "We need to save the document here...",
  MessageText = "Save Document",
};
alert.RunModal ();
上述程式代碼會顯示警示,其中包含警告圖示、標題、警告訊息和單 一 [確定 ] 按鈕上的應用程式圖示:
Apple 提供數個屬性,可用來自定義警示:
- AlertStyle 會將警示的類型定義為下列其中一項:
- 警告 - 用來警告使用者目前或即將發生的事件,這些事件並不重要。 這是預設樣式。
- 資訊 - 用來警告使用者目前或即將發生的事件。 目前,警告與信息之間沒有明顯的差異
- 重大 - 用來警告使用者即將發生之事件的嚴重後果(例如刪除檔案)。 這種警示應該謹慎使用。
- MessageText - 這是警示的主要訊息或標題,而且應該快速定義用戶的情況。
- 資訊文字 - 這是警示主體,您應該清楚定義情況,並將可行的選項呈現給使用者。
- 圖示 - 允許使用者顯示自定義圖示。
- HelpAnchor & ShowsHelp - 允許警示系結至應用程式 HelpBook,並顯示警示的說明。
- 按鈕 - 根據預設,警示只有 [確定] 按鈕,但 Buttons 集合可讓您視需要新增更多選擇。
- ShowsSuppressionButton - 如果
true顯示複選框,用戶可用來隱藏觸發事件的後續事件警示。 - AccessoryView - 可讓您將另一個 子檢視附加至警示,以提供額外的資訊,例如新增數據輸入的文字字段 。 如果您設定新的 AccessoryView 或修改現有的 AccessoryView ,您必須呼叫
Layout()方法來調整警示的可見配置。
顯示警示
有兩種不同的方式可以顯示警示、自由浮動或工作表。 下列程式代碼會將警示顯示為自由浮動:
var alert = new NSAlert () {
  AlertStyle = NSAlertStyle.Informational,
  InformativeText = "This is the body of the alert where you describe the situation and any actions to correct it.",
  MessageText = "Alert Title",
};
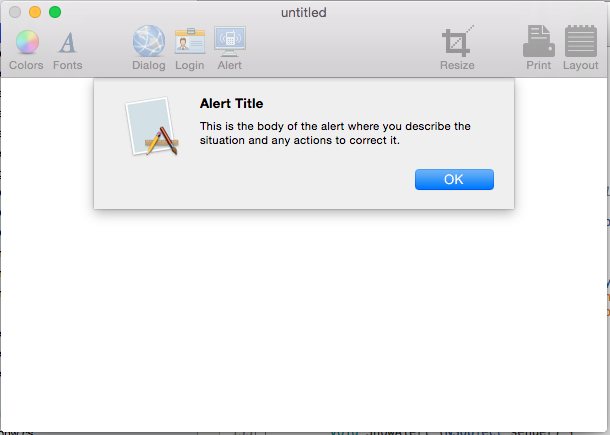
alert.RunModal ();
如果執行此程式代碼,則會顯示下列專案:
下列程式代碼會顯示與 Sheet 相同的警示:
var alert = new NSAlert () {
  AlertStyle = NSAlertStyle.Informational,
  InformativeText = "This is the body of the alert where you describe the situation and any actions to correct it.",
  MessageText = "Alert Title",
};
alert.BeginSheet (this);
如果執行此程式代碼,將會顯示下列專案:
使用警示按鈕
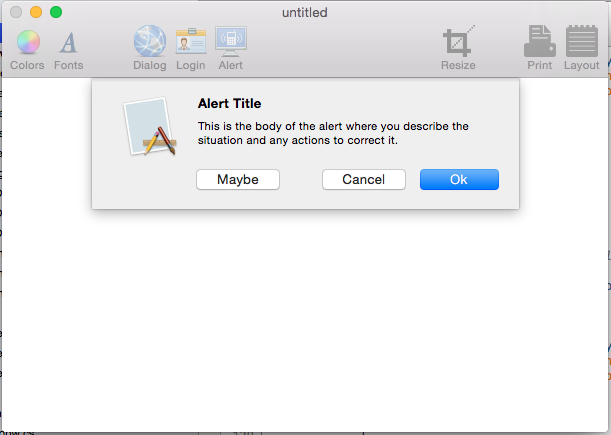
根據預設,警示只會顯示 [ 確定 ] 按鈕。 不過,您不限於此專案,您可以將這些按鈕附加至 Buttons 集合,以建立額外的按鈕。 下列程式代碼會建立具有 [確定]、[取消] 和 [可能] 按鈕的免費浮動警示:
var alert = new NSAlert () {
  AlertStyle = NSAlertStyle.Informational,
  InformativeText = "This is the body of the alert where you describe the situation and any actions to correct it.",
  MessageText = "Alert Title",
};
alert.AddButton ("Ok");
alert.AddButton ("Cancel");
alert.AddButton ("Maybe");
var result = alert.RunModal ();
新增的第一個按鈕會是 使用者按下 Enter 鍵時,將會啟動的預設按鈕 。 傳回的值會是整數,代表使用者按下的按鈕。 在我們的案例中,將會傳回下列值:
- 確定 - 1000。
- 取消 - 1001。
- 也許 - 1002。
如果我們執行程式代碼,將會顯示下列專案:
以下是與工作表相同的警示程式代碼:
var alert = new NSAlert () {
  AlertStyle = NSAlertStyle.Informational,
  InformativeText = "This is the body of the alert where you describe the situation and any actions to correct it.",
  MessageText = "Alert Title",
};
alert.AddButton ("Ok");
alert.AddButton ("Cancel");
alert.AddButton ("Maybe");
alert.BeginSheetForResponse (this, (result) => {
  Console.WriteLine ("Alert Result: {0}", result);
});
如果執行此程式代碼,將會顯示下列專案:
重要
您不應該將三個以上的按鈕新增至警示。
顯示隱藏按鈕
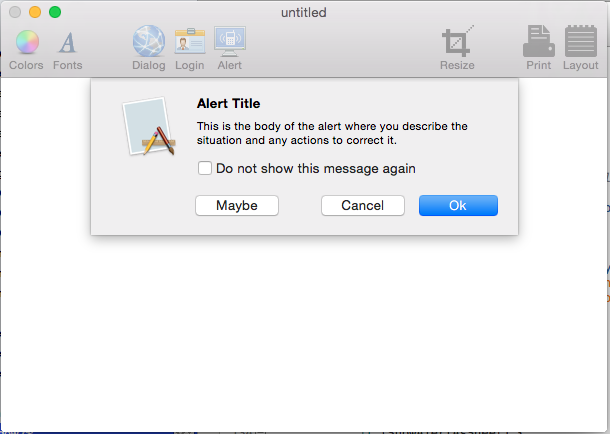
如果Alert的 ShowSuppressButton 屬性為 true,警示會顯示複選框,讓用戶可用來隱藏觸發警示之後續事件的警示。 下列程式代碼會顯示具有隱藏按鈕的自由浮動警示:
var alert = new NSAlert () {
  AlertStyle = NSAlertStyle.Informational,
  InformativeText = "This is the body of the alert where you describe the situation and any actions to correct it.",
  MessageText = "Alert Title",
};
alert.AddButton ("Ok");
alert.AddButton ("Cancel");
alert.AddButton ("Maybe");
alert.ShowsSuppressionButton = true;
var result = alert.RunModal ();
Console.WriteLine ("Alert Result: {0}, Suppress: {1}", result, alert.SuppressionButton.State == NSCellStateValue.On);
如果的值 alert.SuppressionButton.State 是 NSCellStateValue.On,則使用者已核取 [隱藏] 複選框,否則他們沒有。
如果執行程式代碼,將會顯示下列專案:
以下是與工作表相同的警示程式代碼:
var alert = new NSAlert () {
  AlertStyle = NSAlertStyle.Informational,
  InformativeText = "This is the body of the alert where you describe the situation and any actions to correct it.",
  MessageText = "Alert Title",
};
alert.AddButton ("Ok");
alert.AddButton ("Cancel");
alert.AddButton ("Maybe");
alert.ShowsSuppressionButton = true;
alert.BeginSheetForResponse (this, (result) => {
  Console.WriteLine ("Alert Result: {0}, Suppress: {1}", result, alert.SuppressionButton.State == NSCellStateValue.On);
});
如果執行此程式代碼,將會顯示下列專案:
新增自訂 SubView
警示具有AccessoryView屬性,可用來進一步自定義警示,並新增使用者輸入的文字字段之類的專案。 下列程式代碼會建立具有新增文字輸入字段的免費浮動警示:
var input = new NSTextField (new CGRect (0, 0, 300, 20));

var alert = new NSAlert () {
AlertStyle = NSAlertStyle.Informational,
InformativeText = "This is the body of the alert where you describe the situation and any actions to correct it.",
  MessageText = "Alert Title",
};
alert.AddButton ("Ok");
alert.AddButton ("Cancel");
alert.AddButton ("Maybe");
alert.ShowsSuppressionButton = true;
alert.AccessoryView = input;
alert.Layout ();
var result = alert.RunModal ();
Console.WriteLine ("Alert Result: {0}, Suppress: {1}", result, alert.SuppressionButton.State == NSCellStateValue.On);
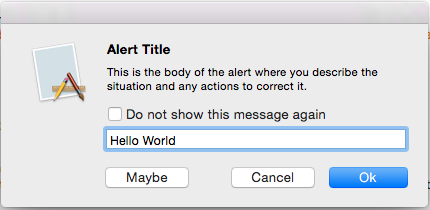
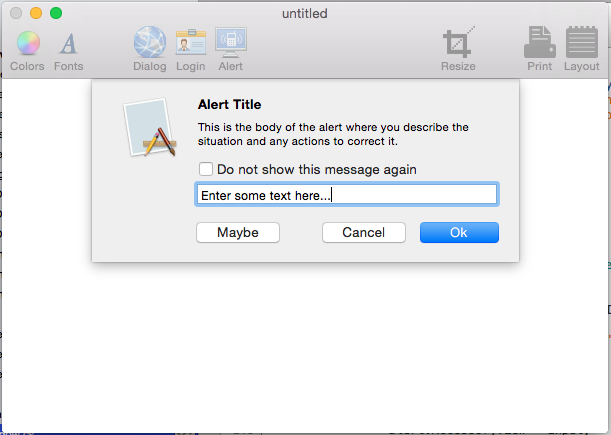
這裡的關鍵詞行會 var input = new NSTextField (new CGRect (0, 0, 300, 20)); 建立 新的文字欄位 ,我們將新增警示。 alert.AccessoryView = input;會將 [文字欄位] 附加至警示,以及Layout()呼叫 方法,這是調整警示大小以符合新子檢視的必要專案。
如果我們執行程式代碼,將會顯示下列專案:
以下是與工作表相同的警示:
var input = new NSTextField (new CGRect (0, 0, 300, 20));

var alert = new NSAlert () {
  AlertStyle = NSAlertStyle.Informational,
  InformativeText = "This is the body of the alert where you describe the situation and any actions to correct it.",
  MessageText = "Alert Title",
};
alert.AddButton ("Ok");
alert.AddButton ("Cancel");
alert.AddButton ("Maybe");
alert.ShowsSuppressionButton = true;
alert.AccessoryView = input;
alert.Layout ();
alert.BeginSheetForResponse (this, (result) => {
  Console.WriteLine ("Alert Result: {0}, Suppress: {1}", result, alert.SuppressionButton.State == NSCellStateValue.On);
});
如果我們執行此程式代碼,將會顯示下列專案:
摘要
本文已詳細探討在 Xamarin.Mac 應用程式中使用警示。 我們看到了不同類型的警示和使用方式、如何建立和自定義警示,以及如何在 C# 程式代碼中使用警示。

![具有 [確定] 按鈕的警示](alert-images/alert01.png)

