Xamarin.iOS 中的進階使用者通知
IOS 10 的新功能是使用者通知架構,可讓您傳遞和處理本機和遠端通知。 使用此架構,應用程式或應用程式延伸模組可以藉由指定一組條件,例如位置或一天中的時間,來排程本機通知的傳遞。
關於使用者通知
新的使用者通知架構允許傳遞和處理本機和遠端通知。 使用此架構,應用程式或應用程式延伸模組可以藉由指定一組條件,例如位置或一天中的時間,來排程本機通知的傳遞。
此外,當應用程式或擴充功能傳遞至使用者的iOS裝置時,應用程式或擴充功能可以同時接收本機和遠端通知。
新的使用者通知 UI 架構可讓應用程式或應用程式延伸模組在向用戶呈現時自定義本機和遠端通知的外觀。
此架構提供下列方式,讓應用程式可以將通知傳遞給使用者:
- 視覺警示 - 通知從畫面頂端向下滾落為橫幅的位置。
- 音效和震動 - 可以與通知產生關聯。
- 應用程式圖示錯誤 - 應用程式圖示顯示可用的新內容徽章的位置。 例如未讀取的電子郵件訊息數目。
此外,視使用者目前的內容而定,將會以不同的方式呈現通知:
- 如果裝置解除鎖定,通知會從畫面頂端向下滾下來作為橫幅。
- 如果裝置已鎖定,通知將會顯示在用戶的鎖定畫面上。
- 如果使用者錯過通知,他們可以開啟通知中心並檢視任何可用的等候通知。
Xamarin.iOS 應用程式有兩種類型的使用者通知,可以傳送:
- 本機通知 - 這些是由在使用者裝置本機安裝的應用程式所傳送。
- 遠端通知 - 會從遠端伺服器傳送,並呈現給使用者,或觸發應用程式內容的背景更新。
如需詳細資訊,請參閱 增強的使用者通知 檔。
新的使用者通知介面
iOS 10 中的使用者通知會呈現新的UI設計,提供更多內容,例如可在鎖定畫面上呈現的標題、子標題和選擇性媒體附件、裝置頂端的橫幅或通知中心。
無論使用者通知顯示在 iOS 10 中的位置,它都會呈現相同的外觀和風格,以及相同的特性和功能。
在 iOS 8 中,Apple 引進了可採取動作的通知,開發人員可以將自定義動作附加至通知,並允許使用者在通知上採取動作,而不需要啟動應用程式。 在iOS 9中,Apple增強可採取動作的通知與快速回復,可讓使用者以文字輸入回應通知。
由於使用者通知是 iOS 10 用戶體驗中更不可或缺的一部分,因此 Apple 已進一步擴充可採取動作的通知以支援 3D Touch,讓使用者按下通知並顯示自定義使用者介面,以提供與通知的豐富互動。
顯示自定義使用者通知 UI 時,如果使用者與附加至通知的任何動作互動,則可以立即更新自定義 UI,以提供已變更內容的意見反應。
iOS 10 的新功能是使用者通知 UI API 可讓 Xamarin.iOS 應用程式輕鬆利用這些新的使用者通知 UI 功能。
新增媒體附件
在使用者之間共用的其中一個較常見的專案是相片,因此iOS 10新增了將媒體專案(例如相片)直接附加至通知的功能,以便向使用者呈現並隨時可供使用者使用,以及通知內容的其餘部分。
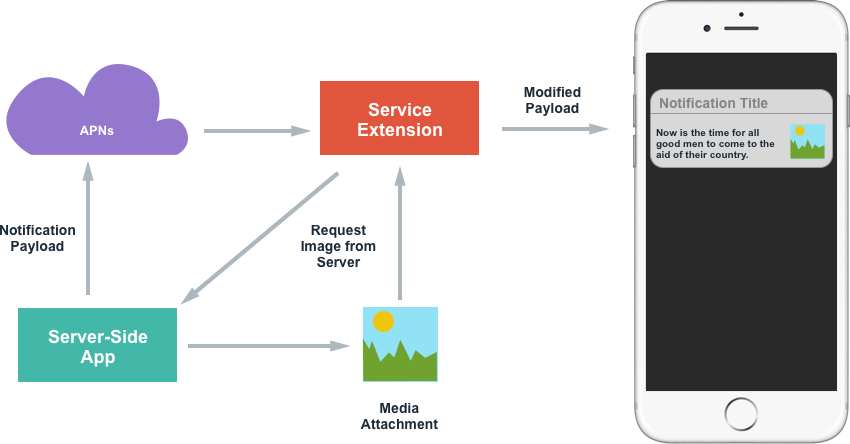
不過,由於傳送甚至小型影像所涉及的大小,因此將它附加至遠端通知承載會變得不切實際。 為了處理這種情況,開發人員可以使用 iOS 10 中的新服務延伸模組,從另一個來源下載影像(例如 CloudKit 數據存放區),並在向用戶顯示之前,將其附加至通知的內容。
若要讓服務延伸模組修改遠端通知,其承載必須標示為可變動。 例如:
{
    aps : {
        alert : "New Photo Available",
        mutable-content: 1
    },
    my-attachment : "https://example.com/photo.jpg"
}
請檢視下列程式概觀:
一旦遠端通知傳遞至裝置(透過 APNs),服務延伸模組就可以透過任何所需方式下載所需的影像, NSURLSession並在收到影像之後,修改通知的內容,並將其顯示給使用者。
以下是此程式在程式代碼中處理方式的範例:
using System;
using Foundation;
using UIKit;
using UserNotifications;

namespace MonkeyNotification
{
    public class NotificationService : UNNotificationServiceExtension
    {
        #region Constructors
        public NotificationService (IntPtr handle) : base(handle)
        {
        }
        #endregion

        #region Override Methods
        public override void DidReceiveNotificationRequest (UNNotificationRequest request, Action<UNNotificationContent> contentHandler)
        {
            // Get file URL
            var attachementPath = request.Content.UserInfo.ObjectForKey (new NSString ("my-attachment"));
            var url = new NSUrl (attachementPath.ToString ());

            // Download the file
            var localURL = new NSUrl ("PathToLocalCopy");

            // Create attachment
            var attachmentID = "image";
            var options = new UNNotificationAttachmentOptions ();
            NSError err;
            var attachment = UNNotificationAttachment.FromIdentifier (attachmentID, localURL, options , out err);

            // Modify contents
            var content = request.Content.MutableCopy() as UNMutableNotificationContent;
            content.Attachments = new UNNotificationAttachment [] { attachment };

            // Display notification
            contentHandler (content);
        }

        public override void TimeWillExpire ()
        {
            // Handle service timing out
        }
        #endregion
    }
}
從 APN 接收通知時,會從內容讀取映像的自定義位址,並從伺服器下載檔。 UNNotificationAttachement然後,會以唯一標識符和映射的本機位置建立 (作為 NSUrl)。 會建立通知內容的可變復本,並新增媒體附件。 最後,呼叫 contentHandler來向用戶顯示通知。
將附件新增至通知之後,系統就會接管檔案的移動和管理。
除了上述的遠端通知之外,本機通知也支持媒體附件,其中 UNNotificationAttachement 會建立並附加至通知及其內容。
iOS 10 中的通知支援影像的媒體附件(靜態和 GIF)、音訊或視訊,而且當通知向使用者顯示通知時,系統會自動顯示這些類型附件的正確自定義 UI。
注意
應小心將媒體大小優化,以及從遠端伺服器下載媒體所需的時間(或為本機通知組合媒體),因為系統在執行應用程式的服務延伸模組時對兩者施加嚴格的限制。 例如,請考慮傳送縮小版本的影像,或要顯示在通知中的視訊小型剪輯。
建立自定義使用者介面
若要為其使用者通知建立自定義使用者介面,開發人員必須將通知內容延伸模組(iOS 10 的新功能)新增至應用程式的解決方案。
通知內容延伸模組可讓開發人員將自己的檢視新增至通知 UI,並繪製想要的任何內容。 從 iOS 12 開始,通知內容延伸模組支援互動式 UI 控件,例如按鈕和滑桿。 如需詳細資訊,請參閱 iOS 12 檔中的互動式通知。
若要支援使用者與使用者通知的互動,應該先建立自定義動作、向系統註冊,並附加至通知,再與系統排程。 系統會呼叫通知內容延伸模組來處理這些動作的處理。 如需自定義動作的詳細資訊,請參閱增強使用者通知檔的<使用通知動作>一節。
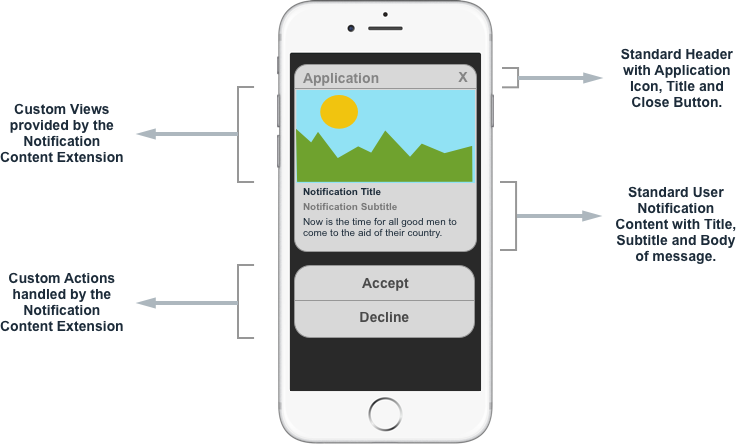
向使用者顯示具有自訂 UI 的使用者通知時,其會有下列元素:
如果使用者與自定義動作互動(如通知下方所示),使用者介面可以更新,以提供使用者意見反應,作為他們叫用指定動作時所發生的情況。
新增通知內容延伸模組
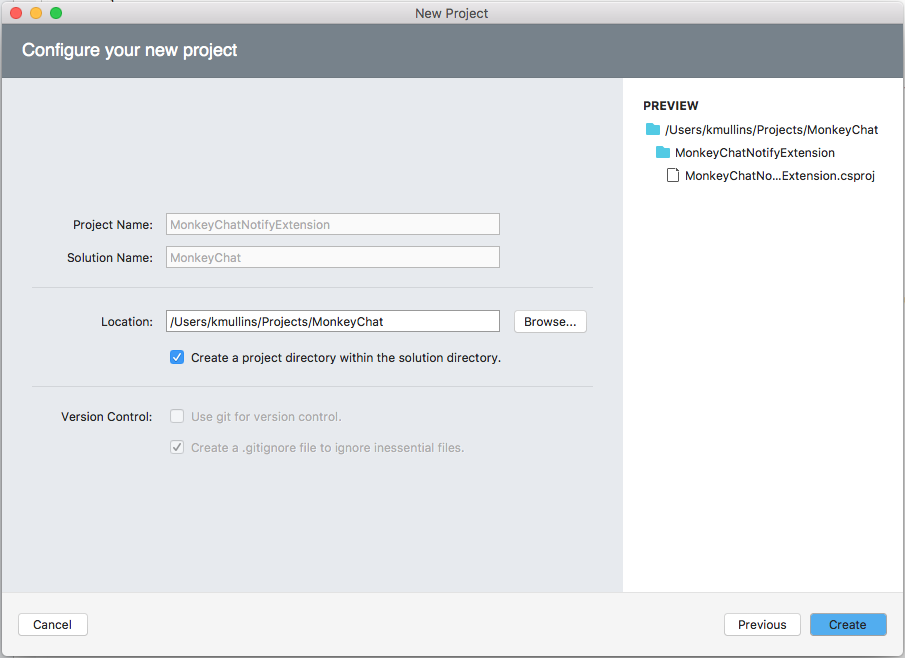
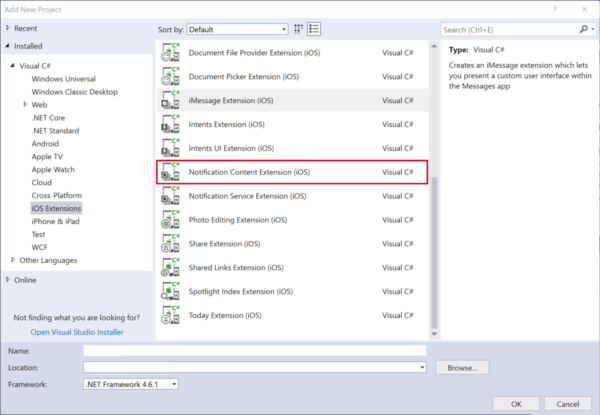
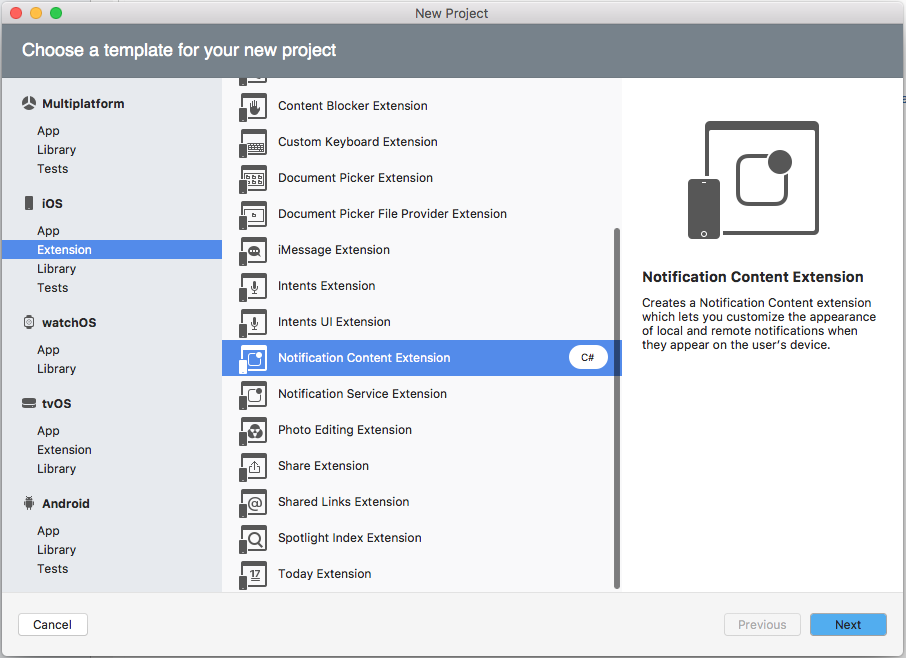
若要在 Xamarin.iOS 應用程式中實作自訂使用者通知 UI,請執行下列動作:
將通知內容延伸模組新增至方案時,會在延伸模組的專案中建立三個檔案:
NotificationViewController.cs- 這是通知內容延伸模組的主要檢視控制器。MainInterface.storyboard- 開發人員在 iOS 設計工具中為通知內容延伸模組配置可見 UI 的位置。Info.plist- 控制通知內容延伸模組的設定。
預設 NotificationViewController.cs 檔案如下所示:
using System;
using Foundation;
using UIKit;
using UserNotifications;
using UserNotificationsUI;

namespace MonkeyChatNotifyExtension
{
    public partial class NotificationViewController : UIViewController, IUNNotificationContentExtension
    {
        #region Constructors
        protected NotificationViewController (IntPtr handle) : base (handle)
        {
            // Note: this .ctor should not contain any initialization logic.
        }
        #endregion

        #region Override Methods
        public override void ViewDidLoad ()
        {
            base.ViewDidLoad ();

            // Do any required interface initialization here.
        }
        #endregion

        #region Public Methods
        [Export ("didReceiveNotification:")]
        public void DidReceiveNotification (UNNotification notification)
        {
            label.Text = notification.Request.Content.Body;

            // Grab content
            var content = notification.Request.Content;

        }
        #endregion
    }
}
當使用者 DidReceiveNotification 擴充通知時,會呼叫 方法,讓通知內容延伸模組可以使用 的內容 UNNotification填入自定義UI。 針對上述範例,標籤已新增至檢視,並公開給具有名稱 label 的程式代碼,並用來顯示通知的本文。
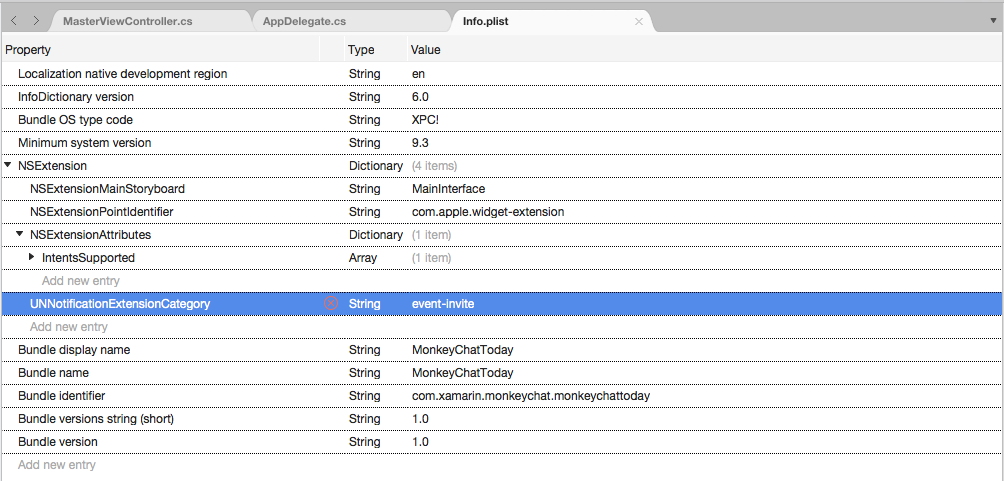
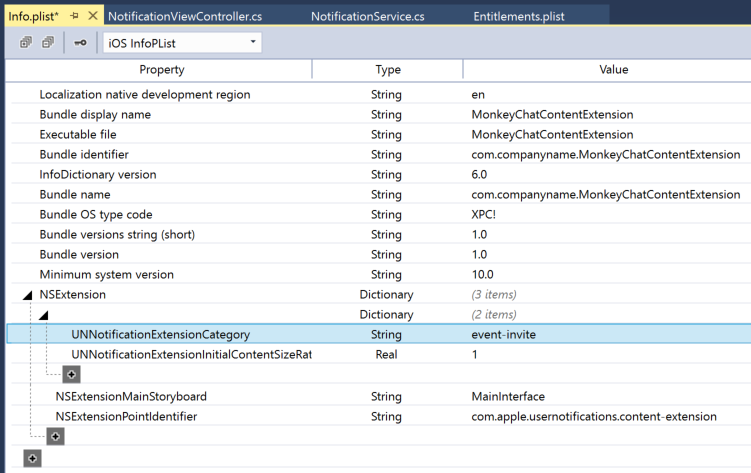
設定通知內容延伸模組的類別
系統必須知道如何根據應用程式回應的特定類別來尋找應用程式的通知內容延伸模組。 執行下列操作:
通知內容延伸模組類別 (UNNotificationExtensionCategory) 使用相同的類別值來註冊通知動作。 在應用程式將針對多個類別使用相同的 UI 的情況下,將切換UNNotificationExtensionCategory為 Array 類型,並提供所有必要的類別。 例如:
隱藏預設通知內容
在自定義通知 UI 將顯示與預設通知相同的內容時,[通知 UI] 底部會自動顯示 [標題]、[標題]、[子標題] 和 [內文],藉由將索引鍵新增至機碼,將索引鍵新增UNNotificationExtensionDefaultContentHidden為NSExtensionAttributes布爾值,並在 Extension 的Info.plist檔案中顯示值YES,即可隱藏此預設資訊:
設計自定義UI
若要設計通知內容延伸模組的自定義使用者介面,請 MainInterface.storyboard 按兩下檔案以開啟檔案以在 iOS 設計工具中編輯,並拖曳您需要建置所需介面的元素(例如 UILabels 和 UIImageViews)。
注意
從 iOS 12 開始,通知內容延伸模組可以包含互動式控件,例如按鈕和文字欄位。 如需詳細資訊,請參閱 iOS 12 檔中的互動式通知。
一旦配置 UI 並公開至 C# 程式代碼的必要控件,請開啟 NotificationViewController.cs 以編輯和修改 DidReceiveNotification 方法,以在使用者展開通知時填入 UI。 例如:
using System;
using Foundation;
using UIKit;
using UserNotifications;
using UserNotificationsUI;

namespace MonkeyChatNotifyExtension
{
    public partial class NotificationViewController : UIViewController, IUNNotificationContentExtension
    {
        #region Constructors
        protected NotificationViewController (IntPtr handle) : base (handle)
        {
            // Note: this .ctor should not contain any initialization logic.
        }
        #endregion

        #region Override Methods
        public override void ViewDidLoad ()
        {
            base.ViewDidLoad ();

            // Do any required interface initialization here.
        }
        #endregion

        #region Public Methods
        [Export ("didReceiveNotification:")]
        public void DidReceiveNotification (UNNotification notification)
        {
            label.Text = notification.Request.Content.Body;

            // Grab content
            var content = notification.Request.Content;

            // Display content in the UILabels
            EventTitle.Text = content.Title;
            EventDate.Text = content.Subtitle;
            EventMessage.Text = content.Body;

            // Get location and display
            var location = content.UserInfo ["location"].ToString ();
            if (location != null) {
                Event.Location.Text = location;
            }

        }
        #endregion
    }
}
設定內容區域大小
若要調整向使用者顯示的內容區域大小,下列程式代碼會將 方法中的 ViewDidLoad 屬性設定PreferredContentSize為所需的大小。 此大小也可以藉由將條件約束套用至 iOS 設計工具中的檢視來調整,讓開發人員挑選最適合它們的方法。
由於通知系統已在叫用通知內容延伸模組之前執行,因此內容區域會開始完整大小,並在向用戶呈現時以動畫顯示到要求的大小。
若要消除這個效果,請編輯 Info.plist Extension 的檔案,並將索引鍵的NSExtensionAttributes索引鍵設定UNNotificationExtensionInitialContentSizeRatio為類型 Number,其值代表所需的比率。 例如:
在自訂UI中使用媒體附件
因為媒體附件(如上述的新增媒體附件一節所示)是通知承載的一部分,所以可以在通知內容延伸模組中存取和顯示,就像在預設通知 UI 中一樣。
例如,如果上述自定義 UI 包含 UIImageView 公開給 C# 程式代碼的 ,則下列程式代碼可用來從媒體附件填入它:
using System;
using Foundation;
using UIKit;
using UserNotifications;
using UserNotificationsUI;

namespace MonkeyChatNotifyExtension
{
    public partial class NotificationViewController : UIViewController, IUNNotificationContentExtension
    {
        #region Constructors
        protected NotificationViewController (IntPtr handle) : base (handle)
        {
            // Note: this .ctor should not contain any initialization logic.
        }
        #endregion

        #region Override Methods
        public override void ViewDidLoad ()
        {
            base.ViewDidLoad ();

            // Do any required interface initialization here.
        }
        #endregion

        #region Public Methods
        [Export ("didReceiveNotification:")]
        public void DidReceiveNotification (UNNotification notification)
        {
            label.Text = notification.Request.Content.Body;

            // Grab content
            var content = notification.Request.Content;

            // Display content in the UILabels
            EventTitle.Text = content.Title;
            EventDate.Text = content.Subtitle;
            EventMessage.Text = content.Body;

            // Get location and display
            var location = content.UserInfo ["location"].ToString ();
            if (location != null) {
                Event.Location.Text = location;
            }

            // Get Media Attachment
            if (content.Attachements.Length > 1) {
                var attachment = content.Attachments [0];
                if (attachment.Url.StartAccessingSecurityScopedResource ()) {
                    EventImage.Image = UIImage.FromFile (attachment.Url.Path);
                    attachment.Url.StopAccessingSecurityScopedResource ();
                }
            }
        }
        #endregion
    }
}
因為媒體附件是由系統管理,所以它不在應用程式的沙箱之外。 擴充功能必須藉由呼叫 StartAccessingSecurityScopedResource 方法,通知系統想要存取檔案。 當擴展名使用 檔案完成時,它必須呼叫 StopAccessingSecurityScopedResource 以釋放其連線。
將自定義動作新增至自訂UI
自定義動作按鈕可用來將互動功能新增至自定義通知 UI。 如需自定義動作的詳細資訊,請參閱增強使用者通知檔的<使用通知動作>一節。
除了自定義動作之外,通知內容延伸模組也可以回應下列內建動作:
- 默認動作 - 這是當使用者點選通知以開啟應用程式並顯示指定通知的詳細數據時。
- 關閉動作 - 當使用者關閉指定的通知時,此動作會傳送至應用程式。
通知內容延伸模組也可以在使用者叫用其中一個自定義動作時更新其UI,例如當使用者點選 [接受 自定義動作] 按鈕時,顯示已接受的日期。 此外,通知內容延伸模組可以告知系統延遲關閉通知 UI,讓使用者可以在關閉通知之前看到其動作的效果。
這是藉由實作包含完成處理程式之方法的第二個版本 DidReceiveNotification 來完成。 例如:
using System;
using Foundation;
using UIKit;
using UserNotifications;
using UserNotificationsUI;
using CoreGraphics;

namespace myApp {
    public class NotificationViewController : UIViewController, UNNotificationContentExtension {

        public override void ViewDidLoad() {
            base.ViewDidLoad();

            // Adjust the size of the content area
            var size = View.Bounds.Size
            PreferredContentSize = new CGSize(size.Width, size.Width/2);
        }

        public void DidReceiveNotification(UNNotification notification) {

            // Grab content
            var content = notification.Request.Content;

            // Display content in the UILabels
            EventTitle.Text = content.Title;
            EventDate.Text = content.Subtitle;
            EventMessage.Text = content.Body;

            // Get location and display
            var location = Content.UserInfo["location"] as string;
            if (location != null) {
                Event.Location.Text = location;
            }

            // Get Media Attachment
            if (content.Attachements.Length > 1) {
                var attachment = content.Attachments[0];
                if (attachment.Url.StartAccessingSecurityScopedResource()) {
                    EventImage.Image = UIImage.FromFile(attachment.Url.Path);
                    attachment.Url.StopAccessingSecurityScopedResource();
                }
            }
        }

        [Export ("didReceiveNotificationResponse:completionHandler:")]
        public void DidReceiveNotification (UNNotificationResponse response, Action<UNNotificationContentExtensionResponseOption> completionHandler)
        {

            // Update UI when the user interacts with the
            // Notification
            Server.PostEventResponse += (response) {
                // Take action based on the response
                switch(response.ActionIdentifier){
                case "accept":
                    EventResponse.Text = "Going!";
                    EventResponse.TextColor = UIColor.Green;
                    break;
                case "decline":
                    EventResponse.Text = "Not Going.";
                    EventResponse.TextColor = UIColor.Red;
                    break;
                }

                // Close Notification
                completionHandler (UNNotificationContentExtensionResponseOption.Dismiss);
            };
        }
    }
}
藉由將 Server.PostEventResponse 處理程式新增至 DidReceiveNotification 通知內容延伸模組的 方法,擴充 功能必須 處理所有自定義動作。 延伸模組也可以藉由變更 UNNotificationContentExtensionResponseOption,將 上的自定義動作轉送至包含的應用程式。 例如:
// Close Notification
completionHandler (UNNotificationContentExtensionResponseOption.DismissAndForwardAction);
在自訂UI中使用文字輸入動作
視應用程式的設計和通知而定,有時候可能需要使用者將文字輸入通知(例如回復訊息)。 通知內容延伸模組可以存取內建的文字輸入動作,就像標準通知一樣。
例如:
using System;
using Foundation;
using UIKit;
using UserNotifications;
using UserNotificationsUI;

namespace MonkeyChatNotifyExtension
{
    public partial class NotificationViewController : UIViewController, IUNNotificationContentExtension
    {
        #region Computed Properties
        // Allow to take input
        public override bool CanBecomeFirstResponder {
            get { return true; }
        }

        // Return the custom created text input view with the
        // required buttons and return here
        public override UIView InputAccessoryView {
            get { return InputView; }
        }
        #endregion

        #region Constructors
        protected NotificationViewController (IntPtr handle) : base (handle)
        {
            // Note: this .ctor should not contain any initialization logic.
        }
        #endregion

        #region Override Methods
        public override void ViewDidLoad ()
        {
            base.ViewDidLoad ();

            // Do any required interface initialization here.
        }
        #endregion

        #region Private Methods
        private UNNotificationCategory MakeExtensionCategory ()
        {

            // Create Accept Action
            ...

            // Create decline Action
            ...

            // Create Text Input Action
            var commentID = "comment";
            var commentTitle = "Comment";
            var textInputButtonTitle = "Send";
            var textInputPlaceholder = "Enter comment here...";
            var commentAction = UNTextInputNotificationAction.FromIdentifier (commentID, commentTitle, UNNotificationActionOptions.None, textInputButtonTitle, textInputPlaceholder);

            // Create category
            var categoryID = "event-invite";
            var actions = new UNNotificationAction [] { acceptAction, declineAction, commentAction };
            var intentIDs = new string [] { };
            var category = UNNotificationCategory.FromIdentifier (categoryID, actions, intentIDs, UNNotificationCategoryOptions.None);

            // Return new category
            return category;

        }
        #endregion

        #region Public Methods
        [Export ("didReceiveNotification:")]
        public void DidReceiveNotification (UNNotification notification)
        {
            label.Text = notification.Request.Content.Body;

            // Grab content
            var content = notification.Request.Content;

            // Display content in the UILabels
            EventTitle.Text = content.Title;
            EventDate.Text = content.Subtitle;
            EventMessage.Text = content.Body;

            // Get location and display
            var location = content.UserInfo ["location"].ToString ();
            if (location != null) {
                Event.Location.Text = location;
            }

            // Get Media Attachment
            if (content.Attachements.Length > 1) {
                var attachment = content.Attachments [0];
                if (attachment.Url.StartAccessingSecurityScopedResource ()) {
                    EventImage.Image = UIImage.FromFile (attachment.Url.Path);
                    attachment.Url.StopAccessingSecurityScopedResource ();
                }
            }
        }

        [Export ("didReceiveNotificationResponse:completionHandler:")]
        public void DidReceiveNotification (UNNotificationResponse response, Action<UNNotificationContentExtensionResponseOption> completionHandler)
        {

            // Is text input?
            if (response is UNTextInputNotificationResponse) {
                var textResponse = response as UNTextInputNotificationResponse;
                Server.Send (textResponse.UserText, () => {
                    // Close Notification
                    completionHandler (UNNotificationContentExtensionResponseOption.Dismiss);
                });
            }

            // Update UI when the user interacts with the
            // Notification
            Server.PostEventResponse += (response) {
                // Take action based on the response
                switch (response.ActionIdentifier) {
                case "accept":
                    EventResponse.Text = "Going!";
                    EventResponse.TextColor = UIColor.Green;
                    break;
                case "decline":
                    EventResponse.Text = "Not Going.";
                    EventResponse.TextColor = UIColor.Red;
                    break;
                }

                // Close Notification
                completionHandler (UNNotificationContentExtensionResponseOption.Dismiss);
            };
        }
        #endregion
    }
}
此程式代碼會建立新的文字輸入動作,並將它新增至 Extension 的類別 (在 MakeExtensionCategory中) 方法中。 在 override 方法中 DidReceive ,它會以下列程式代碼處理輸入文字的使用者:
// Is text input?
if (response is UNTextInputNotificationResponse) {
    var textResponse = response as UNTextInputNotificationResponse;
    Server.Send (textResponse.UserText, () => {
        // Close Notification
        completionHandler (UNNotificationContentExtensionResponseOption.Dismiss);
    });
}
如果設計呼叫將自訂按鈕新增至文字輸入欄位,請新增下列程式代碼以包含它們:
// Allow to take input
public override bool CanBecomeFirstResponder {
    get {return true;}
}

// Return the custom created text input view with the
// required buttons and return here
public override UIView InputAccessoryView {
    get {return InputView;}
}
當使用者觸發批註動作時,必須啟動檢視控制器和自訂文字輸入字段:
// Update UI when the user interacts with the
// Notification
Server.PostEventResponse += (response) {
    // Take action based on the response
    switch(response.ActionIdentifier){
    ...
    case "comment":
        BecomeFirstResponder();
        TextField.BecomeFirstResponder();
        break;
    }

    // Close Notification
    completionHandler (UNNotificationContentExtensionResponseOption.Dismiss);

};
摘要
本文已進一步探討如何在 Xamarin.iOS 應用程式中使用新的使用者通知架構。 它涵蓋將媒體附件新增至本機和遠端通知,並涵蓋使用新的使用者通知 UI 來建立自定義通知 UI。
![輸入延伸模組的 [名稱]](advanced-user-notifications-images/notify02.png)
