在 Xamarin.iOS 中使用 Apple 登入
使用 Apple 登入是一項新服務,可為第三方驗證服務的使用者提供身分識別保護。 從 iOS 13 開始,Apple 要求任何使用第三方驗證服務的新應用程式也應該提供使用 Apple 登入。 現有的應用程式更新不需要在 2020 年 4 月之前新增登入 Apple。
本文件介紹如何使用Apple將登入新增至iOS 13應用程式。
Apple 開發人員設定
使用登入 Apple 建置並執行應用程式之前,您需要完成這些步驟。 在 Apple 開發人員憑證上,標識元和設定檔 入口網站:
- 建立新的 應用程式 識別碼標識碼。
- 在 [描述] 欄位中設定描述。
- 選擇 [ 明確 套件組合標識符],並在欄位中設定
com.xamarin.AddingTheSignInWithAppleFlowToYourApp。 - 啟用 使用Apple 功能登入並註冊新的身分識別。
- 使用新的身分識別建立新的布建配置檔。
- 在您的裝置上下載並安裝。
- 在 Visual Studio 中,啟用 Entitlements.plist 檔案中的 [使用 Apple 登入] 功能。
檢查登入狀態
當您的應用程式開始時,或當您第一次需要檢查使用者的驗證狀態時,請具現化 ASAuthorizationAppleIdProvider 並檢查目前的狀態:
var appleIdProvider = new ASAuthorizationAppleIdProvider ();
appleIdProvider.GetCredentialState (KeychainItem.CurrentUserIdentifier, (credentialState, error) => {
    switch (credentialState) {
    case ASAuthorizationAppleIdProviderCredentialState.Authorized:
        // The Apple ID credential is valid.
        break;
    case ASAuthorizationAppleIdProviderCredentialState.Revoked:
        // The Apple ID credential is revoked.
        break;
    case ASAuthorizationAppleIdProviderCredentialState.NotFound:
        // No credential was found, so show the sign-in UI.
        InvokeOnMainThread (() => {
            var storyboard = UIStoryboard.FromName ("Main", null);

            if (!(storyboard.InstantiateViewController (nameof (LoginViewController)) is LoginViewController viewController))
                return;

            viewController.ModalPresentationStyle = UIModalPresentationStyle.FormSheet;
            viewController.ModalInPresentation = true;
            Window?.RootViewController?.PresentViewController (viewController, true, null);
        });
        break;
    }
});
在此程式代碼中,在中呼叫 期間FinishedLaunching,應用程式會在狀態為 NotFound 時處理,並將 呈現LoginViewController給AppDelegate.cs使用者。 如果狀態傳回 Authorized 或 Revoked,可能會向用戶顯示不同的動作。
使用 Apple 登入的 LoginViewController
實 UIViewController 作登入邏輯並提供使用Apple登入的 ,必須實 IASAuthorizationControllerDelegate 作 , IASAuthorizationControllerPresentationContextProviding 如下列範例所示 LoginViewController 。
public partial class LoginViewController : UIViewController, IASAuthorizationControllerDelegate, IASAuthorizationControllerPresentationContextProviding {
    public LoginViewController (IntPtr handle) : base (handle)
    {
    }

    public override void ViewDidLoad ()
    {
        base.ViewDidLoad ();
        // Perform any additional setup after loading the view, typically from a nib.

        SetupProviderLoginView ();
    }

    public override void ViewDidAppear (bool animated)
    {
        base.ViewDidAppear (animated);

        PerformExistingAccountSetupFlows ();
    }

    void SetupProviderLoginView ()
    {
        var authorizationButton = new ASAuthorizationAppleIdButton (ASAuthorizationAppleIdButtonType.Default, ASAuthorizationAppleIdButtonStyle.White);
        authorizationButton.TouchUpInside += HandleAuthorizationAppleIDButtonPress;
        loginProviderStackView.AddArrangedSubview (authorizationButton);
    }

    // Prompts the user if an existing iCloud Keychain credential or Apple ID credential is found.
    void PerformExistingAccountSetupFlows ()
    {
        // Prepare requests for both Apple ID and password providers.
        ASAuthorizationRequest [] requests = {
            new ASAuthorizationAppleIdProvider ().CreateRequest (),
            new ASAuthorizationPasswordProvider ().CreateRequest ()
        };

        // Create an authorization controller with the given requests.
        var authorizationController = new ASAuthorizationController (requests);
        authorizationController.Delegate = this;
        authorizationController.PresentationContextProvider = this;
        authorizationController.PerformRequests ();
    }

    private void HandleAuthorizationAppleIDButtonPress (object sender, EventArgs e)
    {
        var appleIdProvider = new ASAuthorizationAppleIdProvider ();
        var request = appleIdProvider.CreateRequest ();
        request.RequestedScopes = new [] { ASAuthorizationScope.Email, ASAuthorizationScope.FullName };

        var authorizationController = new ASAuthorizationController (new [] { request });
        authorizationController.Delegate = this;
        authorizationController.PresentationContextProvider = this;
        authorizationController.PerformRequests ();
    }
}
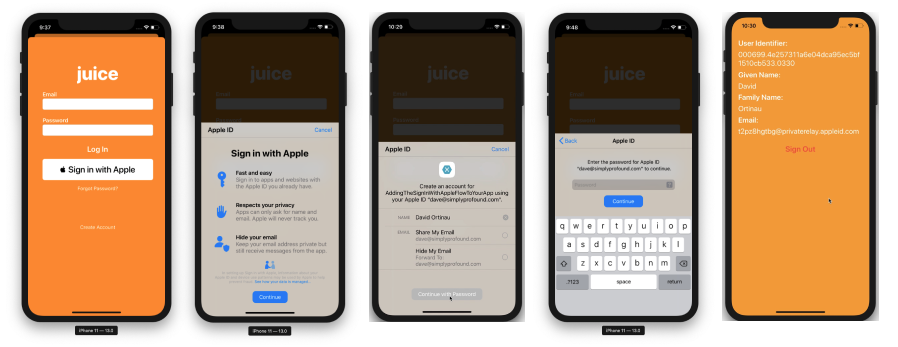
此範例程式代碼會檢查 中的 PerformExistingAccountSetupFlows 目前登入狀態,並以委派身分連接到目前的檢視。 如果找到現有的 iCloud Keychain 認證或 Apple ID 認證,系統會提示使用者使用該認證。
Apple 提供 ASAuthorizationAppleIdButton,這是特別針對此用途的按鈕。 觸控時,按鈕會觸發 方法 HandleAuthorizationAppleIDButtonPress中處理的工作流程。
處理授權
在中 IASAuthorizationController 實作任何自定義邏輯來儲存用戶帳戶。 下列範例會將使用者的帳戶儲存在Apple自己的記憶體服務Keychain中。
#region IASAuthorizationController Delegate

[Export ("authorizationController:didCompleteWithAuthorization:")]
public void DidComplete (ASAuthorizationController controller, ASAuthorization authorization)
{
    if (authorization.GetCredential<ASAuthorizationAppleIdCredential> () is ASAuthorizationAppleIdCredential appleIdCredential) {
        var userIdentifier = appleIdCredential.User;
        var fullName = appleIdCredential.FullName;
        var email = appleIdCredential.Email;

        // Create an account in your system.
        // For the purpose of this demo app, store the userIdentifier in the keychain.
        try {
            new KeychainItem ("com.example.apple-samplecode.juice", "userIdentifier").SaveItem (userIdentifier);
        } catch (Exception) {
            Console.WriteLine ("Unable to save userIdentifier to keychain.");
        }

        // For the purpose of this demo app, show the Apple ID credential information in the ResultViewController.
        if (!(PresentingViewController is ResultViewController viewController))
            return;

        InvokeOnMainThread (() => {
            viewController.UserIdentifierText = userIdentifier;
            viewController.GivenNameText = fullName?.GivenName ?? "";
            viewController.FamilyNameText = fullName?.FamilyName ?? "";
            viewController.EmailText = email ?? "";

            DismissViewController (true, null);
        });
    } else if (authorization.GetCredential<ASPasswordCredential> () is ASPasswordCredential passwordCredential) {
        // Sign in using an existing iCloud Keychain credential.
        var username = passwordCredential.User;
        var password = passwordCredential.Password;

        // For the purpose of this demo app, show the password credential as an alert.
        InvokeOnMainThread (() => {
            var message = $"The app has received your selected credential from the keychain. \n\n Username: {username}\n Password: {password}";
            var alertController = UIAlertController.Create ("Keychain Credential Received", message, UIAlertControllerStyle.Alert);
            alertController.AddAction (UIAlertAction.Create ("Dismiss", UIAlertActionStyle.Cancel, null));

            PresentViewController (alertController, true, null);
        });
    }
}

[Export ("authorizationController:didCompleteWithError:")]
public void DidComplete (ASAuthorizationController controller, NSError error)
{
    Console.WriteLine (error);
}

#endregion
授權控制器
此實作的最後一個部分是 ASAuthorizationController 管理提供者的授權要求。
#region IASAuthorizationControllerPresentation Context Providing

public UIWindow GetPresentationAnchor (ASAuthorizationController controller) => View.Window;

#endregion