Xamarin.iOS 中的 CallKit
iOS 10 中的新 CallKit API 提供一種方式,讓 VOIP 應用程式與 i 電話 UI 整合,並為終端使用者提供熟悉的介面和體驗。 透過此 API,使用者可以從 iOS 裝置的鎖定畫面檢視 VOIP 呼叫並與其互動,並使用 電話 應用程式的 [我的最愛] 和 [最近使用] 檢視來管理聯繫人。
關於 CallKit
根據 Apple,CallKit 是一個新的架構,將第三方 Voice Over IP (VOIP) 應用程式提升為 iOS 10 的第一方體驗。 CallKit API 可讓 VOIP 應用程式與 i 電話 UI 整合,並為使用者提供熟悉的介面和體驗。 就像內建 電話 應用程式一樣,使用者可以從 iOS 裝置的鎖定畫面檢視 VOIP 通話並與其互動,並使用 電話 應用程式的 [我的最愛] 和 [最近使用] 檢視來管理聯繫人。
此外,CallKit API 可讓您建立應用程式延伸模組,讓電話號碼與名稱(來電者標識符)產生關聯,或告訴系統何時應封鎖號碼(通話封鎖)。
現有的 VOIP 應用程式體驗
在討論新的 CallKit API 及其功能之前,請先看看目前在 iOS 9 中使用名為 MonkeyCall 的虛構 VOIP 應用程式來使用第三方 VOIP 應用程式的用戶體驗。 MonkeyCall 是一個簡單的應用程式,可讓使用者使用現有的 iOS API 來傳送和接收 VOIP 呼叫。
目前,如果使用者在 MonkeyCall 上收到來電,且其 i 電話 已鎖定,則鎖定畫面上收到的通知與任何其他通知類型無法區分(例如來自訊息或郵件應用程式的通知)。
如果使用者想要接聽電話,他們必須滑動 MonkeyCall 通知以開啟應用程式並輸入密碼(或使用者觸控標識符),才能解除鎖定電話,然後才能接受通話並啟動交談。
如果手機解除鎖定,體驗同樣麻煩。 同樣地,傳入的 MonkeyCall 呼叫會顯示為從畫面頂端滑入的標準通知橫幅。 由於通知是暫時的,因此使用者可以輕鬆地錯過通知中心,並尋找特定的通知接聽,然後呼叫或手動尋找並啟動 MonkeyCall 應用程式。
CallKit VOIP 應用程式體驗
藉由在 MonkeyCall 應用程式中實作新的 CallKit API,即可大幅改善 iOS 10 中傳入 VOIP 通話的用戶體驗。 以使用者從上方鎖定電話時收到 VOIP 通話的範例為例。 藉由實作 CallKit,呼叫會出現在 i 電話 的鎖定畫面上,就像從內建 電話 應用程式收到通話一樣,具有全螢幕、原生 UI 和標準撥動對接功能。
同樣地,如果在收到 MonkeyCall VOIP 呼叫時解除鎖定 i 電話,則會顯示內建 電話 應用程式的相同全螢幕、原生 UI 和標準撥動對接和點選拒絕功能,而 MonkeyCall 可以選擇播放自定義的鈴聲。
CallKit 為 MonkeyCall 提供額外的功能,允許其 VOIP 通話與其他類型的通話互動、出現在內建的 [最近] 和 [我的最愛] 清單中,以使用內建的 Do Not 打擾和封鎖功能、啟動 Siri 的 MonkeyCall 通話,並讓用戶能夠將 MonkeyCall 通話指派給聯繫人應用程式中的人員。
下列各節將詳細說明 CallKit 架構、傳入和傳出呼叫流程,以及 CallKit API。
CallKit 架構
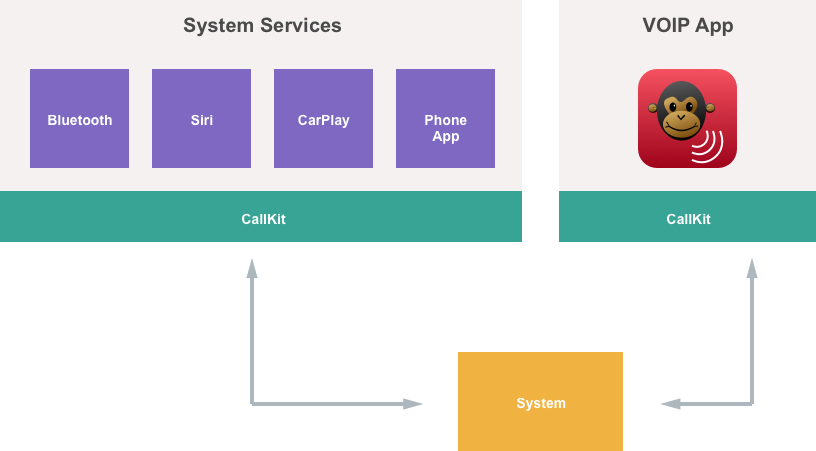
在 iOS 10 中,Apple 已在所有系統服務中採用 CallKit,例如,透過 CallKit 對系統 UI 進行呼叫。 在下列範例中,由於 MonkeyCall 採用 CallKit,因此系統會以與這些內建系統服務相同的方式來得知系統,並取得所有相同的功能:
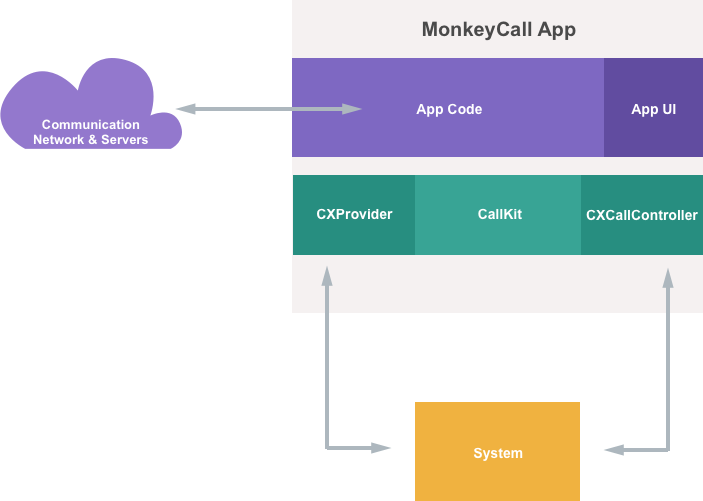
請仔細查看上圖中的 MonkeyCall App。 應用程式包含與其本身網路通訊的所有程序代碼,並包含自己的使用者介面。 它會連結 CallKit 中與系統通訊:
CallKit 中有兩個主要介面可供應用程式使用:
CXProvider- 這可讓 MonkeyCall 應用程式通知系統任何可能發生的頻外通知。CXCallController- 允許 MonkeyCall 應用程式通知系統本機用戶動作。
The CXProvider
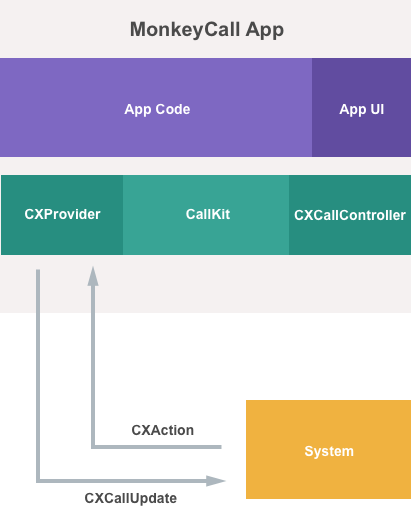
如上所述, CXProvider 允許應用程式通知系統可能發生的任何頻外通知。 這些是不會因為本機用戶動作而發生的通知,但由於外部事件,例如來電而發生。
應用程式應該針對下列專案使用 CXProvider :
- 回報系統的來電。
- 回報該連出通話已連線至系統。
- 回報遠端用戶結束對系統的呼叫。
當應用程式想要與系統通訊時,它會使用 CXCallUpdate 類別,以及當系統需要與應用程式通訊時,它會使用 CXAction 類別:
The CXCallController
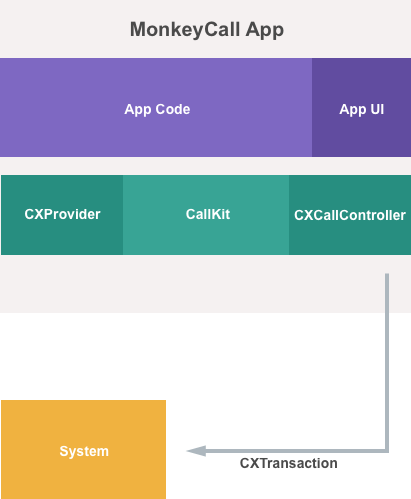
CXCallController可讓應用程式通知系統本機用戶動作,例如用戶啟動 VOIP 通話。 藉由實作 CXCallController 應用程式,可以與系統中其他類型的呼叫互動。 例如,如果已經有進行中的電話語音通話, CXCallController 可以允許 VOIP 應用程式將通話放在保留並啟動或接聽 VOIP 通話。
應用程式應該針對下列專案使用 CXCallController :
- 當用戶開始對系統進行傳出呼叫時報告。
- 當使用者接聽系統來電時回報。
- 當用戶結束對系統的呼叫時報告。
當應用程式想要將本機使用者動作傳達給系統時,它會使用 類別 CXTransaction :
實作 CallKit
下列各節將示範如何在 Xamarin.iOS VOIP 應用程式中實作 CallKit。 為了範例,本檔將使用來自虛構的 MonkeyCall VOIP 應用程式的程式代碼。 此處呈現的程式代碼代表數個支持類別,CallKit 特定部分將在下列各節中詳細說明。
ActiveCall 類別
MonkeyCall 應用程式會使用 類別 ActiveCall 來保存目前作用中 VOIP 通話的所有資訊,如下所示:
using System;
using CoreFoundation;
using Foundation;

namespace MonkeyCall
{
    public class ActiveCall
    {
        #region Private Variables
        private bool isConnecting;
        private bool isConnected;
        private bool isOnhold;
        #endregion

        #region Computed Properties
        public NSUuid UUID { get; set; }
        public bool isOutgoing { get; set; }
        public string Handle { get; set; }
        public DateTime StartedConnectingOn { get; set;}
        public DateTime ConnectedOn { get; set;}
        public DateTime EndedOn { get; set; }

        public bool IsConnecting {
            get { return isConnecting; }
            set {
                isConnecting = value;
                if (isConnecting) StartedConnectingOn = DateTime.Now;
                RaiseStartingConnectionChanged ();
            }
        }

        public bool IsConnected {
            get { return isConnected; }
            set {
                isConnected = value;
                if (isConnected) {
                    ConnectedOn = DateTime.Now;
                } else {
                    EndedOn = DateTime.Now;
                }
                RaiseConnectedChanged ();
            }
        }

        public bool IsOnHold {
            get { return isOnhold; }
            set {
                isOnhold = value;
            }
        }
        #endregion

        #region Constructors
        public ActiveCall ()
        {
        }

        public ActiveCall (NSUuid uuid, string handle, bool outgoing)
        {
            // Initialize
            this.UUID = uuid;
            this.Handle = handle;
            this.isOutgoing = outgoing;
        }
        #endregion

        #region Public Methods
        public void StartCall (ActiveCallbackDelegate completionHandler)
        {
            // Simulate the call starting successfully
            completionHandler (true);

            // Simulate making a starting and completing a connection
            DispatchQueue.MainQueue.DispatchAfter (new DispatchTime(DispatchTime.Now, 3000), () => {
                // Note that the call is starting
                IsConnecting = true;

                // Simulate pause before connecting
                DispatchQueue.MainQueue.DispatchAfter (new DispatchTime (DispatchTime.Now, 1500), () => {
                    // Note that the call has connected
                    IsConnecting = false;
                    IsConnected = true;
                });
            });
        }

        public void AnswerCall (ActiveCallbackDelegate completionHandler)
        {
            // Simulate the call being answered
            IsConnected = true;
            completionHandler (true);
        }

        public void EndCall (ActiveCallbackDelegate completionHandler)
        {
            // Simulate the call ending
            IsConnected = false;
            completionHandler (true);
        }
        #endregion

        #region Events
        public delegate void ActiveCallbackDelegate (bool successful);
        public delegate void ActiveCallStateChangedDelegate (ActiveCall call);

        public event ActiveCallStateChangedDelegate StartingConnectionChanged;
        internal void RaiseStartingConnectionChanged ()
        {
            if (this.StartingConnectionChanged != null) this.StartingConnectionChanged (this);
        }

        public event ActiveCallStateChangedDelegate ConnectedChanged;
        internal void RaiseConnectedChanged ()
        {
            if (this.ConnectedChanged != null) this.ConnectedChanged (this);
        }
        #endregion
    }
}
ActiveCall 會保留數個屬性,定義呼叫的狀態,以及呼叫狀態變更時可以引發的兩個事件。 由於這隻是範例,因此有三種方法可用來模擬開始、接聽和結束呼叫。
StartCallRequest 類別
靜態 StartCallRequest 類別提供一些協助程式方法,可在處理傳出呼叫時使用:
using System;
using Foundation;
using Intents;

namespace MonkeyCall
{
    public static class StartCallRequest
    {
        public static string URLScheme {
            get { return "monkeycall"; }
        }

        public static string ActivityType {
            get { return INIntentIdentifier.StartAudioCall.GetConstant ().ToString (); }
        }

        public static string CallHandleFromURL (NSUrl url)
        {
            // Is this a MonkeyCall handle?
            if (url.Scheme == URLScheme) {
                // Yes, return host
                return url.Host;
            } else {
                // Not handled
                return null;
            }
        }

        public static string CallHandleFromActivity (NSUserActivity activity)
        {
            // Is this a start call activity?
            if (activity.ActivityType == ActivityType) {
                // Yes, trap any errors
                try {
                    // Get first contact
                    var interaction = activity.GetInteraction ();
                    var startAudioCallIntent = interaction.Intent as INStartAudioCallIntent;
                    var contact = startAudioCallIntent.Contacts [0];

                    // Get the person handle
                    return contact.PersonHandle.Value;
                } catch {
                    // Error, report null
                    return null;
                }
            } else {
                // Not handled
                return null;
            }
        }
    }
}
和 CallHandleFromURLCallHandleFromActivity 類別用於 AppDelegate,以取得撥出通話中被呼叫人員的聯繫人句柄。 如需詳細資訊,請參閱下方的 處理傳出電話 一節。
ActiveCallManager 類別
類別 ActiveCallManager 會處理 MonkeyCall 應用程式中的所有開啟呼叫。
using System;
using System.Collections.Generic;
using Foundation;
using CallKit;

namespace MonkeyCall
{
    public class ActiveCallManager
    {
        #region Private Variables
        private CXCallController CallController = new CXCallController ();
        #endregion

        #region Computed Properties
        public List<ActiveCall> Calls { get; set; }
        #endregion

        #region Constructors
        public ActiveCallManager ()
        {
            // Initialize
            this.Calls = new List<ActiveCall> ();
        }
        #endregion

        #region Private Methods
        private void SendTransactionRequest (CXTransaction transaction)
        {
            // Send request to call controller
            CallController.RequestTransaction (transaction, (error) => {
                // Was there an error?
                if (error == null) {
                    // No, report success
                    Console.WriteLine ("Transaction request sent successfully.");
                } else {
                    // Yes, report error
                    Console.WriteLine ("Error requesting transaction: {0}", error);
                }
            });
        }
        #endregion

        #region Public Methods
        public ActiveCall FindCall (NSUuid uuid)
        {
            // Scan for requested call
            foreach (ActiveCall call in Calls) {
                if (call.UUID.Equals(uuid)) return call;
            }

            // Not found
            return null;
        }

        public void StartCall (string contact)
        {
            // Build call action
            var handle = new CXHandle (CXHandleType.Generic, contact);
            var startCallAction = new CXStartCallAction (new NSUuid (), handle);

            // Create transaction
            var transaction = new CXTransaction (startCallAction);

            // Inform system of call request
            SendTransactionRequest (transaction);
        }

        public void EndCall (ActiveCall call)
        {
            // Build action
            var endCallAction = new CXEndCallAction (call.UUID);

            // Create transaction
            var transaction = new CXTransaction (endCallAction);

            // Inform system of call request
            SendTransactionRequest (transaction);
        }

        public void PlaceCallOnHold (ActiveCall call)
        {
            // Build action
            var holdCallAction = new CXSetHeldCallAction (call.UUID, true);

            // Create transaction
            var transaction = new CXTransaction (holdCallAction);

            // Inform system of call request
            SendTransactionRequest (transaction);
        }

        public void RemoveCallFromOnHold (ActiveCall call)
        {
            // Build action
            var holdCallAction = new CXSetHeldCallAction (call.UUID, false);

            // Create transaction
            var transaction = new CXTransaction (holdCallAction);

            // Inform system of call request
            SendTransactionRequest (transaction);
        }
        #endregion
    }
}
同樣地,由於這隻是模擬,因此 ActiveCallManager 唯一會維護 物件的集合 ActiveCall ,並且有一個例程,可供其 UUID 屬性尋找指定的呼叫。 它也包含啟動、結束和變更傳出呼叫的保留狀態的方法。 如需詳細資訊,請參閱下方的 處理傳出電話 一節。
ProviderDelegate 類別
如上所述,提供 CXProvider 應用程式和系統之間的雙向通訊,以取得頻外通知。 開發人員需要提供自定義 CXProviderDelegate ,並將其附加至 CXProvider ,應用程式才能處理頻外 CallKit 事件。 MonkeyCall 使用下列專案 CXProviderDelegate:
using System;
using Foundation;
using CallKit;
using UIKit;

namespace MonkeyCall
{
    public class ProviderDelegate : CXProviderDelegate
    {
        #region Computed Properties
        public ActiveCallManager CallManager { get; set;}
        public CXProviderConfiguration Configuration { get; set; }
        public CXProvider Provider { get; set; }
        #endregion

        #region Constructors
        public ProviderDelegate (ActiveCallManager callManager)
        {
            // Save connection to call manager
            CallManager = callManager;

            // Define handle types
            var handleTypes = new [] { (NSNumber)(int)CXHandleType.PhoneNumber };

            // Get Image Template
            var templateImage = UIImage.FromFile ("telephone_receiver.png");

            // Setup the initial configurations
            Configuration = new CXProviderConfiguration ("MonkeyCall") {
                MaximumCallsPerCallGroup = 1,
                SupportedHandleTypes = new NSSet<NSNumber> (handleTypes),
                IconTemplateImageData = templateImage.AsPNG(),
                RingtoneSound = "musicloop01.wav"
            };

            // Create a new provider
            Provider = new CXProvider (Configuration);

            // Attach this delegate
            Provider.SetDelegate (this, null);

        }
        #endregion

        #region Override Methods
        public override void DidReset (CXProvider provider)
        {
            // Remove all calls
            CallManager.Calls.Clear ();
        }

        public override void PerformStartCallAction (CXProvider provider, CXStartCallAction action)
        {
            // Create new call record
            var activeCall = new ActiveCall (action.CallUuid, action.CallHandle.Value, true);

            // Monitor state changes
            activeCall.StartingConnectionChanged += (call) => {
                if (call.isConnecting) {
                    // Inform system that the call is starting
                    Provider.ReportConnectingOutgoingCall (call.UUID, call.StartedConnectingOn.ToNSDate());
                }
            };

            activeCall.ConnectedChanged += (call) => {
                if (call.isConnected) {
                    // Inform system that the call has connected
                    provider.ReportConnectedOutgoingCall (call.UUID, call.ConnectedOn.ToNSDate ());
                }
            };

            // Start call
            activeCall.StartCall ((successful) => {
                // Was the call able to be started?
                if (successful) {
                    // Yes, inform the system
                    action.Fulfill ();

                    // Add call to manager
                    CallManager.Calls.Add (activeCall);
                } else {
                    // No, inform system
                    action.Fail ();
                }
            });
        }

        public override void PerformAnswerCallAction (CXProvider provider, CXAnswerCallAction action)
        {
            // Find requested call
            var call = CallManager.FindCall (action.CallUuid);

            // Found?
            if (call == null) {
                // No, inform system and exit
                action.Fail ();
                return;
            }

            // Attempt to answer call
            call.AnswerCall ((successful) => {
                // Was the call successfully answered?
                if (successful) {
                    // Yes, inform system
                    action.Fulfill ();
                } else {
                    // No, inform system
                    action.Fail ();
                }
            });
        }

        public override void PerformEndCallAction (CXProvider provider, CXEndCallAction action)
        {
            // Find requested call
            var call = CallManager.FindCall (action.CallUuid);

            // Found?
            if (call == null) {
                // No, inform system and exit
                action.Fail ();
                return;
            }

            // Attempt to answer call
            call.EndCall ((successful) => {
                // Was the call successfully answered?
                if (successful) {
                    // Remove call from manager's queue
                    CallManager.Calls.Remove (call);

                    // Yes, inform system
                    action.Fulfill ();
                } else {
                    // No, inform system
                    action.Fail ();
                }
            });
        }

        public override void PerformSetHeldCallAction (CXProvider provider, CXSetHeldCallAction action)
        {
            // Find requested call
            var call = CallManager.FindCall (action.CallUuid);

            // Found?
            if (call == null) {
                // No, inform system and exit
                action.Fail ();
                return;
            }

            // Update hold status
            call.isOnHold = action.OnHold;

            // Inform system of success
            action.Fulfill ();
        }

        public override void TimedOutPerformingAction (CXProvider provider, CXAction action)
        {
            // Inform user that the action has timed out
        }

        public override void DidActivateAudioSession (CXProvider provider, AVFoundation.AVAudioSession audioSession)
        {
            // Start the calls audio session here
        }

        public override void DidDeactivateAudioSession (CXProvider provider, AVFoundation.AVAudioSession audioSession)
        {
            // End the calls audio session and restart any non-call
            // related audio
        }
        #endregion

        #region Public Methods
        public void ReportIncomingCall (NSUuid uuid, string handle)
        {
            // Create update to describe the incoming call and caller
            var update = new CXCallUpdate ();
            update.RemoteHandle = new CXHandle (CXHandleType.Generic, handle);

            // Report incoming call to system
            Provider.ReportNewIncomingCall (uuid, update, (error) => {
                // Was the call accepted
                if (error == null) {
                    // Yes, report to call manager
                    CallManager.Calls.Add (new ActiveCall (uuid, handle, false));
                } else {
                    // Report error to user here
                    Console.WriteLine ("Error: {0}", error);
                }
            });
        }
        #endregion
    }
}
建立此委派的實體時,會傳遞 ActiveCallManager 用來處理任何呼叫活動的 。 接下來,它會定義 將回應的句柄類型 (CXHandleType) CXProvider :
// Define handle types
var handleTypes = new [] { (NSNumber)(int)CXHandleType.PhoneNumber };
而且它會取得範本映像,該映像會在呼叫進行時套用至應用程式的圖示:
// Get Image Template
var templateImage = UIImage.FromFile ("telephone_receiver.png");
這些值會組合成 CXProviderConfiguration 將用來設定 的 CXProvider:
// Setup the initial configurations
Configuration = new CXProviderConfiguration ("MonkeyCall") {
    MaximumCallsPerCallGroup = 1,
    SupportedHandleTypes = new NSSet<NSNumber> (handleTypes),
    IconTemplateImageData = templateImage.AsPNG(),
    RingtoneSound = "musicloop01.wav"
};
然後委派會使用這些組態建立新的 CXProvider ,並將它附加至它:
// Create a new provider
Provider = new CXProvider (Configuration);

// Attach this delegate
Provider.SetDelegate (this, null);
使用 CallKit 時,應用程式將不再建立及處理自己的音訊會話,而是需要設定並使用系統將為其建立及處理的音訊會話。
如果這是真正的應用程式,方法 DidActivateAudioSession 會用來啟動呼叫,並 AVAudioSession 預先設定系統所提供的 :
public override void DidActivateAudioSession (CXProvider provider, AVFoundation.AVAudioSession audioSession)
{
    // Start the call's audio session here...
}
它也會使用 DidDeactivateAudioSession 方法來完成並釋放其與系統提供的音訊會話的連線:
public override void DidDeactivateAudioSession (CXProvider provider, AVFoundation.AVAudioSession audioSession)
{
    // End the calls audio session and restart any non-call
    // releated audio
}
下列各節將詳細說明其餘程序代碼。
AppDelegate 類別
MonkeyCall 會使用 AppDelegate 來保存 的 ActiveCallManager 實例,而且 CXProviderDelegate 會在整個應用程式中使用:
using Foundation;
using UIKit;
using Intents;
using System;

namespace MonkeyCall
{
    [Register ("AppDelegate")]
    public class AppDelegate : UIApplicationDelegate
    {
        #region Constructors
        public override UIWindow Window { get; set; }
        public ActiveCallManager CallManager { get; set; }
        public ProviderDelegate CallProviderDelegate { get; set; }
        #endregion

        #region Override Methods
        public override bool FinishedLaunching (UIApplication application, NSDictionary launchOptions)
        {
            // Initialize the call handlers
            CallManager = new ActiveCallManager ();
            CallProviderDelegate = new ProviderDelegate (CallManager);

            return true;
        }

        public override bool OpenUrl (UIApplication app, NSUrl url, NSDictionary options)
        {
            // Get handle from url
            var handle = StartCallRequest.CallHandleFromURL (url);

            // Found?
            if (handle == null) {
                // No, report to system
                Console.WriteLine ("Unable to get call handle from URL: {0}", url);
                return false;
            } else {
                // Yes, start call and inform system
                CallManager.StartCall (handle);
                return true;
            }
        }

        public override bool ContinueUserActivity (UIApplication application, NSUserActivity userActivity, UIApplicationRestorationHandler completionHandler)
        {
            var handle = StartCallRequest.CallHandleFromActivity (userActivity);

            // Found?
            if (handle == null) {
                // No, report to system
                Console.WriteLine ("Unable to get call handle from User Activity: {0}", userActivity);
                return false;
            } else {
                // Yes, start call and inform system
                CallManager.StartCall (handle);
                return true;
            }
        }

        ...
        #endregion
    }
}
當 OpenUrl 應用程式正在處理傳出呼叫時,會使用 和 ContinueUserActivity override 方法。 如需詳細資訊,請參閱下方的 處理傳出電話 一節。
處理來電
在一般來電工作流程期間,傳入 VOIP 通話可以經歷數個狀態和程式,例如:
- 通知使用者(和系統)有來電存在。
- 當使用者想要接聽通話並初始化與其他使用者的通話時,接收通知。
- 當使用者想要結束目前的通話時,通知系統和通訊網路。
下列各節將詳細說明應用程式如何使用 CallKit 來處理來電工作流程,再次使用 MonkeyCall VOIP 應用程式作為範例。
通知用戶來電
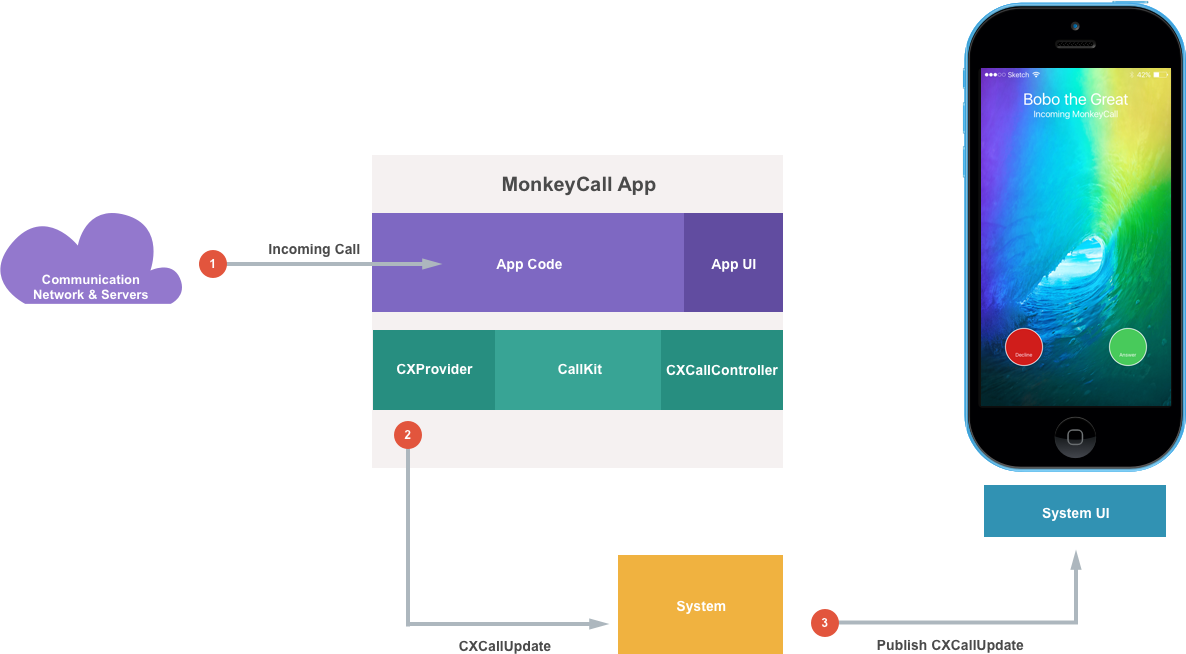
當遠端使用者與本機用戶啟動 VOIP 交談時,會發生下列情況:
- 應用程式會從其通訊網路取得有連入 VOIP 通話的通知。
- 應用程式會使用
CXProvider將 傳送CXCallUpdate給系統,告知其呼叫。 - 系統會使用 CallKit,將呼叫發佈至系統 UI、系統服務和任何其他 VOIP 應用程式。
例如,在中 CXProviderDelegate:
public void ReportIncomingCall (NSUuid uuid, string handle)
{
    // Create update to describe the incoming call and caller
    var update = new CXCallUpdate ();
    update.RemoteHandle = new CXHandle (CXHandleType.Generic, handle);

    // Report incoming call to system
    Provider.ReportNewIncomingCall (uuid, update, (error) => {
        // Was the call accepted
        if (error == null) {
            // Yes, report to call manager
            CallManager.Calls.Add (new ActiveCall (uuid, handle, false));
        } else {
            // Report error to user here
            Console.WriteLine ("Error: {0}", error);
        }
    });
}
此程式代碼會建立新的 CXCallUpdate 實例,並將句柄附加至它會識別呼叫端的句柄。 接下來,它會使用 ReportNewIncomingCall 類別的 CXProvider 方法,通知系統呼叫。 如果成功,則會將呼叫新增至應用程式的作用中呼叫集合,如果不是,則錯誤必須回報給使用者。
使用者接聽來電
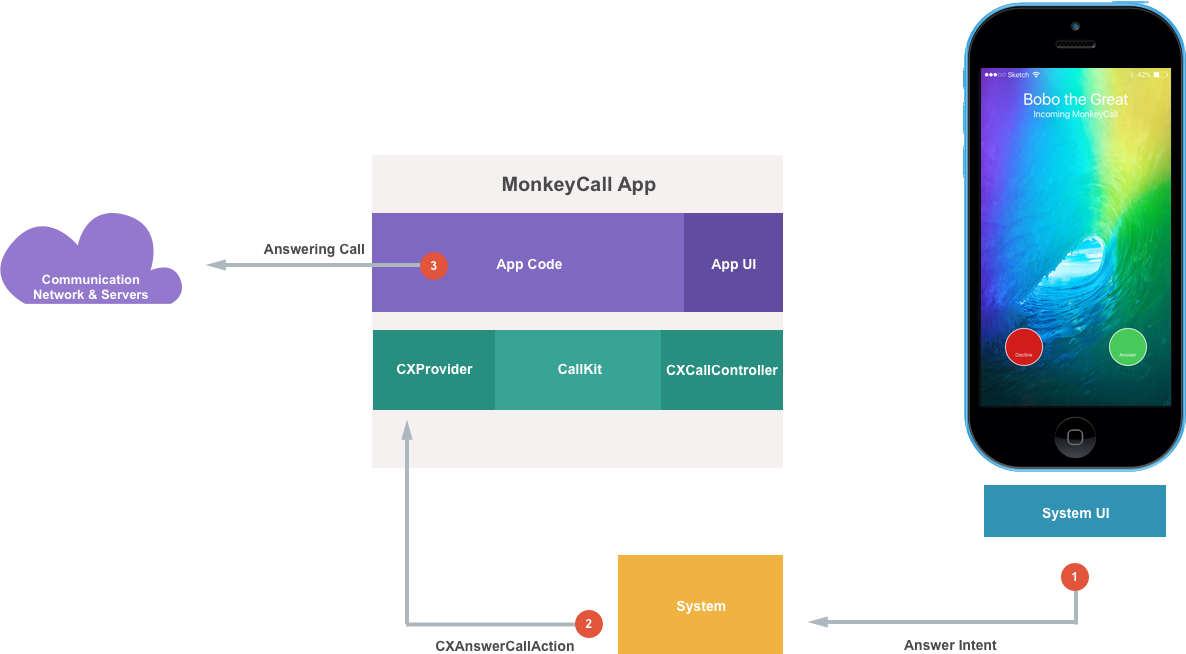
如果使用者想要接聽連入 VOIP 通話,就會發生下列情況:
- 系統 UI 會通知系統使用者想要接聽 VOIP 通話。
- 系統會將 傳送
CXAnswerCallAction給應用程式,通知應用程式CXProvider回應意圖。 - 應用程式會通知其通訊網路,使用者正在接聽通話,而 VOIP 通話會如往常般繼續。
例如,在中 CXProviderDelegate:
public override void PerformAnswerCallAction (CXProvider provider, CXAnswerCallAction action)
{
    // Find requested call
    var call = CallManager.FindCall (action.CallUuid);

    // Found?
    if (call == null) {
        // No, inform system and exit
        action.Fail ();
        return;
    }

    // Attempt to answer call
    call.AnswerCall ((successful) => {
        // Was the call successfully answered?
        if (successful) {
            // Yes, inform system
            action.Fulfill ();
        } else {
            // No, inform system
            action.Fail ();
        }
    });
}
此程式代碼會先在其作用中呼叫清單中搜尋指定的呼叫。 如果找不到呼叫,系統會收到通知,而且方法會結束。 如果找到 AnswerCall ,則會呼叫 類別的 ActiveCall 方法來啟動呼叫,而且如果系統成功或失敗,則為資訊。
用戶結束來電
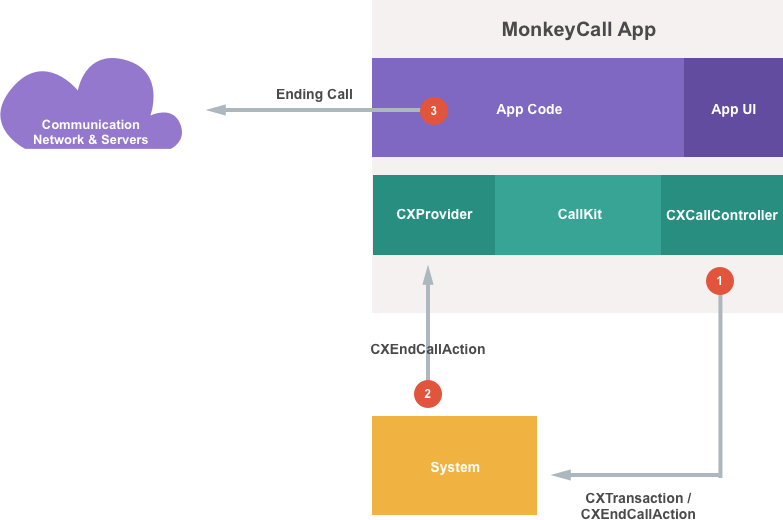
如果使用者想要從應用程式的 UI 內終止呼叫,就會發生下列情況:
- 應用程式會
CXEndCallAction建立 ,其會組合成CXTransaction傳送至系統的 ,以通知呼叫即將結束。 - 系統會驗證結束呼叫意圖,並透過
CXProvider將傳CXEndCallAction回應用程式。 - 然後,應用程式會通知其通訊網路通話即將結束。
例如,在中 CXProviderDelegate:
public override void PerformEndCallAction (CXProvider provider, CXEndCallAction action)
{
    // Find requested call
    var call = CallManager.FindCall (action.CallUuid);

    // Found?
    if (call == null) {
        // No, inform system and exit
        action.Fail ();
        return;
    }

    // Attempt to answer call
    call.EndCall ((successful) => {
        // Was the call successfully answered?
        if (successful) {
            // Remove call from manager's queue
            CallManager.Calls.Remove (call);

            // Yes, inform system
            action.Fulfill ();
        } else {
            // No, inform system
            action.Fail ();
        }
    });
}
此程式代碼會先在其作用中呼叫清單中搜尋指定的呼叫。 如果找不到呼叫,系統會收到通知,而且方法會結束。 如果找到,則會 EndCall 呼叫 類別的 ActiveCall 方法以結束呼叫,而且如果系統成功或失敗,則為資訊。 如果成功,就會從使用中呼叫的集合中移除呼叫。
管理多個呼叫
大部分的 VOIP 應用程式可以一次處理多個呼叫。 例如,如果目前有作用中的 VOIP 通話,且應用程式會收到有新來電的通知,則用戶可以在第一次通話上暫停或停止回應第二個通話。
在上述情況中,系統會將 傳送 CXTransaction 給應用程式,其中包含多個動作的清單(例如 CXEndCallAction 和 CXAnswerCallAction)。 所有這些動作都必須個別完成,讓系統可以適當地更新UI。
處理傳出呼叫
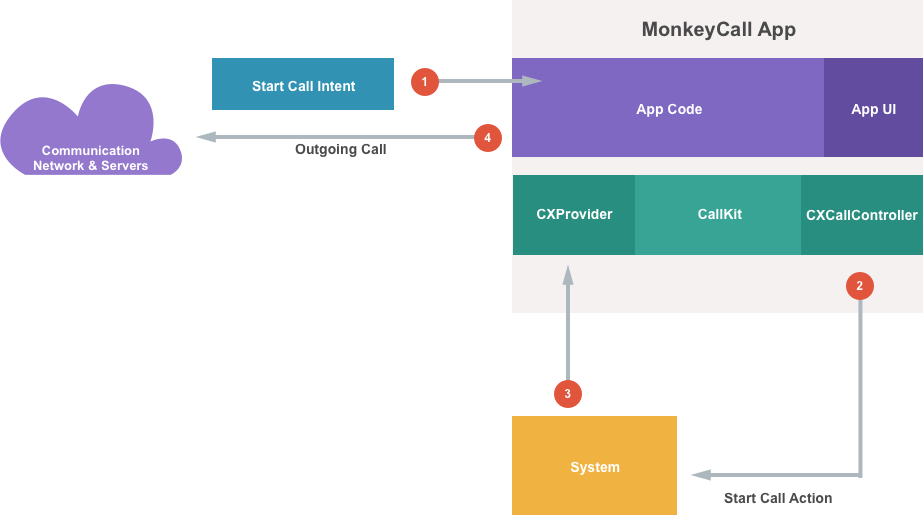
例如,如果使用者從 [最近] 清單點選一個專案(在 電話 應用程式中),也就是從屬於應用程式的呼叫,系統會傳送啟動通話意圖:
- 應用程式會根據從系統收到的啟動呼叫意圖來建立 啟動呼叫動作 。
- 應用程式會使用
CXCallController,向系統要求啟動呼叫動作。 - 如果系統接受 Action,則會透過
XCProvider委派將它傳回給應用程式。 - 應用程式會使用其通訊網路啟動傳出呼叫。
如需意圖的詳細資訊,請參閱我們的 意圖和意圖 UI 延伸模組 檔。
撥出通話生命週期
使用 CallKit 和傳出通話時,應用程式必須通知系統下列生命週期事件:
- 啟動 - 通知系統即將啟動傳出電話。
- 已啟動 - 通知系統撥出電話已啟動。
- 連線 - 通知系統撥出通話正在連線。
- 連線 - 通知撥出電話已連線,雙方現在可以交談。
例如,下列程式代碼會啟動傳出呼叫:
private CXCallController CallController = new CXCallController ();
...

private void SendTransactionRequest (CXTransaction transaction)
{
    // Send request to call controller
    CallController.RequestTransaction (transaction, (error) => {
        // Was there an error?
        if (error == null) {
            // No, report success
            Console.WriteLine ("Transaction request sent successfully.");
        } else {
            // Yes, report error
            Console.WriteLine ("Error requesting transaction: {0}", error);
        }
    });
}

public void StartCall (string contact)
{
    // Build call action
    var handle = new CXHandle (CXHandleType.Generic, contact);
    var startCallAction = new CXStartCallAction (new NSUuid (), handle);

    // Create transaction
    var transaction = new CXTransaction (startCallAction);

    // Inform system of call request
    SendTransactionRequest (transaction);
}
它會建立 CXHandle ,並使用它來設定 CXStartCallAction ,其隨附於 CXTransaction 使用 RequestTransaction 類別的 CXCallController 方法傳送至系統。 藉由呼叫 RequestTransaction 方法,系統可以在新的呼叫開始之前,將任何現有的呼叫置於保留狀態,無論來源為何(電話 應用程式、FaceTime、VOIP 等等)。
啟動傳出 VOIP 通話的要求可能來自數個不同的來源,例如 Siri、連絡人卡片上的專案(在聯繫人應用程式中),或來自 [最近] 清單(在 電話 應用程式中)。 在這些情況下,應用程式會在 內部 NSUserActivity 傳送啟動呼叫意圖,而AppDelegate必須處理它:
public override bool ContinueUserActivity (UIApplication application, NSUserActivity userActivity, UIApplicationRestorationHandler completionHandler)
{
    var handle = StartCallRequest.CallHandleFromActivity (userActivity);

    // Found?
    if (handle == null) {
        // No, report to system
        Console.WriteLine ("Unable to get call handle from User Activity: {0}", userActivity);
        return false;
    } else {
        // Yes, start call and inform system
        CallManager.StartCall (handle);
        return true;
    }
}
在這裡, CallHandleFromActivity 協助程式類別 StartCallRequest 的 方法是用來取得所呼叫人員的句柄(請參閱 上面的 StartCallRequest 類別 )。
PerformStartCallAction ProviderDelegate 類別的 方法可用來最終啟動實際的傳出呼叫,並通知系統其生命週期:
public override void PerformStartCallAction (CXProvider provider, CXStartCallAction action)
{
    // Create new call record
    var activeCall = new ActiveCall (action.CallUuid, action.CallHandle.Value, true);

    // Monitor state changes
    activeCall.StartingConnectionChanged += (call) => {
        if (call.IsConnecting) {
            // Inform system that the call is starting
            Provider.ReportConnectingOutgoingCall (call.UUID, call.StartedConnectingOn.ToNSDate());
        }
    };

    activeCall.ConnectedChanged += (call) => {
        if (call.IsConnected) {
            // Inform system that the call has connected
            Provider.ReportConnectedOutgoingCall (call.UUID, call.ConnectedOn.ToNSDate ());
        }
    };

    // Start call
    activeCall.StartCall ((successful) => {
        // Was the call able to be started?
        if (successful) {
            // Yes, inform the system
            action.Fulfill ();

            // Add call to manager
            CallManager.Calls.Add (activeCall);
        } else {
            // No, inform system
            action.Fail ();
        }
    });
}
它會建立 類別的 ActiveCall 實例(以保存進行中呼叫的相關信息),並填入被呼叫的人員。 StartingConnectionChanged和 ConnectedChanged 事件可用來監視和報告傳出呼叫生命週期。 通話已啟動,並通知系統已完成動作。
結束撥出通話
當使用者完成撥出電話並想要結束呼叫時,可以使用下列程式代碼:
private CXCallController CallController = new CXCallController ();
...

private void SendTransactionRequest (CXTransaction transaction)
{
    // Send request to call controller
    CallController.RequestTransaction (transaction, (error) => {
        // Was there an error?
        if (error == null) {
            // No, report success
            Console.WriteLine ("Transaction request sent successfully.");
        } else {
            // Yes, report error
            Console.WriteLine ("Error requesting transaction: {0}", error);
        }
    });
}

public void EndCall (ActiveCall call)
{
    // Build action
    var endCallAction = new CXEndCallAction (call.UUID);

    // Create transaction
    var transaction = new CXTransaction (endCallAction);

    // Inform system of call request
    SendTransactionRequest (transaction);
}
如果建立CXEndCallAction具有結束呼叫 UUID 的 ,請使用 類別的 CXCallController 方法,將它組合在CXTransaction傳送至系統的 RequestTransaction 中。
其他 CallKit 詳細數據
本節將討論開發人員在使用 CallKit 時需要考慮的一些其他詳細數據,例如:
- 提供者設定
- 動作錯誤
- 系統限制
- VOIP 音訊
提供者設定
提供者設定可讓 iOS 10 VOIP 應用程式在使用 CallKit 時自定義用戶體驗(在原生通話 UI 內)。
應用程式可以進行下列類型的自訂:
- 顯示本地化的名稱。
- 啟用視訊通話支援。
- 藉由呈現自己的範本影像圖示,自定義 [呼叫中 UI] 上的按鈕。 使用者與自定義按鈕的互動會直接傳送至要處理的應用程式。
動作錯誤
使用 CallKit 的 iOS 10 VOIP 應用程式必須正常處理動作失敗,並隨時通知使用者動作狀態。
將下列範例納入考慮:
- 應用程式已收到啟動通話動作,並開始使用其通訊網路初始化新的 VOIP 通話程式。
- 由於網路通訊功能有限或沒有,因此此聯機會失敗。
- 應用程式必須將 [失敗] 訊息傳送回 [啟動呼叫動作] ,
Action.Fail()以通知系統失敗。 - 這可讓系統通知用戶通話的狀態。 例如,若要顯示呼叫失敗UI。
此外,iOS 10 VOIP 應用程式必須回應 在指定時間內無法處理預期動作時可能發生的逾時錯誤 。 CallKit 所提供的每個動作類型都有與其相關聯的最大逾時值。 這些逾時值可確保使用者所要求的任何 CallKit Action 都會以回應方式處理,進而讓 OS 流暢且回應。
提供者委派 (CXProviderDelegate) 上有數種方法應該覆寫,以正常處理此逾時情況。
系統限制
根據執行 iOS 10 VOIP 應用程式的 iOS 裝置目前狀態,可能會強制執行特定系統限制。
例如,如果下列狀況,系統可以限制連入 VOIP 通話:
- 通話人員位於使用者的封鎖來電者清單上。
- 使用者的 iOS 裝置處於 Do-Not-Disturb 模式。
如果 VOIP 呼叫受限於上述任何情況,請使用下列程式代碼來處理它:
public class ProviderDelegate : CXProviderDelegate
{
...

    public void ReportIncomingCall (NSUuid uuid, string handle)
    {
        // Create update to describe the incoming call and caller
        var update = new CXCallUpdate ();
        update.RemoteHandle = new CXHandle (CXHandleType.Generic, handle);

        // Report incoming call to system
        Provider.ReportNewIncomingCall (uuid, update, (error) => {
            // Was the call accepted
            if (error == null) {
                // Yes, report to call manager
                CallManager.Calls.Add (new ActiveCall (uuid, handle, false));
            } else {
                // Report error to user here
                if (error.Code == (int)CXErrorCodeIncomingCallError.CallUuidAlreadyExists) {
                    // Handle duplicate call ID
                } else if (error.Code == (int)CXErrorCodeIncomingCallError.FilteredByBlockList) {
                    // Handle call from blocked user
                } else if (error.Code == (int)CXErrorCodeIncomingCallError.FilteredByDoNotDisturb) {
                    // Handle call while in do-not-disturb mode
                } else {
                    // Handle unknown error
                }
            }
        });
    }

}
VOIP 音訊
CallKit 提供數個優點,可處理 iOS 10 VOIP 應用程式在即時 VOIP 通話期間所需的音訊資源。 其中一個最大的優點是應用程式音訊會話在iOS 10中執行時,會提高優先順序。 這與內建的 電話 和 FaceTime 應用程式相同,此增強的優先順序層級可防止其他執行中的應用程式中斷 VOIP 應用程式的音訊會話。
此外,CallKit 可以存取其他音訊路由提示,以根據使用者喜好設定和裝置狀態,在即時通話期間,以智慧方式將 VOIP 音訊路由傳送至特定輸出裝置。 例如,根據藍牙耳機、即時 CarPlay 連線或輔助功能設定等附加裝置。
在使用 CallKit 的一般 VOIP 通話生命週期中,應用程式必須設定 CallKit 將提供的音訊串流。 請檢視下列範例:
- 應用程式會收到啟動通話動作以接聽來電。
- 在應用程式完成此動作之前,它會提供其
AVAudioSession所需的設定。 - 應用程式會通知系統已完成動作。
- 呼叫連線之前,CallKit 會提供與應用程式所要求的設定相符的高優先順序
AVAudioSession。 應用程式將會透過DidActivateAudioSession其CXProviderDelegate的方法收到通知。
使用通話目錄延伸模組
使用 CallKit 時, 通話目錄延伸模組 提供一種方式,將封鎖的通話號碼新增,並識別指定 VOIP 應用程式專屬的號碼給 iOS 裝置上聯繫人中的聯繫人。
實作通話目錄擴充功能
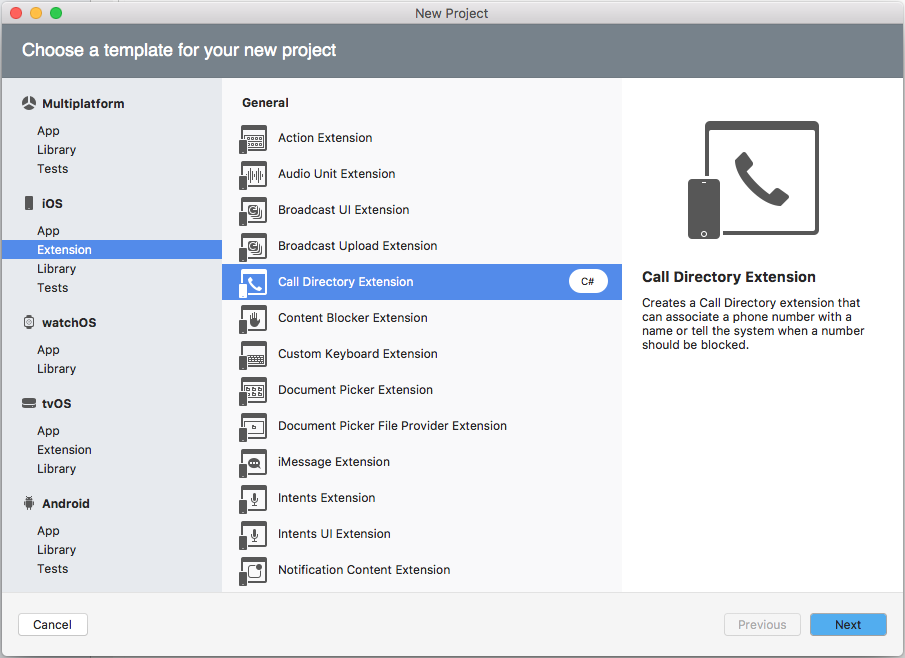
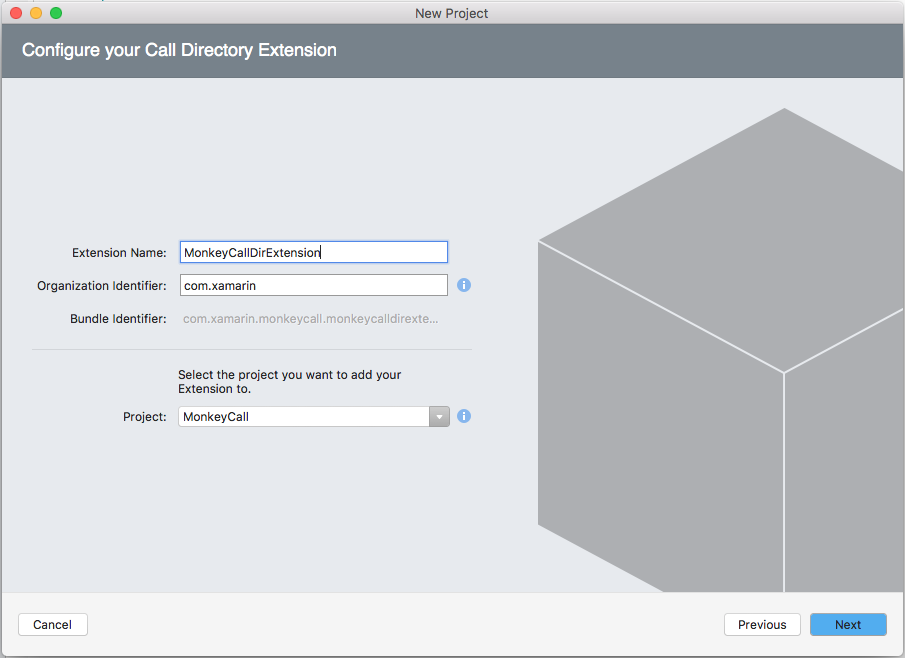
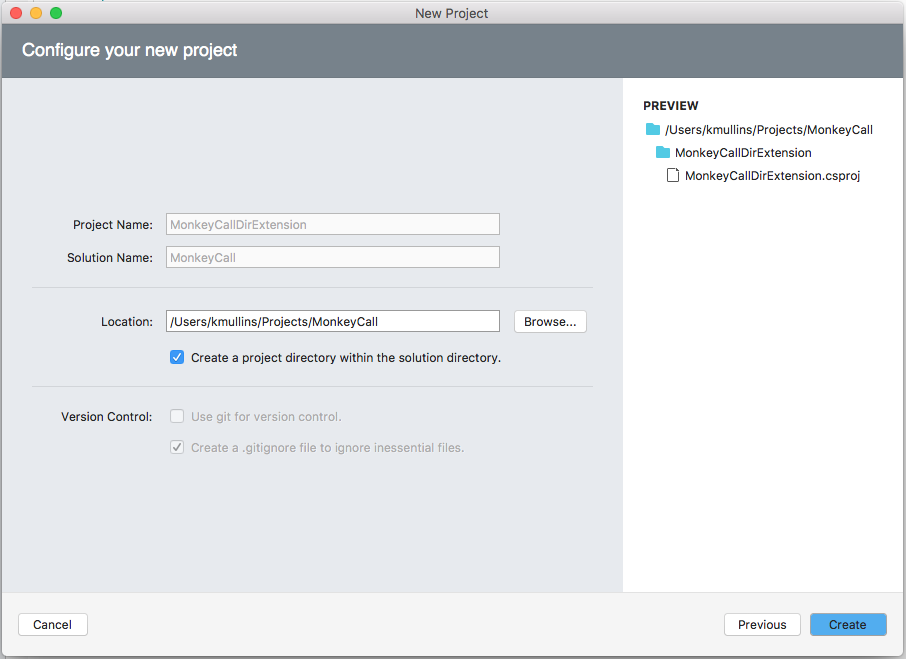
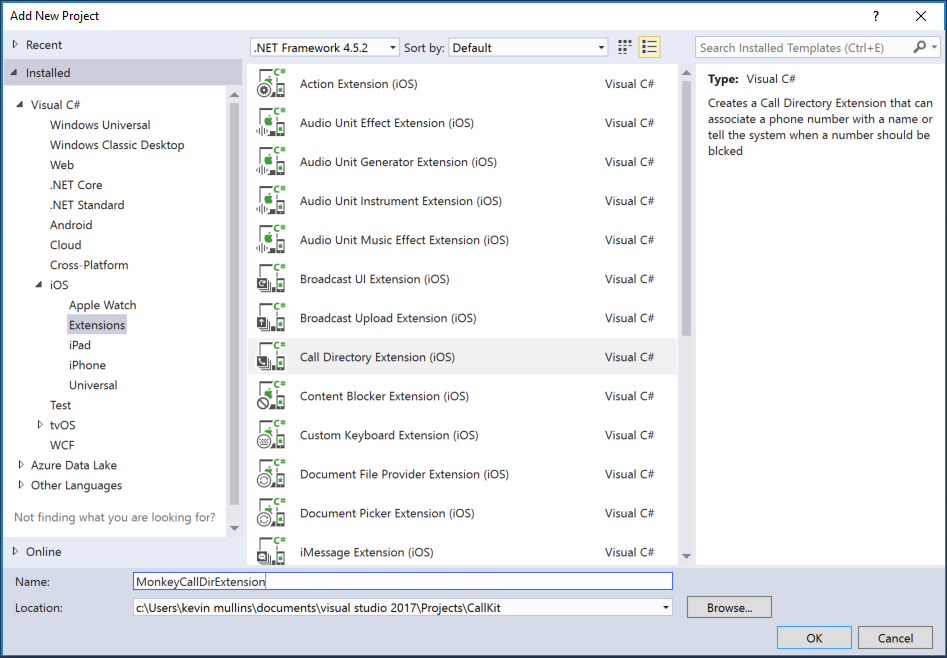
若要在 Xamarin.iOS 應用程式中實作呼叫目錄擴充功能,請執行下列動作:
這會將類別新增 CallDirectoryHandler.cs 至如下所示的專案:
using System;

using Foundation;
using CallKit;

namespace MonkeyCallDirExtension
{
    [Register ("CallDirectoryHandler")]
    public class CallDirectoryHandler : CXCallDirectoryProvider, ICXCallDirectoryExtensionContextDelegate
    {
        #region Constructors
        protected CallDirectoryHandler (IntPtr handle) : base (handle)
        {
            // Note: this .ctor should not contain any initialization logic.
        }
        #endregion

        #region Override Methods
        public override void BeginRequest (CXCallDirectoryExtensionContext context)
        {
            context.Delegate = this;

            if (!AddBlockingPhoneNumbers (context)) {
                Console.WriteLine ("Unable to add blocking phone numbers");
                var error = new NSError (new NSString ("CallDirectoryHandler"), 1, null);
                context.CancelRequest (error);
                return;
            }

            if (!AddIdentificationPhoneNumbers (context)) {
                Console.WriteLine ("Unable to add identification phone numbers");
                var error = new NSError (new NSString ("CallDirectoryHandler"), 2, null);
                context.CancelRequest (error);
                return;
            }

            context.CompleteRequest (null);
        }
        #endregion

        #region Private Methods
        private bool AddBlockingPhoneNumbers (CXCallDirectoryExtensionContext context)
        {
            // Retrieve phone numbers to block from data store. For optimal performance and memory usage when there are many phone numbers,
            // consider only loading a subset of numbers at a given time and using autorelease pool(s) to release objects allocated during each batch of numbers which are loaded.
            //
            // Numbers must be provided in numerically ascending order.

            long [] phoneNumbers = { 14085555555, 18005555555 };

            foreach (var phoneNumber in phoneNumbers)
                context.AddBlockingEntry (phoneNumber);

            return true;
        }

        private bool AddIdentificationPhoneNumbers (CXCallDirectoryExtensionContext context)
        {
            // Retrieve phone numbers to identify and their identification labels from data store. For optimal performance and memory usage when there are many phone numbers,
            // consider only loading a subset of numbers at a given time and using autorelease pool(s) to release objects allocated during each batch of numbers which are loaded.
            //
            // Numbers must be provided in numerically ascending order.

            long [] phoneNumbers = { 18775555555, 18885555555 };
            string [] labels = { "Telemarketer", "Local business" };

            for (var i = 0; i < phoneNumbers.Length; i++) {
                long phoneNumber = phoneNumbers [i];
                string label = labels [i];
                context.AddIdentificationEntry (phoneNumber, label);
            }

            return true;
        }
        #endregion

        #region Public Methods
        public void RequestFailed (CXCallDirectoryExtensionContext extensionContext, NSError error)
        {
            // An error occurred while adding blocking or identification entries, check the NSError for details.
            // For Call Directory error codes, see the CXErrorCodeCallDirectoryManagerError enum.
            //
            // This may be used to store the error details in a location accessible by the extension's containing app, so that the
            // app may be notified about errors which occurred while loading data even if the request to load data was initiated by
            // the user in Settings instead of via the app itself.
        }
        #endregion
    }
}
BeginRequest呼叫目錄處理程式中的 方法必須修改,以提供必要的功能。 在上述範例中,它會嘗試在 VOIP 應用程式的聯繫人資料庫中設定封鎖和可用號碼的清單。 如果任一要求因任何原因而失敗,請建立 NSError 來描述失敗並傳遞 CancelRequest 類別的 CXCallDirectoryExtensionContext 方法。
若要設定封鎖的數位,請使用 AddBlockingEntry 類別的 CXCallDirectoryExtensionContext 方法。 提供給方法 的數字必須 以數值遞增順序。 為了在有許多電話號碼時達到最佳效能和記憶體使用量,請考慮只在指定時間載入數位子集,並使用自動發行集區來釋放載入每個批次號碼期間所配置的物件。
若要通知聯繫人應用程式 VOIP 應用程式已知的聯繫人號碼,請使用 AddIdentificationEntry 類別的 CXCallDirectoryExtensionContext 方法,並提供號碼和識別標籤。 同樣地,提供給 方法 的數字必須 以數值遞增順序。 為了在有許多電話號碼時達到最佳效能和記憶體使用量,請考慮只在指定時間載入數位子集,並使用自動發行集區來釋放載入每個批次號碼期間所配置的物件。
摘要
本文涵蓋 Apple 在 iOS 10 中發行的新 CallKit API,以及如何在 Xamarin.iOS VOIP 應用程式中實作。 它已示範 CallKit 如何允許應用程式整合到 iOS 系統、它如何提供功能與內建應用程式(例如 電話)的同位,以及如何透過 Siri 互動和聯繫人應用程式等位置增加應用程式在 iOS 中的可見度。
