警告
iOS 設計工具在 Visual Studio 2019 16.8 版和 Visual Studio 2019 for Mac 8.8 版中已被取代,並在 Visual Studio 2019 16.9 版和 Visual Studio for Mac 8.9 版中移除。 建置 iOS 使用者介面的建議方式是直接在執行 Xcode 介面產生器的 Mac 上。 如需詳細資訊,請參閱 使用 Xcode 設計使用者介面。
逐步解說的這個部分會在 Phoneword 應用程式中新增第二個畫面,其中顯示使用應用程式撥打的電話號碼歷程記錄。 最終的應用程式將具有第二個畫面來顯示通話記錄,如下列螢幕擷取畫面所示:
隨附的深度剖析將檢閱已建置的應用程式並討論架構、巡覽、以及過程中遇到的其他 iOS 新概念。
需求
本指南會從 Hello, iOS 文件未完成的地方繼續,而且必須完成 Hello, iOS 快速入門。
macOS 的逐步解說
本逐步解說將會在 Phoneword 應用程式中新增 [通話記錄] 畫面。
在 Visual Studio for Mac 中開啟 Phoneword 應用程式。
從 Solution Pad 開啟 Main.storyboard 檔案:
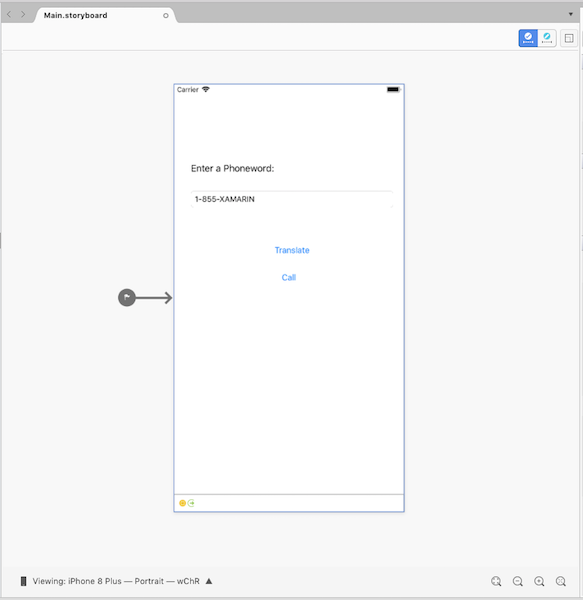
將 [瀏覽控制器] 從 [工具箱] 拖曳至設計介面 (您可能需要縮小,才能在設計介面上容納這些所有項目!):
![將 [瀏覽控制器] 從 [工具箱] 拖曳至設計介面](hello-ios-multiscreen-quickstart-images/03new.png)
將無來源的 Segue (單一檢視控制器左邊的灰色箭頭) 拖曳到 [瀏覽控制器],以變更應用程式的起點:
![將無來源的 Segue 拖曳至 [瀏覽控制器],以變更應用程式的起點](hello-ios-multiscreen-quickstart-images/04new.png)
按底部列來選取現有的 [根檢視控制器],然後按 Delete 鍵,從設計介面移除它。 接著,移至 [瀏覽控制器] 旁的 Phoneword 場景:
![移至 [瀏覽控制器] 旁的 Phoneword 場景](hello-ios-multiscreen-quickstart-images/05new.png)
設定 ViewController 作為瀏覽控制器的根檢視控制器。 按住 Ctrl 鍵,並在 [瀏覽控制器] 內部按一下。 應該會出現藍色線條。 接著,持續按住 Ctrl 鍵,從 [瀏覽控制器] 拖曳至 Phoneword 場景,然後放開。 這稱為「Ctrl 拖曳」:
![從 [瀏覽控制器] 拖曳至 Phoneword 場景,然後放開](hello-ios-multiscreen-quickstart-images/06.png)
從 popover,將關聯性設為 [根]:
![將關聯性設為 [根]](hello-ios-multiscreen-quickstart-images/07new.png)
ViewController 現在是瀏覽控制器的根檢視控制器:

按兩下 Phoneword 畫面的 [標題] 列,然後將標題變更為 Phoneword:

從 [工具箱] 拖曳 [按鈕],並放置於 [通話按鈕] 下方。 拖曳控點,讓新的 [按鈕] 與 [通話按鈕] 等寬:
![讓新的 [按鈕] 與 [通話按鈕] 等寬](hello-ios-multiscreen-quickstart-images/10new.png)
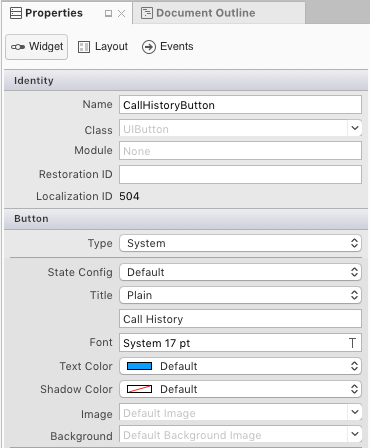
在 Properties Pad 中,將按鈕的 [名稱] 變更為 CallHistoryButton,並將 [標題] 變更為通話記錄:
建立 [通話記錄] 畫面。 從 [工具箱] 中,將 [資料表檢視控制器] 拖曳至設計介面:
![將 [資料表檢視控制器] 拖曳至設計介面](hello-ios-multiscreen-quickstart-images/12new.png)
接下來,按一下場景底部的黑色列來選取 [資料表檢視控制器]。 在 Properties Pad 中,將 [資料表檢視控制器] 的類別變更為
CallHistoryController,然後按 Enter 鍵:![將 [資料表檢視控制器] 類別變更為 CallHistoryController](hello-ios-multiscreen-quickstart-images/13new.png)
iOS 設計工具將產生稱為
CallHistoryController的自訂支援類別,用來管理此畫面的內容檢視階層。 CallHistoryController.cs 檔案將出現在 Solution Pad 中: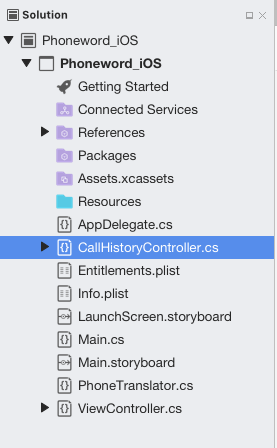
按兩下 CallHistoryController.cs 檔案加以開啟,並使用下列程式碼來取代內容:
using System;
using Foundation;
using UIKit;
using System.Collections.Generic;

namespace Phoneword_iOS
{
    public partial class CallHistoryController : UITableViewController
    {
        public List<string> PhoneNumbers { get; set; }

        static NSString callHistoryCellId = new NSString ("CallHistoryCell");

        public CallHistoryController (IntPtr handle) : base (handle)
        {
            TableView.RegisterClassForCellReuse (typeof(UITableViewCell), callHistoryCellId);
            TableView.Source = new CallHistoryDataSource (this);
            PhoneNumbers = new List<string> ();
        }

        class CallHistoryDataSource : UITableViewSource
        {
            CallHistoryController controller;

            public CallHistoryDataSource (CallHistoryController controller)
            {
                this.controller = controller;
            }

            public override nint RowsInSection (UITableView tableView, nint section)
            {
                return controller.PhoneNumbers.Count;
            }

            public override UITableViewCell GetCell (UITableView tableView, NSIndexPath indexPath)
            {
                var cell = tableView.DequeueReusableCell (CallHistoryController.callHistoryCellId);

                int row = indexPath.Row;
                cell.TextLabel.Text = controller.PhoneNumbers [row];
                return cell;
            }
        }
    }
}
儲存應用程式 (⌘ + s) 並建置該檔案 (⌘ + b),以確保沒有任何錯誤。
在 Phoneword 場景與通話記錄場景之間建立一個 Segue (轉換)。 在 Phoneword 場景中,選取通話記錄按鈕,然後從按鈕 Ctrl 拖曳至通話記錄場景:

從 [動作 Segue] popover,選取 [顯示]
iOS 設計工具將在兩個場景之間新增一個 Segue:
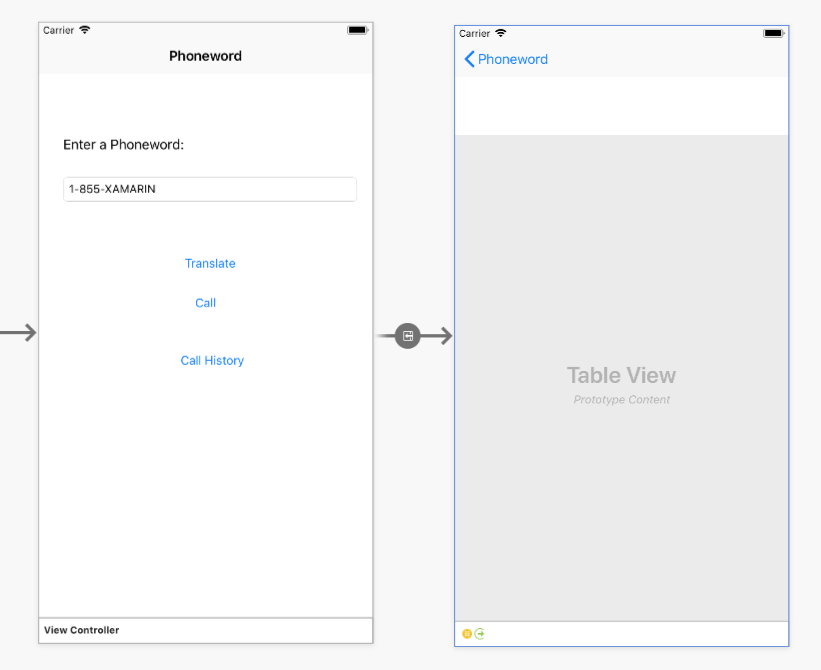
選取場景底部的黑色列,然後在 Properties Pad 中,將檢視控制器標題變更為通話記錄,以便將標題新增至 [資料表檢視控制器]:
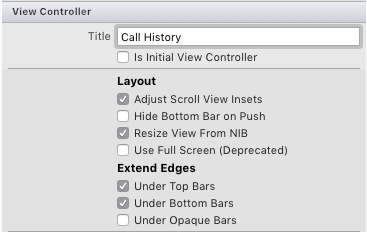
執行應用程式時,通話記錄按鈕將會開啟 [通話記錄] 畫面,但資料表檢視會是空白,這是因為沒有可追蹤和顯示電話號碼的程式碼。
此應用程式會將電話號碼儲存為字串清單。
using在 ViewController 頂端新增 的 指示詞System.Collections.Generic:using System.Collections.Generic;使用下列程式碼來修改
ViewController類別:using System; using System.Collections.Generic; using Foundation; using UIKit; namespace Phoneword_iOS { public partial class ViewController : UIViewController { string translatedNumber = ""; public List<string> PhoneNumbers { get; set; } protected ViewController(IntPtr handle) : base(handle) { //initialize list of phone numbers called for Call History screen PhoneNumbers = new List<string>(); } public override void ViewDidLoad() { base.ViewDidLoad(); // Perform any additional setup after loading the view, typically from a nib. TranslateButton.TouchUpInside += (object sender, EventArgs e) => { // Convert the phone number with text to a number // using PhoneTranslator.cs translatedNumber = PhoneTranslator.ToNumber( PhoneNumberText.Text); // Dismiss the keyboard if text field was tapped PhoneNumberText.ResignFirstResponder(); if (translatedNumber == "") { CallButton.SetTitle("Call ", UIControlState.Normal); CallButton.Enabled = false; } else { CallButton.SetTitle("Call " + translatedNumber, UIControlState.Normal); CallButton.Enabled = true; } }; CallButton.TouchUpInside += (object sender, EventArgs e) => { //Store the phone number that we're dialing in PhoneNumbers PhoneNumbers.Add(translatedNumber); // Use URL handler with tel: prefix to invoke Apple's Phone app... var url = new NSUrl("tel:" + translatedNumber); // otherwise show an alert dialog if (!UIApplication.SharedApplication.OpenUrl(url)) { var alert = UIAlertController.Create("Not supported", "Scheme 'tel:' is not supported on this device", UIAlertControllerStyle.Alert); alert.AddAction(UIAlertAction.Create("Ok", UIAlertActionStyle.Default, null)); PresentViewController(alert, true, null); } }; } public override void PrepareForSegue(UIStoryboardSegue segue, NSObject sender) { base.PrepareForSegue(segue, sender); // set the view controller that’s powering the screen we’re // transitioning to var callHistoryController = segue.DestinationViewController as CallHistoryController; //set the table view controller’s list of phone numbers to the // list of dialed phone numbers if (callHistoryController != null) { callHistoryController.PhoneNumbers = PhoneNumbers; } } } }這裡有幾件事會發生:
- 變數
translatedNumber已從ViewDidLoad方法移到「類別層級變數」。 - 已修改 CallButton 程式碼,透過呼叫
PhoneNumbers.Add(translatedNumber)來將撥打的號碼新增至電話號碼清單。 - 已新增
PrepareForSegue方法。
儲存並建置應用程式,以確定沒有任何錯誤。
- 變數
按 [啟動] 按鈕,在 iOS 模擬器內啟動應用程式:
![按 [啟動] 按鈕,在 iOS 模擬器內啟動應用程式](hello-ios-multiscreen-quickstart-images/19.png)
恭喜您完成第一個多重畫面的 Xamarin.iOS 應用程式!
Windows 的逐步解說
本逐步解說將會在 Phoneword 應用程式中新增 [通話記錄] 畫面。
在 Visual Studio 中開啟 Phoneword 應用程式。 請記住,需要連線到 Mac,才能使用 iOS 設計工具和 iOS 模擬器。
從編輯使用者介面開始。 從 [方案總管] 中開啟 Main.storyboard 檔案,確定已將 [檢視方式] 設為 [iPhone 6]:

將 [瀏覽控制器] 從 [工具箱] 拖曳至設計介面:
![將 [瀏覽控制器] 從 [工具箱] 拖曳至設計介面](hello-ios-multiscreen-quickstart-images/image2.png)
將無來源的 Segue (亦即 Phoneword 場景左邊的灰色箭頭) 從 Phoneword 場景拖曳至 [瀏覽控制器],以變更應用程式的起點:
![將無來源的 Segue 拖曳至 [瀏覽控制器],以變更應用程式的起點](hello-ios-multiscreen-quickstart-images/image3.png)
按一下黑色列來選取 [根檢視控制器],然後按 Delete 鍵,從設計介面移除它。 接著,移至 [瀏覽控制器] 旁的 Phoneword 場景:
![移至 [瀏覽控制器] 旁的 Phoneword 場景](hello-ios-multiscreen-quickstart-images/image4.png)
設定 ViewController 作為瀏覽控制器的根檢視控制器。 按下 Ctrl 鍵,並在 [瀏覽控制器] 內部按一下。 應該會出現藍色線條。 接著,持續按住 Ctrl 鍵,從 [瀏覽控制器] 拖曳至 Phoneword 場景,然後放開。 這稱為「Ctrl 拖曳」:
![從 [瀏覽控制器] 拖曳至 Phoneword 場景,然後放開](hello-ios-multiscreen-quickstart-images/image5.png)
從 popover,將關聯性設為 [根]:
![將關聯性設為 [根]](hello-ios-multiscreen-quickstart-images/image6.png)
ViewController 現在是瀏覽控制器的根檢視控制器。
按兩下 Phoneword 畫面的 [標題] 列,然後將標題變更為 Phoneword:

從 [工具箱] 拖曳 [按鈕],並放置於 [通話按鈕] 下方。 拖曳控點,讓新的 [按鈕] 與 [通話按鈕] 等寬:
![讓新的 [按鈕] 與 [通話按鈕] 等寬](hello-ios-multiscreen-quickstart-images/image8.png)
在屬性總管中,將按鈕的名稱變更為
CallHistoryButton,並將標題變更為通話記錄:
建立 [通話記錄] 畫面。 從 [工具箱] 中,將 [資料表檢視控制器] 拖曳至設計介面:
![將 [資料表檢視控制器] 拖曳至設計介面](hello-ios-multiscreen-quickstart-images/image10.png)
按一下場景底部的黑色列來選取 [資料表檢視控制器]。 在屬性總管中,將 [資料表檢視控制器] 的類別變更為
CallHistoryController,然後按 Enter 鍵:![將 [資料表檢視控制器] 類別變更為 CallHistoryController](hello-ios-multiscreen-quickstart-images/image11.png)
iOS 設計工具將產生稱為
CallHistoryController的自訂支援類別,用來管理此畫面的內容檢視階層。 CallHistoryController.cs 檔案將出現在方案總管中:
按兩下 CallHistoryController.cs 檔案加以開啟,並使用下列程式碼來取代內容:
using System;
using Foundation;
using UIKit;
using System.Collections.Generic;

namespace Phoneword
{
    public partial class CallHistoryController : UITableViewController
    {
        public List<String> PhoneNumbers { get; set; }

        static NSString callHistoryCellId = new NSString ("CallHistoryCell");

        public CallHistoryController (IntPtr handle) : base (handle)
        {
            TableView.RegisterClassForCellReuse (typeof(UITableViewCell), callHistoryCellId);
            TableView.Source = new CallHistoryDataSource (this);
            PhoneNumbers = new List<string> ();
        }

        class CallHistoryDataSource : UITableViewSource
        {
            CallHistoryController controller;

            public CallHistoryDataSource (CallHistoryController controller)
            {
                this.controller = controller;
            }

            // Returns the number of rows in each section of the table
            public override nint RowsInSection (UITableView tableView, nint section)
            {
                return controller.PhoneNumbers.Count;
            }

            public override UITableViewCell GetCell (UITableView tableView, NSIndexPath indexPath)
            {
                var cell = tableView.DequeueReusableCell (CallHistoryController.callHistoryCellId);

                int row = indexPath.Row;
                cell.TextLabel.Text = controller.PhoneNumbers [row];
                return cell;
            }
        }
    }
}
儲存應用程式並建置該檔案,以確保沒有任何錯誤。 現在可以略過任何建置警告。
在 Phoneword 場景與通話記錄場景之間建立一個 Segue (轉換)。 在 Phoneword 場景中,選取通話記錄按鈕,然後從按鈕Ctrl 拖曳至通話記錄場景:

從 [動作 Segue] popover,選取 [顯示]:
![選取 [顯示] 作為 Segue 類型](hello-ios-multiscreen-quickstart-images/image14.png)
iOS 設計工具將在兩個場景之間新增一個 Segue:

選取場景底部的黑色列,並將檢視控制器>標題變更為 [屬性總管] 中的 [呼叫歷程記錄],將 [標題] 新增至數據表檢視控制器:
![將 [檢視控制器] 標題變更為通話記錄](hello-ios-multiscreen-quickstart-images/image16.png)
執行應用程式時,通話記錄按鈕將會開啟 [通話記錄] 畫面,但資料表檢視會是空白,這是因為沒有可追蹤和顯示電話號碼的程式碼。
此應用程式會將電話號碼儲存為字串清單。
using在 ViewController 頂端新增 的 指示詞System.Collections.Generic:using System.Collections.Generic;使用下列程式碼來修改
ViewController類別:using System; using System.Collections.Generic; using Foundation; using UIKit; namespace Phoneword_iOS { public partial class ViewController : UIViewController { string translatedNumber = ""; public List<string> PhoneNumbers { get; set; } protected ViewController(IntPtr handle) : base(handle) { //initialize list of phone numbers called for Call History screen PhoneNumbers = new List<string>(); } public override void ViewDidLoad() { base.ViewDidLoad(); // Perform any additional setup after loading the view, typically from a nib. TranslateButton.TouchUpInside += (object sender, EventArgs e) => { // Convert the phone number with text to a number // using PhoneTranslator.cs translatedNumber = PhoneTranslator.ToNumber( PhoneNumberText.Text); // Dismiss the keyboard if text field was tapped PhoneNumberText.ResignFirstResponder(); if (translatedNumber == "") { CallButton.SetTitle("Call ", UIControlState.Normal); CallButton.Enabled = false; } else { CallButton.SetTitle("Call " + translatedNumber, UIControlState.Normal); CallButton.Enabled = true; } }; CallButton.TouchUpInside += (object sender, EventArgs e) => { //Store the phone number that we're dialing in PhoneNumbers PhoneNumbers.Add(translatedNumber); // Use URL handler with tel: prefix to invoke Apple's Phone app... var url = new NSUrl("tel:" + translatedNumber); // otherwise show an alert dialog if (!UIApplication.SharedApplication.OpenUrl(url)) { var alert = UIAlertController.Create("Not supported", "Scheme 'tel:' is not supported on this device", UIAlertControllerStyle.Alert); alert.AddAction(UIAlertAction.Create("Ok", UIAlertActionStyle.Default, null)); PresentViewController(alert, true, null); } }; } public override void PrepareForSegue(UIStoryboardSegue segue, NSObject sender) { base.PrepareForSegue(segue, sender); // set the view controller that’s powering the screen we’re // transitioning to var callHistoryController = segue.DestinationViewController as CallHistoryController; //set the table view controller’s list of phone numbers to the // list of dialed phone numbers if (callHistoryController != null) { callHistoryController.PhoneNumbers = PhoneNumbers; } } } }這裡有幾件事會發生
- 已將變數
translatedNumber從ViewDidLoad方法移至「類別層級變數」。 - 已修改 CallButton 程式碼,透過呼叫
PhoneNumbers.Add(translatedNumber)來將撥打的號碼新增至電話號碼清單 - 已新增
PrepareForSegue方法
儲存並建置應用程式,以確定沒有任何錯誤。
儲存並建置應用程式,以確定沒有任何錯誤。
- 已將變數
按 [啟動] 按鈕,在 iOS 模擬器內啟動應用程式:

恭喜您完成第一個多重畫面的 Xamarin.iOS 應用程式!
應用程式現在可以使用分鏡腳本 Segue 和程式碼來處理瀏覽。 現在是時候在 Hello, iOS 深度剖析中仔細分析我們剛了解到的工具與技能。
相關連結
- iOS 人性化介面指導方針 \(英文\)
