Xamarin.Android GridView
GridView 是 ViewGroup ,會顯示二維可捲動網格線中的專案。 網格線專案會使用 ListAdapter自動插入至版面配置。
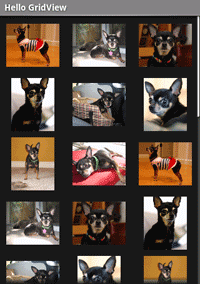
在本教學課程中,您將建立影像縮圖的方格。 選取專案時,快顯通知訊息會顯示影像的位置。
啟動名為 HelloGridView 的新專案。
尋找您想要使用的一些相片,或 下載這些範例影像。 將圖像檔新增至專案的 Resources/Drawable 目錄。 在 [ 屬性] 視窗中,將每個的 [建置動作] 設定為 [AndroidResource]。
開啟 Resources/Layout/Main.axml 檔案,然後插入下列專案:
<?xml version="1.0" encoding="utf-8"?>
<GridView xmlns:android="http://schemas.android.com/apk/res/android"
    android:id="@+id/gridview"
    android:layout_width="fill_parent"
    android:layout_height="fill_parent"
    android:columnWidth="90dp"
    android:numColumns="auto_fit"
    android:verticalSpacing="10dp"
    android:horizontalSpacing="10dp"
    android:stretchMode="columnWidth"
    android:gravity="center"
/>
這會 GridView 填滿整個畫面。 屬性相當自我說明。 如需有效屬性的詳細資訊,請參閱 GridView 參考。
開啟 HelloGridView.cs 並插入下列程序代碼 OnCreate() 方法:
protected override void OnCreate (Bundle bundle)
{
    base.OnCreate (bundle);

    SetContentView (Resource.Layout.Main);

    var gridview = FindViewById<GridView> (Resource.Id.gridview);
    gridview.Adapter = new ImageAdapter (this);

    gridview.ItemClick += delegate (object sender, AdapterView.ItemClickEventArgs args) {
        Toast.MakeText (this, args.Position.ToString (), ToastLength.Short).Show ();
    };
}
設定內容檢視的 Main.axml 版面設定之後, GridView 會使用 從版面配置 FindViewById擷取 。 Adapter 屬性接著會用來設定自定義配接器 (ImageAdapter) 做為要顯示在方格中之所有專案的來源。 會在 ImageAdapter 下一步驟中建立 。
若要在單擊方格中的專案時執行某些動作,匿名委派會 ItemClick 訂閱事件。
它會顯示 Toast 所選專案的索引位置(以零起始的)(在真實世界案例中,位置可用來取得其他工作的完整大小影像)。 請注意,可以使用 Java 樣式接聽程式類別,而不是 .NET 事件。
建立名為 ImageAdapter 該子類別 BaseAdapter的新類別:
public class ImageAdapter : BaseAdapter
{
    Context context;

    public ImageAdapter (Context c)
    {
        context = c;
    }

    public override int Count {
        get { return thumbIds.Length; }
    }

    public override Java.Lang.Object GetItem (int position)
    {
        return null;
    }

    public override long GetItemId (int position)
    {
        return 0;
    }

    // create a new ImageView for each item referenced by the Adapter
    public override View GetView (int position, View convertView, ViewGroup parent)
    {
        ImageView imageView;

        if (convertView == null) {  // if it's not recycled, initialize some attributes
            imageView = new ImageView (context);
            imageView.LayoutParameters = new GridView.LayoutParams (85, 85);
            imageView.SetScaleType (ImageView.ScaleType.CenterCrop);
            imageView.SetPadding (8, 8, 8, 8);
        } else {
            imageView = (ImageView)convertView;
        }

        imageView.SetImageResource (thumbIds[position]);
        return imageView;
    }

    // references to our images
    int[] thumbIds = {
        Resource.Drawable.sample_2, Resource.Drawable.sample_3,
        Resource.Drawable.sample_4, Resource.Drawable.sample_5,
        Resource.Drawable.sample_6, Resource.Drawable.sample_7,
        Resource.Drawable.sample_0, Resource.Drawable.sample_1,
        Resource.Drawable.sample_2, Resource.Drawable.sample_3,
        Resource.Drawable.sample_4, Resource.Drawable.sample_5,
        Resource.Drawable.sample_6, Resource.Drawable.sample_7,
        Resource.Drawable.sample_0, Resource.Drawable.sample_1,
        Resource.Drawable.sample_2, Resource.Drawable.sample_3,
        Resource.Drawable.sample_4, Resource.Drawable.sample_5,
        Resource.Drawable.sample_6, Resource.Drawable.sample_7
    };
}
首先,這會實作繼承自 BaseAdapter的一些必要方法。 建構函式和 Count 屬性是自我解釋的。 通常 GetItem(int) 應該傳回位於配接器中指定位置的實際物件,但本範例會忽略它。 同樣 GetItemId(int) 應該傳回專案的數據列標識符,但這裡不需要。
第一個必要 GetView()方法是 。
此方法會建立新的 View 針對每個新增至的 ImageAdapter影像。 呼叫此專案時,會是 View 會傳入,這通常是回收的物件(至少在呼叫過一次之後),因此會檢查物件是否為 Null。 如果它是 null,則為ImageView 會具現化並設定影像簡報所需的屬性:
LayoutParams會設定檢視的高度和寬度,這可確保無論可繪製的大小為何,每個影像都會重設大小並裁剪以適當地符合這些維度。SetScaleType()宣告應該將影像裁剪到中心(如有必要)。SetPadding(int, int, int, int)定義所有側邊的邊框間距。 (請注意,如果影像有不同的外觀比例,則如果影像與 ImageView 指定的維度不符,則較少的邊框間距會導致影像裁剪。
View如果傳遞至 GetView() 的 不是 Null,則本機ImageView 會使用回收 View 的物件初始化。
在結尾 GetView() 方法, position 傳入 方法的整數是用來從 thumbIds 數位中選取影像,該陣列會設定為的 ImageView影像資源。
剩下的就是定義 thumbIds 可繪製資源的陣列。
執行應用程式。 網格線配置看起來應該像這樣:
嘗試試驗 和的行為GridViewImageView 元素會藉由調整其屬性。 例如,而不是使用 LayoutParams try using SetAdjustViewBounds()。
參考資料
此頁面的部分是根據 Android 開放原始碼專案所建立和共用的工作進行修改,並根據 Creative Commons 2.5 屬性授權中所述的詞彙使用。
