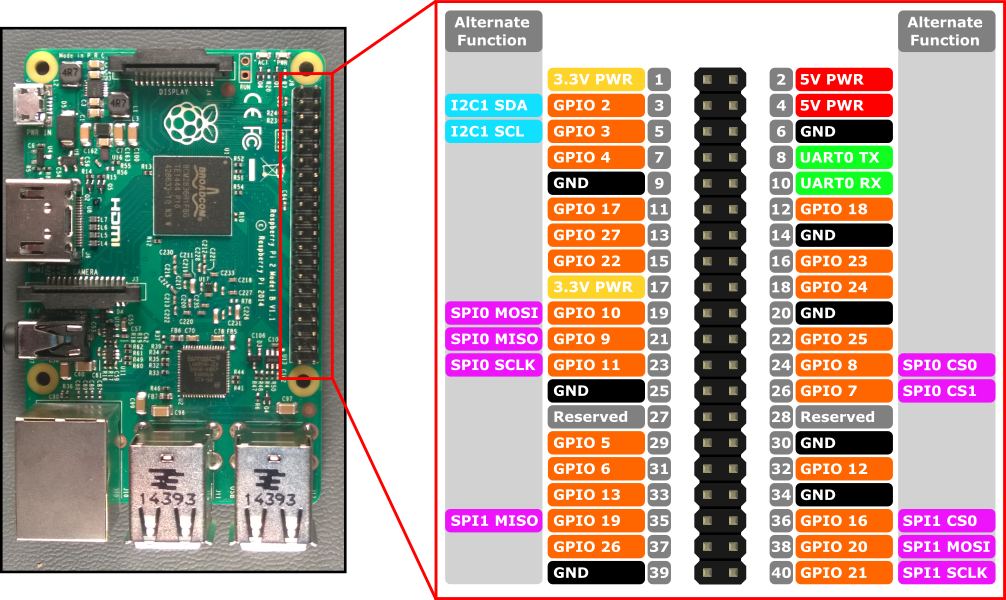
Raspberry Pi 2 和 3 針腳對應

Raspberry Pi 2 和 Raspberry Pi 3 的硬體介面會透過面板上的 40 針腳標頭 J8 公開。 功能包括:
- 24x - GPIO 針腳
- 1x - 序列 UART (RPi3 僅包含迷你 UART)
- 2x - SPI 總線
- 1x - I2C 總線
- 2x - 5V 電源針腳
- 2x - 3.3V 電源針腳
- 8x - 地面針腳
GPIO 針腳
讓我們看看此裝置上可用的 GPIO。
GPIO 釘選概觀
下列 GPIO 針腳可透過 API 存取:
GPIO# 電源上提取 替代函式 標頭釘選 2 PullUp I2C1 SDA 3 3 PullUp I2C1 SCL 5 4 PullUp 7 5 PullUp 29 6 PullUp 31 7 PullUp SPI0 CS1 26 8 PullUp SPI0 CS0 24 9 PullDown SPI0 MISO 21 10 PullDown SPI0 MOSI 19 11 PullDown SPI0 SCLK 23 12 PullDown 32 13 PullDown 33 16 PullDown SPI1 CS0 36 17 PullDown 11 18 PullDown 12 19 PullDown SPI1 MISO 35 20 PullDown SPI1 MOSI 38 21 PullDown SPI1 SCLK 40 22 PullDown 15 23 PullDown 16 24 PullDown 18 25 PullDown 22 26 PullDown 37 27 PullDown 13 35* PullUp 紅色電源LED 47* PullUp 綠色活動 LED
* = 僅 Raspberry Pi 2。 Raspberry Pi 3 不提供 GPIO 35 和 47。
GPIO 範例
例如,下列程式代碼會開啟 GPIO 5 做為輸出,並在針腳上寫入數位 '1':
using Windows.Devices.Gpio;

public void GPIO()
{
    // Get the default GPIO controller on the system
    GpioController gpio = GpioController.GetDefault();
    if (gpio == null)
        return; // GPIO not available on this system

    // Open GPIO 5
    using (GpioPin pin = gpio.OpenPin(5))
    {
        // Latch HIGH value first. This ensures a default value when the pin is set as output
        pin.Write(GpioPinValue.High);

        // Set the IO direction as output
        pin.SetDriveMode(GpioPinDriveMode.Output);

    } // Close pin - will revert to its power-on state
}
當您開啟針腳時,它會處於其電源開啟狀態,這可能包括提取電壓。 若要中斷提取修飾並取得高階回應輸入,請將磁碟驅動器模式設定為 GpioPinDriveMode.Input:
pin.SetDriveMode(GpioPinDriveMode.Input);
當針腳關閉時,它會還原為其電源開啟狀態。
針腳多任務處理
某些 GPIO 針腳可以執行多個函式。 根據預設,針腳會設定為 GPIO 輸入。 當您藉由呼叫 I2cDevice.FromIdAsync() 或 SpiDevice.FromIdAsync() 開啟替代函式時,函式所需的針腳會自動切換為正確的函式(「多任務處理」)。 當裝置藉由呼叫 I2cDevice.Dispose() 或 SpiDevice.Dispose()關閉時,針腳會還原回其預設函式。 如果您嘗試同時針對兩個不同的函式使用針腳,當您嘗試開啟衝突的函式時,將會擲回例外狀況。 例如,
var controller = GpioController.GetDefault();
var gpio2 = controller.OpenPin(2);      // open GPIO2, shared with I2C1 SDA

var dis = await DeviceInformation.FindAllAsync(I2cDevice.GetDeviceSelector());
var i2cDevice = await I2cDevice.FromIdAsync(dis[0].Id, new I2cConnectionSettings(0x55)); // exception thrown because GPIO2 is open

gpio2.Dispose(); // close GPIO2
var i2cDevice = await I2cDevice.FromIdAsync(dis[0].Id, new I2cConnectionSettings(0x55)); // succeeds because gpio2 is now available

var gpio2 = controller.OpenPin(2); // throws exception because GPIO2 is in use as SDA1

i2cDevice.Dispose(); // release I2C device
var gpio2 = controller.OpenPin(2); // succeeds now that GPIO2 is available
序列 UART
RPi2/3 提供一個序列 UART: UART0
- Pin 8 - UART0 TX
- Pin 10 - UART0 RX
下列範例會 初始化 UART0 並執行寫入,後面接著讀取:
using Windows.Storage.Streams;
using Windows.Devices.Enumeration;
using Windows.Devices.SerialCommunication;

public async void Serial()
{
    string aqs = SerialDevice.GetDeviceSelector("UART0");                   /* Find the selector string for the serial device   */
    var dis = await DeviceInformation.FindAllAsync(aqs);                    /* Find the serial device with our selector string  */
    SerialDevice SerialPort = await SerialDevice.FromIdAsync(dis[0].Id);    /* Create an serial device with our selected device */

    /* Configure serial settings */
    SerialPort.WriteTimeout = TimeSpan.FromMilliseconds(1000);
    SerialPort.ReadTimeout = TimeSpan.FromMilliseconds(1000);
    SerialPort.BaudRate = 9600;                                             /* mini UART: only standard baud rates */
    SerialPort.Parity = SerialParity.None;                                  /* mini UART: no parities */
    SerialPort.StopBits = SerialStopBitCount.One;                           /* mini UART: 1 stop bit */
    SerialPort.DataBits = 8;

    /* Write a string out over serial */
    string txBuffer = "Hello Serial";
    DataWriter dataWriter = new DataWriter();
    dataWriter.WriteString(txBuffer);
    uint bytesWritten = await SerialPort.OutputStream.WriteAsync(dataWriter.DetachBuffer());

    /* Read data in from the serial port */
    const uint maxReadLength = 1024;
    DataReader dataReader = new DataReader(SerialPort.InputStream);
    uint bytesToRead = await dataReader.LoadAsync(maxReadLength);
    string rxBuffer = dataReader.ReadString(bytesToRead);
}
請注意,您必須將下列功能新增至 UWP 專案中的 Package.appxmanifest 檔案,才能執行序列 UART 程式代碼:
Visual Studio 2017 在指令清單設計工具中有已知的 Bug(appxmanifest 檔案的可視化編輯器),會影響串行通訊功能。 如果您的 appxmanifest 新增了 serialcommunication 功能,使用設計工具修改 appxmanifest 將會損毀 appxmanifest (Device xml 子系將會遺失)。 您可以在 appxmanifest 上按下滑鼠右鍵,然後從操作功能表中選取 [檢視程序代碼],藉以手動編輯 appxmanifest 來解決此問題。
  <Capabilities>
    <DeviceCapability Name="serialcommunication">
      <Device Id="any">
        <Function Type="name:serialPort" />
      </Device>
    </DeviceCapability>
  </Capabilities>
I2C Bus
讓我們看看此裝置上可用的I2C 總線。
I2C 概觀
針腳標頭上公開了一個 I2C 控制器 I2C1 ,兩行 SDA 和 SCL。 1.8K0 內部拉力電壓已經安裝在這輛公共汽車的板上。
訊號名稱 標頭釘選編號 Gpio 數位 SDA 3 2 SCL 5 3
下列範例會 初始化 I2C1 ,並將數據寫入位址 為 0x40 的 I2C 裝置:
using Windows.Devices.Enumeration;
using Windows.Devices.I2c;

public async void I2C()
{
    // 0x40 is the I2C device address
    var settings = new I2cConnectionSettings(0x40);
    // FastMode = 400KHz
    settings.BusSpeed = I2cBusSpeed.FastMode;

    // Create an I2cDevice with the specified I2C settings
    var controller = await I2cController.GetDefaultAsync();

    using (I2cDevice device = controller.GetDevice(settings))
    {
        byte[] writeBuf = { 0x01, 0x02, 0x03, 0x04 };
        device.Write(writeBuf);
    }
}
SPI Bus
RPi2/3 上提供兩個 SPI 總線控制器。
SPI0
訊號名稱 標頭釘選編號 Gpio 數位 MOSI 19 10 醬 21 9 SCLK 23 11 CS0 24 8 CS1 26 7
SPI1
訊號名稱 標頭釘選編號 Gpio 數位 MOSI 38 20 醬 35 19 SCLK 40 21 CS0 36 16
SPI 範例
以下顯示如何使用晶片選取 0 在總線 SPI0 上執行 SPI 寫入的範例:
using Windows.Devices.Enumeration;
using Windows.Devices.Spi;

public async void SPI()
{
    // Use chip select line CS0
    var settings = new SpiConnectionSettings(0);
    // Set clock to 10MHz
    settings.ClockFrequency = 10000000;

    // Get a selector string that will return our wanted SPI controller
    string aqs = SpiDevice.GetDeviceSelector("SPI0");

    // Find the SPI bus controller devices with our selector string
    var dis = await DeviceInformation.FindAllAsync(aqs);

    // Create an SpiDevice with our selected bus controller and Spi settings
    using (SpiDevice device = await SpiDevice.FromIdAsync(dis[0].Id, settings))
    {
        byte[] writeBuf = { 0x01, 0x02, 0x03, 0x04 };
        device.Write(writeBuf);
    }
}