How to: Create a Basic Texture
Note
This article applies to Visual Studio 2015. If you're looking for the latest Visual Studio documentation, see Visual Studio documentation. We recommend upgrading to the latest version of Visual Studio. Download it here
This document demonstrates how to use the Image Editor to create a basic texture.
This document demonstrates these activities:
Setting the size of the texture
Setting the foreground and background colors
Using the alpha channel (transparency)
Using the Fill and Ellipse tools
Setting tool properties
Creating a basic texture
You can use the Image Editor to create and modify images and textures for your game or app.
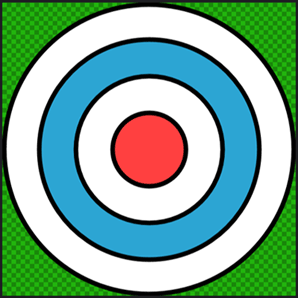
The following steps show how to create a texture that represents a "bullseye" target.When you are finished, the texture should look like the following picture. To better demonstrate the transparency in the texture, the Image Editor has been configured to use a green, checkered pattern to display it.

Before you begin, make sure that the Properties window is displayed. You use the Properties window to set the image size, change tool properties, and specify colors while you work.
To create a "bullseye" target texture
Create a texture to work with. For information about how to add a texture to your project, see the Getting Started section in Image Editor.
Set the image size to 512x512 pixels. In the Properties window, set the values of the Width and Height properties to
512.On the Image Editor toolbar, choose the Fill tool. The Properties window now displays the properties of the Fill tool together with the image properties.
Set the foreground color to fully-transparent black. In the Properties window, in the Colors property group, select Foreground. Set the values of the R, G, B, and A properties next to the color picker to
0.On the Image Editor toolbar, choose the Fill tool, and then press and hold the Shift key and choose any point in the image. Using the Shift key causes the alpha value of the fill color to replace the color in the image; otherwise, the alpha value is used to blend the fill color together with the color in the image.
Important
This step, together with the color selection in the previous step, ensures that the base image is prepared for the "bullseye" target texture that you will draw. When the image is filled with transparent black—and because the border of the target is black—there will be no aliasing artifacts around the target.
On the Image Editor toolbar, choose the Ellipse tool.
Set the foreground color to fully-opaque black. Set the values of the R, G, and B properties to
0and the value of the A property to255.Set the background color to fully-opaque white. In the Properties window, in the Colors property group, select Background. Set the values of the R, G, B, and A properties to
255.Set the width of the outline of the ellipse. In the Properties window, in the Appearance property group, set the value of the Width property to
8.Make sure that anti-aliasing is enabled. In the Properties window, in the Appearance property group, make sure that the Anti-alias property is set.
Using the Ellipse tool, draw a circle from pixel coordinate
(3, 3)to pixel coordinate(508, 508). To draw the circle more easily, you can press and hold the Shift key while you draw.Note
The pixel coordinates of the current pointer location are displayed on the Visual Studio status bar.
Change the background color. Set R to
44, G to165, B to211, and A to255.Draw another circle from pixel coordinate
(64, 64)to pixel coordinate(448, 448).Change the background color back to fully-opaque white. Set R, G, B, and A to
255.Draw another circle from pixel coordinate
(128, 128)to pixel coordinate(384, 384).Change the background color. Set R to
255, G and B to64, and A to255.Draw another circle from pixel coordinate
(192, 192)to pixel coordinate(320, 320).The "bullseye" target texture is complete. Here's the final image, shown with transparency.

As a next step, you can generate MIP levels for this texture. For information, see How to: Create and Modify MIP Levels.