View where and when changesets have been merged
TFS 2018
Visual Studio 2019 | Visual Studio 2022
By branching your code base, you can isolate concurrent development efforts and take snapshots. However, when your team members work in a branched code base, they might not know which branches have received which changes and when those changes were merged.
For example, say Feature Team B is waiting for a bug fix. You receive a notification that the bug has been fixed, but you can still reproduce the bug in the builds that come from your branch.
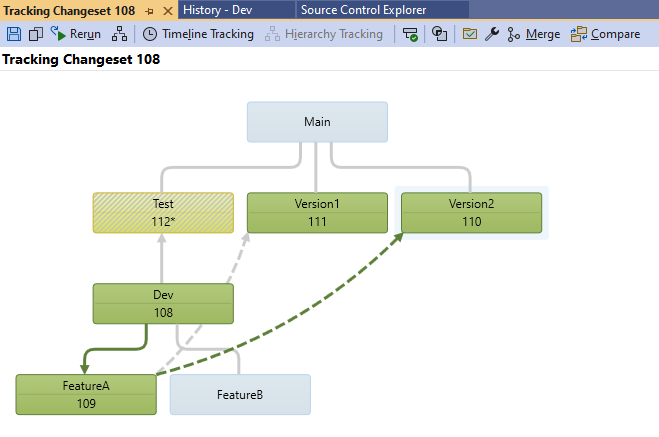
In Team Foundation Version Control (TFVC), you can use the Tracking Changeset window to see which branches have received a set of changes. For example, in the following screenshot, the Tracking Changeset window shows how changeset 108 was merged from the Dev branch to a child branch and then baselessly merged to two other branches:

Prerequisites
- To view changesets, your Read permission must be set to Allow for the branches that you're working with.
- To display the timeline view of a changeset, your Manage branch object permission must be set to Allow.
For more information about permissions, see Default TFVC permissions.
View the Tracking Changeset window
Important
You can perform these procedures on a branch but not on a folder. In the following screenshot, BuildProcessTemplates is a folder, and Dev is a branch:

For more information about how to branch, see Branch folders and files.
View the Tracking Changeset window from the History window of a branch or file
On the Visual Studio menu bar, select View > Other Windows > Source Control Explorer.
In Source Control Explorer, select a branch, or select a folder or file that's contained by a branch.
On the File menu, select Source Control, and then select View History.
In the History window, right-click the changeset that you want to view, and then select Track Changeset. The Select Branches dialog appears.
(Optional) In the Branches list, select or clear the branches that you want to show or hide. As you select or clear branches, a preview of your selections appears on the right side of the dialog.
(Optional) If your team has many branches, use the buttons above the preview to easily select the branches that you want. Hover over a button to get information about what it does.
Select Visualize.
View the Tracking Changeset window from a work item that's linked to a changeset
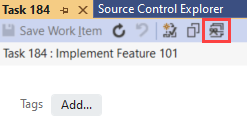
Open a work item that's linked to one or more changesets, and then select the Track Work Item button.

The Select Branches dialog appears.
(Optional) In the Branches list, select or clear the branches that you want to show or hide. As you select or clear branches, a preview of your selections appears on the right side of the dialog.
(Optional) If your team has many branches, select the buttons above the preview to easily select the branches that you want. Hover over a button to get information about what it does.
Select Visualize.
Overview of the Tracking Changeset Window
The following screenshot shows a changeset in the DinnerNow project:

- The branches that the changeset has been merged to appear green. Each of those branches includes the number of the changeset that implemented the merge.
- The branches that haven't received the changeset appear light blue.
- If a branch received only some of the changes in the changeset, the branch is filled with a pattern, and an asterisk appears next to the changeset numbers within that branch. In the screenshot, only some of the changes in changeset 108 were merged to the Test branch.
- An arrow represents a merge. A solid line indicates a standard merge, and a dashed line indicates a baseless merge.
Tip
You can select a branch that received the changeset, for example, Version2. Then you can see all the merges that were required for the changeset to reach that branch. Those merges appear as dark green arrows.
Switch to the timeline view
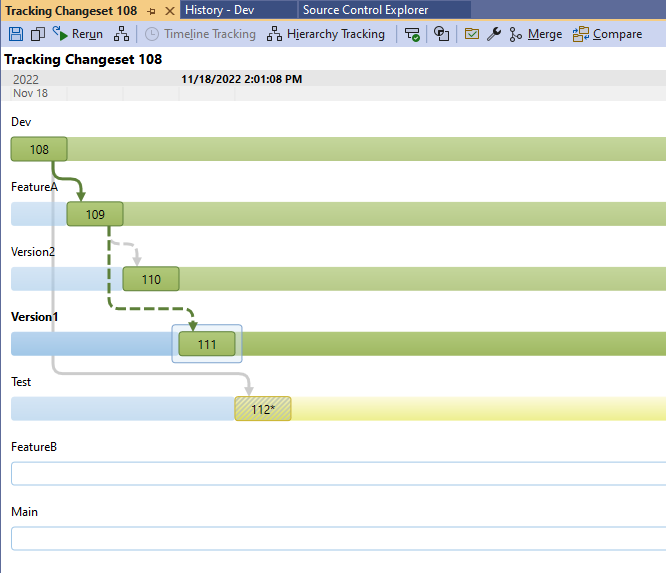
You can get information about when a changeset was merged to various branches by switching to the timeline view. This view shows the source, target, and time stamp of each merge.
Display the timeline view of a changeset
Open the Tracking Changeset or Tracking Work Item window, and then select  Timeline Tracking.
Example: Use the timeline view
In the earlier example, various standard and baseless merges were visible. When you select  Timeline Tracking, the Tracking Changeset window switches to a view that shows the sequence of the merges:

- The branches that received the changeset appear at the top of the view.
- The branches that didn't receive the changeset appear in white at the bottom of the view. In this case, FeatureB and Main didn't receive the changeset.
- The time stamp shows the date and time when the changeset was merged to a selected branch. In this case, Version1 is selected, and the merge to that branch occurred at the displayed time.
Drag changesets and branches to merge them
To merge a changeset or branch into another branch, you can drag the changeset or branch to another branch in the Tracking Changeset window. For more information, see Merge folders and files.