WinUI 3 (Windows 應用程式 SDK) 範例應用程式
- 範例名稱: WebView2_WinUI3_Sample
- 存放庫目錄: WebView2_WinUI3_Sample
- 方案檔:
WebView2_WinUI3_Sample.sln
此範例示範如何在 WinUI 3 中使用 WebView2 控制件 (Windows 應用程式 SDK) 封裝應用程式。

此範例也可讓您使用固定版本的 WebView2 執行時間來寄送應用程式,而不是使用在使用者電腦上安裝及執行的 WebView2 運行時間版本。
NuGet 套件和工作負載元件
在建置之前,我們將執行下列動作:
- 針對專案和 (Package) 專案更新 Microsoft.Windows.SDK.BuildTools NuGet 套件。
- 更新 專案的 Microsoft.WindowsAppSDK NuGet 套件和 (Package) 專案。
- 如果尚未安裝,請安裝「Windows 應用程式開發」工作負載的「Windows 10 SDK」元件。
目錄
| Directory | 內容 |
|---|---|
| WebView2_WinUI3_Sample | 項目程式代碼 |
| WebView2_WinUI3_Sample (套件) | 封裝和散發專案 |
| WebView2_WinUI3_Sample (Package) \FixedRuntime | (選用) 修正 WebView2 運行時間 |
| WebView2_WinUI3_Sample (Package) \FixedRuntime\130.0.2849.39 | (選用) 修正 WebView2 執行時間範例 |
步驟 1:安裝最新的 Visual Studio 2022
請確定已安裝Visual Studio 2022,並處於最新狀態。
若要安裝最新的 Visual Studio 2022:
移至 [Visual Studio:適用於軟體開發人員和 Teams 的 IDE 和程式代碼 編輯器],然後在 [Visual Studio 2022] 區段中,按兩下 [下載] 按鈕,然後選取 [Community 2022] 或其他版本。
在 Microsoft Edge 右上方的 [ 下載 ] 彈出視窗中,
VisualStudioSetup.exe會列出 。 按兩下 [開啟檔案]。Visual Studio 安裝程式 隨即開啟。
遵循提示,並接受預設值。
步驟 2:複製或下載 WebView2Samples 存放庫
- 如果尚未完成,請將存放庫複製或下載
WebView2Samples到本機磁碟驅動器。 在個別的視窗或索引標籤中,請參閱為 WebView2 設定開發環境中的下載 WebView2Samples 存放庫。 請遵循該區段中的步驟,然後返回此頁面,然後繼續進行下列步驟。
步驟 3:在 Visual Studio 中開啟解決方案
這些關於存放庫和分支的初始步驟並非必要,但這是不錯的做法,可避免變更WebView2Samples存放庫複製複本之 「main」 分支中的程序代碼。 這可讓您改變專案 (的檔案,以建置和執行範例) ,同時讓 「main」 分支中的程式代碼與存放庫相同。
您可以在 git 作業的任何工具中執行下列步驟,例如:
- GitHub Desktop。
- Visual Studio 右下方的 [方案總管] 索引卷標旁的 [Git 變更] 索引卷標。
- git bash 命令提示字元。
若要在工作分支中開啟範例的方案檔:
在 GitHub Desktop 的左上方的 [ 目前存放庫] 列表中,選取 [WebView2Samples ] 存放庫。
按兩下視窗中間上方的 [擷 取原點 ]。
在 [ 最新分支] 功能表中,建立工作分支,例如 user/myGithubUsername/winui3-sample ,並切換至該分支。
您現在已安全地進入工作分支,而不是「主要」分支,而且可以自由地開始變更範例的檔案。
在本機磁碟驅動器上,在 Visual Studio 中開啟
.sln檔案。檔案的範
.sln例位置:如果您複製存放庫,存放庫目錄名稱為/WebView2Samples/:<your-repos-directory>/WebView2Samples/SampleApps/WebView2_WinUI3_Sample/WebView2_WinUI3_Sample.sln如果您已下載存放庫,存放庫目錄名稱為
/WebView2Samples-main/,代表「main」 分支:<your-repos-directory>/WebView2Samples-main/SampleApps/WebView2_WinUI3_Sample/WebView2_WinUI3_Sample.sln
步驟 4:更新 NuGet 套件
在 方案總管 中,以滑鼠右鍵按兩下WebView2_WinUI3_Sample專案,然後選取 [管理 NuGet 套件]。
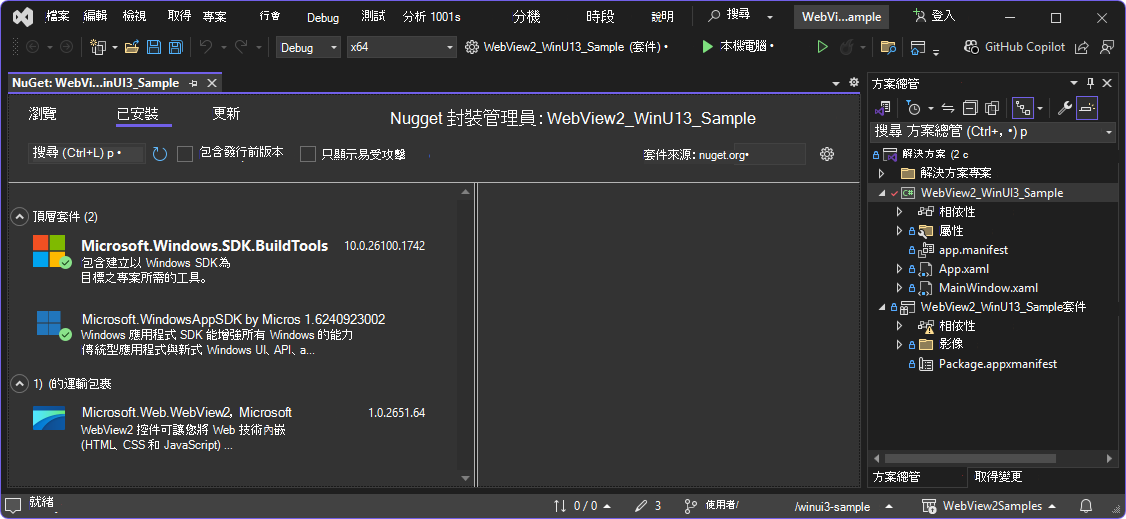
在 Visual Studio 中, NuGet 套件管理員 隨即開啟:

已選取 [ 已安裝 ] 索引標籤,其中列出 NuGet 套件:
- Microsoft.Windows.SDK.BuildTools
- Microsoft.WindowsAppSDK
- Microsoft.Web.WebView2
選取 [匯報] 索引標籤。
在左上方,選取 [ 選取所有套件 ] 複選框。
在該複選框的右側,按兩下 [ 更新] 按鈕。
[ 預覽變更] 對話框隨即開啟。
按兩下 [ 套用] 按鈕。
[ 接受授權 ] 對話框隨即開啟。
按兩下 [ 我接受] 按鈕。
NuGet 套件會更新,並移除 [匯報] 索引標籤旁的數位。
單擊 [ 檢視] 功能表,然後按下 [ 輸出 ] 選單專案。
在 [ 輸出] 索引 標籤的 [ 顯示輸出來源 ] 下拉式清單中,已選取 [ 套件管理員 ]。 輸出包含下列幾行:
Installing NuGet package Microsoft.Windows.SDK.BuildTools
Installing NuGet package Microsoft.WindowsAppSDK

Successfully uninstalled 'Microsoft.Windows.SDK.BuildTools
Successfully uninstalled 'Microsoft.WindowsAppSDK

Successfully installed 'Microsoft.Web.WebView2
Successfully installed 'Microsoft.Windows.SDK.BuildTools
Successfully installed 'Microsoft.WindowsAppSDK
更新 (Package) 專案中的 NuGet 套件
在 方案總管 中,以滑鼠右鍵按兩下 WebView2_WinUI3_Sample (Package) 項目,然後選取 [管理 NuGet 套件]。
選取 [匯報] 索引標籤。
在左上方,選取 [ 選取所有套件 ] 複選框。
在該複選框的右側,按兩下 [ 更新] 按鈕。
[ 預覽變更] 對話框隨即開啟。
按兩下 [ 套用] 按鈕。
[ 接受授權 ] 對話框隨即開啟。
按兩下 [ 我接受] 按鈕。
NuGet 套件會更新,並移除 [匯報] 索引標籤旁的數位。
單擊 [ 檢視] 功能表,然後按下 [ 輸出 ] 選單專案。
在 [ 輸出] 索引 標籤的 [ 顯示輸出來源 ] 下拉式清單中,已選取 [ 套件管理員 ]。 輸出包含如上所示的行。
關閉 [NuGet 套件管理員] 視窗。
步驟 5:安裝 Windows 10 SDK 或其他工作負載元件
視您已安裝的內容而定,您可能需要安裝Visual Studio工作負載或工作負載的元件,如下所示,才能建置範例。
若要安裝 Windows 應用程式開發工作負載的 Windows 10 SDK 元件:
在 Visual Studio 中,單擊 [ 工具] 功能表,然後按兩下 [ 取得工具和功能] 選單項。
Visual Studio 安裝程式 視窗隨即開啟。
選取 Windows 應用程式開發 卡片,以顯示複選標記。
在右側的 [安裝詳細數據] 樹狀結構中,選取 Windows 10 SDK 10.0.19041.0 元件的複選框。
按兩下 [ 修改] 按鈕。
[ 用戶帳戶控制] 對話框隨即開啟。
按兩下 [ 是] 按鈕。
開啟 Visual Studio 安裝程式) 的 [開始之前] 對話框 (,提示您將工作儲存在 Visual Studio 中。
關閉主要 Visual Studio 視窗,視需要儲存。
在 [ 開始之前] 對話框中,按兩下 [ 重試 ] 按鈕。
幾分鐘后,系統會下載並安裝 Windows 10 SDK 10.0.19041.0 工作負載元件。 Visual Studio 安裝程式表示「所有安裝都是最新狀態」。
步驟 6:建置並執行應用程式
在 Visual Studio 2022 中開啟解決方案。 例如,在 Visual Studio 安裝程式 的 [Visual Studio 2022] 區段中,按兩下 [啟動] 按鈕。
Visual Studio 啟動器隨即開啟,其中包含 [ 最近開啟 ] 和 [ 開始使用] 區段。
在 [ 開啟最近使用的 ] 區段中,選 取 [WebView2_WinUI3_Sample.sln]。
此解決方案會在 Visual Studio 2022 中開啟。
按 [F5]****。
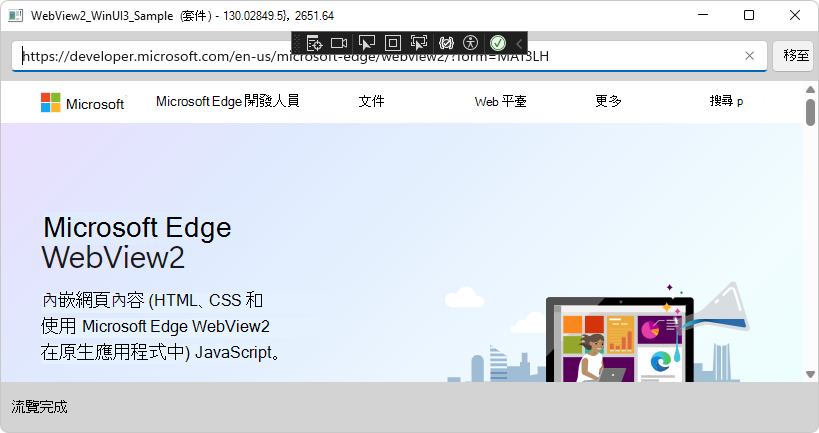
在 方案總管 中, (套件) 專案是粗體,表示它是默認專案。 應用程式會建置,然後WebView2_WinUI3_Sample (套件) 應用程式視窗隨即開啟:

「流覽完成」訊息會顯示在底部。
在 [網址列] (文本框) 中,輸入
https://bing.com(完整的 HTTPS URL) ,然後按 Enter (相當於按 Enter) 。WebView2 控件會巡覽至 Bing,然後在底部顯示 [流覽完成]。
在 Visual Studio 中, [輸出] 視窗會顯示如下的訊息:
AddressBar_KeyDown [Enter]: https://bing.com
TryNavigate
TryCreateUri
Navigation complete
步驟 7:認可工作分支中的變更
在 GitHub Desktop 之類的 Git 工具中,此時您可以認可變更,並選擇性地將變更推送至 GitHub 分支的分支。 當您修改、實驗和自定義範例時,這些類型的作業都相關。 這也會讓您的工作分支保持乾淨,並讓存放庫的複本保持井然有序,讓您可以切換至不同的範例。
若要認可和推送對工作分支中範例所做的變更:
在 Visual Studio 中,選取 [檔案全部儲存> (Ctrl+Shift+S) 。
在 GitHub Desktop 中,輸入簡短的認可訊息,例如「更新、建置、執行範例」,然後按兩下 [ 認可 ] 按鈕。
選 取 [存放庫>推送]。 您的工作分支會從本機磁碟驅動器複製到 GitHub WebView2Samples 存放庫的分支。
在 GitHub 檢視您的工作分支
在 Microsoft Edge 中,移至存放庫的分支,例如
https://github.com/myGithubUsername/WebView2Samples/。點選 取 [#] [#] [分支 ] 連結,然後選取新的工作分支,例如
user/myGithubUsername/winui3-sample。
步驟 8:檢查程序代碼
關閉 WebView2_WinUI3_Sample (套件) 應用程式。
在 方案總管 中,於WebView2_WinUI3_Sample專案中,按兩下每個
.xaml檔案及其.cs檔案:-
App.xaml- 沒有 WebView2 程式代碼。-
App.cs- 使用固定版本 WebView2 執行時間的程式代碼。
-
-
MainWindow.xaml- WebView2 元素。-
MainWindow.cs- WebView2 程序代碼。
-
-
這些檔案的壓縮版本如下。
App.xaml
此檔案中沒有 WebView2 特定的程式代碼。
壓縮清單
<Application
    x:Class="WebView2_WinUI3_Sample.App"
    xmlns="http://schemas.microsoft.com/winfx/2006/xaml/presentation"
    xmlns:x="http://schemas.microsoft.com/winfx/2006/xaml"
    xmlns:local="using:WebView2_WinUI3_Sample">
    <Application.Resources>
        <ResourceDictionary>
            <ResourceDictionary.MergedDictionaries>
                <XamlControlsResources xmlns="using:Microsoft.UI.Xaml.Controls" />
            </ResourceDictionary.MergedDictionaries>
        </ResourceDictionary>
    </Application.Resources>
</Application>
App.cs
此檔案中的 WebView2 特定程式代碼會加上批注。您可以取消批注這些行,以便使用固定版本的運行時間;請參閱下面 的使用固定版本的 WebView2 運行時間。
壓縮清單
namespace WebView2_WinUI3_Sample
{
    /// <summary>
    /// Provides application-specific behavior to supplement the default Application class.
    /// </summary>
    public partial class App : Application
    {
        /// <summary>
        /// Initializes the singleton application object.  Equivalent to main() or WinMain().
        /// </summary>
        public App()
        {
            this.InitializeComponent();

            // If you're shipping a fixed-version WebView2 Runtime with your app, un-comment the
            // following lines of code, and change the version number to the version number of the
            // WebView2 Runtime that you're packaging and shipping to users:

            // StorageFolder localFolder = Windows.ApplicationModel.Package.Current.InstalledLocation;
            // String fixedPath = Path.Combine(localFolder.Path, "FixedRuntime\\130.0.2849.39");
            // Debug.WriteLine($"Launch path [{localFolder.Path}]");
            // Debug.WriteLine($"FixedRuntime path [{fixedPath}]");
            // Environment.SetEnvironmentVariable("WEBVIEW2_BROWSER_EXECUTABLE_FOLDER", fixedPath);
        }

        /// <summary>
        /// Invoked when the application is launched normally by the end user.
        /// </summary>
        /// <param name="args">Details about the launch request and process.</param>
        protected override void OnLaunched(Microsoft.UI.Xaml.LaunchActivatedEventArgs args)
        {
            m_window = new MainWindow();
            m_window.Activate();
        }

        private Window m_window;
    }
}
MainWindow.xaml
主視窗具有下列 XAML 元素作為控制項:
-
<TextBox>- 網址列。 -
<Button>- [ 移至] 按鈕。 -
<WebView2>- WebView2 控制件。 -
<TextBlock>- 狀態列。
壓縮清單
<Window
    xmlns:local="using:WebView2_WinUI3_Sample">
    <Grid>
        <Grid.RowDefinitions>
        </Grid.RowDefinitions>
        <Grid Grid.Row="0" Background="LightGray">
            <TextBox Grid.Column="0"  x:Name="AddressBar" KeyDown="AddressBar_KeyDown" VerticalAlignment="Center" Margin="10,0,0,0"/>
            <Button Grid.Column="1" x:Name="Go" Content="Go" Click="Go_OnClick" VerticalAlignment="Center" HorizontalAlignment="Center"/>
        </Grid>

        <WebView2 x:Name="WebView2" Grid.Row="1"/>

        <Rectangle Grid.Row="2" Fill="LightGray"/>
        <TextBlock x:Name="StatusBar" Text="WebView2" VerticalAlignment="Center" Grid.Row="2" Margin="10,0,10,0"/>
    </Grid>
</Window>
MainWindow.cs
MainWindow 類別具有下列方法:
- 構造 函數
- StatusUpdate
- WebView2_CoreWebView2Initialized
- WebView2_NavigationCompleted
- TryCreateUri
- TryNavigate
- Go_OnClick
- AddressBar_KeyDown
- SetTitle
- GetWebView2Version
這些方法的摘錄或壓縮版本如下。
MainWindow 類別
using Microsoft.Web.WebView2.Core;

namespace WebView2_WinUI3_Sample
{
    /// <summary>
    /// An empty window that can be used on its own or navigated to within a Frame.
    /// </summary>
    public sealed partial class MainWindow : Window
    {
建構函式
public MainWindow()
{
    this.InitializeComponent();

    Closed += (obj, eventArgs) =>
    {
        if (WebView2 != null)
        {
            // Ensure that WebView2 resources are released when
            // the MainWindow is closed.
            // WebView2 lifecycle in WinUI3 and the Close() method:
            // https://github.com/microsoft/microsoft-ui-xaml/issues/4752#issuecomment-819687363
            WebView2.Close();
        }
    };

    AddressBar.Text = "https://developer.microsoft.com/microsoft-edge/webview2/";

    WebView2.NavigationCompleted += WebView2_NavigationCompleted;
    WebView2.CoreWebView2Initialized += WebView2_CoreWebView2Initialized;

    WebView2.Source = new Uri(AddressBar.Text);
    StatusUpdate("Ready");
    SetTitle();
}
StatusUpdate
private void StatusUpdate(string message)
{
    StatusBar.Text = message;
    Debug.WriteLine(message);
}
WebView2_CoreWebView2Initialized
private void WebView2_CoreWebView2Initialized(WebView2 sender, CoreWebView2InitializedEventArgs args)
{
    if (args.Exception != null)
    {
        StatusUpdate($"Error initializing WebView2: {args.Exception.Message}");
    }
    else
    {
        SetTitle(sender);
    }
}
WebView2_NavigationCompleted
private void WebView2_NavigationCompleted(WebView2 sender, CoreWebView2NavigationCompletedEventArgs args)
{
    StatusUpdate("Navigation complete");

    // Update the address bar with the full URL that was navigated to.
    AddressBar.Text = sender.Source.ToString();
}
TryCreateUri
private bool TryCreateUri(String potentialUri, out Uri result)
{
    StatusUpdate("TryCreateUri");

    Uri uri;
    if ((Uri.TryCreate(potentialUri, UriKind.Absolute, out uri) || Uri.TryCreate("http://" + potentialUri, UriKind.Absolute, out uri)) &&
        (uri.Scheme == Uri.UriSchemeHttp || uri.Scheme == Uri.UriSchemeHttps))
    {
        result = uri;
        return true;
    }
    else
    {
        StatusUpdate("Unable to configure URI");
        result = null;
        return false;
    }
}
TryNavigate
private void TryNavigate()
{
    StatusUpdate("TryNavigate");

    Uri destinationUri;
    if (TryCreateUri(AddressBar.Text, out destinationUri))
    {
        WebView2.Source = destinationUri;
    }
    else
    {
        StatusUpdate("URI couldn't be figured out use it as a bing search term");

        String bingString = $"https://www.bing.com/search?q={Uri.EscapeDataString(AddressBar.Text)}";
        if (TryCreateUri(bingString, out destinationUri))
        {
            AddressBar.Text = destinationUri.AbsoluteUri;
            WebView2.Source = destinationUri;
        }
        else
        {
            StatusUpdate("URI couldn't be configured as bing search term, giving up");
        }
    }
}
Go_OnClick
private void Go_OnClick(object sender, RoutedEventArgs e)
{
    StatusUpdate("Go_OnClick: " + AddressBar.Text);

    TryNavigate();
}
AddressBar_KeyDown
private void AddressBar_KeyDown(object sender, KeyRoutedEventArgs e)
{
    if (e.Key == Windows.System.VirtualKey.Enter)
    {
        StatusUpdate("AddressBar_KeyDown [Enter]: " + AddressBar.Text);

        e.Handled = true;
        TryNavigate();
    }
}
SetTitle
private void SetTitle(WebView2 webView2 = null)
{
    var packageDisplayName = Windows.ApplicationModel.Package.Current.DisplayName;
    var webView2Version = (webView2 != null) ? " - " + GetWebView2Version(webView2) : string.Empty;
    Title = $"{packageDisplayName}{webView2Version}";
}
GetWebView2Version
private string GetWebView2Version(WebView2 webView2)
{
    var runtimeVersion = webView2.CoreWebView2.Environment.BrowserVersionString;

    CoreWebView2EnvironmentOptions options = new CoreWebView2EnvironmentOptions();
    var targetVersionMajorAndRest = options.TargetCompatibleBrowserVersion;
    var versionList = targetVersionMajorAndRest.Split('.');
    if (versionList.Length != 4)
    {
        return "Invalid SDK build version";
    }
    var sdkVersion = versionList[2] + "." + versionList[3];

    return $"{runtimeVersion}; {sdkVersion}";
}
使用固定版本的 WebView2 運行時間
如果您想要將 WebView2 執行時間的固定版本隨附於您的應用程式,則必須將其包含在專案中。 請參閱 散發您的應用程式和 WebView2 執行時間。
下列步驟顯示運行時版本號碼 130.0.2849.39;您會將此號碼變更為您要封裝和運送的任何版本。
若要使用固定版本的執行時間:
在封裝專案中包含固定的 WebView2 執行時間:
\WebView2_WinUI3_Sample\WebView2_WinUI3_Sample (Package)\FixedRuntime\130.0.2849.39\在上面,請使用您要運送的版本,而不是
130.0.2849.39。更新您所使用版本的套件項目
wapproj檔, (使用您的版本,130.0.2849.39而不是) :< Content Include="FixedRuntime\130.0.2849.39\\**\*.*" >在
App.xaml.cs中,將批注下方五行批注化的程序代碼取消批注,以啟用運行時間覆寫:public App() { this.InitializeComponent(); // If you're shipping a fixed-version WebView2 Runtime with your app, un-comment the // following lines of code, and change the version number to the version number of the // WebView2 Runtime that you're packaging and shipping to users: // StorageFolder localFolder = Windows.ApplicationModel.Package.Current.InstalledLocation; // String fixedPath = Path.Combine(localFolder.Path, "FixedRuntime\\130.0.2849.39"); // Debug.WriteLine($"Launch path [{localFolder.Path}]"); // Debug.WriteLine($"FixedRuntime path [{fixedPath}]"); // Environment.SetEnvironmentVariable("WEBVIEW2_BROWSER_EXECUTABLE_FOLDER", fixedPath); }在上述程式代碼中,將版本號碼從
130.0.2849.39變更為您要寄送的版本。