NotebookUtils (前 MSSparkUtils) for Fabric
Notebook 公用程式 (NotebookUtils) 是內建套件,可協助您輕鬆地在網狀架構筆記本中執行一般工作。 您可以使用 NotebookUtils 來處理文件系統、取得環境變數、將筆記本鏈結在一起,以及使用秘密。 NotebookUtils 套件可在 PySpark (Python) Scala、SparkR Notebook 和 Fabric 管線中使用。
注意
- MsSparkUtils 已正式重新命名為 NotebookUtils。 現有的程式代碼會維持 回溯相容,而且不會造成任何重大變更。 強烈建議升級至 Notebookutils,以確保持續支援並存取新功能。 mssparkutils 命名空間未來將會淘汰。
- NotebookUtils 的設計目的是使用 Spark 3.4 (執行階段 v1.2) 和更新版本。 未來,所有新功能和更新將僅支援 notebookutils 命名空間。
檔系統公用程式
notebookutils.fs 提供使用各種檔案系統的公用程式,包括 Azure Data Lake Storage (ADLS) Gen2 和 Azure Blob 儲存體。 請確定您已設定 Azure Data Lake Storage Gen2 的存取權,並適當地 Azure Blob 儲存體。
執行下列命令以取得可用方法的概觀:
notebookutils.fs.help()
輸出
notebookutils.fs provides utilities for working with various FileSystems.

Below is overview about the available methods:

cp(from: String, to: String, recurse: Boolean = false): Boolean -> Copies a file or directory, possibly across FileSystems
fastcp(from: String, to: String, recurse: Boolean = true): Boolean -> [Preview] Copies a file or directory via azcopy, possibly across FileSystems
mv(from: String, to: String, createPath: Boolean = false, overwrite: Boolean = false): Boolean -> Moves a file or directory, possibly across FileSystems
ls(dir: String): Array -> Lists the contents of a directory
mkdirs(dir: String): Boolean -> Creates the given directory if it does not exist, also creating any necessary parent directories
put(file: String, contents: String, overwrite: Boolean = false): Boolean -> Writes the given String out to a file, encoded in UTF-8
head(file: String, maxBytes: int = 1024 * 100): String -> Returns up to the first 'maxBytes' bytes of the given file as a String encoded in UTF-8
append(file: String, content: String, createFileIfNotExists: Boolean): Boolean -> Append the content to a file
rm(dir: String, recurse: Boolean = false): Boolean -> Removes a file or directory
exists(file: String): Boolean -> Check if a file or directory exists
mount(source: String, mountPoint: String, extraConfigs: Map[String, Any]): Boolean -> Mounts the given remote storage directory at the given mount point
unmount(mountPoint: String): Boolean -> Deletes a mount point
mounts(): Array[MountPointInfo] -> Show information about what is mounted
getMountPath(mountPoint: String, scope: String = ""): String -> Gets the local path of the mount point

Use notebookutils.fs.help("methodName") for more info about a method.
NotebookUtils 會以與 Spark API 相同的方式與文件系統搭配運作。 取得 notebookutils.fs.mkdirs() 和 Fabric Lakehouse 的使用方式,例如:
| 使用方式 | HDFS 根目錄的相對路徑 | ABFS 檔案系統的絕對路徑 | 驅動程式節點中本機檔系統的絕對路徑 |
|---|---|---|---|
| 非預設的 Lakehouse | 不支援 | notebookutils.fs.mkdirs("abfss://<container_name>@<storage_account_name>.dfs.core.windows.net/<new_dir>") | notebookutils.fs.mkdirs("file:/<new_dir>") |
| 默認 lakehouse | 「檔案」或「資料表」下的目錄:notebookutils.fs.mkdirs("Files/<new_dir>") | notebookutils.fs.mkdirs("abfss://<container_name>@<storage_account_name>.dfs.core.windows.net/<new_dir>") | notebookutils.fs.mkdirs("file:/<new_dir>") |
清單檔
若要列出目錄的內容,請使用 notebookutils.fs.ls(「您的目錄路徑」)。 例如:
notebookutils.fs.ls("Files/tmp") # The relatvie path may work with different base path, details in below
notebookutils.fs.ls("abfss://<container_name>@<storage_account_name>.dfs.core.windows.net/<path>")  # The absolute path, like: ABFS file system
notebookutils.fs.ls("file:/tmp")  # The full path of the local file system of driver node
使用相對路徑時,notebookutils.fs.ls() API 的行為會有所不同,視筆記本類型而定。
Spark 筆記本:相對路徑相對於預設 Lakehouse 的 ABFSS 路徑。 例如,
notebookutils.fs.ls("Files")指向預設 Lakehouse 中的Files目錄。例如:
notebookutils.fs.ls("Files/sample_datasets/public_holidays.parquet")Python 筆記本中:相對路徑是相對於本地檔案系統的工作目錄,預設為 /home/trusted-service-user/work。 因此,您應該使用完整路徑,而不是相對路徑
notebookutils.fs.ls("/lakehouse/default/Files")來存取預設 Lakehouse 中的Files目錄。例如:
notebookutils.fs.ls("/lakehouse/default/Files/sample_datasets/public_holidays.parquet")
檢視檔案屬性
此方法會傳回檔案屬性,包括檔案名稱、檔案路徑、檔案大小,以及其是否為目錄和檔案。
files = notebookutils.fs.ls('Your directory path')
for file in files:
    print(file.name, file.isDir, file.isFile, file.path, file.size)
建立新的目錄
如果指定的目錄不存在,這個方法會建立指定的目錄,並建立任何必要的父目錄。
notebookutils.fs.mkdirs('new directory name')
notebookutils.fs.mkdirs("Files/<new_dir>")  # works with the default lakehouse files using relative path
notebookutils.fs.ls("abfss://<container_name>@<storage_account_name>.dfs.core.windows.net/<new_dir>")  # based on ABFS file system
notebookutils.fs.ls("file:/<new_dir>")  # based on local file system of driver node
複製檔案
此方法會複製檔案或目錄,並支援跨檔案系統複製活動。
notebookutils.fs.cp('source file or directory', 'destination file or directory', True)# Set the third parameter as True to copy all files and directories recursively
注意
由於 OneLake 快捷方式的
高效能複製檔案
此方法提供更有效率的方法來複製或移動檔案,特別是在處理大量資料時。 為了提升 Fabric 的效能,建議使用 fastcp 作為傳統 cp 方法的替代方法。
注意
-
notebookutils.fs.fastcp()不支援跨區域複製 OneLake 中的檔案。 在這裡情況下,您可以改用notebookutils.fs.cp()。 - 由於 OneLake 快捷方式的
限制,當您需要使用 從 S3/GCS 類型快捷方式複製數據時,建議使用掛載的路徑,而不是 abfss 路徑。
notebookutils.fs.fastcp('source file or directory', 'destination file or directory', True)# Set the third parameter as True to copy all files and directories recursively
預覽檔案內容
這個方法會傳回指定檔案的第一個 'maxBytes' 位元組,做為以 UTF-8 編碼的字串。
notebookutils.fs.head('file path', maxBytes to read)
移動檔案
此方法會移動檔案或目錄,並支援跨檔案系統移動。
notebookutils.fs.mv('source file or directory', 'destination directory', True) # Set the last parameter as True to firstly create the parent directory if it does not exist
notebookutils.fs.mv('source file or directory', 'destination directory', True, True) # Set the third parameter to True to firstly create the parent directory if it does not exist. Set the last parameter to True to overwrite the updates.
寫入檔案
這個方法會將指定的字串寫出至以 UTF-8 編碼的檔案。
notebookutils.fs.put("file path", "content to write", True) # Set the last parameter as True to overwrite the file if it existed already
將內容附加至檔案
這個方法會將指定的字串附加至以 UTF-8 編碼的檔案。
notebookutils.fs.append("file path", "content to append", True) # Set the last parameter as True to create the file if it does not exist
注意
-
notebookutils.fs.append()和notebookutils.fs.put()不支援並行寫入相同的檔案,因為缺乏不可部分完成性保證。 - 在
notebookutils.fs.append迴圈中使用forAPI 來寫入相同的檔案時,我們建議您在每次寫入之間新增一個sleep語句,將間隔時間設為約 0.5 秒至 1 秒。 這項建議是因為notebookutils.fs.appendAPI 的內部flush作業是異步的,因此短暫的延遲有助於確保數據完整性。
刪除檔案或目錄
此方法會移除檔案或目錄。
notebookutils.fs.rm('file path', True) # Set the last parameter as True to remove all files and directories recursively
裝載/卸載目錄
在檔案裝載和卸載中尋找詳細使用方式的詳細資訊。
筆記本公用程式
使用 Notebook 公用程式來執行筆記本,或使用 值結束筆記本。 執行下列命令以取得可用方法的概觀:
notebookutils.notebook.help()
輸出:
The notebook module.

exit(value: String): void -> This method lets you exit a notebook with a value.
run(path: String, timeoutSeconds: int, arguments: Map, workspace: String): String -> This method runs a notebook and returns its exit value.
runMultiple(DAG: Any): Map[String, MsNotebookRunResult] -> [Preview] Runs multiple notebooks concurrently with support for dependency relationships.
validateDAG(DAG: Any): Boolean -> [Preview] This method check if the DAG is correctly defined.

[Preview] Below methods are only support Fabric Notebook.
create(name: String, description: String = "", content: String = "", defaultLakehouse: String = "", defaultLakehouseWorkspace: String = "", workspaceId: String = ""): Artifact -> Create a new Notebook.
get(name: String, workspaceId: String = ""): Artifact -> Get a Notebook by name or id.
update(name: String, newName: String, description: String = "", workspaceId: String = ""): Artifact -> Update a Artifact by name.
delete(name: String, workspaceId: String = ""): Boolean -> Delete a Notebook by name.
list(workspaceId: String = "", maxResults: Int = 1000): Array[Artifact] -> List all Notebooks in the workspace.
updateDefinition(name: String, content: String = "", defaultLakehouse: String = "", defaultLakehouseWorkspace: String = "", workspaceId: String = "") -> Update the definition of a Notebook.

Use notebookutils.notebook.help("methodName") for more info about a method.
注意
筆記本公用程式不適用於 Apache Spark 工作定義 (SJD)。
筆記本參考
此方法會參考筆記本,並傳回其結束值。 您可以在筆記本中以互動方式或在管線中執行巢狀函數呼叫。 所參考的筆記本會在呼叫此函式的筆記本 Spark 集區上執行。
notebookutils.notebook.run("notebook name", <timeoutSeconds>, <parameterMap>, <workspaceId>)
例如:
notebookutils.notebook.run("Sample1", 90, {"input": 20 })
Fabric 筆記本也支持藉由指定工作區 ID,跨多個工作區參考筆記本。
notebookutils.notebook.run("Sample1", 90, {"input": 20 }, "fe0a6e2a-a909-4aa3-a698-0a651de790aa")
您可以在儲存格輸出中開啟參考執行的快照連結。 快照集會擷取程式碼執行結果,並可讓您輕鬆地偵錯參考執行。
注意
- 執行階段 1.2 版和更高版本支援跨工作區參考筆記本。
- 如果您使用 Notebook 資源底下的檔案,請在參考的筆記本中使用
notebookutils.nbResPath,確定它指向與互動式執行相同的資料夾。
參考以平行方式執行多個筆記本
重要
這項功能處於預覽狀態。
方法 notebookutils.notebook.runMultiple() 可讓您平行執行多個筆記本,或使用預先定義的拓撲結構。 API 在 Spark 會話中使用多線程實作機制,這表示參考筆記本運行會共用計算資源。
使用 notebookutils.notebook.runMultiple(),您可以:
同時執行多個筆記本,而不需要等待每個筆記本完成。
使用簡單的 JSON 格式,指定筆記本的相依性和執行順序。
最佳化 Spark 計算資源的使用,並降低 Fabric 專案的成本。
檢視輸出中每個筆記本執行記錄的快照集,並方便偵錯/監視筆記本工作。
取得每個執行活動的結束值,並在下游工作中使用這些值。
您也可以嘗試執行 notebookutils.notebook.help("runMultiple") 來尋找範例和詳細的使用方式。
以下是使用此方法平行執行筆記本清單的簡單範例:
notebookutils.notebook.runMultiple(["NotebookSimple", "NotebookSimple2"])
根筆記本的執行結果如下所示:
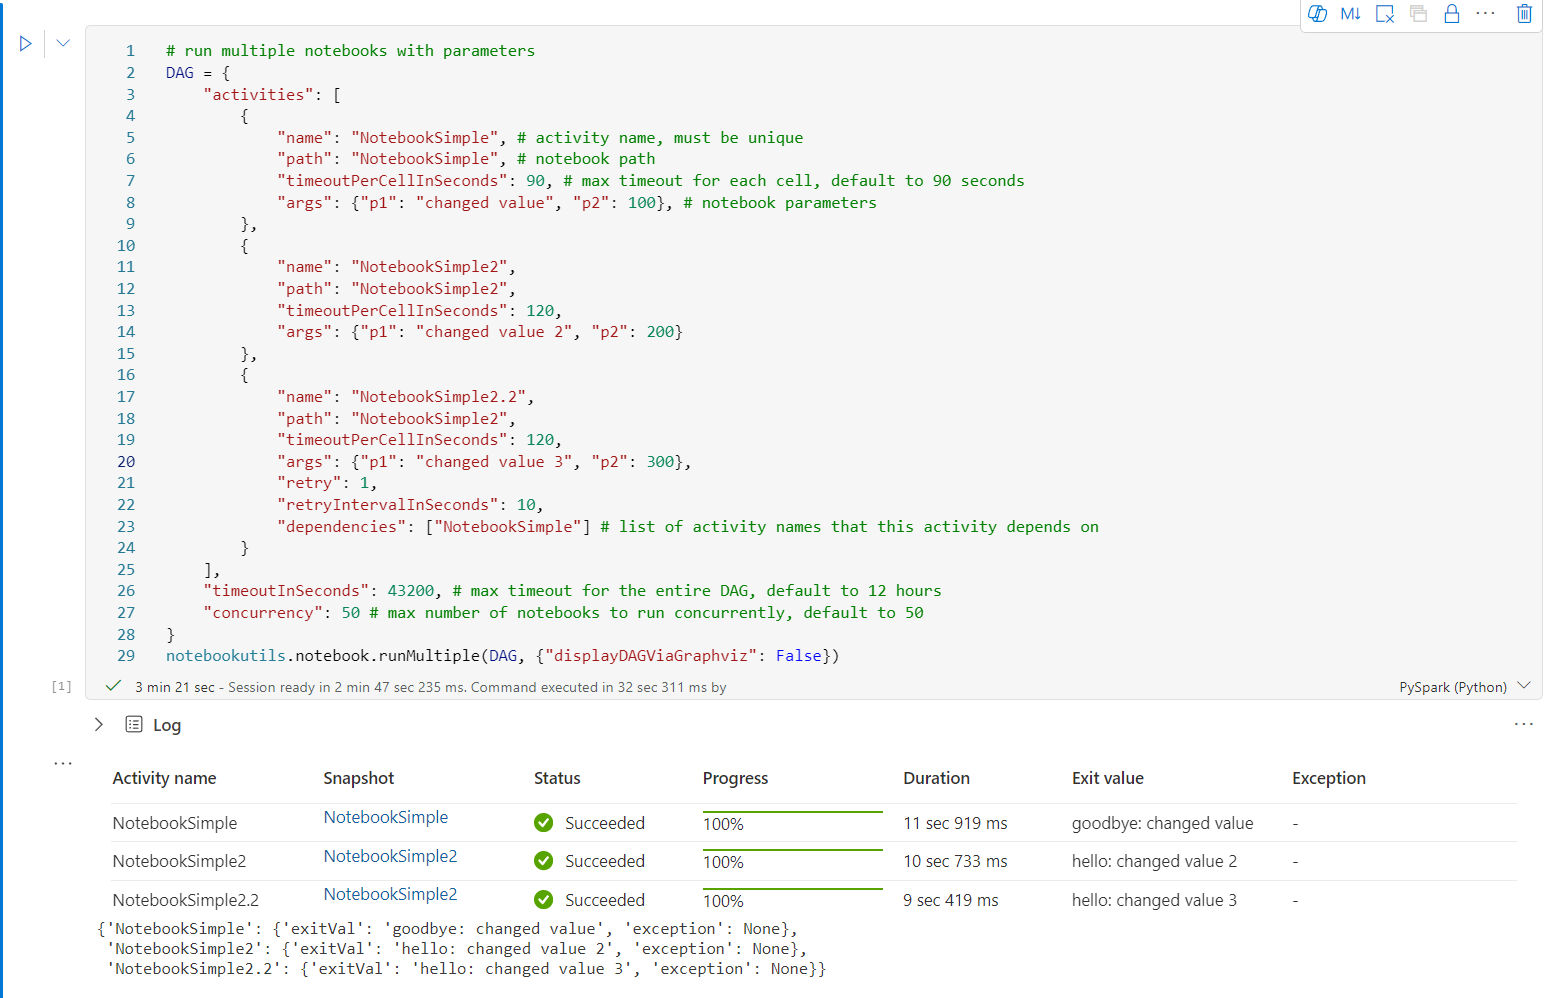
以下是使用 notebookutils.notebook.runMultiple()執行具有拓撲結構的筆記本範例。 使用此方法,輕鬆地透過程式碼體驗協調筆記本。
# run multiple notebooks with parameters
DAG = {
    "activities": [
        {
            "name": "NotebookSimple", # activity name, must be unique
            "path": "NotebookSimple", # notebook path
            "timeoutPerCellInSeconds": 90, # max timeout for each cell, default to 90 seconds
            "args": {"p1": "changed value", "p2": 100}, # notebook parameters
        },
        {
            "name": "NotebookSimple2",
            "path": "NotebookSimple2",
            "timeoutPerCellInSeconds": 120,
            "args": {"p1": "changed value 2", "p2": 200}
        },
        {
            "name": "NotebookSimple2.2",
            "path": "NotebookSimple2",
            "timeoutPerCellInSeconds": 120,
            "args": {"p1": "changed value 3", "p2": 300},
            "retry": 1,
            "retryIntervalInSeconds": 10,
            "dependencies": ["NotebookSimple"] # list of activity names that this activity depends on
        }
    ],
    "timeoutInSeconds": 43200, # max timeout for the entire DAG, default to 12 hours
    "concurrency": 50 # max number of notebooks to run concurrently, default to 50
}
notebookutils.notebook.runMultiple(DAG, {"displayDAGViaGraphviz": False})
根筆記本的執行結果如下所示:
我們也提供方法來檢查 DAG 是否已正確定義。
notebookutils.notebook.validateDAG(DAG)
注意
- 多個筆記本執行的平行處理原則程度僅限於 Spark 工作階段的總可用計算資源。
- 筆記本活動或並行筆記本的上限為 50。 超過此限制可能會導致因高計算資源使用量而導致穩定性和效能問題。 如果發生問題,請考慮將筆記本分成多個
runMultiple呼叫,或藉由調整 DAG 參數中的並行欄位來減少並行。 - 整個 DAG 的預設逾時為 12 小時,而子筆記本中每個儲存格的預設逾時為 90 秒。 您可以藉由在 DAG 參數中設定 timeoutInSeconds 和 timeoutPerCellInSeconds 字段來變更逾時。
編輯筆記本
這個方法會結束具有值的筆記本。 您可以在筆記本中以互動方式或在管線中執行巢狀函數呼叫。
當您以互動方式從筆記本呼叫 exit() 函式時,Fabric 筆記本會擲回例外狀況、略過執行後續儲存格,並讓 Spark 工作階段保持運作。
當您在管線中協調調用 exit() 函式的筆記本時,筆記本的活動會以一個結束值回傳。這會完成管線的執行並停止 Spark 會話。
當您在所參考的筆記本中呼叫 exit() 函式時,Fabric Spark 將會停止進一步執行參考的筆記本,並繼續在呼叫 run() 函式的主要筆記本中執行下一個儲存格。 例如:Notebook1 有三個儲存格,並呼叫第二個儲存格中的 exit() 函式。 Notebook2 的第三個儲存格中有五個儲存格並呼叫 run (notebook1)。 當您執行 Notebook2 時,Notebook1 會在達到 exit() 函式時停止在第二個儲存格。 Notebook2 會繼續執行第四個儲存格和第五個儲存格。
notebookutils.notebook.exit("value string")
注意
exit() 函式會覆寫目前的儲存格輸出。 若要避免遺失其他程式代碼語句的輸出,請在個別單元格中呼叫 notebookutils.notebook.exit()。
例如:
具有下列兩個儲存格的 Sample1 筆記本:
儲存格 1 會定義預設值設定為 10 的輸入參數。
儲存格 2 會結束筆記本,輸入為結束值。
您可以使用預設值在另一個筆記本中執行 Sample1:
exitVal = notebookutils.notebook.run("Sample1")
print (exitVal)
輸出:
Notebook is executed successfully with exit value 10
您可以在另一個筆記本中執行 Sample1,並將輸入值設定為 20:
exitVal = notebookutils.notebook.run("Sample1", 90, {"input": 20 })
print (exitVal)
輸出:
Notebook is executed successfully with exit value 20
管理筆記本成品
notebookutils.notebook 提供特殊公用程式,以程序設計方式管理 Notebook 項目。 這些 API 可協助您輕鬆建立、取得、更新及刪除筆記本項目。
若要有效地使用這些方法,請考慮下列使用範例:
建立筆記本
with open("/path/to/notebook.ipynb", "r") as f:
    content = f.read()

artifact = notebookutils.notebook.create("artifact_name", "description", "content", "default_lakehouse_name", "default_lakehouse_workspace_id", "optional_workspace_id")
取得筆記本的內容
artifact = notebookutils.notebook.get("artifact_name", "optional_workspace_id")
更新筆記本
updated_artifact = notebookutils.notebook.update("old_name", "new_name", "optional_description", "optional_workspace_id")
updated_artifact_definition = notebookutils.notebook.updateDefinition("artifact_name", "content", "default_lakehouse_name", "default_Lakehouse_Workspace_name", "optional_workspace_id")
刪除筆記本
is_deleted = notebookutils.notebook.delete("artifact_name", "optional_workspace_id")
列出工作區中的筆記本
artifacts_list = notebookutils.notebook.list("optional_workspace_id")
認證公用程式
您可以使用認證公用程式來取得存取令牌,以及管理 Azure 金鑰保存庫 中的秘密。
執行下列命令以取得可用方法的概觀:
notebookutils.credentials.help()
輸出:
Help on module notebookutils.credentials in notebookutils:

NAME
    notebookutils.credentials - Utility for credentials operations in Fabric

FUNCTIONS
    getSecret(akvName, secret) -> str
        Gets a secret from the given Azure Key Vault.
        :param akvName: The name of the Azure Key Vault.
        :param secret: The name of the secret.
        :return: The secret value.

    getToken(audience) -> str
        Gets a token for the given audience.
        :param audience: The audience for the token.
        :return: The token.

    help(method_name=None)
        Provides help for the notebookutils.credentials module or the specified method.

        Examples:
        notebookutils.credentials.help()
        notebookutils.credentials.help("getToken")
        :param method_name: The name of the method to get help with.

DATA
    creds = <notebookutils.notebookutils.handlers.CredsHandler.CredsHandler...

FILE
    /home/trusted-service-user/cluster-env/trident_env/lib/python3.10/site-packages/notebookutils/credentials.py
取得權杖
getToken 會針對指定的對象和名稱傳回 Microsoft Entra 權杖 (選擇性)。 下列清單顯示目前可用的對循金鑰:
- 儲存體物件資源:“儲存體”
- Power BI 資源:“pbi”
- Azure Key Vault 資源:"keyvault"
- Synapse RTA KQL DB 資源:“kusto”
執行下列命令以取得權杖:
notebookutils.credentials.getToken('audience Key')
使用使用者認證取得秘密
getSecret 會使用使用者認證,針對指定的 Azure Key Vault 端點和祕密名稱,傳回 Azure Key Vault 祕密。
notebookutils.credentials.getSecret('https://<name>.vault.azure.net/', 'secret name')
檔案裝載和卸載
Fabric 支援Microsoft Spark 公用程式套件中的下列裝載案例。 您可以使用裝載、卸載、getMountPath()和 mounts() API,將遠端儲存體 (ADLS Gen2) 連結至所有工作節點 (驅動程序節點和背景工作節點)。 儲存載入點就緒之後,請使用本機檔案 API 來存取資料,就好像儲存在本機文件系統中一樣。
如何裝載 ADLS Gen2 帳戶
下列範例說明如何裝載 Azure Data Lake Storage Gen2。 裝載 Blob 儲存體的運作方式類似。
此範例假設您有一個名為 storegen2 的 Data Lake Storage Gen2 帳戶,而該帳戶有一個名為 mycontainer 的容器,而您想要裝載至 /test 到筆記本 Spark 工作階段。
若要掛接名為 mycontainer 的容器,Notebookutils 必須先檢查您是否有權存取容器。 目前,Fabric 支援兩種觸發程式掛接作業的驗證方法: accountKey 和 sastoken。
透過共用存取簽章令牌或帳戶密鑰掛接
NotebookUtils 支援明確傳遞帳戶密鑰或 共用存取簽章 (SAS) 令牌作為掛接目標的參數。
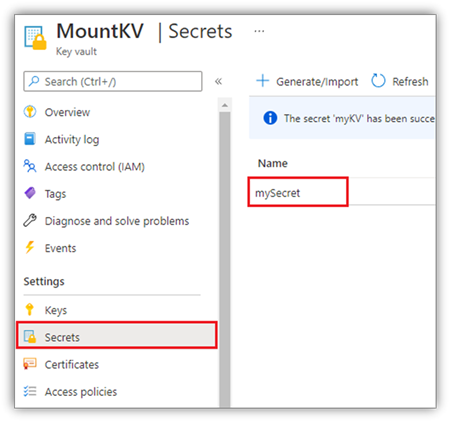
基於安全性考慮,我們建議您將帳戶密鑰或 SAS 令牌儲存在 Azure 金鑰保存庫 中(如下列螢幕擷取畫面所示)。 接著,您可以使用 notebookutils.credentials.getSecret API 來擷取它們。 如需 Azure Key Vault 的更多資訊,請參閱關於 Azure Key Vault 受控儲存體帳戶金鑰。
accountKey 方法的範例程式碼:
# get access token for keyvault resource
# you can also use full audience here like https://vault.azure.net
accountKey = notebookutils.credentials.getSecret("<vaultURI>", "<secretName>")
notebookutils.fs.mount(
    "abfss://mycontainer@<accountname>.dfs.core.windows.net",
    "/test",
    {"accountKey":accountKey}
)
sastoken 的範例程序代碼:
# get access token for keyvault resource
# you can also use full audience here like https://vault.azure.net
sasToken = notebookutils.credentials.getSecret("<vaultURI>", "<secretName>")
notebookutils.fs.mount(
    "abfss://mycontainer@<accountname>.dfs.core.windows.net",
    "/test",
    {"sasToken":sasToken}
)
掛接參數:
- fileCacheTimeout:Blobs 預設會在本機臨時資料夾中快取 120 秒。 在此期間,blobfuse 不會檢查檔案是否為最新狀態。 參數可以設定為變更預設逾時時間。 當多個客戶端同時修改檔案時,若要避免本機和遠端檔案之間的不一致,建議您縮短快取時間,甚至將其變更為 0,並一律從伺服器取得最新的檔案。
- timeout:掛接作業逾時預設為120秒。 參數可以設定為變更預設逾時時間。 當執行程式太多或裝載逾時時,建議增加值。
您可以使用這些參數,如下所示:
notebookutils.fs.mount(
   "abfss://mycontainer@<accountname>.dfs.core.windows.net",
   "/test",
   {"fileCacheTimeout": 120, "timeout": 120}
)
注意
基於安全性考慮,建議您避免將認證直接內嵌在程序代碼中。 為了進一步保護您的認證,任何在筆記本輸出中顯示的機密資訊都會被遮蔽。 如需詳細資訊,請參閱祕密修訂。
如何裝載 Lakehouse
將 lakehouse 掛接至 /<mount_name> 的範例程式代碼:
notebookutils.fs.mount(
 "abfss://<workspace_name>@onelake.dfs.fabric.microsoft.com/<lakehouse_name>.Lakehouse",
 "/<mount_name>"
)
使用 Notebookutils fs API 存取裝入點下的檔案
掛接作業的主要目的是讓客戶使用本機檔系統 API 存取儲存在遠端儲存體帳戶中的資料。 您也可以使用 notebookutils fs API 搭配掛接路徑做為參數來存取資料。 此路徑格式稍有不同。
假設您使用掛接 API 將 Data Lake Storage Gen2 容器 mycontainer 裝載至 /test。 當您使用本機檔案系統 API 存取資料時,路徑格式如下所示:
/synfs/notebook/{sessionId}/test/{filename}
當您想要使用 Notebookutils fs API 存取資料時,建議您使用 getMountPath() 來取得正確的路徑:
path = notebookutils.fs.getMountPath("/test")
清單目錄:
notebookutils.fs.ls(f"file://{notebookutils.fs.getMountPath('/test')}")讀取檔案內容:
notebookutils.fs.head(f"file://{notebookutils.fs.getMountPath('/test')}/myFile.txt")建立目錄:
notebookutils.fs.mkdirs(f"file://{notebookutils.fs.getMountPath('/test')}/newdir")
透過本機路徑存取裝載點下的檔案
您可以使用標準檔案系統,輕鬆地在裝載點中讀取和寫入檔案。 以下是 Python 範例:
#File read
with open(notebookutils.fs.getMountPath('/test2') + "/myFile.txt", "r") as f:
    print(f.read())
#File write
with open(notebookutils.fs.getMountPath('/test2') + "/myFile.txt", "w") as f:
    print(f.write("dummy data"))
如何檢查現有的裝入點
您可以使用 notebookutils.fs.mounts() API 來檢查所有現有的裝入點資訊:
notebookutils.fs.mounts()
如何卸除裝載點
使用下列程式碼來卸載掛接點 (此範例中的 /test):
notebookutils.fs.unmount("/test")
已知的限制
目前的掛接是作業層級組態;建議您使用 掛接 API 來檢查載入點是否存在或無法使用。
不會自動套用卸除機制。 當應用程式執行完成時,若要卸載裝入點並釋放磁碟空間,您必須在程式碼中明確呼叫卸載 API。 否則,在應用程式執行完成之後,裝載點仍會存在於節點中。
不支援掛接 ADLS Gen1 儲存體帳戶。
Lakehouse 公用程式
notebookutils.lakehouse 提供專為管理 Lakehouse 專案量身打造的公用程式。 這些公用程式可讓您輕鬆建立、取得、更新及刪除 Lakehouse 成品。
方法概觀
以下是 notebookutils.lakehouse所提供的可用方法概觀:
# Create a new Lakehouse artifact
create(name: String, description: String = "", definition: ItemDefinition = null, workspaceId: String = ""): Artifact

# Retrieve a Lakehouse artifact
get(name: String, workspaceId: String = ""): Artifact

# Get a Lakehouse artifact with properties
getWithProperties(name: String, workspaceId: String = ""): Artifact

# Update an existing Lakehouse artifact
update(name: String, newName: String, description: String = "", workspaceId: String = ""): Artifact

# Delete a Lakehouse artifact
delete(name: String, workspaceId: String = ""): Boolean

# List all Lakehouse artifacts
list(workspaceId: String = "", maxResults: Int = 1000): Array[Artifact]

# List all tables in a Lakehouse artifact
listTables(lakehouse: String, workspaceId: String = "", maxResults: Int = 1000): Array[Table]

# Starts a load table operation in a Lakehouse artifact
loadTable(loadOption: collection.Map[String, Any], table: String, lakehouse: String, workspaceId: String = ""): Array[Table]
使用範例
若要有效地使用這些方法,請考慮下列使用範例:
建立 Lakehouse
artifact = notebookutils.lakehouse.create("artifact_name", "Description of the artifact", "optional_workspace_id")
取得 Lakehouse
artifact = notebookutils.lakehouse.get("artifact_name", "optional_workspace_id")
artifact = notebookutils.lakehouse.getWithProperties("artifact_name", "optional_workspace_id")
更新 Lakehouse
updated_artifact = notebookutils.lakehouse.update("old_name", "new_name", "Updated description", "optional_workspace_id")
刪除 Lakehouse
is_deleted = notebookutils.lakehouse.delete("artifact_name", "optional_workspace_id")
列出工作區中的 Lakehouses
artifacts_list = notebookutils.lakehouse.list("optional_workspace_id")
列出 Lakehouse 中的所有資料表
artifacts_tables_list = notebookutils.lakehouse.listTables("artifact_name", "optional_workspace_id")
在 Lakehouse 中啟動載入資料表作業
notebookutils.lakehouse.loadTable(
    {
        "relativePath": "Files/myFile.csv",
        "pathType": "File",
        "mode": "Overwrite",
        "recursive": False,
        "formatOptions": {
            "format": "Csv",
            "header": True,
            "delimiter": ","
        }
    }, "table_name", "artifact_name", "optional_workspace_id")
其他資訊
如需每個方法及其參數的詳細資訊,請使用函式 notebookutils.lakehouse.help("methodName")。
執行階段公用程式
顯示工作階段內容資訊
您可以透過 notebookutils.runtime.context 取得目前即時工作階段的內容資訊,包括筆記本名稱、預設 Lakehouse、工作區資訊,如果是管線執行等。
notebookutils.runtime.context
會話管理
停止互動式會話
有時候,藉由在程式代碼中呼叫 API 來停止互動式會話,而不是手動按兩下 [停止] 按鈕。 在這種情況下,我們提供 API notebookutils.session.stop() 來支援透過程式代碼停止互動式會話,其適用於 Scala 和 PySpark。
notebookutils.session.stop()
notebookutils.session.stop() API 會在背景中以異步方式停止目前的互動式會話。 它也會停止 Spark 會話,並釋放會話佔用的資源,讓集區中其他會話可以使用。
重新啟動 Python 解釋器
notebookutils.session 公用程式提供重新啟動 Python 解釋器的方式。
notebookutils.session.restartPython()
注意
- 在筆記本參考執行案例中,
restartPython()只會重新啟動目前所參考筆記本的 Python 解釋器。 - 在罕見的情況下,命令可能會因為Spark反映機制而失敗,新增重試可以減輕問題。
已知問題
使用高於 1.2 的執行階段版本並執行
notebookutils.help()時,目前不支援列出的 fabricClient、PBIClient API,進一步提供。 此外,Scala 筆記本目前不支持認證 API。Python 筆記本在使用 notebookutils.session 公用程式進行會話管理時,不支援 停止和 重新啟動 Python API。


