在 Authenticator 中啟用通行密鑰
本文會列出在 Microsoft Entra ID 的 Authenticator 中啟用和強制使用密鑰的步驟。 首先,您會更新驗證方法原則,以允許使用者在 Authenticator 中使用傳遞金鑰註冊和登入。 然後,您可以使用條件式存取驗證強度原則,在使用者存取敏感性資源時強制執行通行金鑰登入。
需求
Android 14 和更新版本或 iOS 17 和更新版本。
針對跨裝置註冊和驗證:
- 這兩個裝置都必須啟用藍牙。
- 組織中必須允許這兩個端點的因特網連線:
https://cable.ua5v.comhttps://cable.auth.com
注意
如果您啟用證明,用戶就無法使用跨裝置註冊。
若要深入瞭解 FIDO2 支援,請參閱 Microsoft Entra ID的 FIDO2 驗證支援。
在系統管理中心的 Authenticator 中啟用密鑰
以至少驗證原則管理員的身分登入 Microsoft Entra 系統管理中心。
瀏覽至 [保護]>[驗證方法]>[驗證方法原則]。
在 [密鑰 (FIDO2)] 方法下,選取 [所有使用者] 或 [新增群組] 以選取特定群組。 僅支援安全性群組。
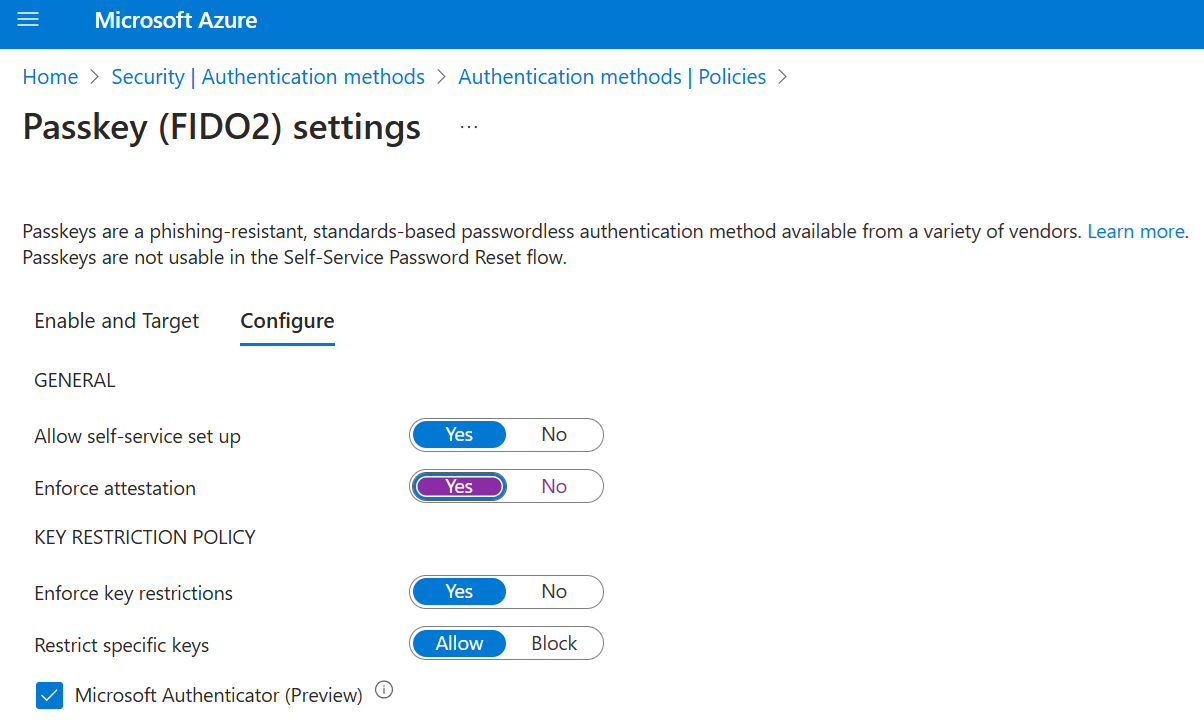
在 [設定] 索引標籤上:
將 [允許自助設定] 設定為 [是]。 如果設定為 無,即使驗證方法政策已啟用通行密鑰 (FIDO2),使用者也無法使用 安全資訊註冊通行密鑰。
將 [強制證明 設定為 [是] 或 [否]。
在通行密鑰(FIDO2)原則中啟用驗證時,Microsoft Entra ID 會嘗試驗證所建立的通行密鑰的合法性。 當使用者在 Authenticator 中註冊通行密鑰時,驗證會使用 Apple 和 Google 服務來確認由合法的 Authenticator 應用程式創建的通行密鑰。 以下是更多詳細資料:
Android:
- 對於 Play 完整性證明,Authenticator 證明會使用 Play 完整性 API 來確保驗證器應用程式的合法性,再註冊通行密鑰。
- 針對密鑰證明,Authenticator 證明會使用 Android 的密鑰證明來驗證所註冊的通行密鑰是否為硬體支援。
注意
針對iOS和Android,Authenticator證明依賴Apple和Google服務來驗證 Authenticator 應用程式的真實性。 大量使用服務可能會導致通行密鑰註冊失敗,而使用者可能需要再試一次。 如果 Apple 和 Google 服務已關閉,Authenticator 證明會封鎖需要證明的註冊,直到服務還原為止。 若要監視Google Play完整性服務的狀態,請參閱 Google Play狀態儀錶板。 若要監視 iOS 應用程式證明服務的狀態,請參閱 系統狀態。
注意
使用者只能在 Authenticator 應用程式中直接註冊證明的通行密鑰。 跨裝置註冊流程不支援經過驗證的通行密鑰註冊。
金鑰限制 設定特定通行碼在註冊和驗證中的可用性。 您可以將 [強制執行密鑰限制] 設定為 [否],讓使用者可以在 Authenticator 應用程式中註冊任何支援的通行密鑰。
您可以將 [強制執行金鑰限制] 設定為 [是] 只允許或封鎖其 AAGUID 所識別的特定通行密鑰。 在 2 月中旬之前,安全性資訊 需要將此設定設為 [是],讓使用者可以在 Authenticator 中選擇 通行密碼,並完成專用的 Authenticator 通行密碼註冊流程。 如果您選擇 No,流覽至 SecurityInfo 的使用者仍然可以根據其操作系統和瀏覽器,通過選擇 安全性金鑰或傳遞密鑰 方法,於 Authenticator 中新增傳遞密鑰。 不過,我們並不預期許多使用者會探索並使用該方法。
如果您施行金鑰限制,而且已有活躍的通行密鑰使用,您應該收集目前使用的通行密鑰的 AAGUID。 您可以使用 PowerShell 腳本來尋找您租戶中使用的 AAGUID。 如需詳細資訊,請參閱 尋找 AAGUIDs。
如果您將 [限制特定密鑰] 設定為 [允許],請選取 [Microsoft Authenticator],以自動將 Authenticator 應用程式 AAGUID 新增至密鑰限制清單。 您也可以手動新增下列 AAGUIDs,讓使用者透過登入 Authenticator 應用程式或在 安全資訊上完成引導式流程,於 Authenticator 註冊通行密鑰:
- 適用於 Android的
Authenticator: - 適用於 iOS的
Authenticator:
如果您變更金鑰限制並移除您先前允許的 AAGUID,則先前註冊允許方法的使用者會無法再將其用來登入。
注意
如果您關閉密鑰限制,請務必清除 [Microsoft Authenticator] 複選框,以避免使用者在 安全性資訊設定中被提示在 Authenticator 應用程式中設定通行碼。
- 適用於 Android的
完成設定之後,請選取 [儲存]。
如果您在嘗試儲存時看到錯誤,請在單一作業中以單一群組取代多個群組,然後再次選取 [儲存]。
在 Authenticator 中使用 Graph Explorer 啟用通行密鑰
除了使用 Microsoft Entra 系統管理中心之外,您也可以使用 Graph 總管來啟用 Authenticator 中的通行金鑰。 如果您至少被指派 驗證原則管理員 角色,您可以更新驗證方法的政策,以允許驗證器使用的 AAGUID。
若要使用 Graph 總管來設定原則:
登入 Graph 總管,並同意 Policy.Read.All 和 Policy.ReadWrite.AuthenticationMethod 權限。
擷取驗證方法原則:
GET https://graph.microsoft.com/v1.0/authenticationMethodsPolicy/authenticationMethodConfigurations/FIDO2若要停用證明強制執行,並限制密鑰以僅允許 Authenticator 的 AAGUID,請使用下列要求本文執行
PATCH作業:PATCH https://graph.microsoft.com/v1.0/authenticationMethodsPolicy/authenticationMethodConfigurations/FIDO2 Request Body: { "@odata.type": "#microsoft.graph.fido2AuthenticationMethodConfiguration", "isAttestationEnforced": true, "keyRestrictions": { "isEnforced": true, "enforcementType": "allow", "aaGuids": [ "90a3ccdf-635c-4729-a248-9b709135078f", "de1e552d-db1d-4423-a619-566b625cdc84" <insert previous AAGUIDs here to keep them stored in policy> ] } }請確定密鑰 (FIDO2) 原則已正確更新。
GET https://graph.microsoft.com/v1.0/authenticationMethodsPolicy/authenticationMethodConfigurations/FIDO2
尋找 AAGUID
使用 GetRegisteredPasskeyAAGUIDsForAllUsers.ps1 Microsoft Graph PowerShell 腳本來列舉租戶中所有已註冊密碼金鑰的 AAGUID。
將此腳本的內容儲存至名為 GetRegisteredPasskeyAAGUIDsForAllUsers.ps1的檔案。
# Disconnect from Microsoft Graph
Disconnect-MgGraph

# Connect to Microsoft Graph with required scopes
Connect-MgGraph -Scope 'User.Read,UserAuthenticationMethod.Read,UserAuthenticationMethod.Read.All'

# Define the output file [If the script is run more than once, delete the file to avoid appending to it.]
$file = ".\AAGUIDs.txt"

# Initialize the file with a header
Set-Content -Path $file -Value '---'

# Retrieve all users
$UserArray = Get-MgBetaUser -All

# Iterate through each user
foreach ($user in $UserArray) {
    # Retrieve Passkey authentication methods for the user
    $fidos = Get-MgBetaUserAuthenticationFido2Method -UserId $user.Id

    if ($fidos -eq $null) {
        # Log and write to file if no Passkey methods are found
        Write-Host "User object ID $($user.Id) has no Passkey"
        Add-Content -Path $file -Value "User object ID $($user.Id) has no Passkey"
    } else {
        # Iterate through each Passkey method
        foreach ($fido in $fidos) {
            # Log and write to file the Passkey details
            Write-Host "- User object ID $($user.Id) has a Passkey with AAGUID $($fido.Aaguid) of Model type '$($fido.Model)'"
            Add-Content -Path $file -Value "- User object ID $($user.Id) has a Passkey with AAGUID $($fido.Aaguid) of Model type '$($fido.Model)'"
        }
    }

    # Log and write a separator to file
    Write-Host "==="
    Add-Content -Path $file -Value "==="
}
將藍牙使用限制為 Authenticator 中的通行密鑰
某些組織會限制藍牙使用方式,其中包括使用通行密鑰。 在這種情況下,組織可以允許藍牙與已啟用傳遞密鑰的 FIDO2 驗證器進行獨佔配對,以允許傳遞密鑰。 如需如何僅針對通行密鑰設定藍牙使用方式的詳細資訊,請參閱 藍牙限制環境中的Passkeys。
刪除密鑰
如果使用者刪除 Authenticator 中的傳遞金鑰,密碼也會從使用者的登入方法中移除。 驗證原則系統管理員也可以遵循下列步驟,從使用者的驗證方法中刪除通行密鑰,但不會從 Authenticator 移除通行密鑰。
登入 Microsoft Entra 系統管理中心,並搜尋必須移除其通行密鑰的使用者。
選取 驗證方法,以滑鼠右鍵按兩下 [Passkey],然後選取 [刪除]。
除非使用者在 Authenticator 中起始傳遞金鑰刪除本身,否則他們也必須移除其裝置上 Authenticator 中的通行密鑰。
在 Authenticator 中使用密鑰強制執行登入
若要讓使用者在存取敏感性資源時以通行金鑰登入,請使用內建的網路釣魚防護驗證強度,或依照下列步驟建立自訂驗證強度:
以條件式存取系統管理員身分登入 Microsoft Entra 系統管理中心。
瀏覽至 [資料保護]> [驗證方法] > [驗證強度]。
選取 [新驗證強度]。
為您的新身份驗證強度提供一個描述性的名稱。
或者,提供描述。
選取 [Passkeys (FIDO2)],然後選取 [進階選項]。
選取 防釣魚 MFA 強度,或在 Authenticator 中新增通行密鑰的 AAGUID:
- 適用於 Android的
Authenticator: - 適用於 iOS的
Authenticator:
- 適用於 Android的
選取 [下一步] ,然後檢閱政策配置。
