Create a CTI Connector
The CTI Connector component in your custom CTI adapter contains the logic to connect to and communicate with an external CTI system. CTI Connector consists of the ICtiControl interface, which includes the CtiHostedControl class containing methods and events that will be called and listened to by the CTI Desktop Manager component.
CTI Connector supports two models of interaction with CTI systems:
The first model is a service-based polling system. In this model, the developer defines a service connection to an upstream CTI interaction source and polls that source for updates and events. This model is preferred for CTI sources that provide access to events and CTI actions via web services. In this model, consideration must be given to a proper threading model to support asynchronous communications with the upstream CTI web service.
The second model uses an instanced or static object that uses a callback or event notification system. This model is preferred for CTI sources that provide an API. As in the polling model, consideration should be given to providing asynchronous support via threading to prevent an impact to Unified Service Desk.
The UII CTI framework supports only one instance of the CTI Connector component.
Define a CTI Connector
CTI Connector implements the ICtiControl interface. To define a CTI Connector, use the CRM SDK Visual Studio project template. Download the CRM SDK Templates from the Visual Studio gallery, and double-click the CRMSDKTemplates.vsix file to install the template in Visual Studio.
Note
The template works if you have Microsoft .NET Framework 4.6.2 and Visual Studio 2012, Visual Studio 2013, or Visual Studio 2015. Additionally, you must have NuGet Package Manager for Visual Studio 2012, Visual Studio 2013, or Visual Studio 2015.
The CTI Connector template provides pre-wired events and methods that help you define a CTI Connector.
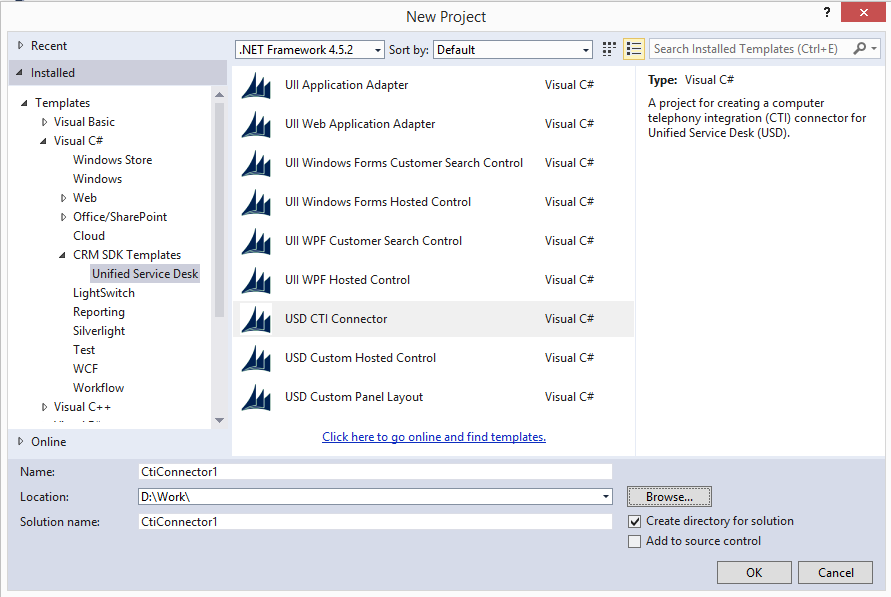
Start Visual Studio, and create a new project.
In the New Project dialog box:
From the list of installed templates, expand Visual C#, and select CRM SDK Templates > Unified Service Desk > USD CTI Connector.
Specify the name and location of the project, and click OK.

In Solution Explorer, right-click the CtiConnector.cs file, and select View Code to display the code.
Implement the required methods and events. For sample code that demonstrates how to create a CTI Connector, download and install the UII SDK, and then browse to the UII\SampleCode\UII\CCA\Source Code\Cti Root folder. For more information about the methods and events to implement for a CTI Connector, see the ICtiControl interface.
Save your project, and build it (Build > Build Solution). After the project builds successfully, an assembly (.dll file) is generated with the same names as your project (unless you changed it in the project properties) in the \bin\debug folder of your project.
Note
Note the name of the class that is used to build your CTI control in the
CtiConnector.csfile. You’ll need this information in the next step.Copy this file to your Unified Service Desk client application installation directory (typically C:\Program Files\Microsoft Dynamics CRM USD\USD). This file is required for testing and for using the CTI Connector from your Unified Service Desk client application.
Configure a hosted control for CTI Connector in Unified Service Desk
After you have built your CTI Connector control, you must configure it in Unified Service Desk.
Note
The CTI Connector project also lets you define your CTI Desktop Manager component. You have to create two separate hosted controls, one each for the CTI Connector and CTI Desktop Manager, in Unified Service Desk after you have added the code for the latter in the Visual Studio. More information: Create a CTI Desktop Manager
Sign in to the Dynamics 365 instance.
On the nav bar, choose Dynamics 365 > Settings > Unified Service Desk.
On the Unified Service Desk page, choose Hosted Controls.
On the Hosted Controls page, choose New.
On the New Hosted Control page, specify the following values
Field Value Name CTIConnector USD Component Type CCA Hosted Application Hosted Application Hosted Control Application is Global Checked Display Group HiddenPanel Adapter Use No Adapter Assembly URI This is the name of the assembly file (.dll) that you built in the previous step. Assembly Type This is the name of the assembly file (.dll) followed by a dot, and then the class name of your CTI Connector. For example, if your .dll file name is MyCtiConnector, and the name of the class of your CTI project isCtiConnector, type the following value in this field:MyCtiConnector.CtiConnector.Choose Save to create the hosted control.
See also
Create a CTI Desktop Manager Create a CTI Control UII Computer Telephony Integration (CTI) framework Walkthrough: Use generic listener adapter for CTI events