Models and packages
This article describes the concept of models and packages. It also explains how to use the development tools in Microsoft Visual Studio to create new models, how to update the parameters of existing models, and how to visualize dependencies between models.
To work with models in the model store, you use tools in Microsoft Visual Studio. You can create new models and change parameters for existing models.
Conceptual overview
A model is a group of elements, such as metadata and source files, that typically constitute a distributable software solution and includes customizations of an existing solution. A model is a design-time concept, for example a warehouse management model or a project accounting model. A model always belongs to a package. A package is a deployment and compilation unit of one or more models. It includes model metadata, binaries, and other associated resources. One or more packages can be packaged into a deployable package, which is the vehicle used for deployment on runtime environments.
Creating a new model
You use the Create model wizard to create new models. You can access this wizard from Model Management on the Dynamics 365 menu. You can create two types of models:
- A model that is deployed in its own package – You can use this type of model to create new model elements, and extend the metadata and business logic of referenced models. The wizard lets you select the referenced models. This type of model is compiled into its own assembly and binaries, and will simplify and reduce the cost of upgrades, deployment, and application lifecycle management in general.
- A model that is a part of an existing package – You can use this type of model to temporarily use legacy features such as overlayering source code and metadata. This feature is considered legacy and is supported only to upgrade from legacy versions.
In the Create model wizard, select usr for the layer. This layer will store user customizations. If needed, you can patch your customizations using the usp layer. If there are multiple versions of the same object in different layers, then the top layer will take precedence and will be used.
When the Create model wizard is completed, if you chose to create a new project, you will be prompted to specify a name and location for it.
Updating model parameters
If you must change the parameters for a model, you can use the Update model parameters dialog box.
- On the Dynamics 365 menu, point to Model Management, and then click Update model parameters.
- In the Model name field, select the model to update parameters for.
- Update the parameters as you require.
- Click Next.
- Update the dependency information for the current model, if changes are required.
- Click Next. The summary information for the model is displayed.
- Click Finish.
The updated model parameters become effective only after you restart Visual Studio.
Viewing package dependencies
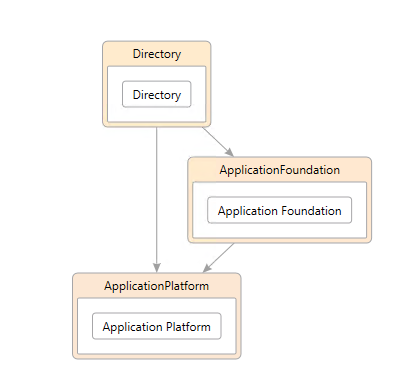
You can create a graphical representation that shows which packages and their models have dependencies on other packages. On the Dynamics 365 menu, point to Model Management, and then click View package dependencies. A Directed Graph Markup Language (DGML) diagram will be generated for the current packages and their models. This diagram is a collection of interdependent nodes, each of which represents a package. Each node lists all the models that belong to that package. Additional tools let you enhance or simplify the diagram. For example, you can add comments, move nodes around, or remove nodes. You can also view package dependencies of a single model by following these steps:
- Make sure the Application Explorer is in Model view: Right-click the AOT node and select Model view.
- Right-click on any model and select View package dependencies > View outgoing references.
This will generate a graph of all packages that the selected model depends on.


Deleting a model
In a development or test environment, follow these steps to delete a model.
The following steps assume the local model store folder is C:\AOSService\PackagesLocalDirectory and your model is named MyModel1.
If your model belongs to its own package. For example an extension package with no other models in the package.
- Close all instances of Visual Studio.
- Stop the following services: AOS web service and Batch Management service.
- Delete the package folder
C:\AOSService\PackagesLocalDirectory\MyModel1. On cloud-hosted environments this folder may be located on another drive letter such asK:. - Restart the services that you stopped in step 1.
- In Visual Studio, perform a full database synchronization (Visual Studio > Dynamics 365 > Synchronize database).
If your model belongs to a package with multiple models. For example, the MyModel1 overlays Application Suite.
- Close all instances of Visual Studio.
- Stop the following services: AOS web service and Batch Management service.
- Delete the model folder
C:\AOSService\PackagesLocalDirectory\<PackageName>\MyModel1. In this example, it'sPackageName=ApplicationSuite. On cloud-hosted environments this folder may be located on another drive letter such asK:. - Remove the descriptor file for the model in
C:\AOSService\PackagesLocalDirectory\<PackageName>\Descriptor\MyModel1.xml. On cloud-hosted environments this folder may be located on another drive letter such asK:. - Restart the services that you stopped in step 1.
- In Visual Studio, build the package that the deleted models belonged to (Visual Studio > Dynamics 365 > Build models).
- In Visual Studio, perform a full database synchronization (Visual Studio > Dynamics 365 > Synchronize database).
Additional resources
Development tools in Visual Studio