Power BI integration with Entity store
Entity store is an operational data store that is included with Microsoft Dynamics 365 Finance. This article describes how Entity store enables Power BI integration.
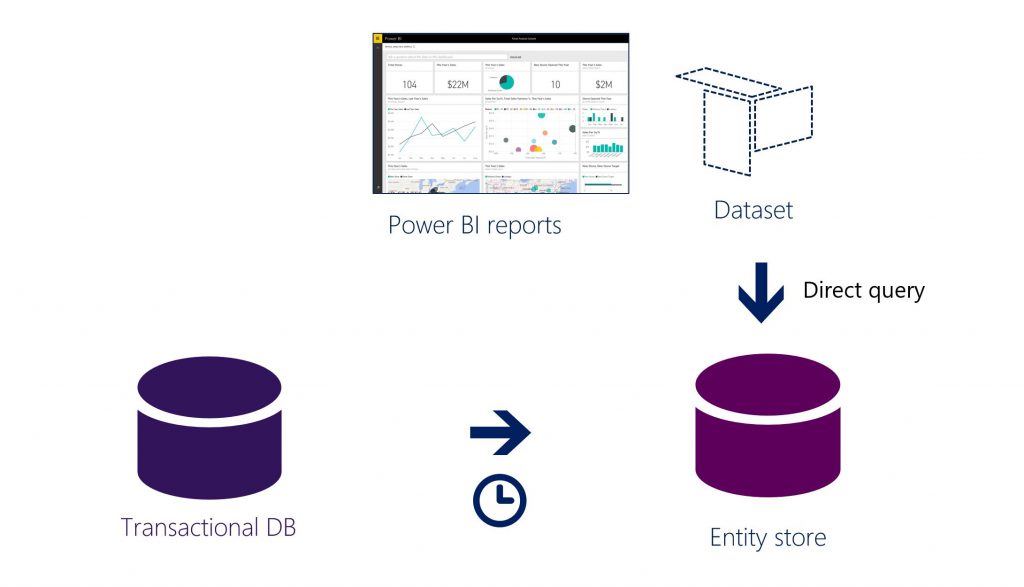
Entity store is an operational data store that is included with the application. The Entity store feature was introduced in the Microsoft Dynamics AX platform update 1 (May 2016) release. This feature lets an administrator or power user stage aggregate measurements in a dedicated data store for reporting and analytics. (Aggregate measurements are a star schema that is modeled by using entities.) We call this data store Entity store. It’s a database that is optimized for reporting purposes. Entity store uses the in-memory, clustered columnstore index (CCI) functionality that is built into Microsoft SQL Server to optimize reporting and queries. Customers can use Microsoft Power BI DirectQuery models together with Entity store to enable high-volume, near-real-time analytical reporting over large volumes of data.
Power BI DirectQuery mode
In the February 2016 release of Microsoft Dynamics AX, you could create Power BI reports by using OData endpoints that are exposed via data entities (both aggregate data entities and detailed or regular data entities). Although this approach is still supported, Entity store also lets power users create Power BI DirectQuery reports.
As the preceding illustration shows, DirectQuery is a reporting mode that runs reports directly on Entity store. In this reporting mode, data isn't staged in Power BI caches. This mode provides two immediate benefits:
- You can create Power BI reports over large data volumes.
- Reports don't have to be updated by using Power BI. When Entity store is updated, reports reflect the latest data.
Additionally, data doesn't leave your environment, because no data is cached in the Power BI service.
Stage aggregate measurements in Entity store
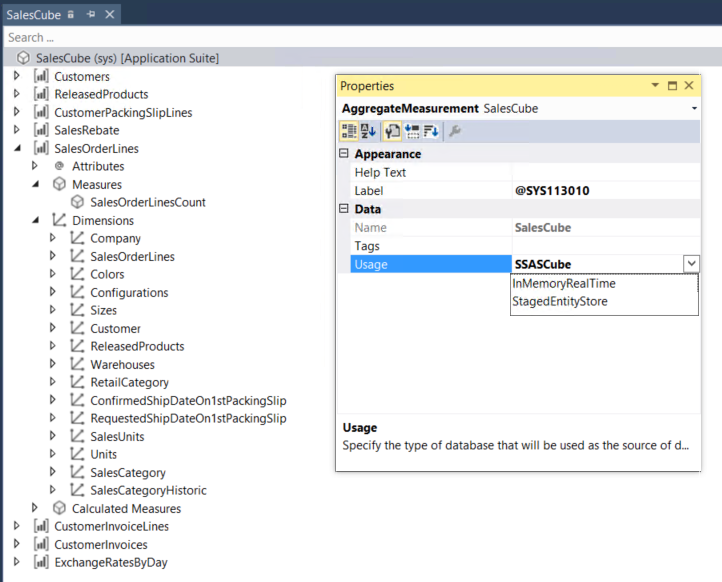
Aggregate measurements are a star schema that is modeled for analytical scenarios. In the February 2016 release, we enabled real-time, in-memory aggregate measurements. By using real-time aggregate measurements, you can enable embedded charts and key performance indicators (KPIs) that react to real-time operations on data. For information, see Transition from Analysis Services cubes to aggregate models. Real-time aggregate measurements take advantage of the in-memory, non-clustered columnstore index (NCCI) technology. Visuals and aggregate calculations that are built over real-time aggregate measurements reflect transactions within seconds. In the platform update 1 (May 2016) release, we enabled aggregate measurements that can be staged in Entity store. Aggregate measurements that are staged in Entity store can be used for near-real-time analytical scenarios where large volumes of data must be explored by using Power BI. As a developer, you learned how to model an aggregate measurement for real-time analytics in Model aggregate data. In the platform update 1 (May 2016) release, we also added the capability to model aggregate measurements that can be staged in Entity store. In Microsoft Visual Studio, you can specify StagedEntityStore as the usage property of an aggregate measurement. This new property was added in May 2016. Previously, InMemoryRealTime was available as the usage property.

However, you might wonder why you would model an aggregate measurement so that it can be staged? Why wouldn’t you use in-memory real-time aggregate measurements all the time? There are several reasons for using the StagedEntityStore pattern:
- There might be large amounts of data that must be explored and analyzed.
- You might have Analysis projects (that is, cubes) that you migrated from Microsoft Dynamics AX 2012 R3 as part of the code upgrade process. Because of the complex views and joins that are present in the schema, query response times might not be acceptable for embedded visuals. However, you might not want to refactor the visuals to take advantage of NCCI technology immediately.
- Unlike the operational database schema, the schema in Entity store is modeled specifically for reporting. Therefore, it's much easier to build new reports from the schema in Entity store.
- Your scenario might not require that analytical data be updated within seconds of an operation. Most Power BI reports that are built to enable data exploration fall into this category. If data freshness of approximately 10 minutes is acceptable for your scenario, you might want to use the staged pattern.
If one of the preceding reasons covers your situation, you should stage your aggregate measurement in Entity store and it use for Power BI integration.
Update Entity store
Entity store refresh is automated and managed by the system. In the client, you can find the Entity Store page at Systems administration > Setup > Entity Store. For more information, see Automated Entity store refresh.
Connecting to the Entity store database
For troubleshooting and diagnostics, you can connect to the Entity store database directly from a related sandbox environment. To connect:
- Use Remote Desktop to access the sandbox. The RDP file can be downloaded from the Environment Details page after you have included your IP address in a safe list.
- Open SQL Server Management Studio, and connect to the server specified on the Environment Details page.
- Find the section titled Database Accounts. Locate the entry for the user with the name axdwadmin.
- The server name is the first portion of the SQL Server\Database Name field. This should be used in the format of SQLServerName.database.windows.net where SQLServerName is the value from LCS.
- The authentication type should be changed from Windows Authentication to SQL Server Authentication.
- The login will be axdwadmin and the password will be the value from LCS.
- Using the Options button or by browsing to the Connection Properties tab, change the Connect to database property from the default value to your Database Name value from LCS.
- Click Connect to access the database.
