Ad-hoc analyses in purchasing
This article explains how to analyze purchasing data from list pages and queries using the Data Analysis feature. The feature lets you analyze data directly from the page, without having to run a report or open another application, such as Excel. Data Analysis provides an interactive and versatile way to calculate, summarize, and examine data. Instead of running reports using options and filters, you can add multiple tabs that represent different tasks or views on the data. Some examples are "My vendors," or "Purchasing statistics," or any other view you can imagine. To learn more about how to use the Data Analysis feature, go to Analyze list and query data with analysis mode.
Use the following list pages for ad-hoc analysis of purchase processes:
- Purchase Orders
- Purchase lines
- Posted Purchase Invoices
- Vendor Ledger Entries
- General Ledger Entries
Ad-hoc analysis scenarios for purchasing
Use the Data Analysis feature for quick fact checking and ad-hoc analysis:
- If you don't want to run a report
- If there isn't a report for your specific needs
- If you want to quickly iterate to get a good overview on a part of your business.
The following sections provide examples of purchasing scenarios in Business Central.
| Area | To... | Open this page in analysis mode | Using these fields |
|---|---|---|---|
| GRNI overview | Get a Goods Received, Not Invoiced (GRNI) overview across vendors. | Purchase lines | Type, Amt. Rec. Not Invoiced (LCY) (filter on these fields), Vendor No., Document No., No., and Amt. Rec. Not Invoiced (LCY) NOTE: You must personalize the page to add these fields. To learn more, go to Personalize your workspace. |
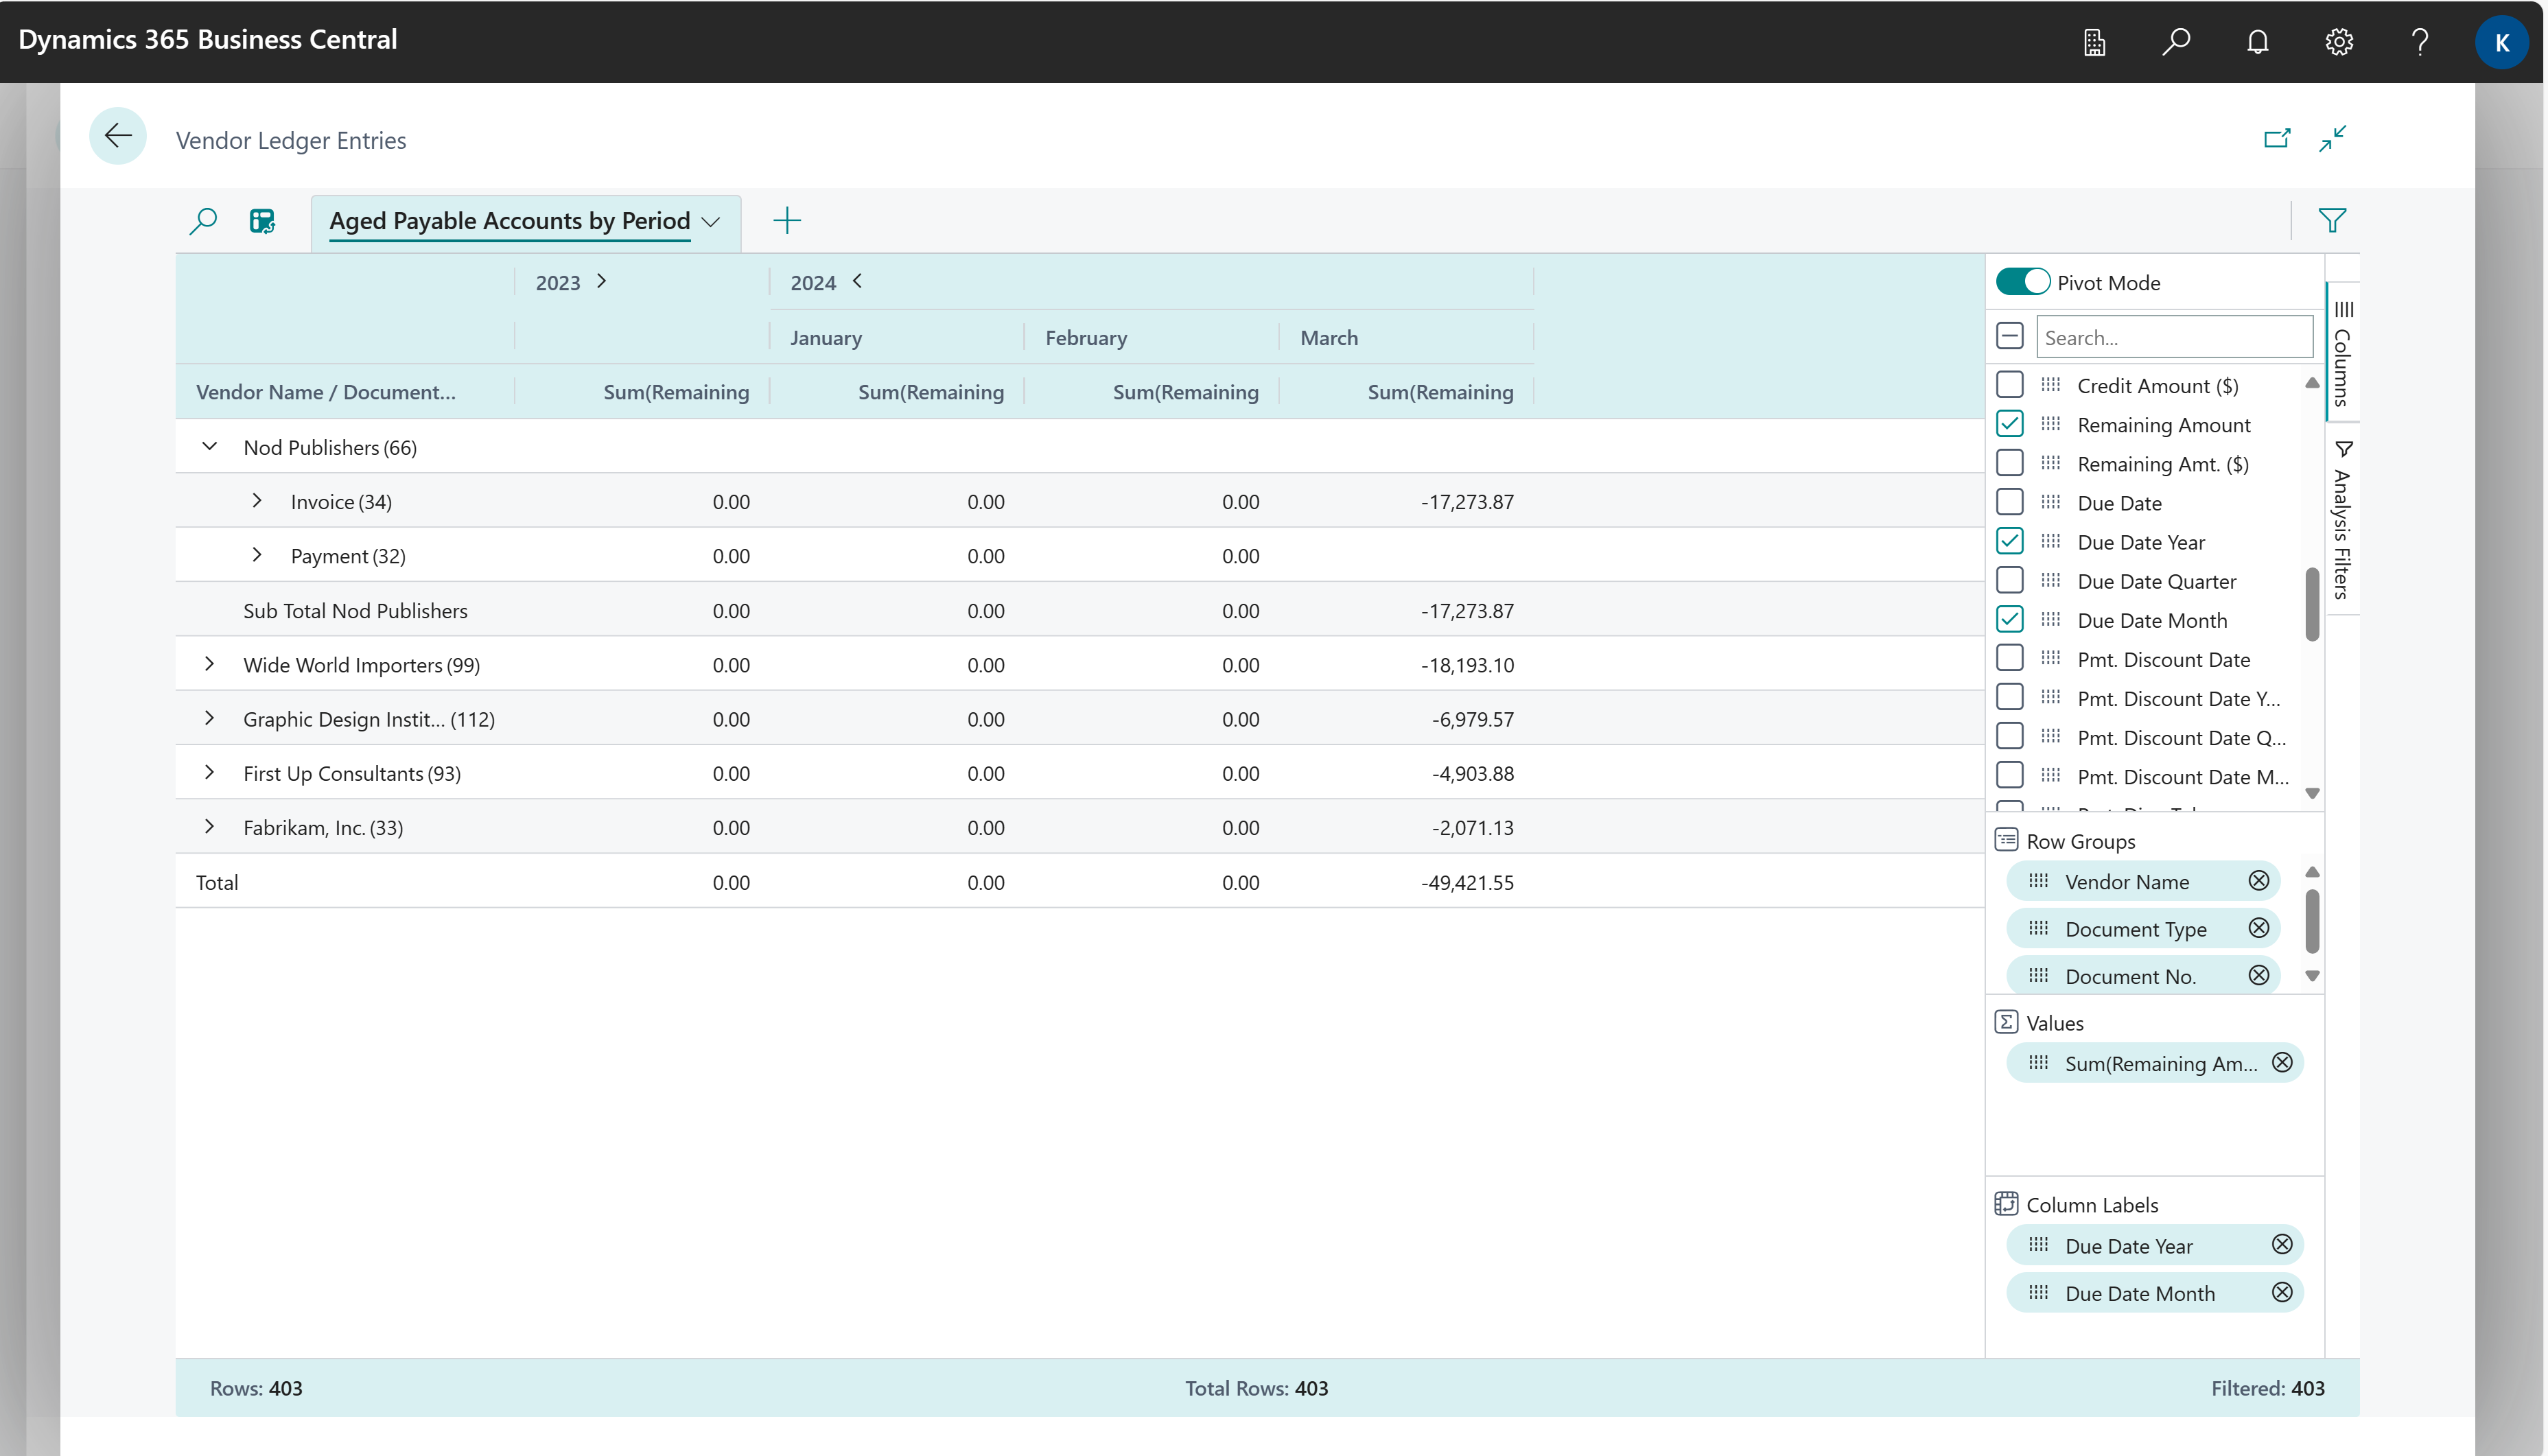
| Finance (Accounts Payable) | See what you owe your vendors, maybe broken down into time intervals for when amounts are due. | Vendor Ledger Entries | Vendor Name, Document Type, Document No., Due Date Year, Due Date Month, and Remaining Amount. |
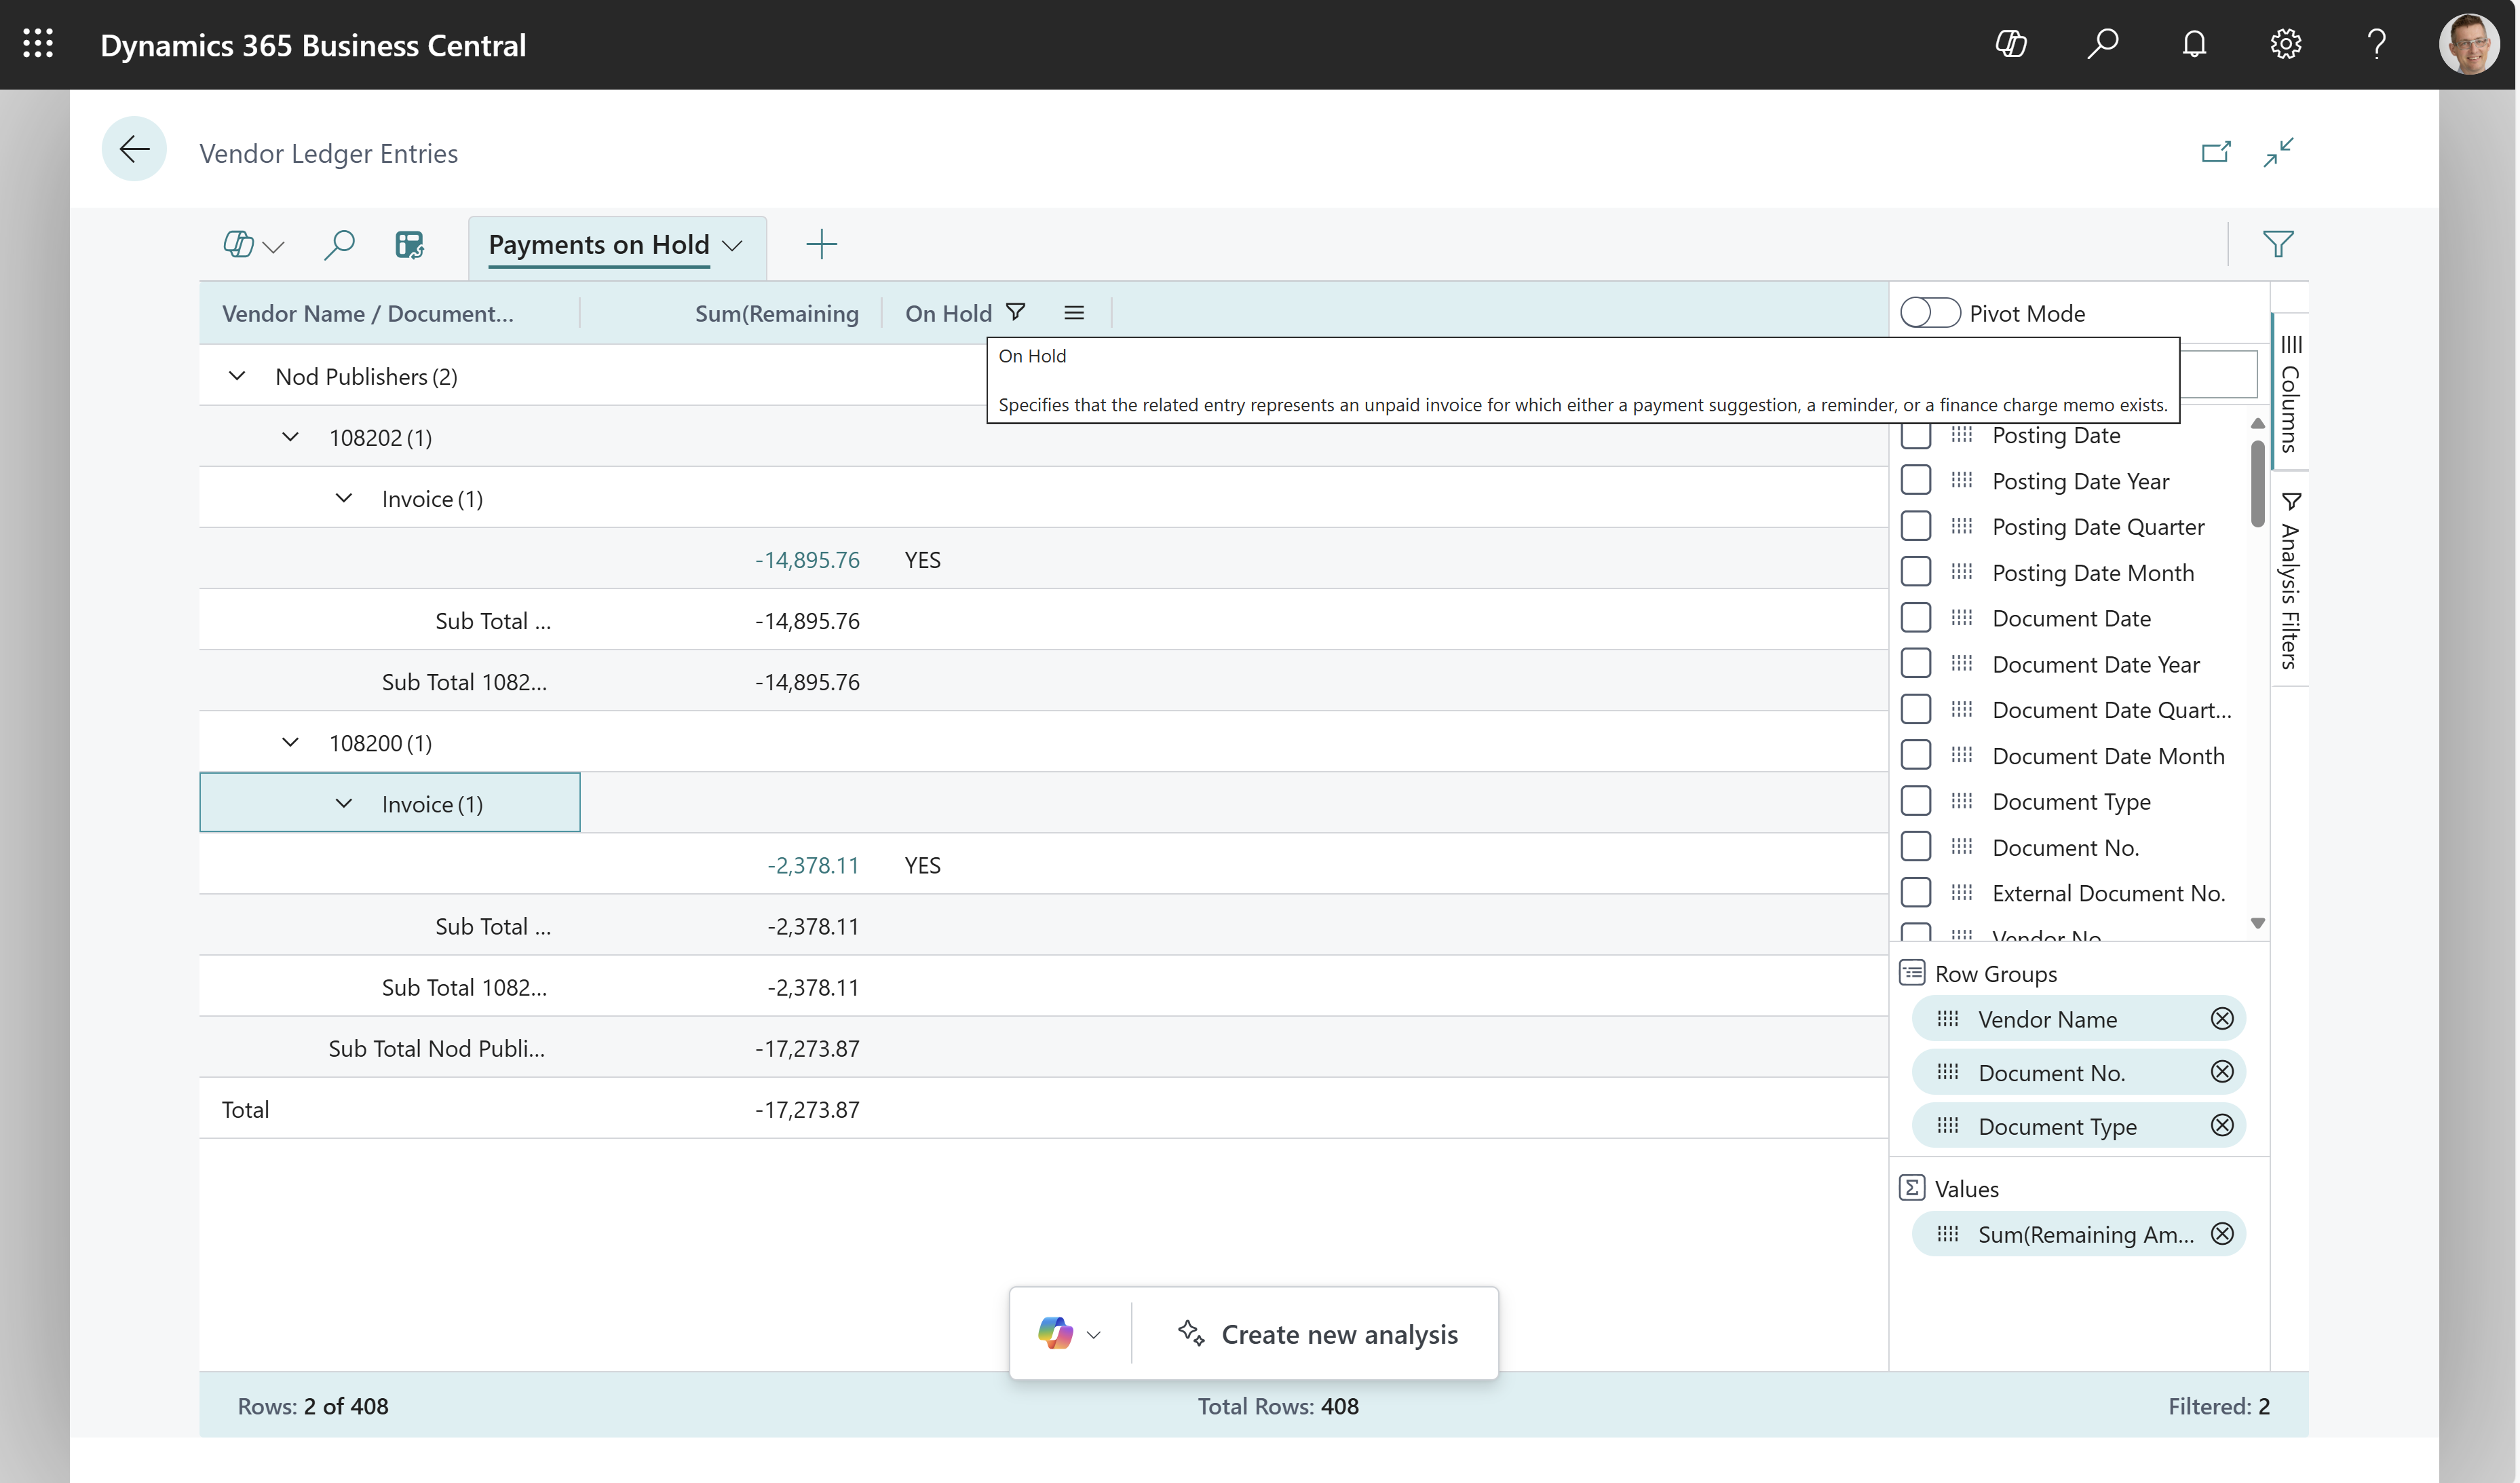
| Finance (Accounts Payable) | Get an overview of vendor ledger entries that have been marked On Hold | Vendor Ledger Entries | Vendor Name, Document Type, Document No., On Hold, and Remaining Amount. |
Example: goods received, not invoiced (GRNI) overview
To create a goods received, not invoiced (GRNI) overview across vendors, follow these steps:
- Open the Purchase lines list page.
- Personalize the page to add the Amount Received Not Invoiced field. To personalize the page, choose Settings, and then Personalize.
- Choose
 to turn on analysis mode.
 - Go to the Columns menu and remove all columns (select the box next to the Search field on the right).
- In the Additional Filters menu (located below the Columns menu on the right), set the following filters:
- Type = Item
- Amt. Rec. Not Invoiced (LCY) > 0.
- Drag the Vendor No., Document No., and No. fields to the Row Groups area. Drag the fields in that order.
- Add the Amt. Rec. Not Invoiced (LCY) field to include it on the overview.
- To do the analysis for a given year or quarter, apply a filter in the Analysis Filters menu. The menu is on the right of the page, just below the Columns menu.
- Rename your analysis tab to Goods Received, Not Invoiced (GRNI), or something that describes this analysis.
Example: finance (accounts payable)
To see what you owe your vendors, maybe broken down into time intervals for when amounts are due, follow these steps:
- Open the Vendor Ledger Entries list page, and turn on analysis mode.
- Go to the Columns menu and remove all columns (select the box next to the Search field on the right).
- Turn on the Pivot Mode toggle (located above the Search field on the right).
- Drag the Vendor Name, Document Type, and Document No. fields to the Row Groups area, and then drag the Remaining Amount field to the Values area.
- Drag the Due Date Year and Due Date Month fields to the Column Labels area. Drag the fields in that order.
- To do the analysis for a given year or quarter, apply a filter in the Analysis Filters menu (located below the Columns menu on the right).
- Rename your analysis tab to Aged Payable Accounts by Month, or something that describes this analysis.
The following image shows the result of these steps.
Example: finance (accounts payable) - vendor ledger entries on hold
To see vendor ledger entries on hold, follow these steps:
- Open the Vendor Ledger Entries list page, and turn on analysis mode.
- Go to the Columns menu and remove all columns (select the box next to the Search field on the right).
- Turn on the Pivot Mode toggle (located above the Search field on the right).
- Drag the Vendor Name, Document Type, and Document No. fields to the Row Groups area, and then drag the Remaining Amount field to the Values area.
- Drag the On Hold field to the Column Labels area.
- Rename your analysis tab to Payments On Hold, or something that describes this analysis.
The following image shows the result of these steps.
Data foundation for ad-hoc analysis on purchasing
When you post a purchase document, Business Central updates the vendor's account, general ledger (G/L), item ledger entries, and resource ledger entries:
For each purchase document, a purchase entry is created in the G/L Entry table. An entry is also created in the vendor's account in the Supplier Ledger Entry table, and a G/L entry is created in the relevant payables account. In addition, posting the purchase might result in a value-added tax (VAT) entry and a G/L entry for the discount amount.
For each purchase line, as applicable, entries are created in the:
- Item Ledger Entry table, if the purchase line is of the Item type.
- G/L Entry table, if the purchase line is of the G/L Account type.
- Resource Ledger Entry table, if the purchase line is of the Resource type.
In addition, purchase documents are always recorded in the Purch. Recpt. Header and Purch. Inv. Header tables.
To learn more, go to Posting purchases.
See also
Posting purchases
Analyze list and query data with analysis mode
Analytics, business intelligence, and reporting overview
Purchasing overview
Work with Business Central

