將 Orleans 部署至 Azure 容器應用程式
在本教學課程中,您將瞭解如何將範例 Orleans 購物車應用程式部署至 Azure Container Apps。 本教學課程會展開範例 Orleans 購物車應用程式的功能,其介紹于部署 Orleans 至 Azure App 服務。 範例應用程式會將 Azure Active Directory (AAD) 企業對取用者 (B2C) 驗證新增並部署到 Azure 容器應用程式。
您將瞭解如何使用 GitHub Actions、.NET 和 Azure CLI 和 Azure Bicep 進行部署。 此外,您將了解如何設定容器應用程式的 HTTP 輸入。
在本教學課程中,您會了解如何:
- 將 Orleans 應用程式部署至 Azure Container Apps
- 使用 GitHub Actions 和 Azure Bicep 將部署自動化
- 設定 HTTP 輸入
必要條件
- GitHub 帳戶
- 閱讀簡介 Orleans
- .NET 6 SDK
- Azure CLI
- .NET 整合式開發環境 (IDE)
- 歡迎使用 Visual Studio 或 Visual Studio Code
在本機執行應用程式
若要在本機執行應用程式,請將 Azure 範例: Orleans Azure Container Apps 存放庫上的購物車 分叉,並將其複製到本機電腦。 複製之後,請在您選擇的 IDE 中開啟解決方案。 如果您使用 Visual Studio,請以滑鼠右鍵按一下Orleans 。ShoppingCart.Silo專案,然後選取 [設定為啟始專案],然後執行應用程式。 否則,您可以使用下列 .NET CLI 命令來執行應用程式:
dotnet run --project Silo\Orleans.ShoppingCart.Silo.csproj
如需詳細資訊,請參閱 dotnet run。 您會在執行應用程式後,看到討論應用程式功能的登陸頁面。 在右上角,您會看到 [登入] 按鈕。 您可以註冊帳戶,或如果您已經有帳戶,請登入。 登入之後,您可以四處瀏覽,並免費測試其功能。 在本機執行時,所有應用程式的功能都依賴記憶體內部持續性、本機叢集,並使用 Bogus NuGet 套件來產生仿冒產品。 在 Visual Studio 中選取 [停止偵錯] 選項,或在 .NET CLI 中按 Ctrl+C 來停止應用程式。
AAD B2C
雖然教學驗證的概念超出本教學課程的範圍,但您可以了解如何建立 Azure Active Directory B2C 租用戶,然後可以註冊 Web 應用程式來進行取用。 在此購物車範例應用程式中,必須在 B2C 租用戶中註冊產生的已部署容器應用程式 URL。 如需詳細資訊,請參閱ASP.NET Core Blazor 驗證和授權。
重要
您必須在部署容器應用程式之後,在 B2C 租用戶中註冊應用程式的 URL。 在大部分的生產情節中,因為應用程式的 URL 不應該變更,因此您只需要註冊該 URL 一次即可。
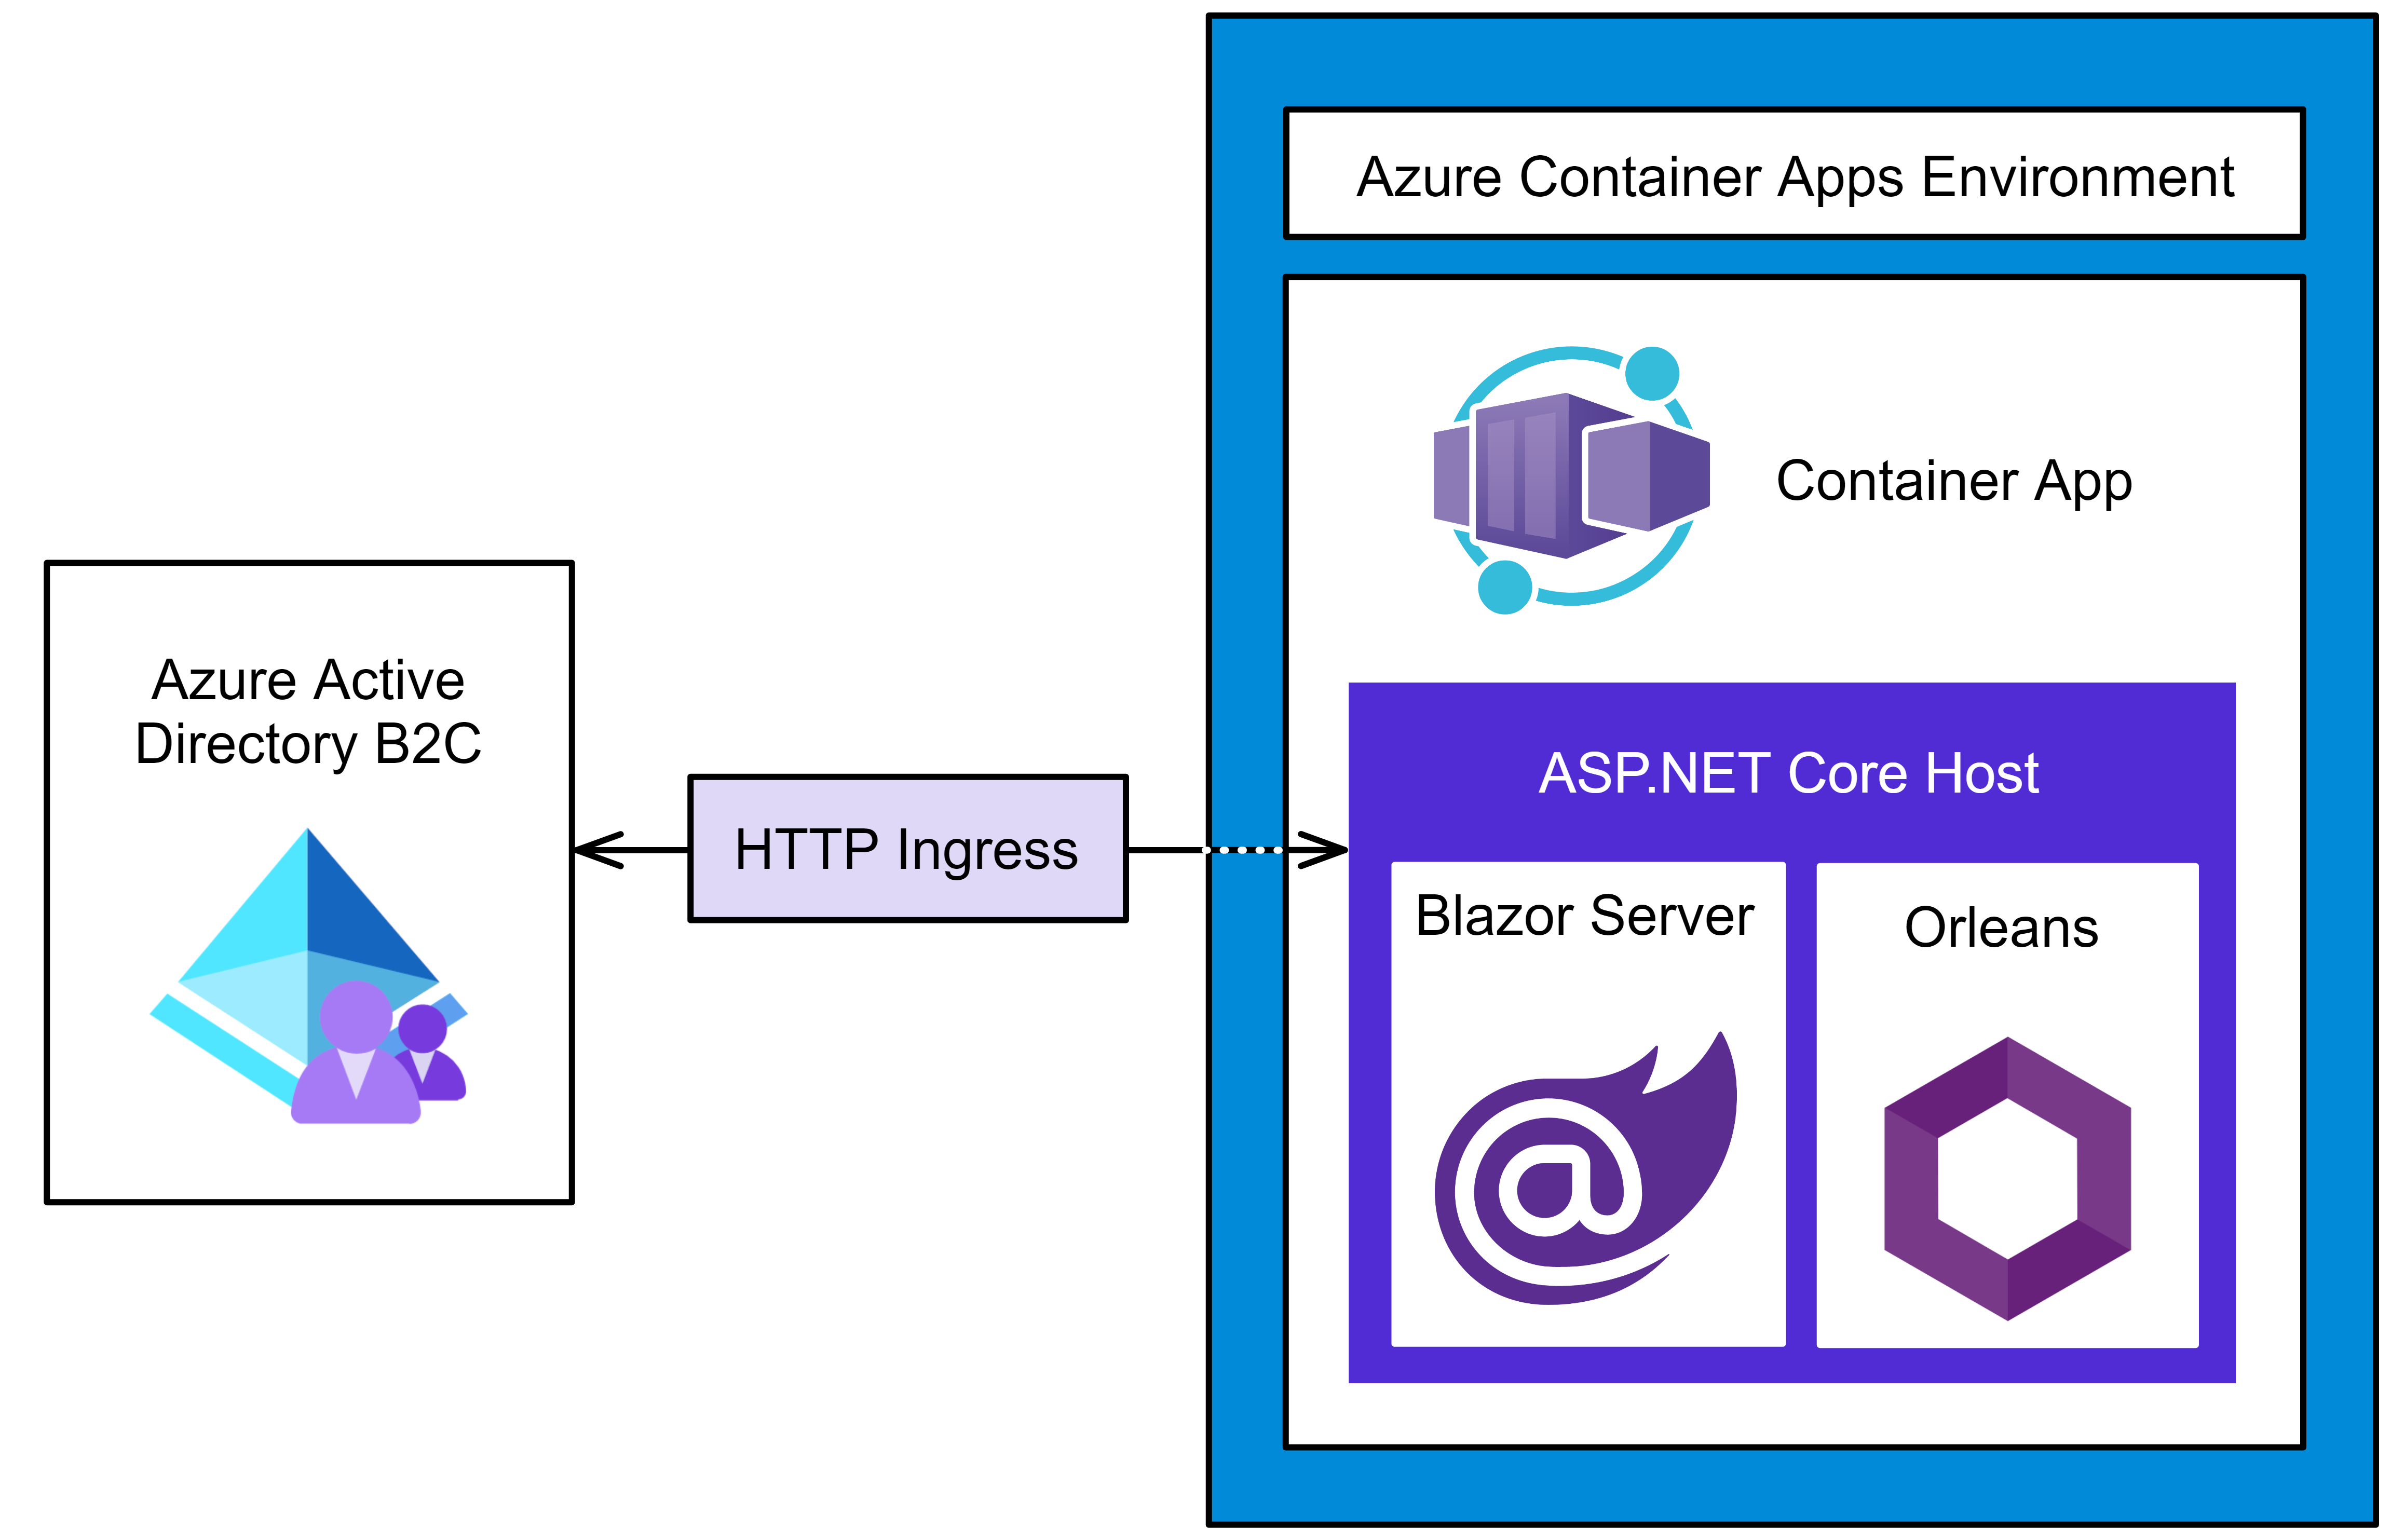
若要協助視覺化應用程式在 Azure 容器應用程式環境中隔離的方式,請參閱下圖:
在上圖中,應用程式的所有輸入流量都會透過安全的 HTTP 輸入輸送。 Azure Container Apps 環境包含應用程式實例,而應用程式實例包含 ASP.NET Core主機,這會公開 Blazor 伺服器和 Orleans 應用程式功能。
部署至 Azure 容器應用程式
若要將應用程式部署至 Azure 容器應用程式,存放庫會使用 GitHub Actions。 在進行此部署之前,您將需要一些 Azure 資源,而且必須正確設定 GitHub 存放庫。
部署應用程式之前,您必須建立 Azure 資源群組 (或者您可以選擇使用現有的資源群組)。 若要建立新的 Azure 資源群組,請參考下列其中一篇文章:
請記下您選擇的資源群組名稱,稍後您會需要此名稱才能部署應用程式。
建立服務主體
若要自動部署應用程式,您必須建立服務主體。 這個 Microsoft 帳戶有權代表您管理 Azure 資源。
az ad sp create-for-rbac --sdk-auth --role Contributor \
  --name "<display-name>"  --scopes /subscriptions/<your-subscription-id>
建立的 JSON 認證看起來會類似下列,但具有用戶端、訂用帳戶和租用戶的實際值:
{
  "clientId": "<your client id>",
  "clientSecret": "<your client secret>",
  "subscriptionId": "<your subscription id>",
  "tenantId": "<your tenant id>",
  "activeDirectoryEndpointUrl": "https://login.microsoftonline.com/",
  "resourceManagerEndpointUrl": "https://brazilus.management.azure.com",
  "activeDirectoryGraphResourceId": "https://graph.windows.net/",
  "sqlManagementEndpointUrl": "https://management.core.windows.net:8443/",
  "galleryEndpointUrl": "https://gallery.azure.com",
  "managementEndpointUrl": "https://management.core.windows.net"
}
將命令的輸出複製到剪貼簿中,並繼續下一個步驟。
建立 GitHub 祕密
GitHub 提供建立加密祕密的機制。 您建立的祕密可用於 GitHub Actions 工作流程。 您將了解如何結合 Azure Bicep,使用 GitHub Actions 來自動部署應用程式。
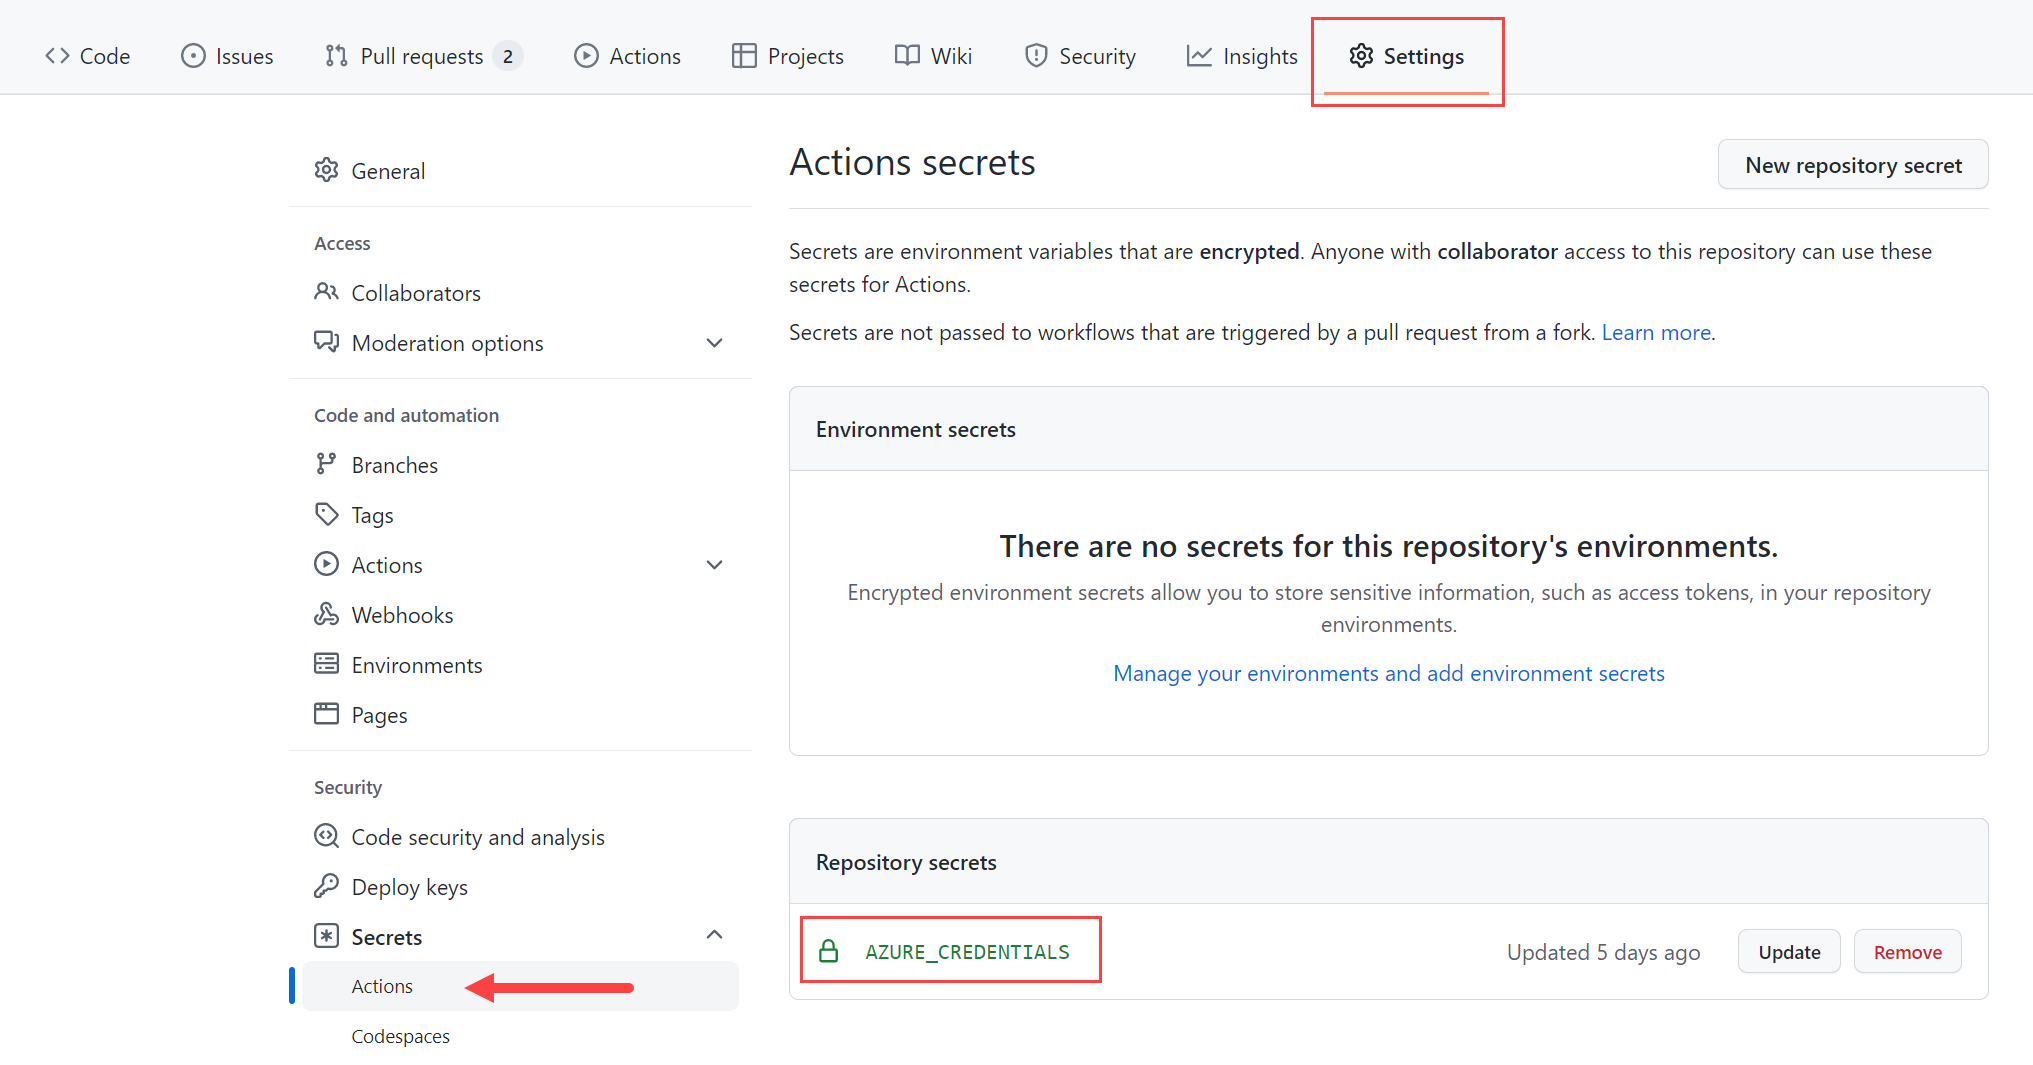
Bicep 是使用宣告式語法來部署 Azure 資源的特定領域語言 (DSL)。 如需詳細資訊,請參閱什麼是 Bicep (英文)。 使用建立服務主體步驟的輸出,您必須使用 JSON 格式的認證來建立名為 AZURE_CREDENTIALS 的 GitHub 祕密。
在 GitHub 存放庫中,選取 [設定] > [祕密] > [建立新的祕密]。 輸入名稱 AZURE_CREDENTIALS,並將上一個步驟中的 JSON 認證貼到 [值] 欄位中。
如需詳細資訊,請參閱 GitHub:加密的祕密 (英文)。
為 Azure 部署做準備
必須封裝此應用程式以進行部署。 在 Orleans.ShoppingCart.Silos 專案中,我們會定義在 Publish 步驟之後執行的 Target 元素。 這會將發佈目錄壓縮成 silo.zip 檔案:
<Target Name="ZipPublishOutput" AfterTargets="Publish">
    <Delete Files="$(ProjectDir)\..\silo.zip" />
    <ZipDirectory SourceDirectory="$(PublishDir)" DestinationFile="$(ProjectDir)\..\silo.zip" />
</Target>
有許多方式可將 .NET 應用程式部署至 Azure Container Apps。 在此教學課程中,您會使用 GitHub Actions、Azure Bicep 和 .NET 與 Azure CLI。 請考慮 GitHub 存放庫根目錄中的 ./github/workflows/deploy.yml 檔案:
name: Deploy to Azure Container Apps

on:
  push:
    branches:
    - main

env:
  UNIQUE_APP_NAME: orleanscart
  SILO_IMAGE_NAME: orleanscart-silo
  AZURE_RESOURCE_GROUP_NAME: orleans-resourcegroup
  AZURE_RESOURCE_GROUP_LOCATION: eastus

jobs:
  build-and-deploy:
    runs-on: ubuntu-latest
    steps:
    - uses: actions/checkout@v3

    - name: Setup .NET 6.0
      uses: actions/setup-dotnet@v3
      with:
        dotnet-version: 6.0.x

    - name: .NET publish shopping cart app
      run: dotnet publish ./Silo/Orleans.ShoppingCart.Silo.csproj --configuration Release

    - name: Login to Azure
      uses: azure/login@v1
      with:
        creds: ${{ secrets.AZURE_CREDENTIALS }}

    - name: Flex ACR Bicep
      run: |
        az deployment group create \
          --resource-group ${{ env.AZURE_RESOURCE_GROUP_NAME }} \
          --template-file '.github/workflows/flex/acr.bicep' \
          --parameters location=${{ env.AZURE_RESOURCE_GROUP_LOCATION }}

    - name: Get ACR Login Server
      run: |
        ACR_NAME=$(az deployment group show -g ${{ env.AZURE_RESOURCE_GROUP_NAME }} -n acr \
        --query properties.outputs.acrName.value | tr -d '"')
        echo "ACR_NAME=$ACR_NAME" >> $GITHUB_ENV
        ACR_LOGIN_SERVER=$(az deployment group show -g ${{ env.AZURE_RESOURCE_GROUP_NAME }} -n acr \
        --query properties.outputs.acrLoginServer.value | tr -d '"')
        echo "ACR_LOGIN_SERVER=$ACR_LOGIN_SERVER" >> $GITHUB_ENV

    - name: Prepare Docker buildx
      uses: docker/setup-buildx-action@v1

    - name: Login to ACR
      run: |
        access_token=$(az account get-access-token --query accessToken -o tsv)
        refresh_token=$(curl https://${{ env.ACR_LOGIN_SERVER }}/oauth2/exchange -v \
        -d "grant_type=access_token&service=${{ env.ACR_LOGIN_SERVER }}&access_token=$access_token" | jq -r .refresh_token)
        # The null GUID 0000... tells the container registry that this is an ACR refresh token during the login flow
        docker login -u 00000000-0000-0000-0000-000000000000 \
        --password-stdin ${{ env.ACR_LOGIN_SERVER }} <<< "$refresh_token"

    - name: Build and push Silo image to registry
      uses: docker/build-push-action@v2
      with:
        push: true
        tags: ${{ env.ACR_LOGIN_SERVER }}/${{ env.SILO_IMAGE_NAME }}:${{ github.sha }}
        file: Silo/Dockerfile

    - name: Flex ACA Bicep
      run: |
        az deployment group create \
          --resource-group ${{ env.AZURE_RESOURCE_GROUP_NAME }} \
          --template-file '.github/workflows/flex/main.bicep' \
          --parameters location=${{ env.AZURE_RESOURCE_GROUP_LOCATION }} \
            appName=${{ env.UNIQUE_APP_NAME }} \
            acrName=${{ env.ACR_NAME }} \
            repositoryImage=${{ env.ACR_LOGIN_SERVER }}/${{ env.SILO_IMAGE_NAME }}:${{ github.sha }} \
          --debug

    - name: Get Container App URL
      run: |
        ACA_URL=$(az deployment group show -g ${{ env.AZURE_RESOURCE_GROUP_NAME }} \
        -n main --query properties.outputs.acaUrl.value | tr -d '"')
        echo $ACA_URL

    - name: Logout of Azure
      run: az logout
上述 GitHub 工作流程將會:
- 使用 dotnet publish 命令,將購物車應用程式發佈為 zip 檔案。
- 使用建立服務主體步驟中的認證登入 Azure。
- 評估 acr.bicep 檔案,並使用 az deployment group create 啟動部署群組。
- 從部署群組取得 Azure Container Registry (ACR) 登入伺服器。
- 使用存放庫
AZURE_CREDENTIALS祕密登入 ACR。 - 建置定址接收器映像,並將其發佈至 ACR。
- 評估 main.bicep 檔案,並使用 az deployment group create 啟動部署群組。
- 部署定址接收器
- 登出 Azure。
工作流程是經由推送至 main 分支觸發。 如需詳細資訊,請參閱 GitHub Actions 和 .NET。
提示
如果您在執行工作流程時遇到問題,您可能需要確認服務主體已註冊所有必要的提供者命名空間。 需要下列提供者命名空間:
Microsoft.AppMicrosoft.ContainerRegistryMicrosoft.InsightsMicrosoft.OperationalInsightsMicrosoft.Storage
如需詳細資訊,請參閱解決資源提供者註冊的錯誤。
Azure 會對資源施加命名限制和慣例。 您需要更新下列項目的 deploy.yml 檔案值:
UNIQUE_APP_NAMESILO_IMAGE_NAMEAZURE_RESOURCE_GROUP_NAMEAZURE_RESOURCE_GROUP_LOCATION
將這些值設定為唯一的應用程式名稱和 Azure 資源群組名稱和位置。
如需詳細資訊,請參閱 Azure 資源的命名規則和限制。
探索 Bicep 範本
當 az deployment group create 命令執行時,其會評估指定的 .bicep 檔案參考。 此檔案包含宣告式資訊,其中詳細說明您要部署的 Azure 資源。 對此步驟的其中一種看法是,其佈建所有部署資源。
重要
如果您使用的是 Visual Studio Code,使用 Bicep 延伸模組時,Bicep 製作體驗會有所改善。
評估的第一個 Bicep 檔案是 acr.bicep 檔案。 此檔案包含 Azure Container Registry (ACR) 登入伺服器資源詳細資料:
param location string = resourceGroup().location

resource acr 'Microsoft.ContainerRegistry/registries@2021-09-01' = {
  name: toLower('${uniqueString(resourceGroup().id)}acr')
  location: location
  sku: {
    name: 'Basic'
  }
  properties: {
    adminUserEnabled: true
  }
}

output acrLoginServer string = acr.properties.loginServer
output acrName string = acr.name
這個 bicep 檔案會輸出 ACR 登入伺服器和對應的名稱。 遇到的下一個 Bicep 檔案包含的不只是單一 resource。 請考慮主要由委派 module 定義所組成的 main.bicep 檔案:
param appName string
param acrName string
param repositoryImage string
param location string = resourceGroup().location

resource acr 'Microsoft.ContainerRegistry/registries@2021-09-01' existing = {
  name: acrName
}

module env 'environment.bicep' = {
  name: 'containerAppEnvironment'
  params: {
    location: location
    operationalInsightsName: '${appName}-logs'
    appInsightsName: '${appName}-insights'
  }
}

var envVars = [
  {
    name: 'APPINSIGHTS_INSTRUMENTATIONKEY'
    value: env.outputs.appInsightsInstrumentationKey
  }
  {
    name: 'APPLICATIONINSIGHTS_CONNECTION_STRING'
    value: env.outputs.appInsightsConnectionString
  }
  {
    name: 'ORLEANS_AZURE_STORAGE_CONNECTION_STRING'
    value: storageModule.outputs.connectionString
  }
  {
    name: 'ASPNETCORE_FORWARDEDHEADERS_ENABLED'
    value: 'true'
  }
]

module storageModule 'storage.bicep' = {
  name: 'orleansStorageModule'
  params: {
    name: '${appName}storage'
    location: location
  }
}

module siloModule 'container-app.bicep' = {
  name: 'orleansSiloModule'
  params: {
    appName: appName
    location: location
    containerAppEnvironmentId: env.outputs.id
    repositoryImage: repositoryImage
    registry: acr.properties.loginServer
    registryPassword: acr.listCredentials().passwords[0].value
    registryUsername: acr.listCredentials().username
    envVars: envVars
  }
}

output acaUrl string = siloModule.outputs.acaUrl
上述 Bicep 檔案:
- 參考
existingACR 資源,如需詳細資訊,請參閱 Azure Bicep:現有的資源。 - 定義委派給 environment.bicep 定義檔的
module env。 - 定義委派給 storage.bicep 定義檔的
module storageModule。 - 宣告定址接收器模組所使用的數個共用
envVars。 - 定義委派給 container-app.bicep 定義檔的
module siloModule。 - 輸出 ACA URL (這可能用來更新現有 AAD B2C 應用程式註冊的重新導向 URI)。
main.bicep 會委派給數個其他 Bicep 檔案。 第一個是 environment.bicep 檔案:
param operationalInsightsName string
param appInsightsName string
param location string

resource appInsights 'Microsoft.Insights/components@2020-02-02' = {
  name: appInsightsName
  location: location
  kind: 'web'
  properties: {
    Application_Type: 'web'
    WorkspaceResourceId: logs.id
  }
}

resource logs 'Microsoft.OperationalInsights/workspaces@2021-06-01' = {
  name: operationalInsightsName
  location: location
  properties: {
    retentionInDays: 30
    features: {
      searchVersion: 1
    }
    sku: {
      name: 'PerGB2018'
    }
  }
}

resource env 'Microsoft.App/managedEnvironments@2022-03-01' = {
  name: '${resourceGroup().name}env'
  location: location
  properties: {
    appLogsConfiguration: {
      destination: 'log-analytics'
      logAnalyticsConfiguration: {
        customerId: logs.properties.customerId
        sharedKey: logs.listKeys().primarySharedKey
      }
    }
  }
}

output id string = env.id
output appInsightsInstrumentationKey string = appInsights.properties.InstrumentationKey
output appInsightsConnectionString string = appInsights.properties.ConnectionString
此 bicep 檔案會定義 Azure Log Analytics 和 Application Insights 資源。
appInsights 資源是 web 型別,而 logs 資源是 PerGB2018 型別。
appInsights 資源和 logs 資源都會佈建在資源群組的位置。
appInsights 資源會透過 logs 屬性連結至 WorkspaceResourceId 資源。 此 bicep 中定義了三個稍後由容器應用程式 module 使用的輸出。 接下來,讓我們看看 storage.bicep 檔案:
param name string
param location string

resource storage 'Microsoft.Storage/storageAccounts@2021-08-01' = {
  name: name
  location: location
  kind: 'StorageV2'
  sku: {
    name: 'Standard_LRS'
  }
}

var key = listKeys(storage.name, storage.apiVersion).keys[0].value
var protocol = 'DefaultEndpointsProtocol=https'
var accountBits = 'AccountName=${storage.name};AccountKey=${key}'
var endpointSuffix = 'EndpointSuffix=${environment().suffixes.storage}'

output connectionString string = '${protocol};${accountBits};${endpointSuffix}'
上述 Bicep 檔案會定義下列項目:
- 資源群組名稱和應用程式名稱的兩個參數。
- 儲存體帳戶的
resource storage定義。 - 建構儲存體帳戶連接字串的單一
output。
最後一個 Bicep 檔案是 container-app.bicep 檔案:
param appName string
param location string
param containerAppEnvironmentId string
param repositoryImage string = 'mcr.microsoft.com/azuredocs/containerapps-helloworld:latest'
param envVars array = []
param registry string
param registryUsername string
@secure()
param registryPassword string

resource containerApp 'Microsoft.App/containerApps@2022-03-01' = {
  name: appName
  location: location
  properties: {
    managedEnvironmentId: containerAppEnvironmentId
    configuration: {
      activeRevisionsMode: 'multiple'
      secrets: [
        {
          name: 'container-registry-password'
          value: registryPassword
        }
      ]
      registries: [
        {
          server: registry
          username: registryUsername
          passwordSecretRef: 'container-registry-password'
        }
      ]
      ingress: {
        external: true
        targetPort: 80
      }
    }
    template: {
      revisionSuffix: uniqueString(repositoryImage, appName)
      containers: [
        {
          image: repositoryImage
          name: appName
          env: envVars
        }
      ]
      scale: {
        minReplicas: 1
        maxReplicas: 1
      }
    }
  }
}

output acaUrl string = containerApp.properties.configuration.ingress.fqdn
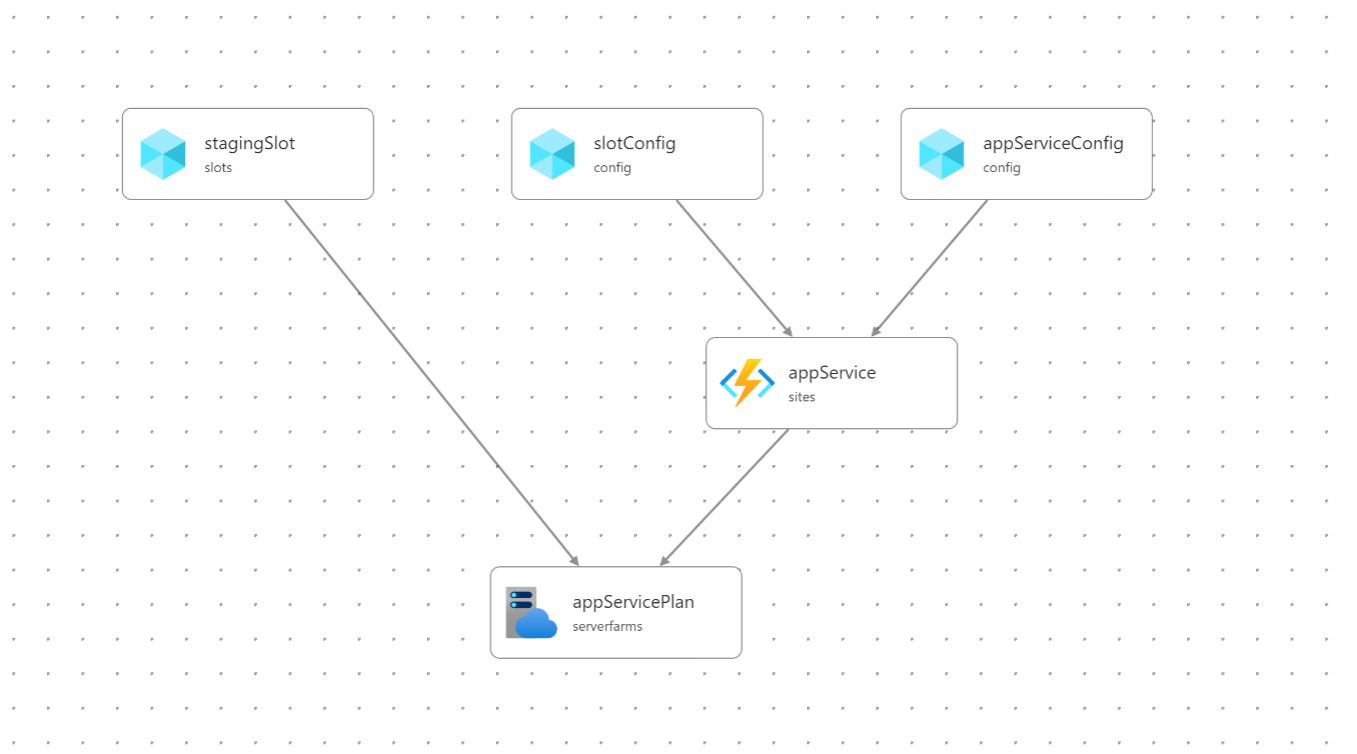
Bicep 的上述 Visual Studio Code 延伸模組包含視覺化檢視。 如下所示,所有這些 Bicep 檔案都會視覺化:
摘要
當您將原始程式碼與 push 變更更新至存放庫的 main 分支時,deploy.yml 工作流程將會執行。 其會佈建 Bicep 檔案中定義的 Azure 資源,並部署應用程式。 會自動在 Azure Container Registry 中註冊修訂。
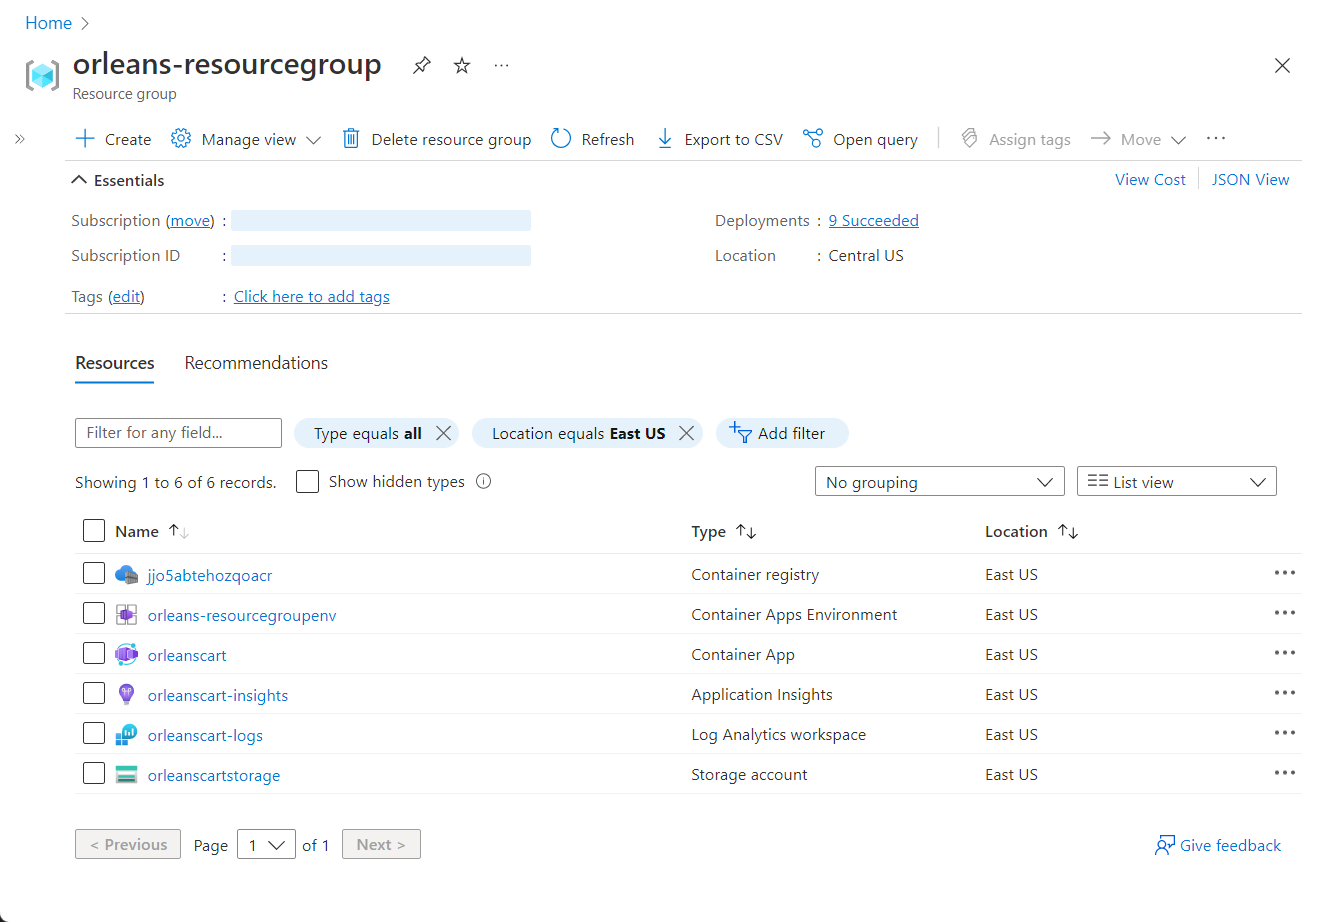
除了 Bicep 延伸模組中的視覺化檢視之外,在佈建和部署應用程式之後,Azure 入口網站資源群組頁面看起來會類似下列範例:


